

Welcome to a world of vibrant color and endless imagination! Construction paper is a staple in every craft box for a reason: it's affordable, versatile, and the perfect medium for little hands to explore their creativity. This guide is your ultimate resource for transforming simple sheets of paper into delightful creations, from classic paper chains and intricate snowflakes to whimsical butterflies and wearable crowns.
These hands-on activities are more than just a way to pass the time; they are crucial for developing fine motor skills, fostering patience, and encouraging powerful self-expression in children. Each project is designed to make learning joyful and engaging, turning a simple afternoon into a memorable creative session. To truly unleash your creativity and make the most of your crafting sessions, having an organized workspace is essential. For more invaluable tips for organizing your craft supplies, a well-ordered space can make finding what you need effortless.
This comprehensive listicle provides ten fantastic and easy construction paper crafts, each complete with a clear materials list, simple step-by-step instructions, and practical tips to ensure a fun, frustration-free experience for everyone involved. Let's get ready to cut, fold, and glue our way to a masterpiece
1. Paper Chains
Paper chains are a quintessential and easy construction paper craft, perfect for developing fine motor skills in young children. The process involves creating interlocking loops from paper strips to form a long, decorative garland. This simple yet versatile activity offers a fantastic introduction to basic crafting techniques like measuring, cutting, and gluing.
Why It’s a Great First Craft
The repetitive nature of making paper chains helps build concentration and hand-eye coordination. It’s a low-mess, high-reward project that can be adapted for any occasion, making it a go-to for parents and educators. From festive holiday decorations to colorful party backdrops, the applications are endless.
Materials You’ll Need
- Assorted colors of construction paper
- Scissors or a paper trimmer
- Glue stick, tape, or a stapler
- Ruler
Step-by-Step Instructions
- Prepare the Strips: Use a ruler to measure and cut the construction paper into uniform strips. A standard size is about 1 inch wide and 8 inches long. For younger children, pre-cutting the strips makes the activity more manageable.
- Create the First Link: Take one strip of paper and form it into a circle, overlapping the ends slightly. Secure the ends together with a dab of glue or a piece of tape.
- Add More Links: Thread a second paper strip through the first circle. Form this second strip into its own loop and secure the ends.
- Continue the Chain: Repeat the process, adding new links to grow the chain to your desired length.
Pro-Tip: For a stronger and more durable chain, use a stapler instead of glue. This is especially useful for long chains that will be hung up for decoration, as it prevents links from pulling apart.
2. Paper Flowers
Paper flowers are a beautiful and versatile construction paper craft where colorful sheets are cut, folded, and layered to create stunning floral designs. This activity allows for immense creativity, from simple, flat flowers for younger kids to intricate, three-dimensional bouquets for more advanced crafters. It’s a wonderful project for learning about symmetry, layering, and shaping techniques.
Why It’s a Great First Craft
Making paper flowers encourages fine motor skill development through precise cutting and curling. The craft is highly adaptable for various skill levels and can be used for countless applications, such as wall decorations, handmade cards, or gift toppers. Their lasting beauty makes them a rewarding project that can be displayed proudly, providing a sense of accomplishment.
Materials You’ll Need
- Assorted colors of construction paper (including green for stems and leaves)
- Scissors
- Glue stick or craft glue
- Pencil or pen
- Optional: Pipe cleaners or craft sticks for stems
Step-by-Step Instructions
- Create the Petals: Draw and cut out several petal shapes from your chosen colors. You can make them teardrop, oval, or heart-shaped. Cutting multiple layers at once saves time.
- Shape the Petals: Gently curl the edges of each petal by wrapping them around a pencil. This adds a realistic, 3D effect to the flower.
- Assemble the Flower: Start by gluing the petals in a circular pattern onto a small paper circle base. Add a second, smaller layer of petals on top, slightly offset from the first.
- Add a Center and Stem: Cut a small circle from a contrasting color (like yellow or brown) and glue it to the middle. Attach a green construction paper stem or a pipe cleaner to the back. For an extra touch, you can even learn more about how flowers grow to inspire different designs.
Pro-Tip: Create depth by using several shades of the same color for your petals. Layering light and dark tones gives the flower a more dynamic and realistic appearance.
3. Paper Masks
Paper masks are a fantastic and easy construction paper craft that encourages creativity and imaginative play. This activity involves designing, cutting, and decorating construction paper to create wearable art, perfect for everything from simple dress-up to school plays. It’s a project that beautifully merges artistic expression with practical design skills.
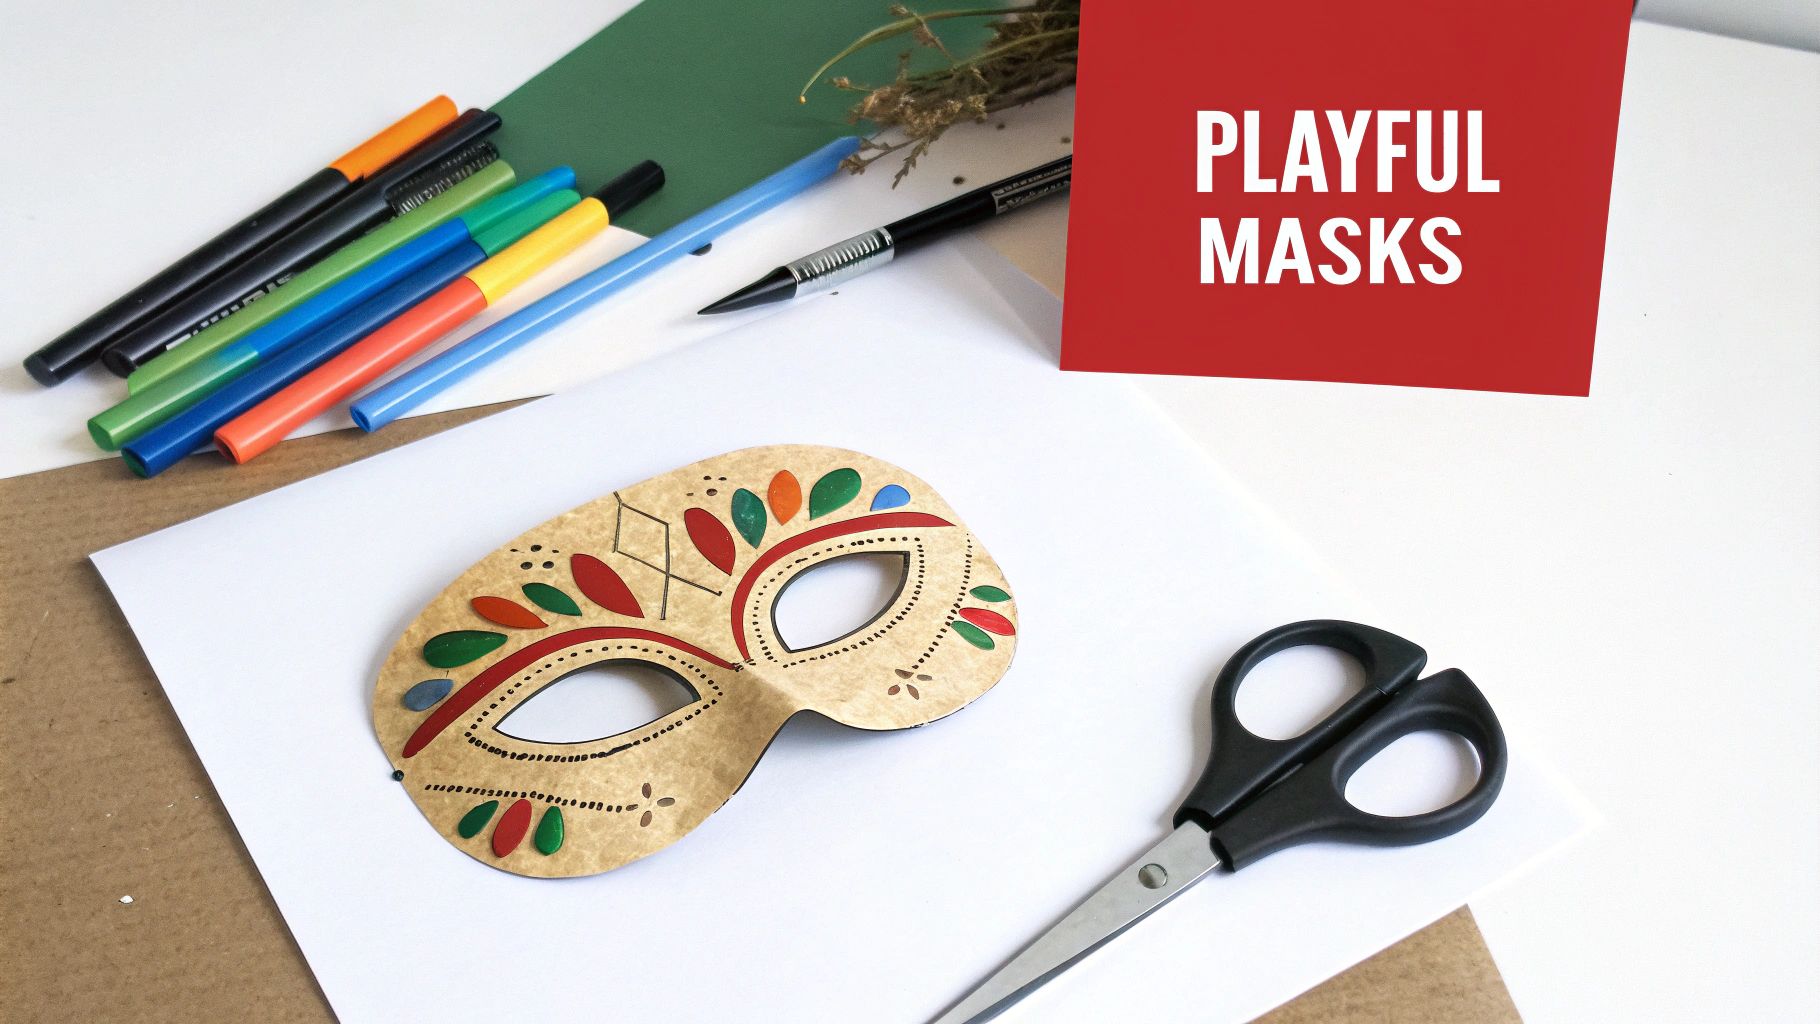
Why It’s a Great First Craft
Making paper masks allows children to step into the roles of their favorite characters, animals, or superheroes, fostering storytelling and social skills. This craft serves as a hands-on introduction to symmetry and facial anatomy in a fun, accessible way. It's an ideal activity for play-based learning, as it promotes self-expression and helps develop fine motor skills through cutting and decorating. Explore the benefits of play-based learning on playzusa.com to see how crafts like this support child development.
Materials You’ll Need
- Construction paper in various colors
- Scissors
- Pencil
- Markers, crayons, or paint
- Elastic string, yarn, or ribbon
- Hole punch
- Optional: Glitter, feathers, sequins
Step-by-Step Instructions
- Design the Mask: Lightly sketch your desired mask shape onto a piece of construction paper. You can fold the paper in half to draw one side for a symmetrical design.
- Cut It Out: Carefully cut along the outline of your mask shape. If you folded the paper, cutting it while folded will create a perfectly symmetrical result.
- Add Eyeholes: Hold the mask up to the child’s face to mark where the eyeholes should go. Carefully fold the mask at the marks and snip a small opening, then cut out circles for the eyes.
- Decorate and Assemble: Unleash creativity by decorating the mask with markers, glitter, or other embellishments. Once dry, use a hole punch to make a hole on each side of the mask and tie a piece of elastic string through them.
Pro-Tip: Reinforce the area around the holes with a small piece of clear tape on both sides before punching. This prevents the string from tearing through the paper during enthusiastic play, making the mask much more durable.
4. Paper Collages
Paper collages are an incredibly creative and easy construction paper craft that encourages artistic expression. The activity involves cutting or tearing pieces of colored paper and arranging them on a background sheet to create a new image, pattern, or abstract design. This versatile project allows crafters of all ages to explore composition, color theory, and texture.
Why It’s a Great First Craft
Creating a collage is a fantastic way to develop fine motor skills through cutting and placing small paper pieces. It’s an open-ended activity with no right or wrong answers, which builds confidence and allows children to express their unique vision. This craft can be simple for toddlers who tear and paste, or more complex for older kids creating detailed scenes.
Materials You’ll Need
- Assorted colors of construction paper
- A sturdy background sheet (cardstock or another piece of construction paper)
- Scissors
- Glue stick or school glue
- Pencil (optional, for sketching)
Step-by-Step Instructions
- Prepare the Pieces: Cut or tear the construction paper into various shapes and sizes. Encourage a mix of geometric shapes, organic forms, and simple strips.
- Plan the Design: Lightly sketch a basic outline of your idea onto the background sheet, or simply start arranging the pieces to see what emerges.
- Arrange and Glue: Place your paper shapes onto the background. Once you are happy with the composition, use a glue stick to secure each piece. Start with the background layers and work your way forward.
- Add Layers and Details: Overlap different colors and shapes to create depth and interest in your artwork. You can add smaller details on top of larger pieces to complete your collage.
Pro-Tip: For a cleaner application that prevents paper from wrinkling, use a glue stick instead of liquid glue. Apply a thin, even coat to the back of each piece before pressing it firmly onto your background.
5. Paper Snowflakes
Paper snowflakes are a classic winter craft where folded paper is cut into intricate, symmetrical patterns to mimic the unique structure of a real snowflake. This activity is a wonderful way to teach children about symmetry and patterns while creating beautiful, delicate decorations. It's an easy construction paper craft that requires minimal materials and offers a magical reveal when the paper is unfolded.
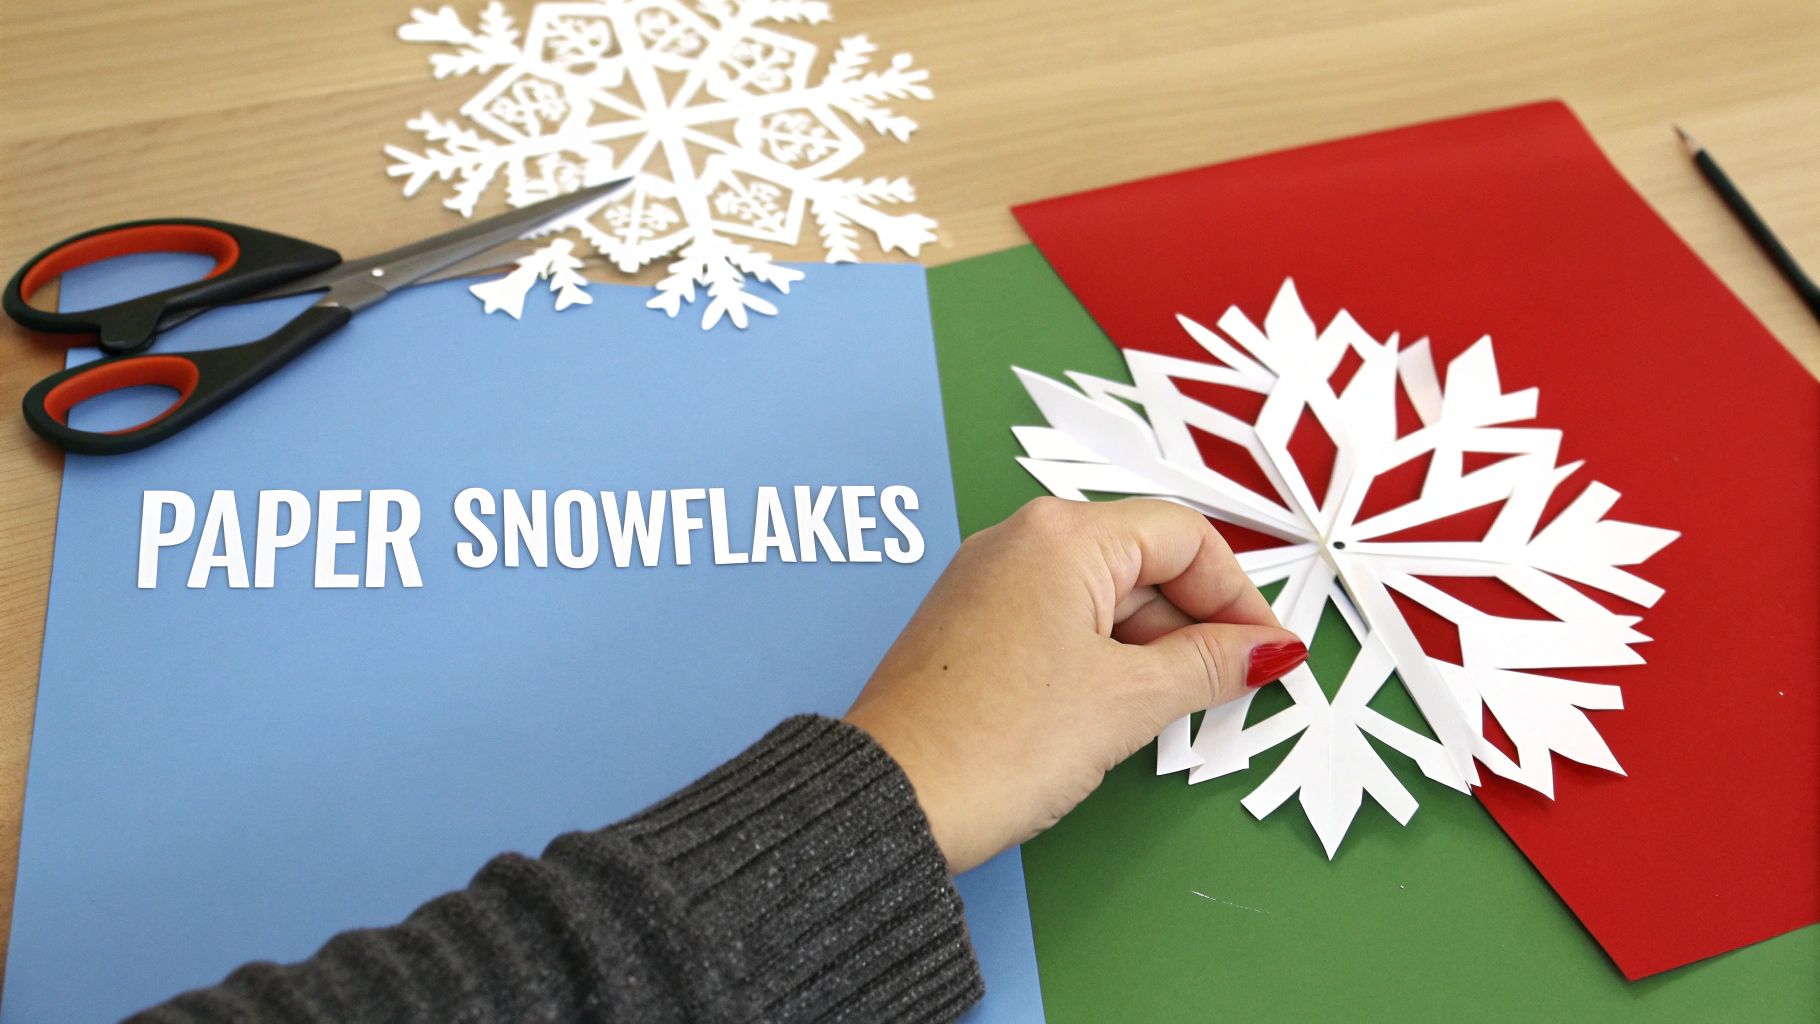
Why It’s a Great First Craft
The magic of unfolding a paper snowflake to reveal a one-of-a-kind design is captivating for all ages. It encourages creativity and precision, as small changes in cuts lead to vastly different results. This makes it an excellent project for classroom window displays, holiday decorating at home, or simply as a quiet, focused activity on a cold day. For more ideas on engaging paper activities, you can learn more about fun paper crafts for kids at playzusa.com.
Materials You’ll Need
- White or colored construction paper
- Scissors (child-safe scissors for younger kids)
- Pencil (optional, for drawing patterns)
Step-by-Step Instructions
- Prepare the Paper: Start with a square piece of construction paper. If you have a rectangular sheet, fold one corner over to meet the opposite edge to form a triangle, then cut off the excess rectangle.
- Fold into a Wedge: Fold the square in half to make a triangle. Fold that triangle in half again. Fold the resulting smaller triangle into thirds, creating a narrow, pointed wedge.
- Cut Your Design: Cut small shapes, notches, and patterns along the folded edges of the paper wedge. Be careful not to cut all the way across any single fold, as this will cause the snowflake to fall apart.
- Unfold and Reveal: Carefully and slowly unfold the paper to reveal your unique snowflake design. Flatten it under a heavy book if it doesn't lie flat.
Pro-Tip: For a more intricate and delicate look, use lighter-weight paper like coffee filters or regular printer paper. These are easier to fold multiple times and cut through, resulting in more detailed patterns.
6. Paper Weaving
Paper weaving is a classic craft that introduces the fundamental principles of textile arts using simple materials. The process involves interlacing strips of construction paper to create checkerboard patterns, colorful mosaics, and intricate designs. This activity is not only visually rewarding but also serves as an excellent, hands-on way to teach concepts like patterns, sequencing, and geometry.
Why It’s a Great First Craft
The methodical nature of paper weaving is fantastic for building patience and precision. As children guide paper strips over and under, they enhance their dexterity and strengthen hand muscles, which is crucial for developing fine motor skills. It’s an easy construction paper craft that allows for endless creativity, from simple placemats to complex wall art, making it suitable for a wide range of ages and skill levels.
Materials You’ll Need
- At least two different colors of construction paper
- Scissors
- Ruler
- Pencil
- Glue stick or tape
Step-by-Step Instructions
- Prepare the Base: Take one sheet of construction paper and fold it in half lengthwise. Using a ruler and pencil, draw a line about one inch from the open edge. This line is your stopping point.
- Cut the Slits: Starting from the folded edge, cut parallel lines up to the pencil line you drew. These slits will form the "loom." Space them about one inch apart. Unfold the paper.
- Cut the Weaving Strips: Using a different color of construction paper, cut several strips, each about one inch wide. These will be your "weft" threads.
- Start Weaving: Take one strip and weave it through the slits of your base paper, going over the first slit and under the next. Continue this over-under pattern until you reach the other side.
- Continue the Pattern: Take a second strip and weave it in the opposite pattern: under the first slit, over the second, and so on. Gently push the strips close together. Continue with more strips until the base is full, then secure the ends with glue.
Pro-Tip: For a clean, finished look, create a border. Use a base paper that is larger than your intended final design. Once weaving is complete, you can glue the woven piece onto another sheet of paper or fold the excess edges of the base paper over the woven strips and glue them down.
7. Paper Butterflies
Paper butterflies are a delightful and easy construction paper craft that brings a touch of nature's beauty indoors. This project involves folding and cutting paper to create symmetrical butterfly shapes, which can then be decorated in endless creative ways. From simple, flat designs to more intricate 3D models, this craft is perfect for springtime themes, room decor, or enhancing other projects.
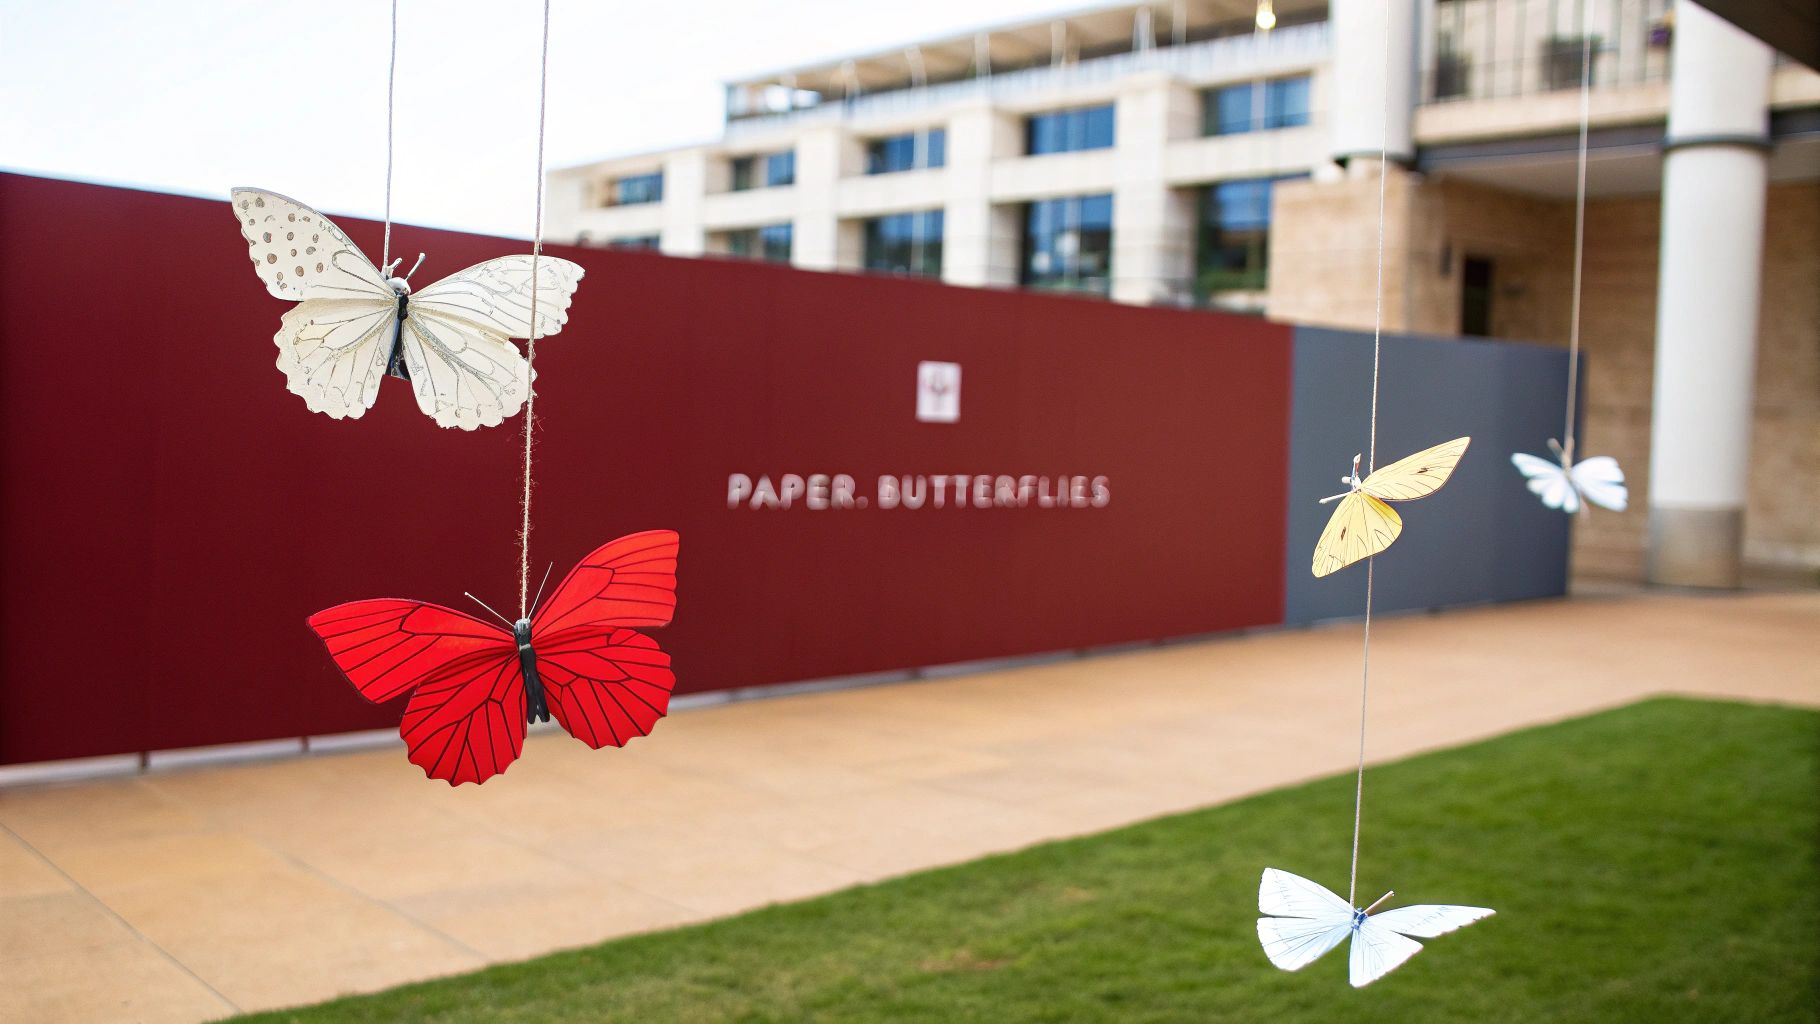
Why It’s a Great First Craft
Making paper butterflies is an excellent way to teach children about symmetry in a fun, hands-on manner. The activity encourages creativity through decoration and can be scaled in complexity for different age groups. These charming creations are perfect for garden-themed party decorations, mobiles hanging from the ceiling, or as beautiful embellishments on greeting cards and gifts.
Materials You’ll Need
- Assorted colors of construction paper
- Scissors
- Pencil
- Markers, crayons, or glitter for decoration
- String or thread (optional, for hanging)
Step-by-Step Instructions
- Fold the Paper: Start by folding a piece of construction paper in half. This ensures your butterfly will have perfectly symmetrical wings.
- Draw the Wing Shape: On one side of the folded edge, draw half of a butterfly shape. Think of it as drawing one wing with the body along the fold.
- Cut Out the Butterfly: Carefully cut along the pencil line you drew. When you unfold the paper, you will have a complete butterfly shape.
- Decorate and Personalize: Unfold the butterfly and let your creativity fly! Use markers, crayons, or glitter to add unique patterns and colors to the wings.
Pro-Tip: To create a 3D effect, gently fold the wings upward along the "body" of the butterfly after decorating. This makes them look like they are in mid-flight and adds depth when displayed on a wall or bulletin board.
8. Paper Crowns
Paper crowns are a classic and imaginative easy construction paper craft that transforms a simple sheet of paper into royal headwear. This activity encourages creativity and is perfect for pretend play, themed parties, or classroom activities. The basic construction involves creating a band to fit the head and then adding decorative points or "jewels."
Why It’s a Great First Craft
Creating a paper crown is an excellent activity for practicing measuring, cutting, and decorating skills. It's a highly customizable project that allows children to express their artistic vision, whether they want to be a king, queen, prince, or princess. The craft is ideal for birthday parties, school plays, or just a fun afternoon of dress-up, making it a versatile favorite. Find more creative crafts for preschoolers to inspire even more imaginative play.
Materials You’ll Need
- Construction paper (gold, silver, or assorted colors)
- Scissors
- Tape, staples, or a glue stick
- Ruler
- Decorations: glitter, markers, crayons, craft jewels, or small construction paper shapes
Step-by-Step Instructions
- Create the Band: Cut two or three long strips of construction paper, about 2-3 inches wide. Measure the child's head circumference and tape or staple the strips together to create a band that fits comfortably.
- Design the Crown: Before securing the band into a circle, lay it flat. Use scissors to cut a zig-zag or scalloped pattern along one of the long edges to create the points of the crown.
- Decorate with Jewels: Let your child decorate the crown. They can glue on craft gems, draw patterns with markers, or cut out and attach small shapes from different colored construction paper.
- Assemble the Crown: Once the decorations are complete (and the glue is dry), form the band into a circle and secure the ends with staples or tape to complete the royal headpiece.
Pro-Tip: For a sturdier crown, use two layers of construction paper for the band. You can also use metallic or glitter paper to give the crown a more regal and eye-catching appearance without the mess of loose glitter.
9. Paper Baskets
Paper baskets are a wonderfully versatile and easy construction paper craft that teaches basic principles of weaving and structural design. By folding or weaving strips of paper, kids can create three-dimensional containers that are both decorative and surprisingly functional. This project is excellent for developing spatial reasoning and patience.
Why It’s a Great First Craft
Creating a paper basket introduces children to the concept of turning a flat material into a useful object, bridging the gap between art and engineering. The process can be as simple as a folded box or as intricate as a woven design, making it adaptable for various age groups. They make fantastic handmade gift containers, classroom organizers, or alternatives to traditional Easter baskets.
Materials You’ll Need
- Assorted colors of sturdy construction paper or cardstock
- Scissors or a paper trimmer
- Glue stick or school glue
- Ruler
- Pencil
- Stapler (optional)
Step-by-Step Instructions
- Prepare the Base: Cut one sheet of paper to your desired base size (e.g., 6x6 inches). Cut another sheet of a different color into multiple 1-inch wide strips for weaving.
- Create the Slits: On the base sheet, make parallel cuts about 1 inch apart, stopping 1 inch from the edge. This creates the vertical "warp" strips for your basket's walls.
- Weave the Sides: Take a paper strip and weave it horizontally through the slits, going over and under each vertical strip. Gently push the strip down to the bottom.
- Build the Walls: Continue weaving more strips, alternating the over-under pattern for each new row, until you reach the top of the slits. Secure the ends of each woven strip with a dot of glue.
- Add a Handle: Create a handle by cutting a longer, thicker strip of paper and attaching it to opposite sides of the basket with glue or a stapler.
Pro-Tip: For a stronger basket, use cardstock as your base. You can also reinforce the top edge by folding a paper strip over it and gluing it in place, which prevents the woven strips from slipping.
10. Paper Boats
Paper boats are a classic craft that introduces children to the art of origami through simple, satisfying folds. This timeless activity transforms a single sheet of construction paper into a three-dimensional toy that can actually float, blending creativity with a touch of basic physics. It’s an easy construction paper craft that doubles as an exciting toy for water play.
Why It’s a Great First Craft
Folding paper boats helps develop spatial reasoning, sequencing skills, and an understanding of geometric shapes. The magic of watching their creation float in a tub or puddle provides a powerful sense of accomplishment. This craft is perfect for transitioning from 2D art to 3D construction, making it a valuable learning experience.
Materials You’ll Need
- Construction paper (rectangular sheets)
- Crayons, markers, or stickers for decoration (optional)
- A small stick or toothpick for a mast (optional)
- A small piece of paper for a sail (optional)
Step-by-Step Instructions
- Fold in Half: Start with a rectangular sheet of construction paper. Fold it in half lengthwise, then unfold. Next, fold it in half widthwise to create a center crease.
- Create the Point: With the folded edge at the top, take the top two corners and fold them down to meet at the center crease, forming a triangle shape on top of a rectangle.
- Fold the Brim: Fold the top layer of the bottom rectangular flap up against the triangle. Flip the paper over and fold the other flap up on the opposite side.
- Form the Boat: Gently pull the two sides of the triangle apart to open it into a square shape, tucking the corners. Fold the bottom points of the square up to the top point, creating a smaller triangle. Finally, gently pull the sides apart again, and your boat shape will emerge.
Pro-Tip: For longer-lasting water adventures, you can "waterproof" your boat by coloring the entire outer surface heavily with a wax crayon. The wax will help repel water and keep your paper boat afloat for a longer period.
Quick Comparison of 10 Easy Construction Paper Crafts
| Craft | Implementation 🔄 | Resources ⚡ | Expected outcomes 📊 | Ideal use cases 💡 | Key advantages ⭐ |
|---|---|---|---|---|---|
| Paper Chains | Very low — simple looping & gluing | Minimal — paper, glue, scissors | Immediate decorative chains, visual impact | Parties, classroom countdowns, holiday decor | Extremely affordable, easy, builds fine motor skills |
| Paper Flowers | Medium — cutting, rolling, layering | Low — paper, scissors, glue; optional tools | Durable decorative flowers, bouquet-ready | Weddings, centerpieces, bulletin displays | Long-lasting, customizable, bulk production friendly |
| Paper Masks | Medium — cutting, shaping, fitting | Low — paper, elastic/ribbon, embellishments | Wearable props for play and performance | Theater, costumes, dramatic play activities | Encourages imagination, inexpensive costume option |
| Paper Collages | Low–Medium — cutting & arranging composition | Low — assorted papers, glue, scissors | Artistic compositions, fosters composition skills | Art class, therapy, mixed-media projects | Encourages creativity, uses scraps efficiently |
| Paper Snowflakes | Very low — folding & cutting symmetry | Minimal — paper, scissors | Fast, intricate symmetrical decorations | Winter classroom projects, holiday windows | Quick to make, teaches symmetry, age-inclusive |
| Paper Weaving | Medium — planning and interlacing strips | Low — pre-cut strips, backing paper, glue | Geometric woven panels, pattern recognition | Elementary art, textile exploration, wall art | Teaches planning and patterns, visually striking |
| Paper Butterflies | Low — fold-and-cut, optional 3D shaping | Minimal — paper, markers, thread for hanging | Lightweight decorative butterflies, mobiles | Spring displays, bulletin boards, gift embellishments | Quick, scalable, teaches symmetry and folding |
| Paper Crowns | Low — roll, secure, decorate | Low — paper, tape/staples, decorative elements | Wearable costume crowns for play | Dress-up, birthday parties, royal-themed activities | Promotes imaginative play, fast to produce |
| Paper Baskets | Medium — weaving or folding for structure | Low–Moderate — sturdy paper/cardstock, glue | Functional decorative containers, storage-ready | Gift baskets, classroom supply holders, decor | Teaches structural skills, practical end-use |
| Paper Boats | Low — origami folding steps | Minimal — paper; waterproofing optional | Floating toys, sequential skill development | Bathtub/outdoor water play, STEM lessons | Quick to fold, introduces origami, playful activity |
Start Crafting and Make Learning Fun Today!
You've just explored a vibrant collection of ten engaging and easy construction paper crafts, each one a gateway to creativity, learning, and fun. From the simple, satisfying loops of a paper chain to the intricate folds of a paper boat, these projects demonstrate how a few basic supplies can unlock a world of imaginative play. We’ve seen how crafting can be so much more than just a way to pass the time; it’s a powerful tool for holistic child development.
The journey through creating paper flowers, masks, and collages isn't just about the final product. It's about the process: the snip of the scissors, the careful application of glue, and the joy of seeing an idea take shape. Each of these activities provides a unique platform for growth, turning abstract concepts into tangible creations that children can be proud of.
Key Takeaways for Creative Success
Remember that the value of these easy construction paper crafts lies in their ability to blend learning with play seamlessly. Here are the core benefits you can expect to see:
- Fine Motor Skill Development: Activities like weaving, cutting snowflakes, and folding butterflies are fantastic for strengthening hand-eye coordination and the small muscles in a child’s hands and fingers.
- Cognitive Growth: Crafting introduces fundamental concepts of geometry (shapes in collages), symmetry (snowflakes and butterflies), and engineering (the structure of a paper basket or boat). Following step-by-step instructions also boosts sequencing skills and problem-solving abilities.
- Creative Expression and Confidence: Providing a blank canvas of construction paper gives children the freedom to express their unique vision. Completing a project from start to finish instills a powerful sense of accomplishment and builds self-esteem.
Your Action Plan for Endless Crafting Fun
Ready to put these ideas into action? Your next step is to prepare your creative space. A well-organized area makes crafting more accessible and less stressful, allowing the focus to remain on the fun. To make your crafting experience even smoother and more enjoyable, learn how to organize your craft supplies like a pro. Once your supplies are ready, choose a project from our list that you think your child will love and dive in.
The most important takeaway is to embrace the imperfection and celebrate the effort. The goal isn't a flawless paper crown or a perfectly symmetrical snowflake; it's about the shared experience, the laughter, and the "aha!" moments along the way. By making these easy construction paper crafts a regular part of your routine, you are not just creating decorations, you are building memories and fostering a lifelong love for learning and creativity.
Ready to take hands-on learning to the next level? While construction paper crafts are a fantastic starting point, Playz offers a universe of STEM-focused kits that turn complex scientific principles into exciting, interactive adventures. Explore our award-winning science kits at Playz and continue to inspire your child's curiosity today