

Struggling to find an example of science fair project that's both engaging and educational? You're in the right place. The classic baking soda volcano has its place, but true scientific inquiry begins when students move beyond simple demonstrations and start asking, "what if?" This guide is designed to spark that curiosity by moving past the well-trodden classics to explore seven innovative project ideas. These examples teach core scientific principles through genuine hands-on discovery.
This is more than just a list of ideas; it's a detailed blueprint for each project. We provide a strategic breakdown and actionable tips to help young scientists not only impress the judges but, more importantly, develop a lasting passion for STEM. For every example of a science fair project presented, we will break down the "why" behind the experiment, offering practical advice for framing a strong hypothesis, collecting meaningful data, and presenting findings effectively. This ensures your child doesn't just build a model; they understand the fundamental science that makes it work. Let's dive into projects that inspire real investigation.
1. Volcano Eruption Model
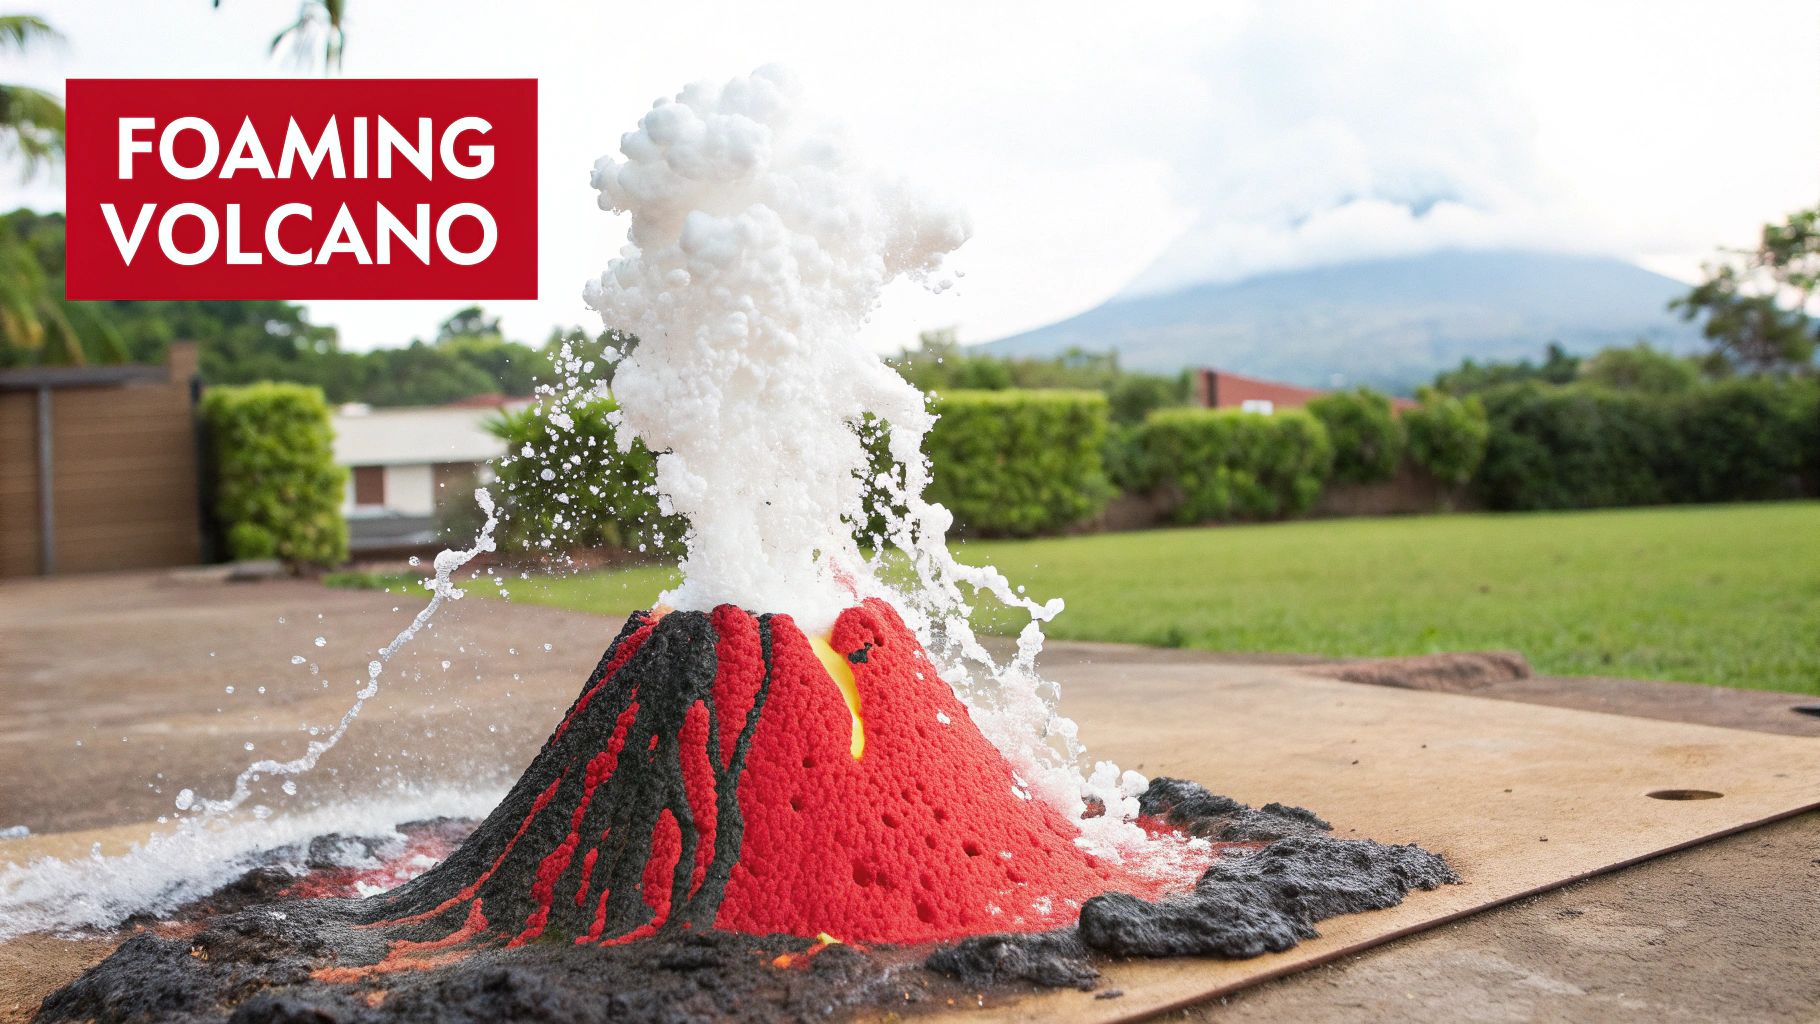
The Volcano Eruption Model is a quintessential, hands-on science fair project that demonstrates a fundamental chemical reaction in a visually spectacular way. At its core, this experiment showcases the acid-base reaction between sodium bicarbonate (baking soda) and acetic acid (vinegar). When mixed, these two common household items produce carbon dioxide gas, which rapidly expands and forces the liquid mixture to foam up and "erupt" from a model volcano structure. This classic project is a fantastic example of a science fair project because it combines creativity, chemistry, and geology into one memorable experience.
Strategic Breakdown
The project’s strength lies in its scalability. While a simple baking soda and vinegar reaction is perfect for younger students, older participants can elevate it by exploring more complex scientific principles. A student can transform it into a controlled experiment by systematically changing the ratio of vinegar to baking soda and measuring the eruption's height or duration. This adds layers of data collection and analysis, which are key components of the scientific method.
Key Insight: The Volcano Eruption Model's success is not just in the "eruption" but in its potential for deep scientific inquiry. It serves as an accessible gateway to complex topics like chemical kinetics, stoichiometry, and volcanology.
Actionable Tips for a Winning Project
To make your volcano stand out, focus on moving beyond a simple demonstration. Consider these tactical upgrades:
- Vary the Reactants: Frame a hypothesis like, "Does lemon juice (a weaker acid) produce a less intense eruption than vinegar?" Test different acids or bases to see how they affect the reaction's intensity.
- Enhance Realism: Use red and orange food coloring mixed with a little dish soap. The soap increases surface tension, creating a slower, more lava-like flow.
- Build a Detailed Model: Construct the volcano from clay or papier-mâché, incorporating a geological cross-section that labels the magma chamber, conduit, and vent.
- Connect to Real Science: Research a specific type of volcano, such as a shield or composite volcano, and design your model and eruption to mimic its characteristics. You can find more engaging project ideas for this age group by checking out these 5th-grade science experiment ideas.
By adding these elements, a simple demonstration transforms into a comprehensive and impressive scientific investigation.
2. Plant Growth Under Different Light Conditions
The Plant Growth Under Different Light Conditions experiment is a foundational biology project that visually demonstrates the critical role of light in photosynthesis. This controlled experiment involves exposing identical plants to various types of light, such as different colors (using colored cellophane or LED lights), intensities, or durations. By meticulously tracking growth metrics like height, leaf count, and overall health, students can directly observe how the light spectrum impacts a plant's ability to create energy and thrive. This project is a perfect example of a science fair project because it teaches the core principles of experimental design, data collection, and biological analysis.
Strategic Breakdown
The project’s true value lies in its adherence to the scientific method. While it seems simple, successfully executing it requires strict control over variables like water, soil, and temperature to ensure that only the light source is affecting the outcome. This elevates the project from a simple observation to a rigorous scientific inquiry. Advanced students can explore concepts like chlorophyll's light absorption spectrum, connecting their results to why plants appear green. It's a direct, hands-on way to explore concepts being studied in modern fields like vertical farming and NASA's space agriculture research.
Key Insight: The success of this project hinges on control and measurement. It’s not just about growing plants; it's about generating clean, quantifiable data that tells a clear story about photosynthesis and plant biology.
Actionable Tips for a Winning Project
To make your plant growth experiment compelling, focus on precision and a strong presentation of your findings. Consider these tactical upgrades:
- Choose Fast-Growing Plants: Use beans, radishes, or lettuce seeds, which germinate and grow quickly, providing measurable results within a typical science fair timeline.
- Establish a Control Group: Always include one plant grown in natural sunlight or standard white light to serve as a baseline for comparing the effects of your experimental light conditions.
- Document Rigorously: Take daily photos from the same angle and record quantitative data (e.g., height in centimeters, number of leaves) in a detailed logbook.
- Visualize Your Data: Create clear, labeled charts and graphs to display the growth trends over time. A line graph showing plant height over two weeks is a powerful visual tool. For a project with all the necessary tools, you can explore kits designed for controlled plant experiments, such as this Mars Greenhouse cloning kit.
By implementing these strategies, a straightforward biology experiment becomes a sophisticated investigation into the mechanics of life.
3. Density Tower Liquid Layers
The Density Tower is a visually stunning and conceptually powerful science fair project that clearly illustrates the principle of density. This experiment involves carefully layering various household liquids, such as honey, corn syrup, dish soap, water, and oil, into a single clear container. Because these liquids have different masses per unit volume (densities), they naturally separate into distinct, colorful layers instead of mixing. This project is an excellent example of a science fair project because it elegantly demonstrates complex physics principles like density, miscibility, and buoyancy using readily available materials.

Strategic Breakdown
The project’s brilliance is in its direct, visual representation of an abstract scientific concept. A younger student can simply create a beautiful rainbow tower, while an older student can elevate it into a rigorous investigation. By calculating the specific gravity of each liquid (its density relative to water), a student can predict the order of the layers before pouring them. They can then test this hypothesis, transforming a simple demonstration into a true experiment involving measurement, prediction, and verification.
Key Insight: The Density Tower’s strength is its ability to make an invisible property, density, visible and understandable. It serves as a launchpad for exploring more advanced topics in fluid mechanics and material science.
Actionable Tips for a Winning Project
To turn your density tower into an award-winning entry, focus on adding layers of scientific inquiry. Consider these strategic enhancements:
- Introduce Buoyancy: Carefully drop small objects (a grape, a plastic bead, a paperclip) into the finished tower and observe which layer they float on. This demonstrates how an object sinks until it reaches a liquid layer denser than itself.
- Measure and Quantify: Use a kitchen scale and measuring cup to calculate the density of each liquid (mass/volume). Create a chart that compares your calculated densities to the final order of the layers in the tower.
- Test Miscibility: Gently try to stir two adjacent layers to see if they mix or remain separate. This introduces the concept of miscibility (the ability of liquids to mix) alongside density.
- Explore Temperature Effects: Hypothesize how heating or cooling a liquid (like water) might change its density and its position in the tower. This makes for a more advanced experiment, and you can explore more kitchen-based science with kits like the Explosive Kitchen Lab educational science kit.
By incorporating these variables and measurements, your project evolves from a simple art piece into a sophisticated scientific exploration.
4. Solar Oven Design and Testing
The Solar Oven Design and Testing project is a brilliant example of a science fair project that blends engineering, physics, and environmental science. It challenges students to build a functional oven that harnesses solar energy to cook food. At its heart, this project demonstrates key principles like the greenhouse effect, heat absorption, and reflection. By using simple materials like a cardboard box, aluminum foil, plastic wrap, and black construction paper, students can create a device that concentrates sunlight to generate significant heat, showcasing the power of renewable energy in a tangible and delicious way.
Strategic Breakdown
This project's greatest asset is its emphasis on the engineering design process: design, build, test, and iterate. A basic box cooker is a great starting point for any age, but older students can dive deeper by creating a controlled experiment. They can build multiple ovens with slight design variations—such as different insulation materials or reflector angles—and then collect quantitative data. Measuring and comparing the maximum temperatures reached or the time it takes to melt chocolate in each design introduces rigorous data analysis and problem-solving.
Key Insight: The Solar Oven project is a powerful gateway to understanding thermodynamics and sustainable engineering. Its success lies not just in cooking a s'more but in methodically testing variables to optimize performance, mirroring the work of real-world engineers.
The following infographic outlines the fundamental process flow for creating and evaluating a solar oven.
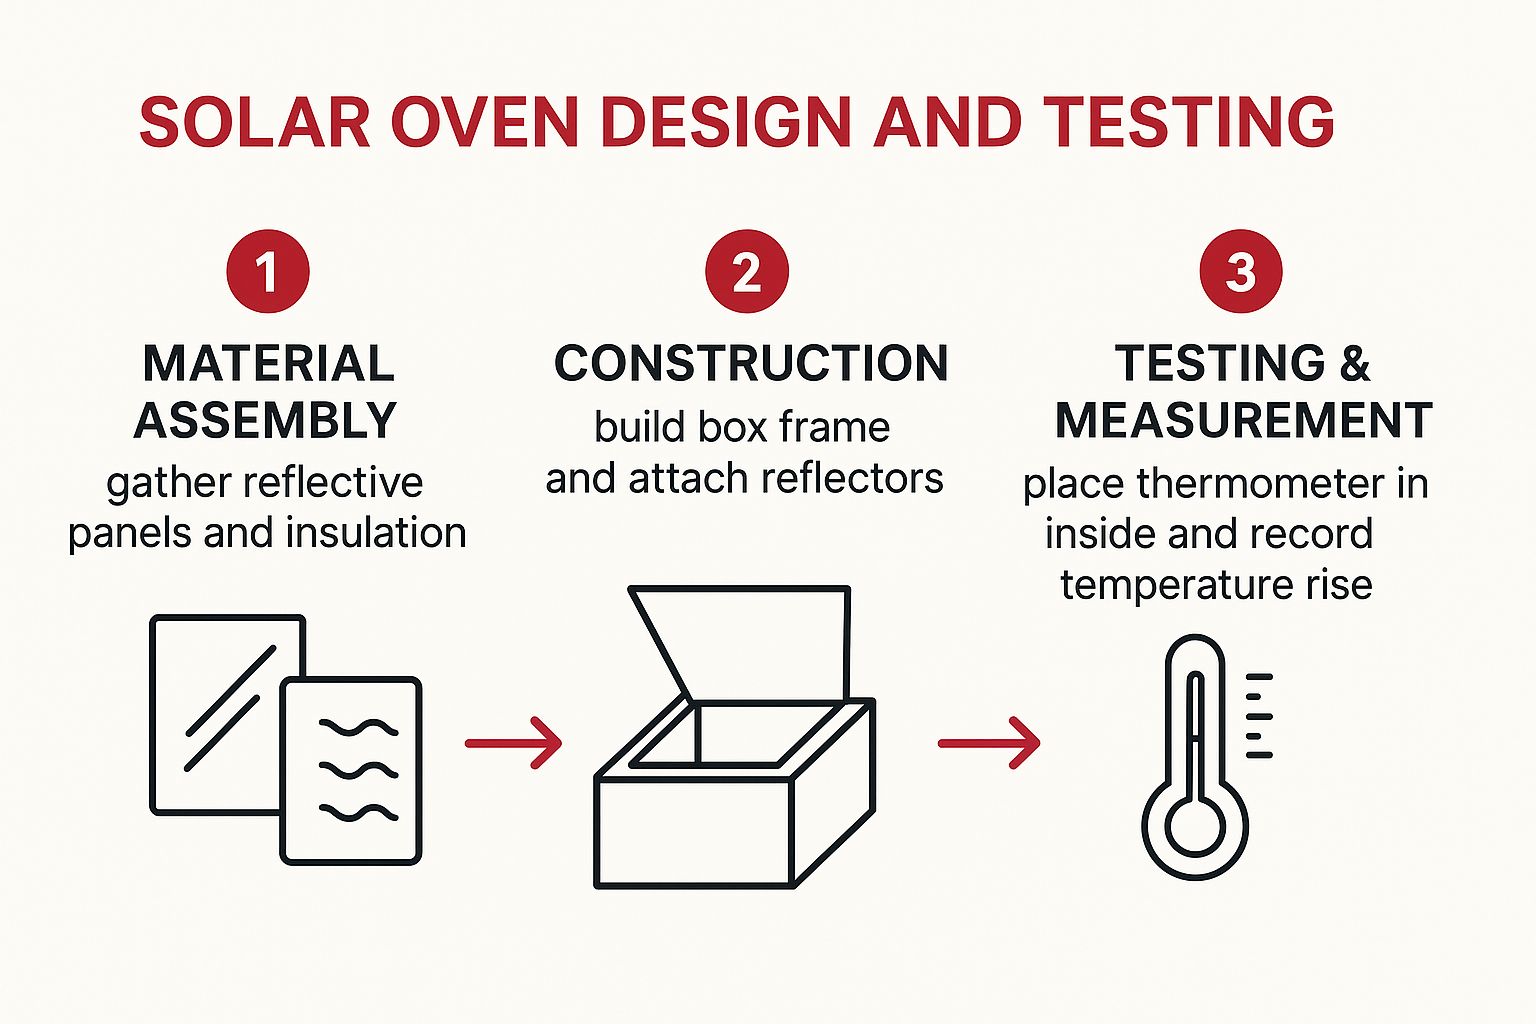
This visual guide emphasizes the systematic approach required, from gathering materials to construction and performance measurement, which is the core of any successful engineering project.
Actionable Tips for a Winning Project
To elevate your solar oven from a simple craft to an award-winning scientific investigation, focus on precision and data.
- Optimize Materials: Use mirrors instead of just aluminum foil for maximum reflection. Line the inner cooking chamber with black paper to maximize heat absorption.
- Insulate Effectively: Pack the walls of your oven with insulating materials like crumpled newspaper or foam to prevent heat from escaping.
- Track Performance: Use a thermometer or a digital temperature probe to log the internal temperature at regular intervals (e.g., every 5 minutes). Chart this data over time to create a heating curve for your oven.
- Compare and Contrast: Build two or three different designs side-by-side to test which variables (e.g., single reflector vs. multiple reflectors) have the biggest impact on heating efficiency. You can find inspiration from organizations like Solar Cookers International that promote this technology globally.
By implementing these tactics, you transform a basic build into a sophisticated experiment that clearly demonstrates scientific principles and engineering ingenuity.
5. Bacterial Growth and Antibiotics Testing
The Bacterial Growth and Antibiotics Testing project is an advanced and highly impactful example of a science fair project that delves into the world of microbiology. This experiment involves culturing safe, non-pathogenic bacteria on agar plates and then introducing different substances to observe their effect on bacterial colonies. It's a direct, visual demonstration of how antimicrobial agents work, providing a powerful lesson on topics ranging from basic hygiene to the critical issue of antibiotic resistance. This project is a fantastic choice because it mirrors real-world scientific procedures used in medical labs and pharmaceutical research.
Strategic Breakdown
The project’s strength lies in its rigorous application of the scientific method and its relevance to public health. While culturing bacteria may seem complex, it provides an unparalleled opportunity to teach sterile techniques, data measurement (measuring the "zone of inhibition"—the area where bacteria can't grow), and the importance of controls. Students can move beyond simple observation by comparing the effectiveness of commercial antibiotics against natural substances like garlic or tea tree oil, introducing variables that make the experiment robust and deeply analytical.
Key Insight: This project’s value is its ability to make abstract concepts like microbial life and antibiotic efficacy tangible. It transforms a student's understanding of germs from something invisible and vague into a measurable and observable scientific phenomenon.
Actionable Tips for a Winning Project
To elevate this experiment from a simple observation to an award-winning investigation, focus on precision and control. Consider these strategic upgrades:
- Test Natural Antimicrobials: Compare the effectiveness of household items like honey, vinegar, or various essential oils against a standard antibiotic disc (the control).
- Vary Concentrations: Prepare several dilutions of a single substance (e.g., 100%, 50%, and 25% concentrations of a tea tree oil solution) to determine the minimum concentration required to inhibit bacterial growth.
- Maintain Sterile Technique: Emphasize the importance of using sterilized equipment and a clean workspace to prevent contamination and ensure reliable results.
- Document Growth Meticulously: Take daily high-resolution photos of the petri dishes with a ruler for scale to create a clear visual record of the results. This approach adds a layer of professionalism to the project display.
By focusing on these details, a student can demonstrate a sophisticated understanding of experimental design and microbiology, creating a truly impressive and educational project.
6. Water Filtration System Design
The Water Filtration System Design is a powerful environmental engineering project that challenges students to address a critical real-world problem: access to clean water. This hands-on experiment involves designing, building, and testing a filtration system using readily available materials such as sand, gravel, activated charcoal, and cotton balls. The core task is to purify contaminated water, making this a perfect example of a science fair project that blends engineering principles with chemistry and environmental science. It allows students to engage with a global issue in a tangible and impactful way.
Strategic Breakdown
The project's ingenuity lies in its direct application of scientific principles to solve a practical problem. While a basic model effectively demonstrates mechanical filtration, advanced students can explore chemical and biological purification. The experiment can be elevated by creating different "contaminants" (like soil, oil, and food coloring) and then methodically testing the effectiveness of various filter designs against each one. This introduces variables, control groups, and quantitative analysis, moving the project from a simple demonstration to a rigorous engineering investigation.
Key Insight: The Water Filtration System Design's strength is its connection to real-world engineering and humanitarian challenges. It empowers students to think like problem-solvers, focusing on efficiency, cost-effectiveness, and measurable results.
Actionable Tips for a Winning Project
To make your filtration system a standout project, focus on data-driven comparison and analysis. Consider these strategic enhancements:
- Layer Intelligently: Research filtration theory and layer your materials strategically from coarse (gravel) to fine (sand), with activated charcoal included to absorb chemical impurities. Test different layer thicknesses and sequences.
- Measure Water Quality: Go beyond visual inspection. Use water testing kits to measure key indicators like pH, turbidity (cloudiness), and total dissolved solids (TDS) before and after filtration.
- Compare Multiple Designs: Build and test several different filter designs side-by-side. You can compare a simple sand filter to a more complex multi-stage system that includes activated charcoal.
- Conduct a Cost-Benefit Analysis: Research the cost of your materials and calculate the cost per liter of filtered water for each design. This adds a compelling real-world engineering dimension to your project.
By incorporating these analytical elements, your project becomes a sophisticated study in environmental engineering and sustainable design.
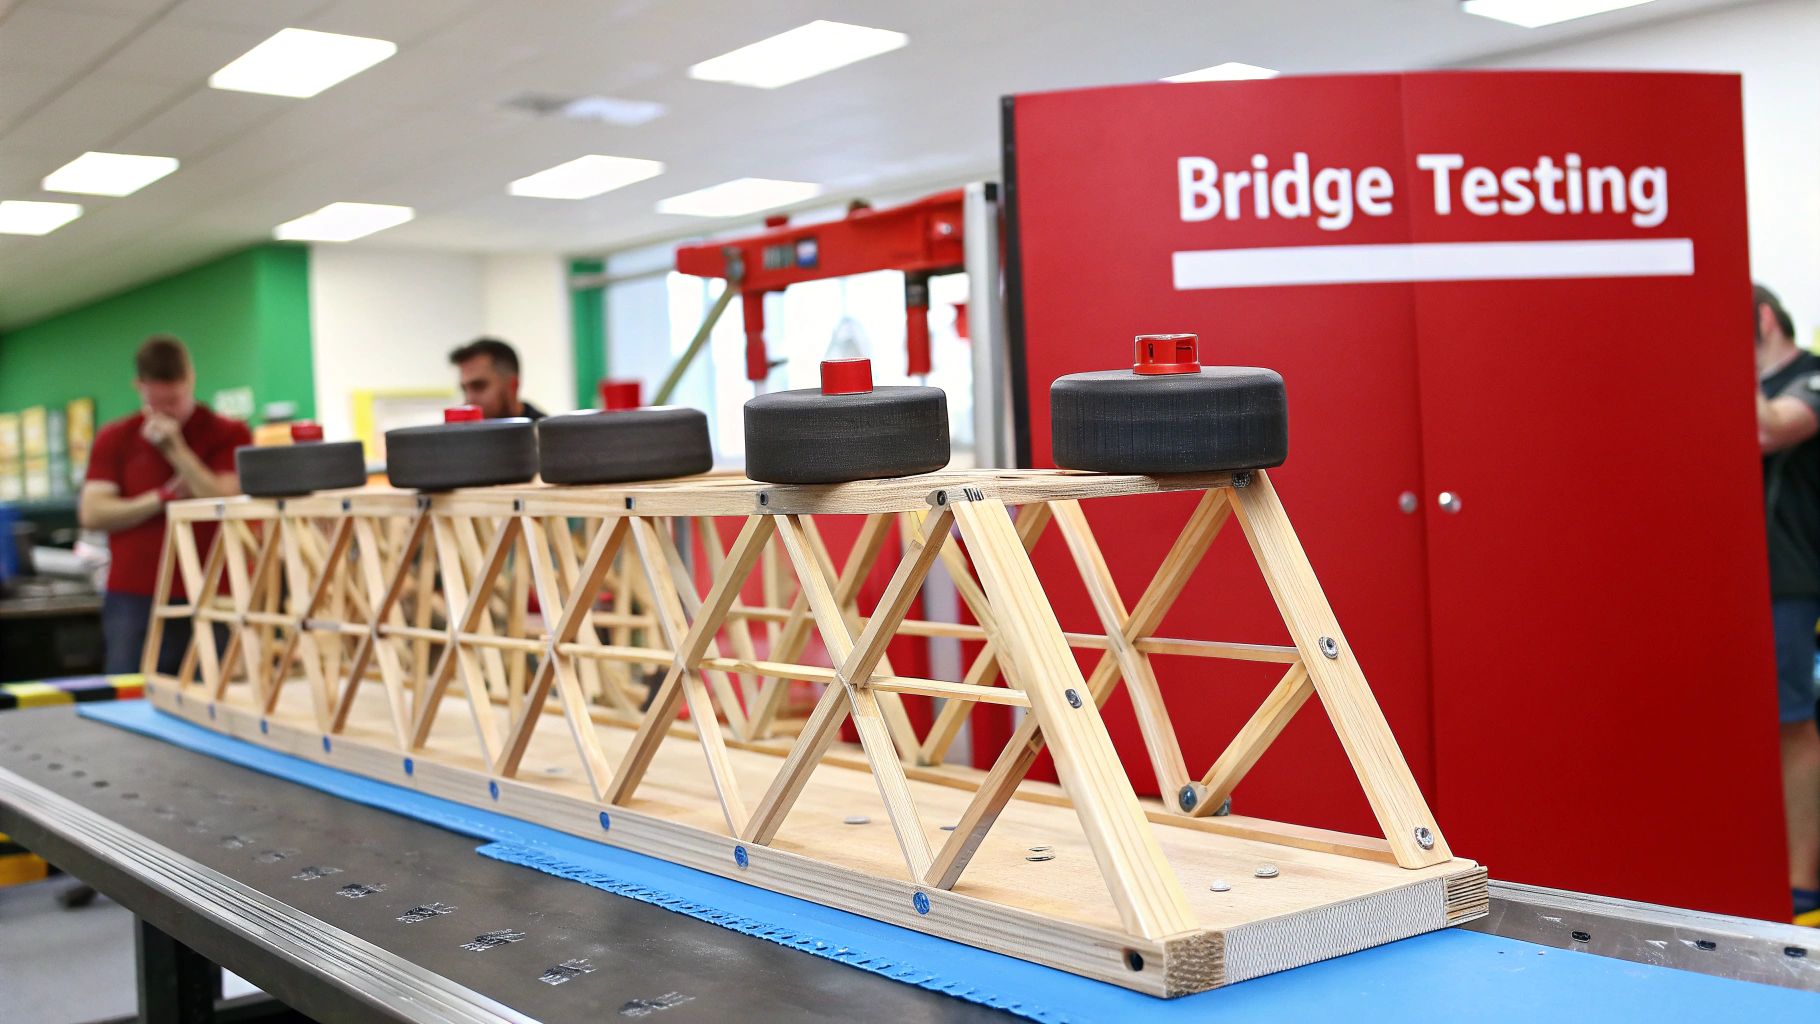
7. Bridge Design Load Testing
Bridge Design Load Testing is a classic structural engineering challenge that serves as an outstanding example of a science fair project. It tasks students with designing and constructing a model bridge using specified materials, like popsicle sticks or spaghetti, with the goal of supporting the maximum possible weight. This project masterfully integrates physics concepts, such as tension and compression, with engineering design principles and mathematical analysis. It’s a hands-on exploration of how real-world structures are designed to withstand incredible forces.
Strategic Breakdown
The project's academic power comes from its direct application of theoretical knowledge to a tangible problem. A basic project involves building and breaking a bridge, which is engaging on its own. However, an advanced approach involves research into different truss designs (like Warren, Pratt, or Howe trusses) and using mathematical calculations to predict failure points. Students can document the entire process, from initial sketches and theoretical load calculations to the final destructive testing, providing a comprehensive scientific narrative.
Key Insight: The true value of this project lies not in building the strongest bridge, but in understanding why it was strong or why it failed. It teaches the iterative nature of engineering: design, test, analyze, and improve.
Actionable Tips for a Winning Project
To elevate your bridge project from a simple craft to a serious engineering investigation, concentrate on precision and analysis. Consider these tactical enhancements:
- Research Truss Designs: Investigate the geometry of real-world bridges. Triangles are the strongest shape; explore how different arrangements distribute forces.
- Precision is Paramount: Use precise measurements and cutting techniques. Ensure all joints are secure and uniform with the same amount of glue, as these are often the weakest points.
- Calculate Strength-to-Weight Ratio: The winning bridge isn't always the one that holds the most weight, but the one that holds the most weight relative to its own mass. Calculate this ratio (Max load / Bridge weight) for a key performance metric.
- Document Failure Points: When the bridge breaks, record exactly where and how it failed. Use this data to analyze design flaws and suggest improvements. Many students can find inspiration by exploring the fundamentals of engineering kits and toys.
By incorporating these analytical elements, you transform a construction activity into a powerful demonstration of the scientific and engineering methods in action.
7 Science Fair Project Examples Comparison
| Project Title | Implementation Complexity 🔄 | Resource Requirements ⚡ | Expected Outcomes 📊 | Ideal Use Cases 💡 | Key Advantages ⭐ |
|---|---|---|---|---|---|
| Volcano Eruption Model | Low: simple setup, basic chemistry | Low: inexpensive, common household items | Engaging visual eruption; basic chemistry | Elementary to Middle School science fairs | Easy, safe, teaches acid-base reaction |
| Plant Growth Under Different Light Conditions | Medium: requires controlled setup & monitoring over weeks | Medium: plants, light sources, measurement tools | Quantifiable growth data, photosynthesis insights | Middle to High School biology experiments | Teaches scientific method, measurable results |
| Density Tower Liquid Layers | Low: quick setup, straightforward process | Low: common household liquids | Immediate, colorful density separation | Elementary to Middle School demos | Quick, visually striking, demonstrates density |
| Solar Oven Design and Testing | High: engineering design, construction | Medium to High: reflective materials, thermometers | Practical temperature data, renewable energy understanding | Middle to High School engineering projects | Real-world application, promotes sustainability |
| Bacterial Growth and Antibiotics Testing | High: requires sterile technique, lab safety | High: lab supplies, incubation equipment | Visible bacterial growth, antibiotic effectiveness | High School to Advanced microbiology | Medical relevance, authentic lab experience |
| Water Filtration System Design | Medium to High: iterative design, testing | Medium to High: filtration materials, water testing tools | Measurable water purity improvements | Middle to High School environmental projects | Real-world problem-solving, environmental focus |
| Bridge Design Load Testing | High: precise construction, testing equipment | Medium: building materials, load weights | Quantifiable load capacity data | Middle to High School engineering contests | Exciting destructive testing, teaches physics |
Your Turn to Experiment: Bringing These Ideas to Life
We've journeyed through a diverse landscape of scientific inquiry, from the bubbling chemical reactions of a homemade volcano to the precise load-bearing calculations of a model bridge. Each example of science fair project shared in this article was more than just a set of instructions; it was a blueprint for discovery. The projects showcased fundamental principles that are the bedrock of a successful and engaging science fair experience.
The key thread connecting the Density Tower, the Solar Oven, and the Water Filtration System isn't just a focus on results, but a deep emphasis on the scientific method. This structured approach to curiosity is the most valuable lesson a science fair can teach. It’s about moving beyond simply "doing" an experiment to truly understanding the "why" and "how" behind the observations.
Core Takeaways for a Winning Project
As you and your young scientist embark on this journey, keep these central themes in mind. They are the strategic pillars that transform a good idea into an award-winning project.
- Hypothesis is King: A strong, testable hypothesis is your project's North Star. As seen with the plant growth experiment, a clear question ("Does a plant grow taller under red light compared to blue light?") provides focus and a measurable outcome. Without it, you have a demonstration, not an experiment.
- Control Your Variables: The bacterial growth project powerfully illustrated the importance of controls. By having a petri dish with no antibiotic, you establish a baseline for comparison. This single step is what gives your results validity and scientific rigor.
- Document Everything: Your logbook is your most important tool. Every measurement, observation, and even every mistake is a crucial piece of data. A detailed log tells the story of your scientific process, demonstrating thoroughness and critical thinking to the judges.
- Iterate and Improve: True innovation rarely happens on the first try. The engineering projects, like the solar oven and bridge design, highlight the power of iteration. Building a prototype, testing its limits, and then refining the design based on those results is the essence of the engineering design process.
From Inspiration to Action
The goal of any science fair is not merely to build a model or grow a plant. It's about nurturing a mindset of inquiry, resilience, and analytical thinking. The real prize is the "aha!" moment when a complex concept clicks into place, or the satisfaction of solving a problem through trial and error. This experience equips children with the critical thinking skills necessary to navigate an increasingly complex world.
Choosing the right example of science fair project is the first step. The key is to select one that sparks genuine interest and allows room for creativity. Encourage your child to ask "What if?" What if we used a different material for the solar oven? What if we tried to filter a different liquid? These questions are the seeds of true scientific exploration. Let them lead the way, and you’ll be fostering a lifelong passion for discovery.
Ready to turn inspiration into a hands-on adventure? The science kits from Playz are designed to make complex concepts accessible and exciting, providing all the tools you need to get started on an unforgettable science fair project. Explore our collection at Playz and discover how #KidsLearnBestThruPlayz.