

Ever wonder how to make learning feel less like a chore and more like an adventure? In a world filled with screens, sparking a child's natural curiosity about the world around them is more important than ever. The secret isn't complicated textbooks or expensive labs; it's the magic of hands-on discovery.
This guide is your launchpad for turning your kitchen into a laboratory of fun and exploration. We've gathered nine of the most engaging and easy-to-follow science experiments for kids that use simple household items you likely already have. From the classic fizz of an erupting baking soda volcano to the surprising dance of raisins in soda, each activity is designed to do more than just entertain. They serve as a powerful, practical introduction to core scientific principles.
These experiments are your toolkit for demonstrating fundamental concepts like chemical reactions, density, static electricity, and aerodynamics in a way that truly sticks. Get ready to foster a genuine love for science, one amazing "wow" moment at a time. As we at Playz know, #KidsLearnBestThruPlayz, and these activities are the perfect proof. Let's dive in and start exploring.
1. Baking Soda and Vinegar Volcano: A Chemistry Classic
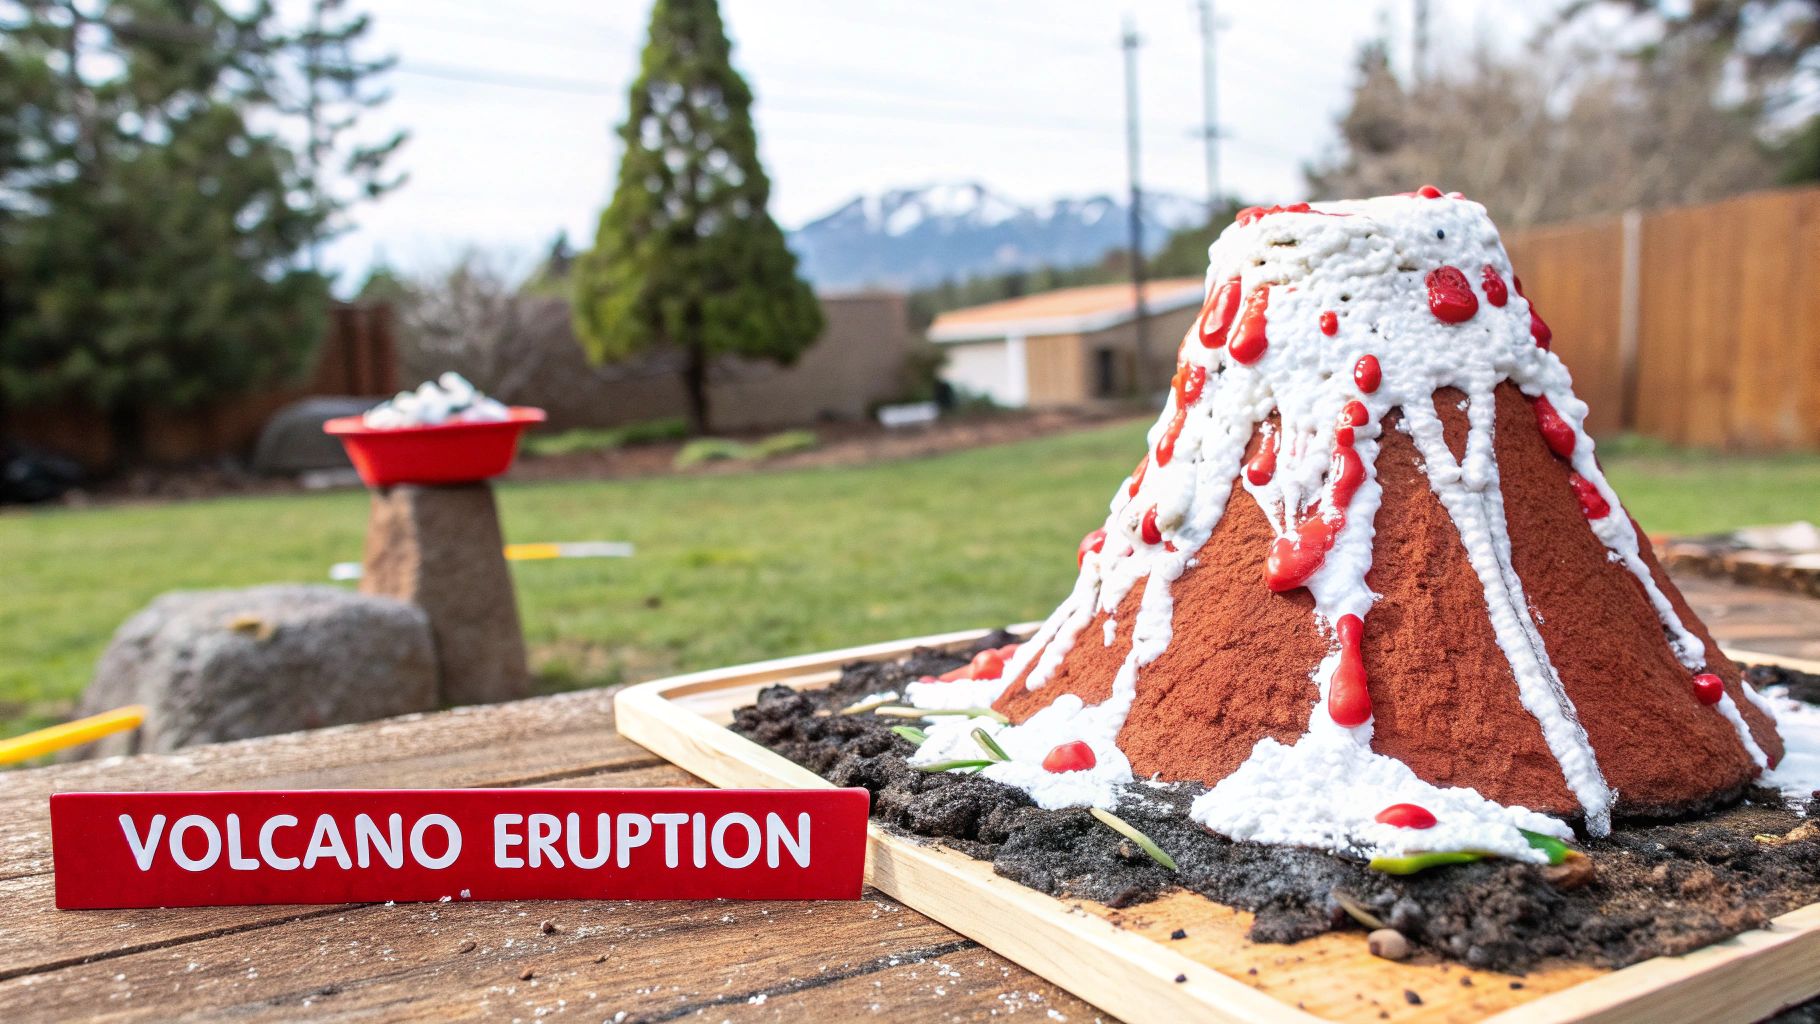
The baking soda and vinegar volcano is a quintessential science experiment for kids, offering a visually thrilling introduction to basic chemistry. This classic activity demonstrates a chemical reaction between an acid (vinegar) and a base (baking soda). When combined, they react to produce carbon dioxide gas, which rapidly expands and bubbles up, creating a fizzy "eruption" that mimics a real volcano.
This experiment is perfect for demonstrating cause and effect and introducing concepts like chemical reactions, acids, bases, and gas production in a safe and memorable way. Its simplicity and dramatic results make it a staple in elementary school science fairs, at-home learning activities, and even interactive children's museum exhibits.
How to Create Your Eruption: Step-by-Step
Creating your own volcanic eruption is simple and requires common household items.
- Materials: A small bottle or plastic cup, modeling clay or play-dough, a tray or baking pan, baking soda (sodium bicarbonate), vinegar (acetic acid), dish soap, and red food coloring.
- Step 1: Build the Volcano. Mold the clay or dough around the bottle on the tray to form a volcano shape, leaving the opening clear.
- Step 2: Prepare the "Magma". Fill the bottle about two-thirds full with warm water. Add a few drops of dish soap and red food coloring to create a more realistic, foamy lava effect. Then, add two tablespoons of baking soda and stir gently.
- Step 3: Start the Eruption! Pour about a half-cup of vinegar into the bottle and watch the fizzy reaction begin!
Why It Works: The reaction between baking soda (NaHCO₃) and vinegar (CH₃COOH) creates carbon dioxide (CO₂) gas. The gas bubbles build up pressure inside the bottle until they burst out, carrying the soapy, colored liquid with them in a dramatic flow. This is a real-world example of an acid-base reaction.
This experiment is a fantastic hands-on tool for young learners. By adjusting the amounts of baking soda and vinegar, children can explore how changing variables affects the reaction's intensity, introducing them to the scientific method of testing hypotheses.
2. Dancing Raisins in Soda: A Buoyancy Breakthrough
The Dancing Raisins experiment is a captivating and simple way to introduce children to the scientific principles of density and buoyancy. This activity uses a glass of carbonated beverage to make raisins magically rise and fall, creating a "dancing" effect. It's an excellent visual demonstration of how gases can interact with solids in a liquid, making abstract concepts tangible and exciting for young learners.
This experiment is perfect for illustrating how density can change and how buoyancy works. By observing the raisins' journey, kids can grasp complex physics concepts in a fun, accessible manner. It's a fantastic choice for kitchen science activities, preschool discovery centers, or elementary school lessons on matter and gas.

How to Make Your Raisins Dance: A Simple Guide
Making raisins dance is incredibly easy and requires only a few common items, making it one of the most accessible science experiments for kids.
- Materials: A clear glass or jar, clear carbonated soda (like club soda, seltzer, or lemon-lime soda), and a small handful of raisins.
- Step 1: Prepare the Stage. Fill the clear glass about three-quarters full with the fresh, bubbly carbonated beverage.
- Step 2: Add the Dancers. Gently drop about 5-10 raisins into the glass.
- Step 3: Observe the Show. Watch closely as the raisins first sink to the bottom, then slowly begin to rise to the surface, fall back down, and repeat the cycle.
Why It Works: Initially, raisins are denser than the soda, so they sink. The carbonated drink is full of dissolved carbon dioxide (CO₂) gas. The rough, wrinkled surface of the raisins provides perfect nucleation sites for these gas bubbles to attach. As bubbles collect on a raisin, they act like tiny floaties, increasing its overall buoyancy until it rises to the surface. Once at the top, the bubbles pop, the gas escapes, the raisin becomes dense again, and it sinks to repeat the process.
This simple yet mesmerizing experiment provides a great opportunity to explore variables. Kids can test other small objects like pasta, corn kernels, or even different types of soda to see how the results change, encouraging critical thinking and scientific inquiry.
3. Rainbow Milk Color Explosion: Surface Tension in Action
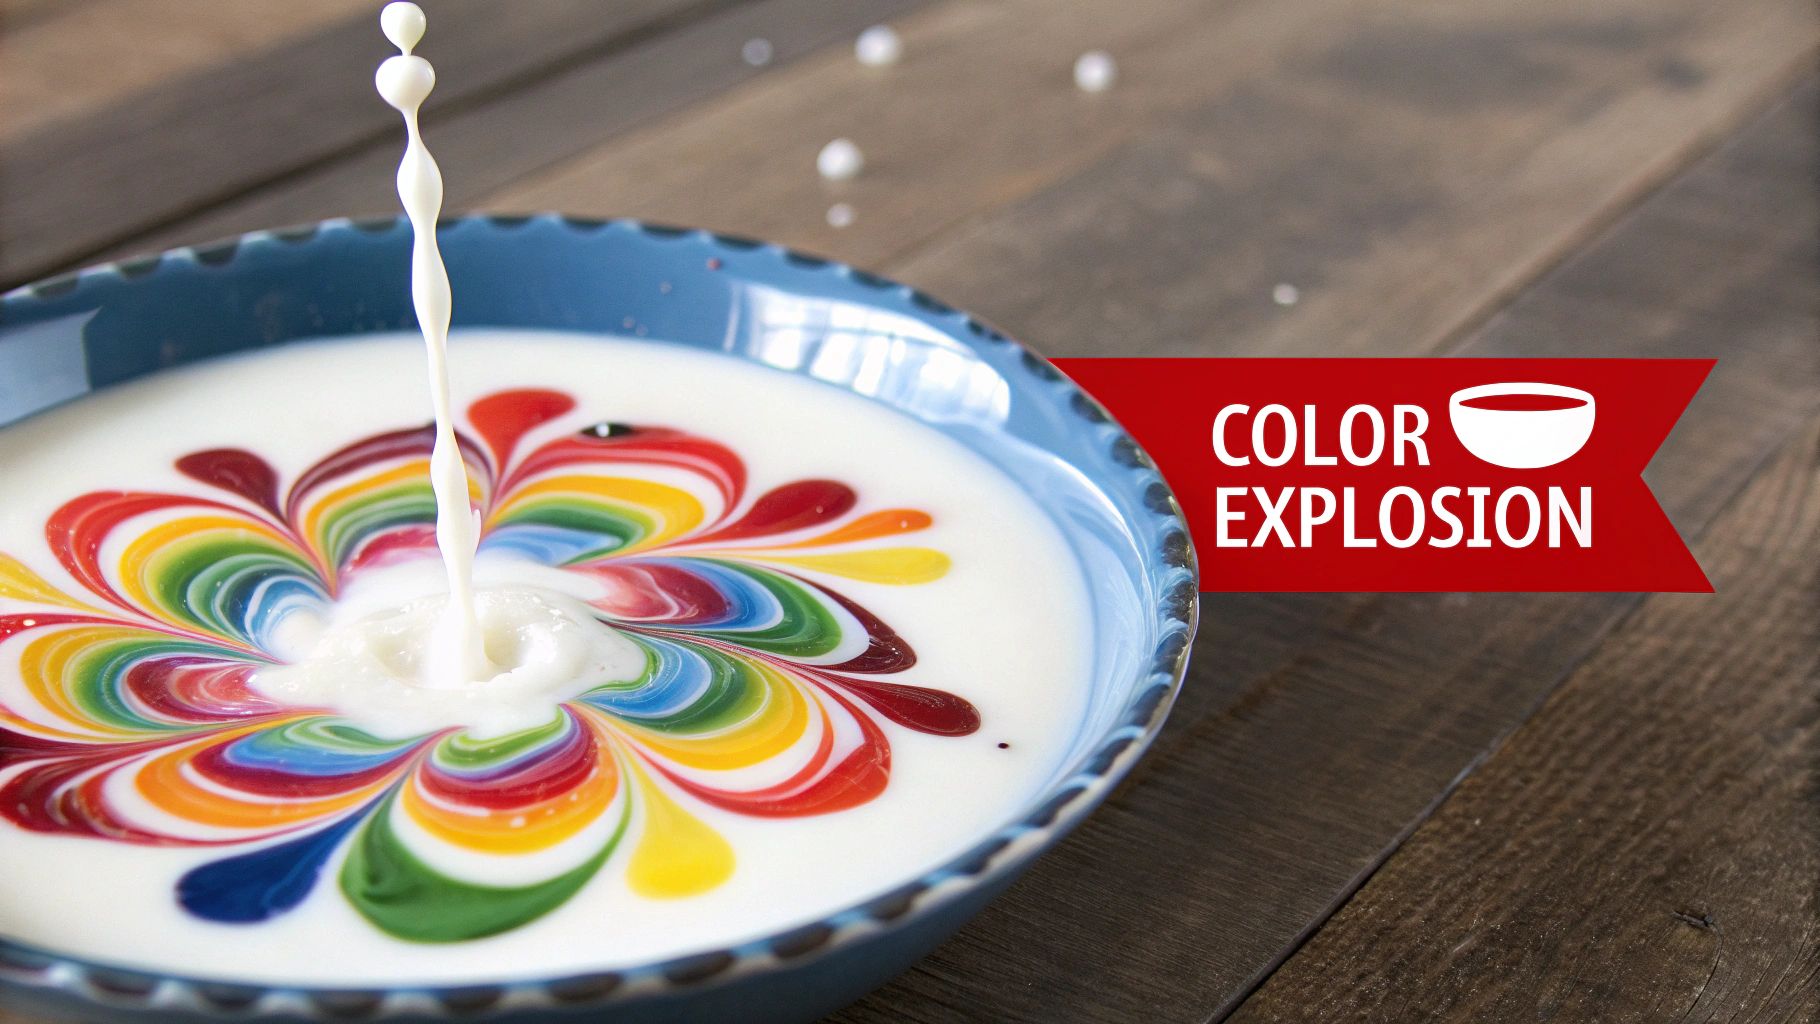
The Rainbow Milk Color Explosion is a captivating science experiment for kids that transforms a simple plate of milk into a swirling canvas of vibrant colors. This activity beautifully demonstrates the scientific principles of surface tension and the interaction between different types of molecules. When dish soap is introduced to milk containing drops of food coloring, the soap breaks down the fats and proteins, causing the colors to burst and dance across the surface in a mesmerizing display.
This experiment is perfect for introducing young scientists to concepts like molecules, chemical reactions, and surface tension in an artistic and visually stunning way. Its quick setup and dramatic, immediate results make it a popular choice for classroom demonstrations, at-home science fun, and viral social media videos that showcase the magic of science.
How to Create Your Color Explosion: Step-by-Step
Making your own rainbow milk is incredibly easy and uses materials you likely already have in your kitchen.
- Materials: A shallow dish or plate, whole milk, various colors of liquid food coloring, liquid dish soap, and a cotton swab.
- Step 1: Prepare the Canvas. Pour enough milk into the plate to completely cover the bottom. Allow the milk to settle for a minute.
- Step 2: Add the Color. Add one drop of each food coloring to different spots in the milk. For the best effect, place them near the center.
- Step 3: Start the Reaction! Dip the tip of a cotton swab in dish soap. Gently touch the soapy tip to the center of the milk and hold it there for 15-20 seconds. Watch the colors burst away from the swab!
Why It Works: Milk is mostly water but also contains fats and proteins. This mixture has surface tension, like a "skin" on top. Dish soap is a surfactant, meaning it weakens the surface tension. As the soap molecules race out to bond with the fat molecules in the milk, the food coloring gets pushed around, creating the beautiful swirling patterns.
This simple yet profound experiment offers a fantastic opportunity to observe molecular interactions in real-time. Experiment with different types of milk (like skim vs. whole) to see how the fat content affects the reaction, providing a great lesson in controlling variables.
4. Invisible Ink with Lemon Juice: A Spy's Secret
Unleash your inner spy with the invisible ink experiment, a fascinating activity that blends chemistry with history. This experiment uses lemon juice to write a secret message that remains invisible until revealed by heat. The science behind it involves an oxidation reaction, where the citric acid in the lemon juice weakens the paper fibers and turns brown when heated, making the hidden message appear.
This is one of the most memorable science experiments for kids because it feels like magic while teaching fundamental chemical principles. It’s perfect for spy-themed parties, scout group activities, or a creative lesson combining science with historical topics like the Revolutionary War, where such methods were used for secret correspondence. For more exciting chemistry projects, explore these 5th grade science experiments.
How to Reveal Your Secret Message: A 3-Step Guide
Writing and revealing a secret message is a simple process that requires only a few household items.
- Materials: Lemon juice, a small bowl, a cotton swab or small paintbrush, white paper, and a heat source like an iron, a 100-watt incandescent light bulb, or an adult's help with an oven.
- Step 1: Write the Message. Squeeze some lemon juice into the bowl. Dip the cotton swab into the juice and write your secret message on the paper.
- Step 2: Let It Dry. Allow the lemon juice to dry completely. The message will become invisible.
- Step 3: Reveal the Secret. With adult supervision, gently heat the paper. You can iron it on low heat, hold it close to a warm light bulb, or place it in an oven set to a low temperature until the message appears.
Why It Works: Lemon juice is an acidic organic substance that oxidizes and turns brown when heated. The acid weakens the paper's fibers, so when heat is applied, the part with the juice burns, or turns brown, faster than the rest of the paper, revealing your message.
This experiment is an excellent way to introduce concepts like oxidation and chemical changes. Kids can have fun creating treasure maps with secret clues or sending coded messages to friends, making learning both interactive and exciting.
5. Floating Egg Density Experiment: Physics in a Glass
The floating egg experiment is a fascinating and straightforward way to demonstrate the concept of density to children. This activity uses a common egg to show how an object that sinks in fresh water can float in salt water. By simply adding salt, you change the water's density, making it "heavier" than the egg and allowing the egg to float on top.
This experiment is perfect for introducing fundamental physics concepts like density, buoyancy, and displacement. It vividly answers the question of why it's easier to float in the ocean than in a swimming pool. Its simplicity and visually clear results make it an excellent choice for a hands-on science lesson at home or in the classroom, sparking curiosity about the properties of liquids.
How to Make Your Egg Float: A Quick Tutorial
Seeing an egg magically rise in water is easy and only requires a few kitchen staples.
- Materials: Two tall, clear glasses, water, a raw egg, table salt, and a spoon.
- Step 1: The Sinking Test. Fill one glass with plain tap water and gently place the egg inside. Observe how it sinks to the bottom.
- Step 2: Prepare the Salt Water. Fill the second glass with water. Add about six tablespoons of salt and stir thoroughly until it dissolves completely. You may need to add more salt if the egg doesn't float at first.
- Step 3: The Floating Test. Carefully place the same egg into the glass of salt water and watch as it floats to the surface!
Why It Works: Salt increases the density of the water. An object floats if it is less dense than the liquid it is placed in. The egg is denser than tap water, so it sinks. By dissolving salt in the water, you make the water denser than the egg, which causes the egg to float due to buoyancy. This is the same principle that helps people float easily in the Dead Sea.
This experiment is a great way to introduce the scientific method. Kids can form a hypothesis about how much salt is needed and test it by gradually adding more until the egg floats. It’s one of the most effective science experiments for kids to visualize an otherwise invisible property of matter.
6. Static Electricity Balloon and Hair: An Invisible Force
The static electricity balloon and hair experiment is a classic and wonderfully simple way to introduce children to the invisible world of physics. This activity demonstrates the principles of static electricity, where rubbing a balloon against hair or wool fabric causes a transfer of tiny particles called electrons. The balloon gains a negative charge, allowing it to attract lightweight, positively charged, or neutral objects.
This experiment is perfect for illustrating concepts like electron transfer, positive and negative charges, and electrostatic attraction. Seeing hair stand on end or small paper pieces magically jump to the balloon provides a clear, hands-on demonstration of scientific forces at work. It’s a staple in elementary physics lessons and makes for a fun, interactive party trick.
How to Create Static Magic: A Fun Activity
Generating static electricity is easy and requires just a few common items.
- Materials: An inflated balloon, a person with clean, dry hair (or a wool sweater), and small, lightweight objects like torn-up paper pieces, salt, or pepper.
- Step 1: Charge the Balloon. Vigorously rub the balloon back and forth on your hair or a wool sweater for about 10 to 15 seconds. This action transfers electrons to the balloon's surface.
- Step 2: Observe the Attraction. Slowly pull the balloon away from the hair and watch the strands stand up and reach toward it.
- Step 3: Test its Power. Hold the charged balloon near small pieces of paper, salt, or pepper, and watch as they leap up and stick to it.
Why It Works: Rubbing the balloon against hair causes electrons (which have a negative charge) to move from the hair to the balloon. The balloon becomes negatively charged, and the hair becomes positively charged. Since opposite charges attract, the hair is pulled toward the balloon. This is the same reason you might get a small shock after walking on carpet in socks.
This simple yet effective science experiment for kids opens the door to understanding more complex topics in electricity and magnetism. You can expand the lesson by exploring how two similarly charged balloons will repel each other. For more hands-on activities, you can learn more about building electricity and energy experiments on playzusa.com.
7. Growing Crystals with Salt or Sugar: Patience and Payoff
Growing crystals is a captivating science experiment for kids that beautifully illustrates the principles of solutions, saturation, and molecular structure. This activity involves dissolving a substance like salt or sugar in water to create a supersaturated solution. As the water slowly evaporates, the dissolved particles are left behind and begin to bond together, forming intricate, organized structures known as crystals.
This experiment is a fantastic lesson in patience and observation, as the crystals form over several days. It introduces children to concepts like solubility, evaporation, and the ordered patterns found in nature. Its slow, magical progression makes it a memorable project for home science activities, long-term classroom observations, or even as an entry in a science fair.
How to Grow Your Crystals: A Long-Term Project
Growing your own shimmering crystals is a simple process that requires just a few basic ingredients.
- Materials: A clean glass jar, salt or sugar, hot water, a pencil or craft stick, string or a pipe cleaner, and optional food coloring.
- Step 1: Create the Solution. Stir salt or sugar into very hot (but not boiling) water until no more will dissolve. This creates a supersaturated solution. Add a few drops of food coloring if you want colored crystals.
- Step 2: Set Up the Structure. Tie a piece of string to the middle of the pencil and let it hang down into the jar, ensuring it doesn't touch the bottom or sides. For larger crystals, a textured pipe cleaner works well.
- Step 3: Wait and Observe. Place the jar in a location where it won't be disturbed. Over the next few days, you'll see crystals begin to form on the string as the water evaporates.
Why It Works: Hot water allows more solute (salt or sugar) to dissolve than cold water. As the water cools and evaporates, the solution can no longer hold all the dissolved particles. These particles need a place to go, so they begin to attach to the string (a nucleation site) and to each other, arranging themselves in a repeating, geometric pattern to form a crystal.
This project is an excellent way to explore variables. Kids can test whether salt or sugar crystals grow faster or create different shapes, providing a hands-on introduction to scientific comparison. For more guided crystal-growing fun, you can explore various science kits for kids on playzusa.com.
8. Paper Airplane Physics Flight Test: The Science of Flight
The Paper Airplane Physics Flight Test is a fantastic, hands-on science experiment for kids that introduces the fundamental principles of aerodynamics. By designing, folding, and flying different paper airplanes, children can intuitively explore the four forces of flight: lift, thrust, drag, and weight. It's a classic activity that turns a simple piece of paper into a tool for scientific inquiry.
This experiment is perfect for demonstrating how subtle changes in design can have a significant impact on performance. It encourages critical thinking, problem-solving, and the basics of the scientific method, making it a popular choice for school STEM challenges, scout group activities, and family fun. For more ideas on engaging children with hands-on learning, explore these STEM activities for elementary students.
How to Conduct Your Flight Test: Engineering in Action
Testing paper airplanes is easy and can be done almost anywhere with a bit of open space.
- Materials: Various types of paper (printer paper, construction paper), a measuring tape, a stopwatch, and a notebook for recording results.
- Step 1: Design and Fold. Create several different paper airplane designs. You can find templates online or invent your own. Try making planes with long, narrow wings and others with short, wide wings.
- Step 2: Launch Your Planes. Throw each plane with the same amount of force from the same starting point. This ensures your test is as fair as possible.
- Step 3: Measure and Record. Use the measuring tape to record how far each plane flew (distance). Use the stopwatch to record how long it stayed in the air (flight time). Write down the results for each design.
Why It Works: A paper airplane's flight is a balance of forces. Thrust is the forward push you give it. Lift is the upward force created by air moving over the wings. Drag is the air resistance slowing it down, and Weight is the downward pull of gravity. Different wing shapes and body designs alter this balance, affecting how far and how long the plane can fly.
This experiment allows kids to become engineers, testing hypotheses by modifying their designs. They can try adding paper clips to the nose to change the center of gravity or bending the back of the wings to create flaps, observing how each adjustment changes the flight path.
9. Oil and Water Layered Density Tower: A Colorful Lesson
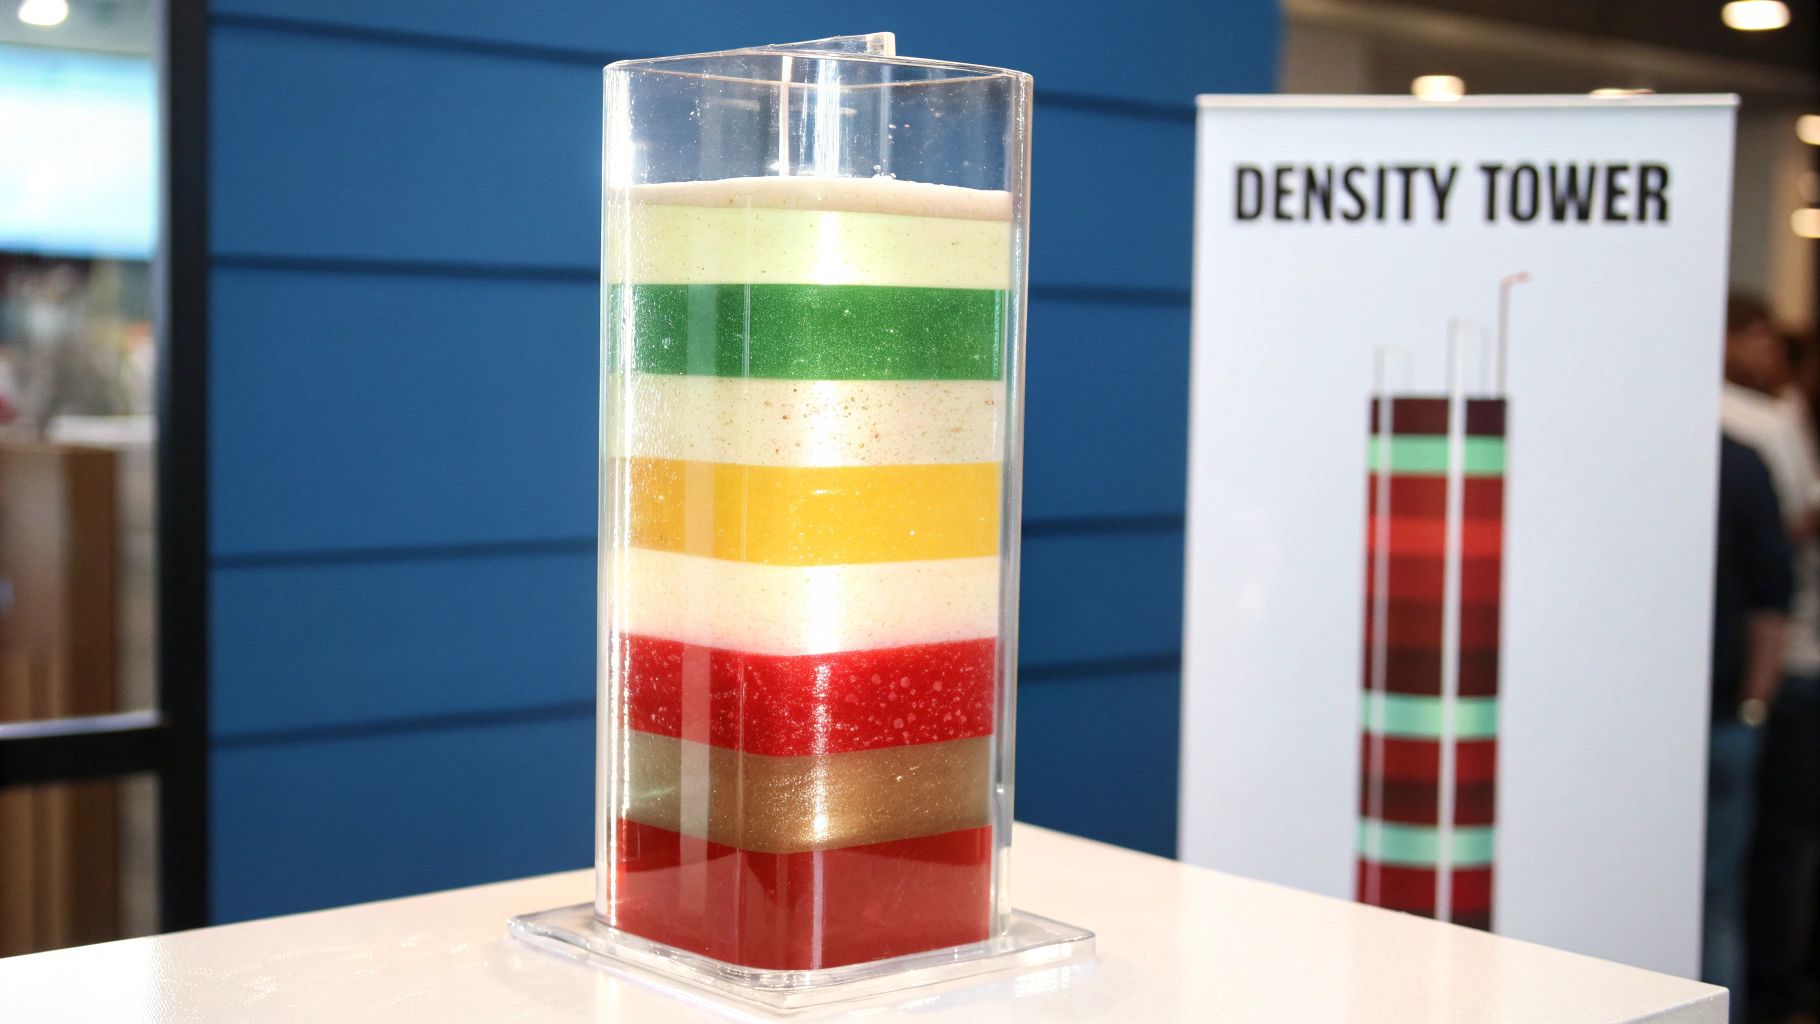
The Oil and Water Layered Density Tower is a visually stunning experiment that introduces children to the concept of density. This activity clearly demonstrates how liquids with different densities will naturally separate into layers, with denser liquids sinking to the bottom and less dense liquids floating on top. By carefully stacking various household liquids, kids can create a beautiful, colorful column that brings a fundamental physics principle to life.
This experiment is excellent for teaching observation skills and introducing concepts like density, mass, volume, and miscibility (the ability of liquids to mix). Its colorful and calm nature makes it a perfect activity for a quiet afternoon of scientific discovery, frequently seen in school science lessons and captivating social media videos.
How to Build Your Density Tower: A Layering Guide
Creating this mesmerizing liquid tower is a lesson in patience and precision that uses common kitchen ingredients.
- Materials: A tall, clear container (like a glass or cylinder), honey, corn syrup, dish soap, water (colored with food coloring), vegetable oil, and rubbing alcohol (colored with a different food coloring).
- Step 1: Layer the Liquids. Start with the densest liquid. Pour the honey into the container, being careful not to touch the sides. Slowly add the next liquid (corn syrup) by tilting the container and pouring it down the inside wall or over the back of a spoon.
- Step 2: Continue Stacking. Repeat the slow pouring process for each liquid in order of decreasing density: dish soap, colored water, vegetable oil, and finally, colored rubbing alcohol.
- Step 3: Observe and Test. Watch as the liquids form distinct layers. You can even gently drop small objects like a grape or a plastic bead to see where they settle in the tower.
Why It Works: Density is the measure of mass per unit of volume. Each liquid has a different density, so the heavier, denser ones sink below the lighter, less dense ones. Additionally, liquids like oil and water do not mix because of polarity; water molecules are attracted to each other but not to oil molecules.
This is one of the most visually rewarding science experiments for kids. It serves as a great foundation for more complex physics concepts and provides a tangible way to see scientific principles in action. For more ideas, explore other hands-on science activities to continue the learning journey.
9 Science Experiments Comparison Guide
| Experiment | Implementation Complexity 🔄 | Resource Requirements ⚡ | Expected Outcomes 📊 | Ideal Use Cases 💡 | Key Advantages ⭐ |
|---|---|---|---|---|---|
| Baking Soda and Vinegar Volcano | Low - simple setup, quick reaction | Low - common household items | Visual fizzing eruption demonstrating acid-base reaction | Introductory chemistry demos, STEM camps, fairs | Highly engaging, inexpensive, teaches basics |
| Dancing Raisins in Soda | Low - easy setup, requires soda | Low - few materials, needs carbonated drink | Continuous rising/falling raisins showing gas buoyancy | Early physics lessons, demonstration of density | Long-lasting, edible materials, promotes observation |
| Rainbow Milk Color Explosion | Low - quick, minimal steps | Low - kitchen materials | Dramatic colorful patterns showing surface tension | Visual chemistry demos, parties, social media content | Immediate, visually stunning, combines art & science |
| Invisible Ink with Lemon Juice | Medium - requires drying & heating | Low - natural, safe materials | Reveal hidden writing via oxidation on heating | History-science lessons, spy-themed activities | Fun theme, teaches chemistry & history, safe |
| Floating Egg Density Experiment | Low - straightforward setup | Low - common kitchen items | Egg floats in salt water showing density & buoyancy | Physics demos, ocean safety education | Simple, real-world connection, safe |
| Static Electricity Balloon & Hair | Low - minimal materials, dry environment preferred | Low - balloons, fabric, small items | Balloon attracts hair/paper demonstrating static forces | Intro to electricity, party demos | Dramatic, safe, no special equipment |
| Growing Crystals with Salt/Sugar | Medium-High - takes days, daily care | Moderate - materials and time | Formation of visible crystals over time | Long-term science projects, geology connections | Lasting results, teaches patience & molecular structure |
| Paper Airplane Physics Flight Test | Medium - design/testing iterations | Low - paper and measuring tools | Data on flight distance/time illustrating flight forces | STEM challenges, engineering activities | Combines creativity & physics, encourages design thinking |
| Oil and Water Layered Density Tower | Medium - careful layering required | Moderate - various liquids, careful pouring | Colorful liquid layers demonstrating density differences | Density lessons, science fairs, visual demos | Visually striking, multiple concepts demonstrated |
Your Adventure in Science Has Just Begun
You've explored the explosive chemical reactions of a baking soda volcano, witnessed the mesmerizing dance of raisins in soda, and even mastered the art of invisible ink. Each of these science experiments for kids offers more than just a few moments of fun; they are powerful gateways to understanding the fundamental principles that govern our world. From the physics of flight with paper airplanes to the chemistry of growing crystals, these hands-on activities demystify complex concepts and make them accessible, tangible, and unforgettable.
The true value of these experiments lies not in perfectly replicating the steps but in embracing the process of discovery. When an experiment doesn't go as planned, it's not a failure; it's a new data point. It’s an opportunity to ask, "Why did that happen differently?" and to adjust variables, fostering critical thinking, resilience, and problem-solving skills that are essential in every aspect of life. You've now seen how simple household items can unlock profound lessons about density, chemical reactions, and static electricity.
Key Takeaways for Future Scientists
As you continue your scientific journey, remember these core principles that turned a simple list of activities into a foundation for learning:
- Curiosity is the Catalyst: The most important ingredient in any experiment is a curious mind. Encourage questions, even if you don't have the answers. The act of wondering "what if" is the first step toward every great discovery.
- Observation is a Superpower: Guide your child to look closely at the details. What did the milk look like before the soap? How did the egg behave in freshwater versus saltwater? Sharpening observational skills helps build a more analytical and detail-oriented mindset.
- Science is Everywhere: These experiments show that science isn’t confined to a sterile laboratory. It’s in the kitchen when you bake, in the sky when you fly a kite, and in your hair on a dry day. Connecting these activities to real-world phenomena makes learning more relevant and impactful.
Your Next Steps in Exploration
The journey doesn't end here. The skills and excitement cultivated through these foundational science experiments for kids can be channeled into even bigger adventures. Use the experiments in this article as a springboard. Try modifying them: what happens if you use a different type of vinegar? Can you make a density tower with more than just two liquids? Empowering children to design their own variations encourages creativity and a deeper level of scientific inquiry. By nurturing this spark, you are not just teaching science; you are building confident, inquisitive, and resourceful future innovators.
Ready to take the next step with more structured, all-in-one adventures? The award-winning kits from Playz provide everything you need to dive deeper into the worlds of chemistry, physics, and engineering. Don't just do an experiment—start a quest for knowledge by exploring the Playz collection today and keep the discovery going