

As the new school year approaches, the aisles fill with generic notebooks and standard-issue pencils. But what if your school supplies could be as unique and creative as the student using them? This year, consider skipping the store-bought basics and diving into the vibrant, hands-on world of DIY school supplies. Crafting your own gear is more than just a fun, budget-friendly activity; it’s a powerful method for fostering creativity, teaching valuable skills like organization and resourcefulness, and generating genuine excitement for heading back to the classroom.
When children and students create their own tools, they build a deeper, more personal connection to their learning process. A simple pencil case transforms into a trophy of their ingenuity, and a decorated notebook becomes a canvas for their personality. These projects are practical lessons in sustainability and self-expression, showing how everyday items can be repurposed into something both useful and beautiful. From upcycled desk organizers that champion environmental awareness to custom flashcards that make studying more engaging, DIY projects offer benefits far beyond simple aesthetic appeal.
This comprehensive guide is your ultimate resource for personalizing the learning journey. We will walk you through 10 incredible and accessible projects designed to turn common materials into one-of-a-kind academic treasures. You'll find everything you need to get started, including materials lists, step-by-step instructions, and tips for adapting each project for different ages and skill levels. Get ready to craft, create, and conquer the school year with supplies that truly tell a story.
1. Custom Desk Organizers from Recycled Materials
Transform household clutter into functional art with custom desk organizers made from recycled materials. This sustainable DIY school supplies project uses everyday items like empty tin cans, cardboard tubes, and food boxes to create a personalized storage system for pens, scissors, and other essentials. It’s an excellent way to teach children about upcycling and environmental responsibility while helping them develop crucial organizational skills.
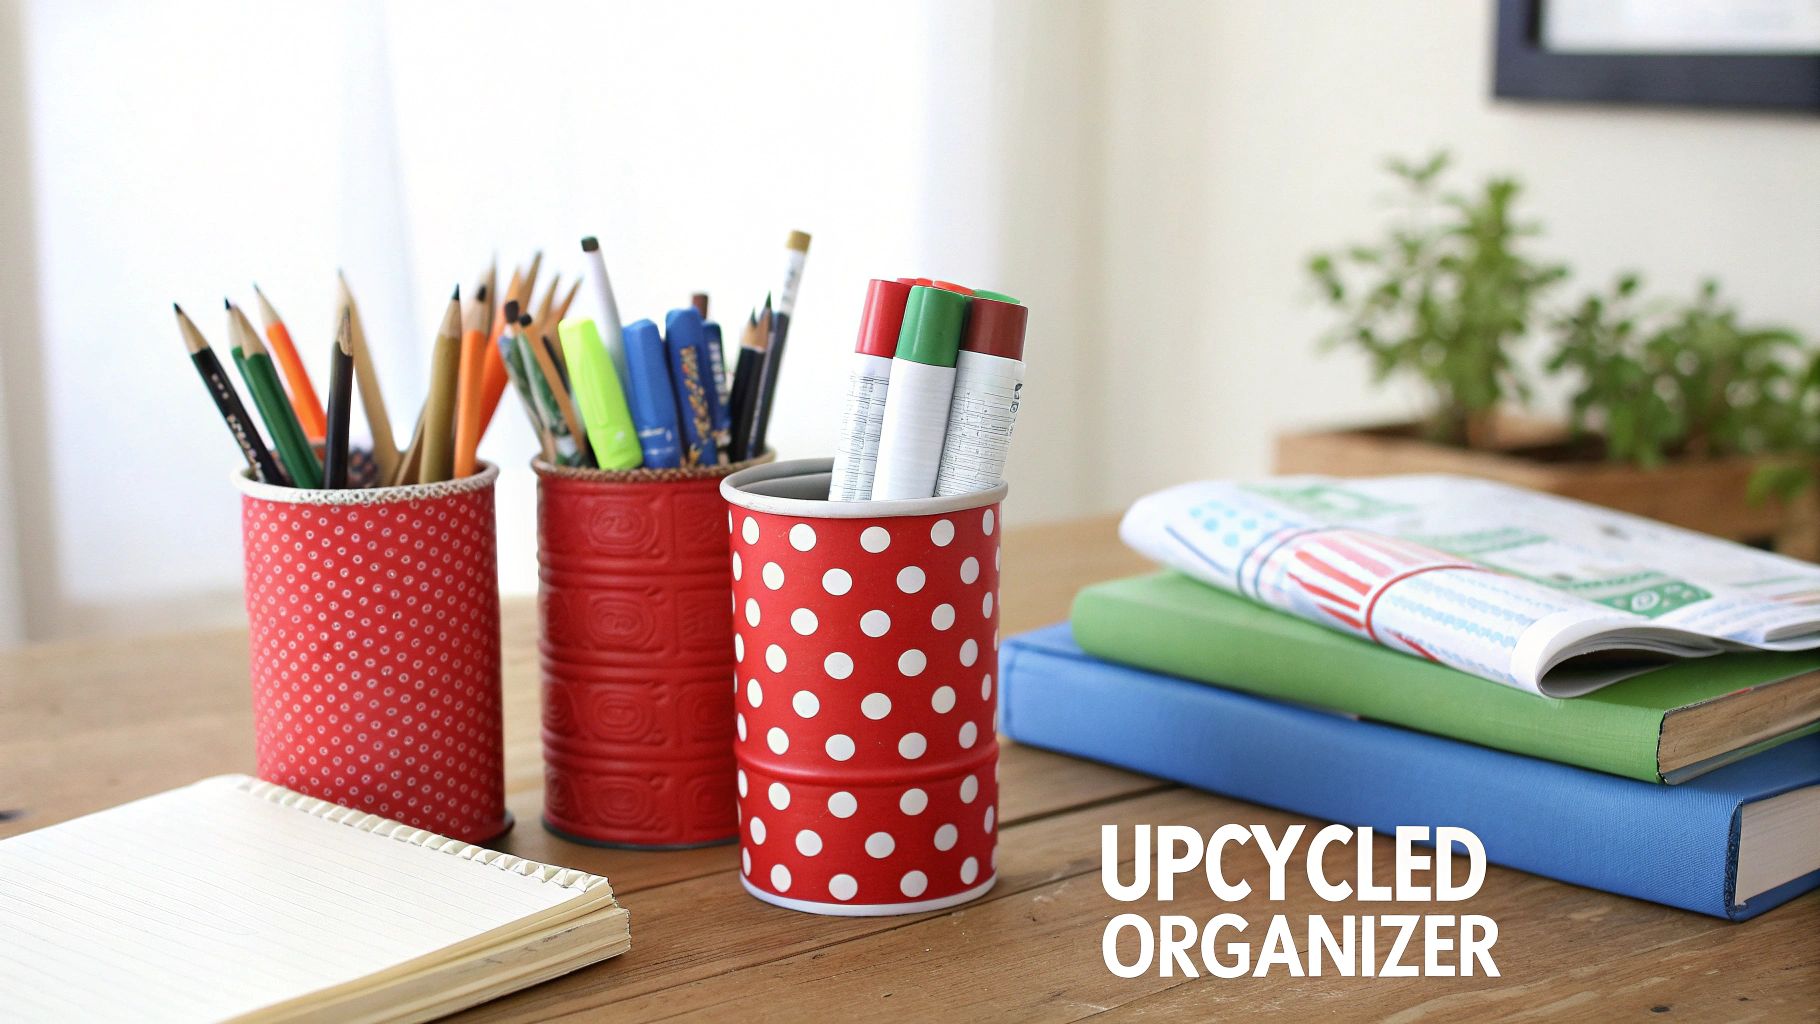
The core idea is to assemble various containers of different heights and sizes onto a sturdy base, like a piece of cardboard or wood. This project is incredibly versatile; a student can create a simple pencil cup from a single decorated can or build a multi-compartment caddy from several connected boxes. For even more inspiration on creating an efficient and inviting study area, explore various student desk organization ideas to customize your space.
Why It's a Great Project
- Age/Skill Level: Ages 6+ (with adult supervision for cutting and gluing)
- Estimated Time: 30-60 minutes, depending on complexity
- Estimated Cost: $0-$5 (using materials you already have)
This project is not just about making a craft; it's about building a tool. When students design their own organizers, they are more likely to use them, leading to a tidier desk and a more focused learning environment. It’s a hands-on lesson in resourcefulness, design, and practical life skills.
Project Tips & Ideas
- Secure Assembly: Use a hot glue gun (with adult help) for a strong, lasting bond between containers. White school glue works for lighter materials like toilet paper rolls.
- Durable Decoration: Paint containers with acrylic paint, which adheres well to most surfaces and is more durable than tempera or watercolor paints.
- Classroom Stations: Teachers can set up a "Recycled Organizer" station where each student decorates a container to contribute to a shared classroom supply caddy.
- Advanced Structures: Cardboard is a surprisingly strong material. For more complex designs, discover a range of amazing cardboard craft ideas that can inspire more intricate organizer shapes.
2. Homemade Book Covers and Bookmarks
Protect textbooks and novels while adding a splash of personality with homemade book covers and bookmarks. This classic DIY school supplies project transforms simple materials like brown paper bags, fabric scraps, or decorated cardstock into elegant and durable protective layers for books. It’s a wonderful craft that teaches students the importance of book care and offers a canvas for their creative expression through unique patterns, illustrations, and designs.
The concept is straightforward: measure a book and create a custom-fit cover that shields it from wear and tear. Paired with a coordinating bookmark, this project encourages reading and helps students take pride in their learning materials. From a simple decorated paper cover to a more intricate sewn fabric version, the possibilities are endless. For more creative ways to use paper, check out these engaging paper activities for kids that can inspire unique cover designs.
Why It's a Great Project
- Age/Skill Level: Ages 5+ (with adult supervision for cutting)
- Estimated Time: 20-45 minutes per book
- Estimated Cost: $0-$10 (depending on decorative materials)
This project connects artistic expression with practical application. When students design their own covers, they form a stronger connection to their books and are more motivated to keep them in good condition. It’s a hands-on activity that reinforces skills in measuring, folding, and design, turning a basic school requirement into a fun, personalized craft.
Project Tips & Ideas
- Accurate Sizing: Always measure the book with its cover open flat to get the correct dimensions for the paper or fabric before cutting. Add at least two inches to each side for folding.
- Add Durability: Protect paper covers from spills and tears by laminating them or carefully applying clear packing tape over the entire surface.
- Personalization: Encourage students to add their names, favorite quotes from the book, or a list of characters to their bookmarks to make them more engaging.
- Fabric Application: For no-sew fabric covers, use a strong fabric glue or hemming tape to secure the edges for a clean, lasting finish.
3. DIY Pencil Cases and Supply Pouches
Skip the store-bought options and create a one-of-a-kind pencil case or supply pouch that truly reflects a student's personality. This DIY school supplies project involves crafting functional storage from materials like fabric, felt, or even decorated containers. Students can learn basic sewing or assembly skills while making a practical item they'll use every day to keep their pens, pencils, and other small tools organized.
This project offers a wide range of complexity, from simple no-sew felt pouches to more complex zippered fabric cases. Middle school sewing classes often use this project to introduce students to creating functional accessories, while summer camps can adapt it for various age groups. It's a fantastic way to produce a useful item that students can be proud of, teaching them the value of handmade goods and practical life skills.
Why It's a Great Project
- Age/Skill Level: Ages 8+ (with adult supervision for sewing or hot glue)
- Estimated Time: 45-90 minutes, depending on complexity and skill
- Estimated Cost: $5-$15 (depending on fabric and closure choice)
This project offers a wonderful blend of creativity and utility. Making a pencil case helps develop patience and precision, and the intricate work with zippers, buttons, and seams provides an excellent opportunity to improve fine motor skills. The final product is a durable, personalized school essential that encourages organization and care for one's belongings.
Project Tips & Ideas
- No-Sew First: For beginners or younger kids, start with no-sew versions using fabric glue and felt. This builds confidence before introducing a needle and thread.
- Easy Closures: Use iron-on velcro strips or simple button-and-loop closures as an easier alternative to installing a zipper.
- Personalize It: Encourage students to add their own flair with decorative patches, fabric markers, or embroidery to make their pouch unique.
- Durable Design: Reinforce the main seams with a second line of stitching or use a strong fabric glue along sewn edges to ensure the pouch can withstand daily use in a backpack.
4. Decorated Folders and Notebook Covers
Transform standard, plain notebooks and folders into vibrant, personalized tools for learning. This creative DIY school supplies project empowers students to express their unique style using markers, stickers, washi tape, and collage materials. It’s a simple yet highly effective way for them to take ownership of their organizational system, making it easier and more exciting to keep track of different subjects.
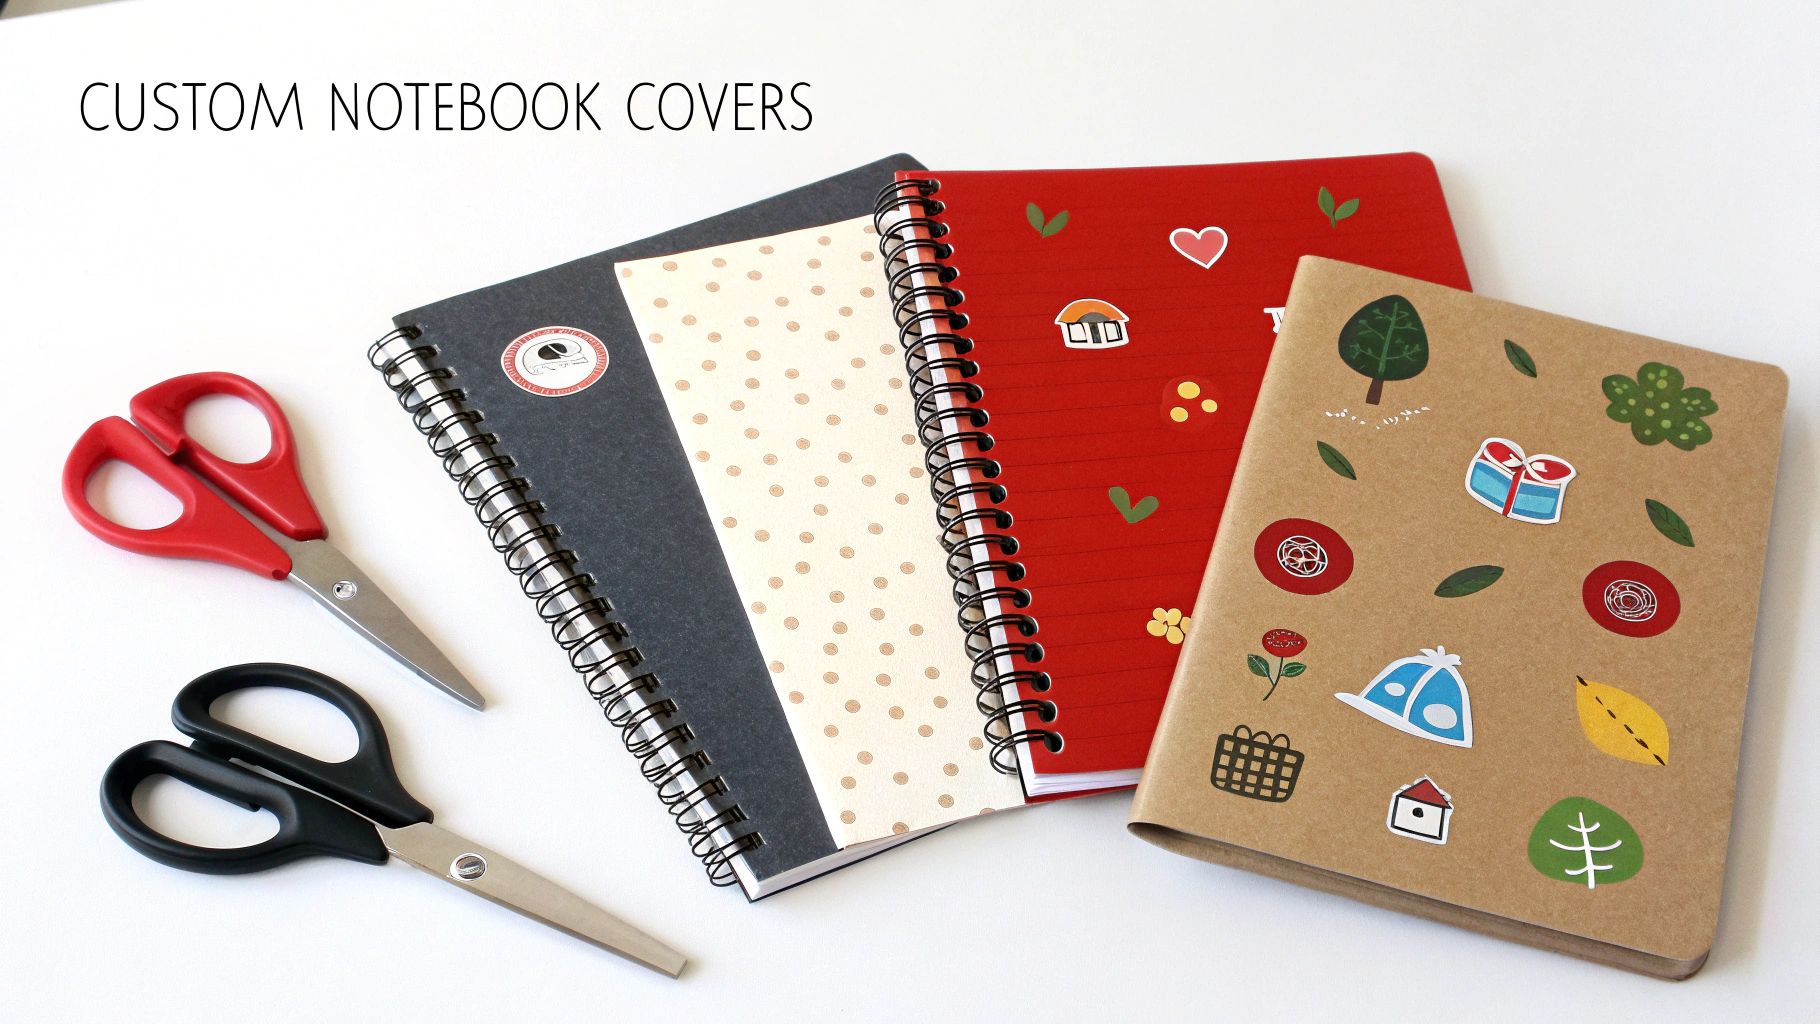
The basic concept is to use various art supplies to cover plain surfaces, turning functional items into works of art. A student might design a math notebook with geometric patterns or a history folder with a historical collage. In the classroom, this can be a fantastic back-to-school activity or an integrated art lesson on design and pattern-making. For more inspiration, explore a variety of engaging art and craft projects that can spark even more creative ideas.
Why It's a Great Project
- Age/Skill Level: Ages 5+
- Estimated Time: 20-45 minutes per item
- Estimated Cost: $2-$10 (depending on decorative materials)
This project is more than just decoration; it’s about building a positive connection with schoolwork. When students are proud of their supplies, they are more motivated to use them and keep them organized. It’s an accessible craft that fosters creativity, planning, and self-expression with immediate, tangible results.
Project Tips & Ideas
- Prevent Smudging: Use permanent markers for designs that won't smear when handled or if they get slightly damp.
- Protect Your Work: Apply a layer of clear contact paper or wide packing tape over the finished design to protect it from wear and tear throughout the school year.
- Plan Ahead: Sketch your design on a piece of scratch paper first. This helps finalize the layout before committing it to the folder or notebook.
- Durable Adhesion: For washi tape, press the edges down firmly and consider sealing the ends with a small piece of clear tape to prevent them from peeling up over time.
5. Homemade Flash Cards and Study Aids
Boost memory retention and make studying more effective with personalized, homemade flash cards. This classic DIY school supplies project transforms simple materials like index cards, cardstock, or recycled cardboard into powerful learning tools. By creating their own study aids, students can tailor the content to their specific needs, using colors, drawings, and visual mnemonics that resonate with their individual learning styles.
The concept is simple yet powerful: students write a question, term, or concept on one side of a card and the answer or definition on the back. This active recall process is scientifically proven to strengthen neural pathways, making information easier to remember. From vocabulary words for a language class to complex formulas for a chemistry exam, these customizable aids turn passive review into an interactive, hands-on experience. This method is a perfect example of effective hands-on learning activities that engage the brain on multiple levels.
Why It's a Great Project
- Age/Skill Level: Ages 7+ (basic writing and drawing skills)
- Estimated Time: 20-40 minutes per set, depending on the subject
- Estimated Cost: $0-$10 (using recycled materials or a pack of index cards)
Creating study aids is more than just a pre-test ritual; it's an integral part of the learning process itself. When students design their own flash cards, they are forced to summarize, synthesize, and re-articulate information, which deepens their understanding. This project empowers students to take ownership of their education, turning a study session into a creative and productive activity.
Project Tips & Ideas
- Durable Design: Use cardstock or index cards for longevity. Cover them with clear packing tape or self-adhesive laminating sheets to protect against wear and tear.
- Color-Code Concepts: Assign different colors to different topics, chapters, or types of information (e.g., green for vocabulary, blue for formulas) to keep sets organized.
- Visual Aids: Encourage students to draw simple pictures or diagrams alongside text. Visual cues are powerful memory triggers and make studying more engaging.
- Immediate Creation: Make flash cards immediately after learning a new concept in class. This reinforces the information when it is freshest in the mind.
6. DIY Paper Storage Boxes and Magazine Holders
Turn flimsy cereal boxes and other cardboard packaging into sturdy, stylish storage for papers, notebooks, and magazines. This upcycling project transforms common household waste into functional organizers, providing a smart, eco-friendly solution to desk clutter. It's a fantastic way to teach students about resourcefulness and practical design while creating essential DIY school supplies to keep their work tidy.
The basic concept involves cutting a cardboard box, like one from cereal or crackers, at a diagonal to create the classic magazine holder shape. Multiple boxes can be decorated and lined up to create a cohesive paper management system. This project is highly adaptable, perfect for a home learning station or as a student-led initiative to organize classroom papers and reading materials.
Why It's a Great Project
- Age/Skill Level: Ages 8+ (with adult help for precise cutting)
- Estimated Time: 20-45 minutes per holder
- Estimated Cost: $0-$5 (mostly for decorative materials)
This project is more than just a craft; it's a lesson in engineering and sustainable living. Students learn how to repurpose materials to solve a real-world problem: keeping important papers organized. By designing and building their own storage, they gain a sense of ownership and are more likely to maintain a neat workspace, which is crucial for effective learning.
Project Tips & Ideas
- Reinforce for Strength: Before decorating, use packing tape or a line of hot glue along the inside seams of the box to make it more durable and prevent it from falling apart.
- Create a Smooth Canvas: Cover the box with kraft paper, newspaper, or a coat of primer before adding paint or decorative paper. This hides the original branding and helps decorations adhere better.
- Add Internal Dividers: For more advanced organization, cut and insert additional pieces of cardboard inside the box to create separate compartments for different subjects or types of paper.
- Label Everything: Help students stay organized by adding clear labels to each holder. They can be handwritten, printed, or made with a label maker for a polished look.
7. Hand-Made Calendar and Planner Pages
Encourage students to take control of their schedules with custom-made calendar and planner pages. This engaging DIY school supplies project merges artistic expression with crucial life skills, allowing students to design their own academic calendars, weekly schedules, and assignment trackers from scratch. Using simple materials like cardstock, markers, and stickers, students can create a planning system that perfectly fits their needs and personality.
The basic concept is to move beyond generic store-bought planners and build a tool that supports an individual's unique way of thinking and organizing. A student can create a visually vibrant weekly spread with doodles and dedicated blocks for each subject, or a minimalist monthly calendar for tracking major project deadlines. This hands-on approach, popularized by bullet journaling communities and education influencers, transforms planning from a chore into a creative and empowering activity.
Why It's a Great Project
- Age/Skill Level: Ages 8+ (younger children can decorate pre-made templates)
- Estimated Time: 45-90 minutes for initial setup; ongoing weekly creation
- Estimated Cost: $5-$15 (for paper, pens, and optional decorative items)
Creating a personal planner is a practical lesson in time management, goal setting, and personal responsibility. When students design the layout, they are actively thinking about how to structure their time, prioritize tasks, and prepare for upcoming deadlines. This ownership fosters a stronger commitment to using the planner, leading to better organization and reduced stress.
Project Tips & Ideas
- Template First: Sketch layouts in pencil on a scrap piece of paper before committing to ink. Alternatively, use printable calendar grids as a foundation to build upon.
- Color-Code for Clarity: Assign a different color to each school subject or area of life (e.g., green for homework, blue for sports, yellow for chores) to make the schedule easy to read at a glance.
- Laminate for Longevity: Laminate key pages, like a weekly schedule template or a list of important dates. This allows them to be reused with dry-erase markers, saving time and paper.
- Incorporate Motivation: Encourage students to add their favorite motivational quotes, drawings, or stickers to their pages to make the planning process more personal and enjoyable.
8. Custom Pencil and Marker Decorations
Turn ordinary writing tools into unique, personalized instruments with custom pencil and marker decorations. This simple yet highly creative DIY school supplies project involves using materials like washi tape, paint pens, and stickers to give standard pencils and markers a vibrant makeover. It’s an engaging way for students to express their personality and take ownership of their supplies, making them less likely to get lost or mixed up with others.
The basic concept is to wrap or draw on the surface of pencils and markers to create one-of-a-kind designs. This can range from a simple spiral of washi tape to intricate patterns drawn with fine-tipped paint pens. Teachers can use this as a fantastic back-to-school activity to help students identify their own belongings, or students can create "friendship pencils" to exchange with classmates.
Why It's a Great Project
- Age/Skill Level: Ages 5+ (with supervision for small parts)
- Estimated Time: 15-30 minutes
- Estimated Cost: $2-$10 (for decorative materials like tape or pens)
This project boosts fine motor skills as children carefully wrap tape and handle small stickers. It also fosters a sense of pride and responsibility for their school supplies. When a pencil feels special and unique, a student is more motivated to keep track of it, turning a simple craft into a practical lesson in organization.
Project Tips & Ideas
- Durable Designs: Use permanent markers or acrylic paint pens for decorations that won't smudge. For a glossy, protective finish, an adult can apply a thin coat of clear nail polish over the finished design.
- Secure Taping: When using washi tape, wrap it in a tight spiral, slightly overlapping the edges. Secure the ends with a tiny dab of clear glue or a small piece of clear tape to prevent unraveling.
- Classroom Management: Have students add their initials or a unique symbol to their decorated pencils. This makes it easy to return lost items and manage shared supply bins.
- Themed Sets: Create themed sets for different subjects, like decorating math pencils with numbers or science markers with atoms and planets. You can find more inspiration for blending art with academics in various STEM art projects.
9. Handmade Labels and Sticker Sets
Bring a new level of organization and personal flair to school gear with handmade labels and sticker sets. This creative DIY school supplies project involves designing and printing custom labels for notebooks, folders, lunchboxes, and more. It’s a fantastic way to blend digital design skills with practical organization, helping students take ownership of their belongings and learning materials.
The process is simple: use free online design tools or word processing software to create unique designs, then print them on self-adhesive sticker paper or cardstock. Students can create everything from simple name tags to elaborate, color-coded systems for different subjects. For unique customization, consider exploring services where you can design and make your own custom sticker for personalizing notebooks, folders, or even your water bottle.
Why It's a Great Project
- Age/Skill Level: Ages 8+ (with adult help for printing and cutting)
- Estimated Time: 45-75 minutes (including design and printing)
- Estimated Cost: $5-$15 (for specialty sticker paper)
This project empowers students to become masters of their own organizational systems. When they design the labels themselves, they are more invested in using them correctly, which can lead to better management of homework, textbooks, and supplies. It's a fun, practical introduction to graphic design and personal branding.
Project Tips & Ideas
- Free Design Tools: Use free platforms like Canva or Google Docs, which offer countless templates and design elements to get started easily.
- Boost Durability: For labels on high-touch items like water bottles or lunchboxes, laminate them or cover them with a layer of clear packing tape to make them waterproof.
- Classroom System: Teachers can have students design labels that follow a class-wide color-coding scheme, making it easy to identify supplies for math, reading, or science.
- QR Code Integration: For older students or classroom use, create labels with QR codes that link to a class website, assignment list, or helpful video tutorial.
10. DIY Bookends and Desk Accessories from Upcycled Materials
Prevent book avalanches and tidy up shelves with functional, decorative bookends made from upcycled materials. This creative project transforms everyday objects like old toys, rocks, or bricks into sturdy supports for textbooks and notebooks. It’s a fantastic way to introduce concepts of weight, balance, and engineering while creating one-of-a-kind DIY school supplies that reflect a student's personality.
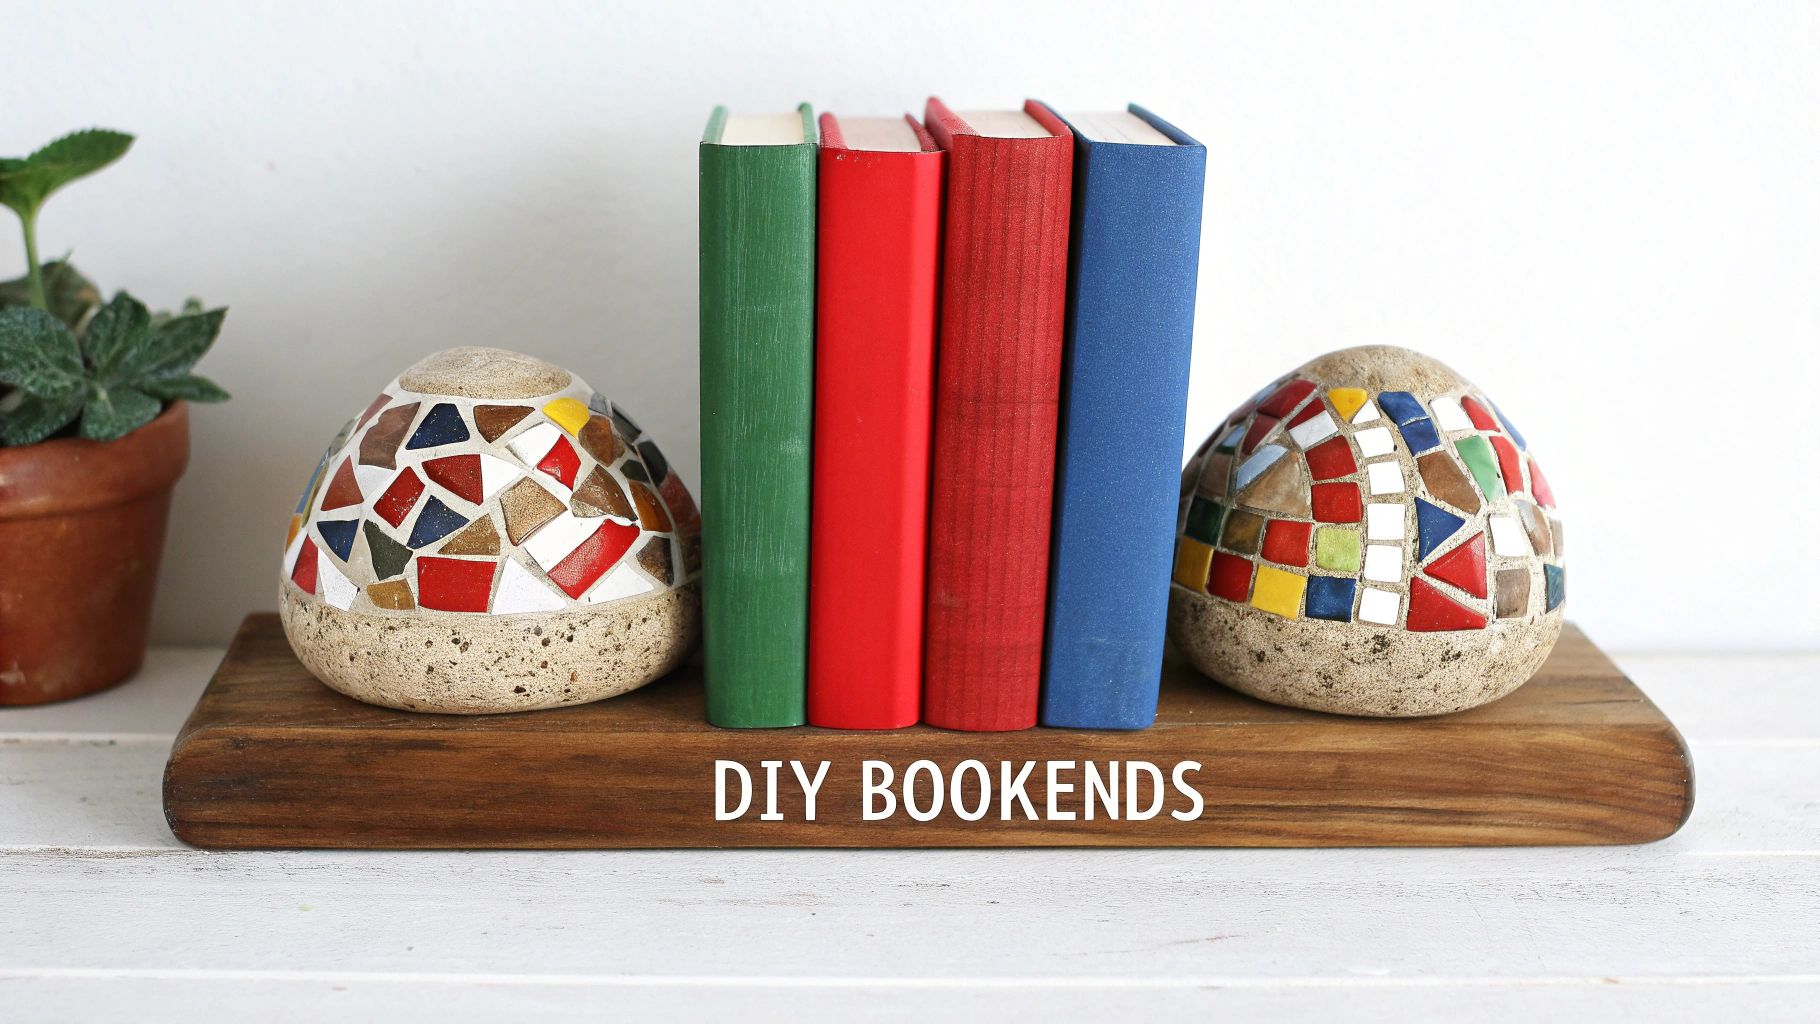
The basic principle involves attaching a heavy, decorative object to a sturdy base, such as an L-shaped piece of wood or a small, solid box. Students can explore what makes an effective bookend, experimenting with different weights and shapes to see what best holds up a row of books. This project doubles as both a functional desk accessory and a personal piece of art, making study spaces more organized and inspiring.
Why It's a Great Project
- Age/Skill Level: Ages 8+ (with adult supervision for gluing and heavy items)
- Estimated Time: 45-90 minutes, plus drying time for paint or glue
- Estimated Cost: $0-$10 (depending on decorative materials)
This project is a perfect blend of art and science. Creating DIY bookends requires students to think critically about stability and design, testing their creations to ensure they work. It’s a hands-on lesson in practical physics and resourcefulness that results in a useful tool they can be proud of, encouraging them to keep their learning materials in order.
Project Tips & Ideas
- Weight is Key: Use heavy, stable items for the core of your bookends. Bricks, large smooth stones, or jars filled with sand provide excellent weight.
- Strong Adhesives: For a durable bond, use a strong adhesive like E6000 or epoxy (with adult supervision and proper ventilation) to attach decorative elements to the base.
- Symmetrical Sets: Encourage students to create a matching pair of bookends for a balanced and professional look on their desk or bookshelf.
- Creative Decor: Decorate with acrylic paints, mosaic tiles, old toys, or even natural elements like seashells and pinecones for a truly custom design.
10-Item DIY School Supplies Comparison
| Project | Implementation Complexity 🔄 | Resource Requirements ⚡ | Expected Outcomes ⭐📊 | Ideal Use Cases | Key Advantages 💡 |
|---|---|---|---|---|---|
| Custom Desk Organizers from Recycled Materials | Low 🔄 (cutting & gluing; adult supervision possible) | Very Low ⚡ (household recyclables, basic craft supplies) | ⭐⭐ — Improved desk organization; sustainability awareness | Classroom stations, upcycling lessons, fundraisers | Cost-effective; highly customizable; teaches recycling |
| Homemade Book Covers and Bookmarks | Medium 🔄 (measuring, cutting; optional sewing) | Low–Medium ⚡ (paper/fabric, tape/laminate) | ⭐⭐ — Better book care; personalization & ownership | Library programs, reading initiatives, gift projects | Protects books; encourages responsibility; attractive results |
| DIY Pencil Cases and Supply Pouches | Medium–High 🔄 (sewing/zipper work; optional no‑sew) | Medium ⚡ (fabric/felt, closures, sewing tools) | ⭐⭐⭐ — Durable storage; fine motor & sewing skills | Sewing classes, craft camps, occupational therapy | Long‑lasting; teaches practical skills; highly personalized |
| Decorated Folders and Notebook Covers | Very Low 🔄 (no special skills) | Very Low ⚡ (markers, stickers, washi tape) | ⭐⭐ — Quick personalization; subject organization | Back‑to‑school activities, single‑period crafts | Fast, accessible, encourages creativity and color‑coding |
| Homemade Flash Cards and Study Aids | Low–Medium 🔄 (content design time) | Low ⚡ (index cards, markers, optional laminator) | ⭐⭐⭐ — High retention; active learning supports | Language study, test prep, special education supports | Highly effective study tool; customizable to learning styles |
| DIY Paper Storage Boxes and Magazine Holders | Low–Medium 🔄 (cutting, reinforcing) | Very Low ⚡ (cardboard, tape, paint) | ⭐⭐ — Organized papers; promotes reuse | Classroom paper management, home study areas | Budget‑friendly; adjustable sizing; teaches upcycling |
| Hand‑Made Calendar and Planner Pages | Medium 🔄 (layout planning; design time) | Low ⚡ (cardstock, markers, rulers) | ⭐⭐ — Improved time management; habit tracking | Student planning, life skills, bullet‑journaling | Personalized planning; combines art + function; modifiable |
| Custom Pencil and Marker Decorations | Very Low 🔄 (simple decorating) | Very Low ⚡ (washi tape, paint pens, stickers) | ⭐ — Identifiable supplies; boosts creativity | Quick classroom activities, reward crafts | Extremely fast; minimal cost; reduces lost items |
| Handmade Labels and Sticker Sets | Low–Medium 🔄 (design & print prep) | Medium ⚡ (printer, label paper, optional laminator) | ⭐⭐ — Clear organization; scalable labeling | Classroom systems, teacher supply organization | Professional look when printed; bulk production possible |
| DIY Bookends and Desk Accessories from Upcycled Materials | Medium 🔄 (weighting & assembly considerations) | Low–Medium ⚡ (recycled materials, adhesives, weights) | ⭐⭐ — Functional decor; teaches balance & design | Art projects, STEM lessons, sustainability programs | Teaches creative reuse; sturdy functional pieces; low cost |
Your Year, Your Style: Let's Get Crafting!
As we've journeyed through ten unique and engaging projects, it’s clear that the world of diy school supplies offers more than just a way to save money. It’s a vibrant, hands-on opportunity to redefine the tools of learning. We've moved beyond the realm of generic, store-bought items and into a space where every notebook, pencil case, and desk organizer tells a story. Your story.
This comprehensive guide wasn't just about crafting; it was about empowering students, parents, and educators to take ownership of the educational environment. By transforming everyday recycled materials into custom desk organizers or designing personalized planner pages, you are actively shaping a more engaging and inspiring learning journey. The process itself is a powerful lesson in resourcefulness, problem-solving, and creative expression.
The Real Value Beyond the Craft Table
Let’s recap the core benefits you unlock when you embrace the DIY approach. These are the powerful takeaways that extend far beyond a single project and can influence an entire academic year.
- Fostering Individuality and Ownership: When a child uses a pencil pouch they sewed themselves or a notebook they decorated, their connection to their schoolwork deepens. These items are no longer just supplies; they are personal achievements, which can boost confidence and encourage responsibility for their belongings.
- Developing Practical Life Skills: Each project covered, from measuring fabric for a book cover to designing a layout for homemade flash cards, builds essential skills. These include fine motor coordination, spatial reasoning, planning, and following multi-step directions. These are the foundational skills that support academic learning in every subject.
- Promoting Sustainability and Resourcefulness: Creating beautiful bookends from upcycled materials or organizers from cardboard boxes teaches a critical lesson about sustainability. It shows children and teens that value isn't just in what is new, but in what can be reimagined. This mindset is crucial for developing environmentally conscious citizens.
Key Insight: The true impact of making your own diy school supplies is not just the final product, but the invaluable skills and positive mindset cultivated during the creation process. It’s about building confidence, one craft at a time.
Putting Your New Skills into Action
You are now equipped with a wealth of ideas, from simple marker decorations to more involved homemade paper storage boxes. The next step is to translate that inspiration into action. Don't feel pressured to tackle every project at once. Instead, start with the one that resonated most with you or addresses an immediate need.
Is the desk a chaotic mess? Begin with the Custom Desk Organizers from Recycled Materials. Are you looking for a fun weekend activity? The Handmade Labels and Sticker Sets are a perfect, low-pressure starting point. The goal is to build momentum and make creativity a regular part of your routine. Involve your kids in the decision-making process, allowing them to choose the colors, materials, and designs. This collaboration makes the experience even more meaningful and fun.
By dedicating a little time to these creative endeavors, you're not just preparing for school; you're investing in a more organized, personalized, and joyful learning experience. You're proving that the tools for success can be as unique and brilliant as the minds that use them. So gather your materials, clear a space, and get ready to craft a school year that is truly, wonderfully yours.
Ready to take hands-on learning to the next level? The same creative spark you used for these diy school supplies is the foundation for scientific discovery, and Playz is here to fuel that curiosity. Explore our award-winning science kits at Playz to seamlessly blend crafting with chemistry, physics, and biology for an educational adventure your child will never forget.