

Are you searching for engaging ways to reduce screen time and ignite a genuine passion for learning in your child? Look no further. The world of science isn't confined to high-tech laboratories; it's bubbling, fizzing, and exploding with wonder right inside your home. This comprehensive guide provides 10 captivating science experiments for kids at home, each designed to be easy to set up, affordable, and incredibly fun.
Using simple household items you likely already have, you can transform your kitchen table into a laboratory of discovery. These activities are far more than just fun distractions; they are foundational lessons in core scientific principles. From the chemical reactions behind a fizzing volcano to the physics of density in a homemade lava lamp, each project is a hands-on learning opportunity. They are specifically designed to build critical thinking, observation, and problem-solving skills in a tangible way. As the creators of Playz science kits, we've seen firsthand that kids learn best through play, and these hands-on projects are the perfect way to bring that philosophy to life.
In the following sections, we will walk you through a variety of exciting projects, including:
- Creating a classic Baking Soda and Vinegar Volcano.
- Exploring surface tension with a Rainbow Milk Color Explosion.
- Observing molecular structures by Growing Your Own Crystals.
- Delving into chemistry with Invisible Ink from Lemon Juice.
Each experiment comes with a complete materials list, clear step-by-step instructions, and a simple explanation of the science behind the magic. Get ready to watch your child's eyes light up with curiosity and wonder as they unlock the secrets of the world around them. This collection of science experiments for kids at home is your ultimate resource for fostering a lifelong love of scientific exploration.
1. Volcano Eruption (Baking Soda and Vinegar)
The baking soda and vinegar volcano is a quintessential science experiment for kids at home, beloved for its dramatic and immediate results. This activity provides a hands-on introduction to fundamental chemistry concepts, specifically the reaction between an acid and a base. When vinegar (acetic acid) mixes with baking soda (sodium bicarbonate), they undergo a chemical reaction that produces carbon dioxide gas, which then bubbles up and out of the container, mimicking a volcanic eruption.
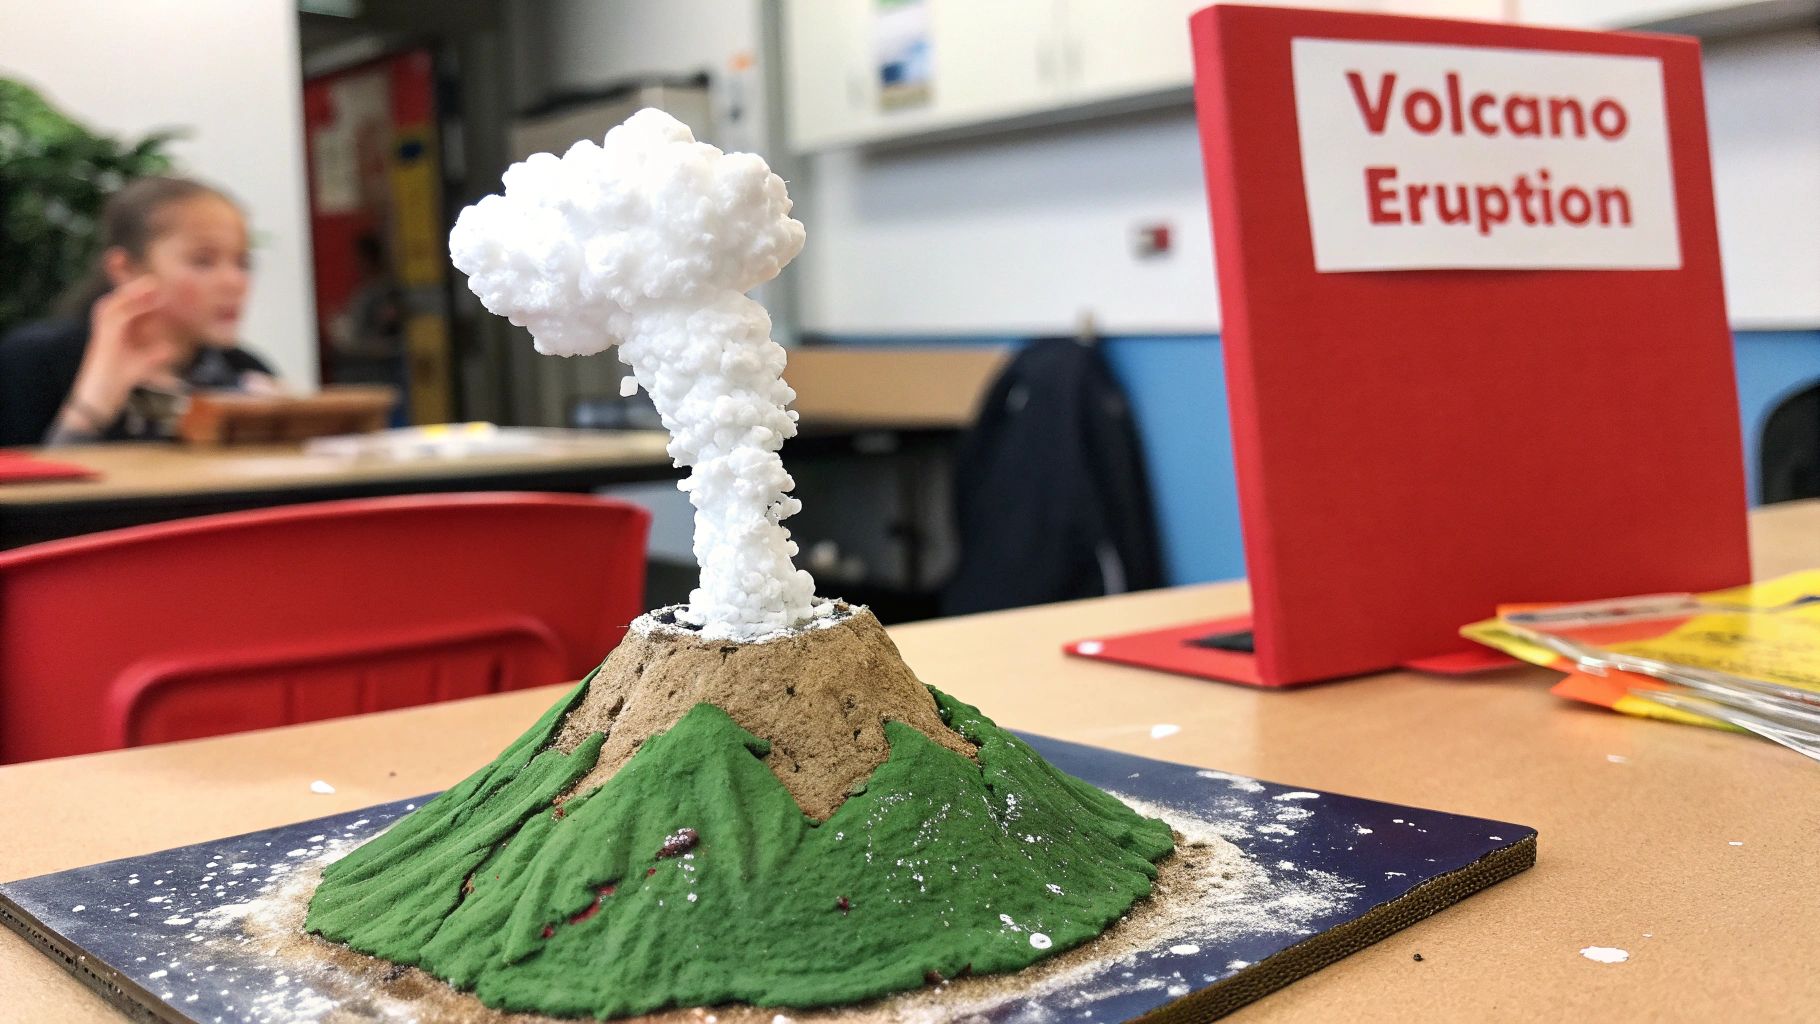
This experiment is a staple in science education, featured in everything from elementary school science fairs to demonstrations at world-renowned institutions like the Smithsonian National Museum of Natural History. Its simplicity and visual appeal make it a perfect starting point for young scientists.
Materials You'll Need:
- A small plastic bottle or jar
- Baking soda (sodium bicarbonate)
- White vinegar (acetic acid)
- Warm water
- Dish soap
- Red or orange food coloring
- A tray or bin to contain the mess
- Modeling clay or playdough (optional, for building the volcano cone)
Step-by-Step Instructions:
- Build Your Volcano (Optional): If you're using clay, mold it around the plastic bottle to create a classic volcano shape. Be sure to leave the bottle's opening clear. Place the entire structure on a tray.
- Prepare the "Magma": Fill the bottle about halfway with warm water. Add several drops of food coloring and a good squirt of dish soap.
- Add the Base: Add two tablespoons of baking soda to the bottle and give it a gentle swirl to mix the ingredients.
- Trigger the Eruption: Quickly pour about half a cup of vinegar into the bottle and step back. The reaction will happen instantly, creating a foamy "lava" that erupts from your volcano.
Pro-Tip: The dish soap is key to creating a more dramatic, foamy eruption. It traps the carbon dioxide gas produced by the reaction, forming thousands of long-lasting bubbles. Without it, the reaction is much quicker and less foamy.
This experiment is fantastic for teaching cause and effect, chemical reactions, and the properties of acids and bases. The visual feedback is immediate, capturing a child's attention and sparking curiosity about what's happening at a molecular level.
2. Rainbow Milk Color Explosion
The Rainbow Milk Color Explosion is a visually stunning yet simple science experiment for kids at home that beautifully demonstrates chemical properties like surface tension and polarity. This activity uses common kitchen ingredients to create a mesmerizing display of swirling colors. When dish soap is introduced to milk with drops of food coloring, the soap breaks the milk's surface tension and interacts with its fat molecules, causing the colors to burst and dance across the surface.
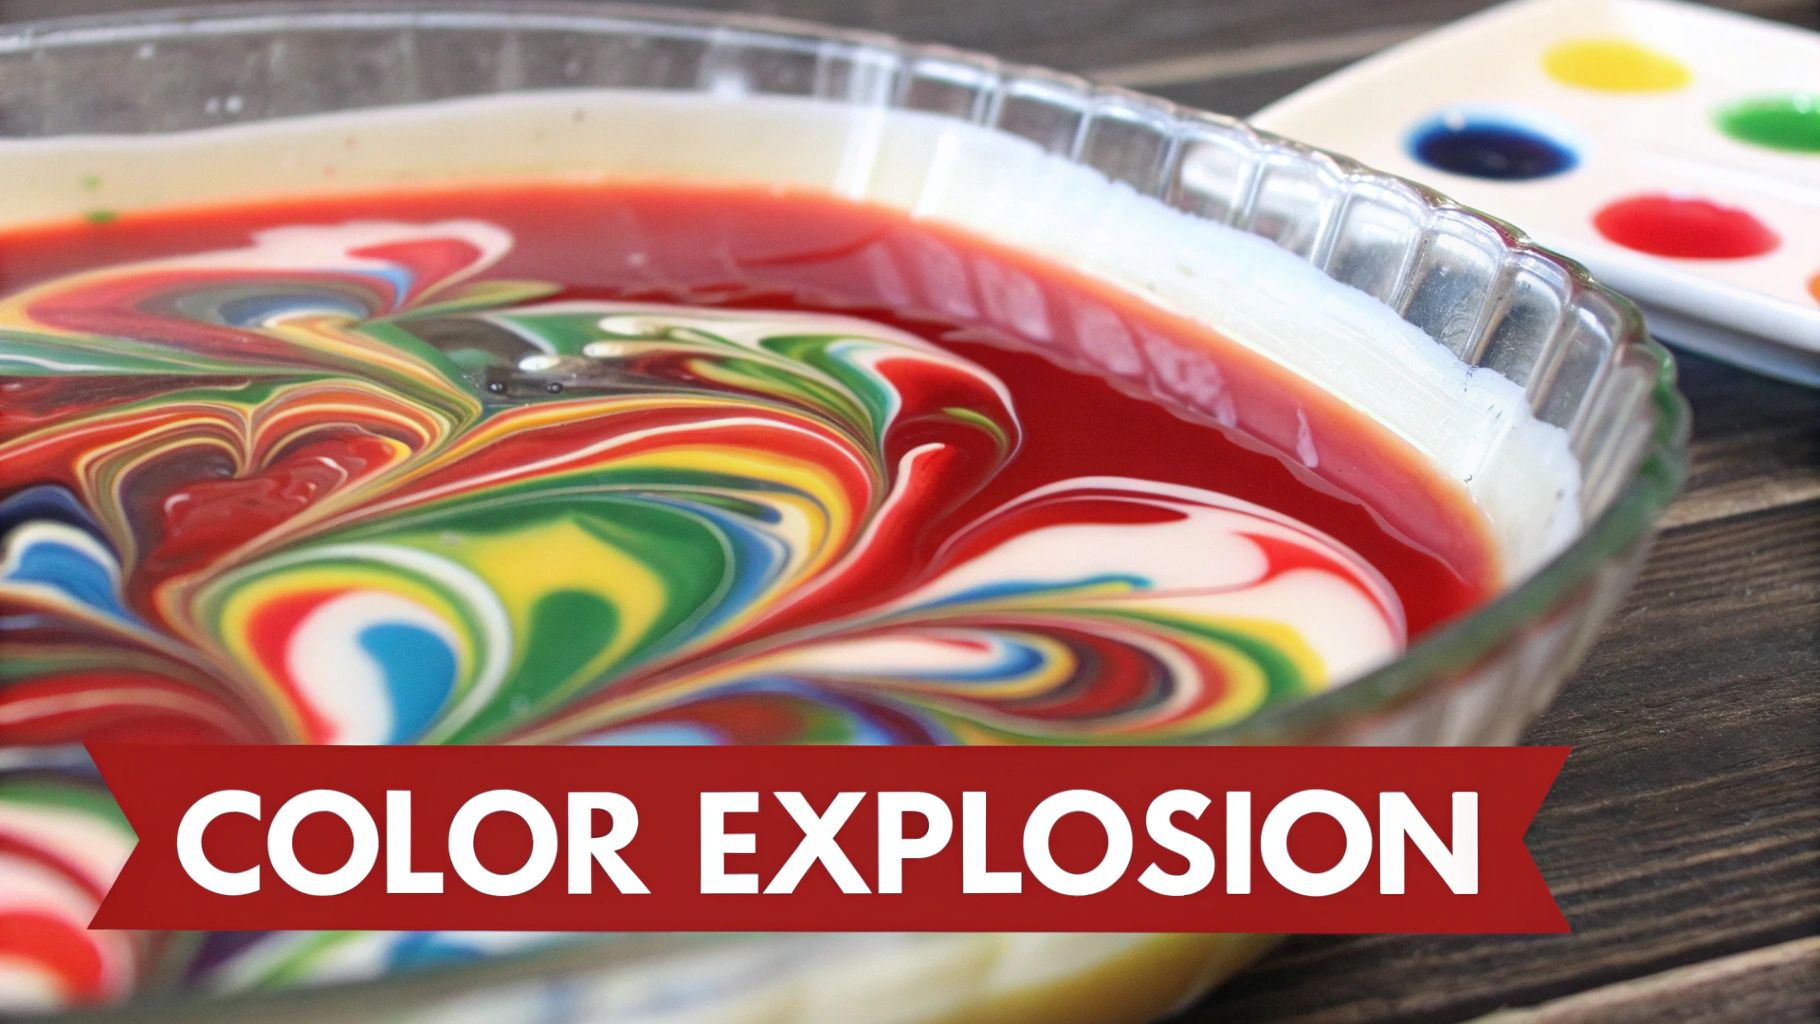
This experiment is a favorite at science museums like the Exploratorium and is widely used in Montessori schools for its hands-on, artistic approach to learning scientific principles. Its vibrant, unpredictable patterns also make it a viral hit on social media platforms, proving that science can be both educational and beautiful.
Materials You'll Need:
- Whole milk
- A shallow dish or plate (white works best for contrast)
- Liquid food coloring (at least 2-3 different colors)
- Liquid dish soap
- Cotton swabs
Step-by-Step Instructions:
- Prepare the Canvas: Pour enough milk into the shallow dish to completely cover the bottom, about a quarter-inch deep.
- Add the Colors: Carefully add one drop of each food coloring onto the surface of the milk. Place the drops near the center of the dish, either close together or slightly apart.
- Get Ready for the Reaction: Dip the tip of a cotton swab into a small amount of liquid dish soap, ensuring it's well-coated.
- Create the Explosion: Gently touch the soapy tip of the cotton swab to the surface of the milk, right in the middle of the food coloring drops. Hold it there for a few seconds and watch the colors burst outward in a fantastic display.
Pro-Tip: For the most dramatic reaction, use whole milk. The higher fat content provides more for the soap molecules to interact with, resulting in more vigorous and longer-lasting color swirls.
This captivating experiment is a perfect way to introduce concepts of chemistry and molecular interactions. The immediate and colorful results provide an exciting "wow" factor that keeps children engaged and curious about the science behind the magic.
3. Crystal Growing Experiment
Growing your own crystals is a captivating and visually rewarding science experiment for kids at home that teaches patience and introduces the concept of molecular structures. This activity demonstrates crystallization and supersaturation, where a solute like salt or sugar is dissolved in hot water to create a supersaturated solution. As the water cools and evaporates over several days, the dissolved particles come out of the solution and arrange themselves into orderly, repeating patterns, forming beautiful crystals.
This long-term project is a favorite in various educational settings, from home education crystallography lessons to science fair projects and displays at geology museums. The slow, magical growth process offers a fantastic opportunity to observe scientific principles unfolding in real-time.
Materials You'll Need:
- A clean glass jar or container
- Table salt, Epsom salt, or sugar
- Hot water (adult supervision required)
- A spoon for stirring
- A wooden skewer, popsicle stick, or pencil
- String or pipe cleaner
- Food coloring (optional)
Step-by-Step Instructions:
- Create a Supersaturated Solution: Have an adult carefully pour hot (near-boiling) water into the glass jar. Add your chosen crystal-growing substance (salt or sugar) one tablespoon at a time, stirring until it dissolves completely.
- Keep Adding Solute: Continue adding the solute until no more will dissolve and you see particles settling at the bottom. This means your solution is supersaturated. If desired, add a few drops of food coloring at this stage.
- Set Up the Structure: Tie a piece of string to the middle of a pencil or skewer and rest it across the top of the jar, allowing the string to dangle into the solution. Make sure it doesn't touch the bottom or sides. A pipe cleaner can also be used as a great base for crystals to grow on.
- Wait and Observe: Place the jar in a safe location where it won't be disturbed. Crystals should begin to form on the string within a few hours or days. Watch them grow over the next week.
Pro-Tip: For the clearest and best-formed crystals, use distilled water instead of tap water. Minerals and impurities in tap water can interfere with the crystallization process. Covering the jar with a coffee filter or paper towel will keep dust out while still allowing water to evaporate.
This experiment is an excellent way to teach concepts like solutions, saturation, and molecular geometry. Documenting the growth with daily photos can turn it into a fantastic long-term observation project, making it one of the most rewarding science experiments for kids at home.
4. Invisible Ink with Lemon Juice
Unleash your inner spy with the classic invisible ink experiment, a fascinating activity that combines chemistry and history. This experiment is a perfect way to introduce kids to the concept of oxidation. Lemon juice, an organic substance, is acidic and contains sugars that are invisible when they dry on paper. When heated, the compounds in the juice oxidize and turn brown, revealing the secret message.

This simple yet magical process has historical significance, famously used for secret communications during events like the American Revolutionary War. Today, it remains a staple in children's mystery camps and educational programs at history museums, blending scientific principles with engaging storytelling. It’s one of the most memorable science experiments for kids at home because it feels like a real-life magic trick.
Materials You'll Need:
- Half a lemon
- A small bowl
- Water
- A cotton swab, small paintbrush, or toothpick
- White paper
- A heat source: an incandescent light bulb, a hair dryer, or an iron (with adult supervision)
Step-by-Step Instructions:
- Create the Ink: Squeeze the juice from the lemon half into the small bowl. Add a few drops of water and stir the mixture with your cotton swab.
- Write Your Message: Dip the cotton swab into the lemon juice mixture and write a secret message or draw a picture on the white paper.
- Let It Dry: Allow the paper to dry completely. The message will become invisible once all the moisture has evaporated.
- Reveal the Secret: With an adult's help, carefully heat the paper. Hold it close to a warm light bulb or use a hair dryer on a low setting. The heat will cause the dried lemon juice to oxidize and turn brown, revealing your hidden message.
Pro-Tip: Using a high-wattage incandescent bulb works best, as the heat is more concentrated. If using an iron, set it to a low-heat setting (no steam) and have an adult gently press it over the paper for a few seconds at a time until the message appears.
This experiment beautifully illustrates chemical changes and oxidation in a way that is both safe and exciting. It's an excellent opportunity to discuss history, chemistry, and how science has been used for communication throughout the ages. For more projects that explore chemical reactions and scientific principles, check out these 5th grade science experiments ideas.
5. Dancing Raisins Density Experiment
The Dancing Raisins experiment is a captivating and simple way to introduce children to the scientific concepts of density, buoyancy, and carbonation. This activity uses common household items to create a mesmerizing effect where raisins appear to dance up and down in a glass of soda. The magic lies in the carbon dioxide bubbles in the soda, which act like tiny life rafts for the raisins.
This classic experiment is a favorite in elementary science classrooms and is frequently featured in children's science books and on educational TV shows. Its simplicity and visually engaging results make it an excellent choice for a quick and easy science experiment for kids at home.
Materials You'll Need:
- A tall, clear glass or jar
- Clear carbonated beverage (like club soda, seltzer, or lemon-lime soda)
- A handful of raisins
- Other small objects to test (optional, like small pasta, corn kernels, or lentils)
Step-by-Step Instructions:
- Prepare Your Container: Place your tall, clear glass on a flat surface where it can be easily observed without being knocked over.
- Add the Liquid: Fill the glass about three-quarters full with the clear carbonated beverage. Pour it slowly to preserve as much carbonation as possible.
- Drop in the Raisins: Gently drop about 10-12 raisins into the glass. At first, they will sink to the bottom because they are denser than the liquid.
- Observe the Dance: Watch closely. Over the next few minutes, you will see tiny carbon dioxide bubbles attach to the wrinkly surface of the raisins. As enough bubbles accumulate, the raisins will become buoyant and float to the surface. Once at the top, the bubbles pop, the gas is released into the air, and the raisins sink back down to repeat the cycle.
Pro-Tip: For the best results, use a freshly opened bottle of soda, as it will have the most carbonation. The fizz is what powers the entire experiment, so more bubbles mean more "dancing."
This experiment brilliantly illustrates how gases can affect the density and buoyancy of an object. It’s a fantastic opportunity to encourage observation skills and ask questions about why some objects float while others sink, sparking a deeper interest in physics.
6. Static Electricity Balloon Experiments
Static electricity balloon experiments are a fantastic and almost magical way to introduce children to the invisible forces that govern our world. This simple activity uses a common party item to demonstrate electrostatic charge and attraction. By rubbing a balloon on hair or a wool sweater, electrons are transferred to the balloon, giving it a negative charge. This charged balloon can then attract neutral or positively charged objects, illustrating fundamental principles of physics.
This classic demonstration is a cornerstone of elementary school science units and a favorite at science museums, often used to explain concepts related to atoms and electricity. Its simplicity and "wow" factor make it one of the most memorable science experiments for kids at home, proving that profound scientific principles can be explored with just a few household items.
Materials You'll Need:
- Balloons (latex works best)
- Your own clean, dry hair or a wool sweater
- Small, lightweight objects (e.g., tiny pieces of paper, salt, pepper)
- A water faucet
- A wall or ceiling
Step-by-Step Instructions:
- Charge the Balloon: Inflate a balloon and tie it off. Rub the balloon vigorously back and forth on your hair or a wool sweater for about 30 seconds. This action transfers electrons, giving the balloon a negative static charge.
- Attract Small Objects: Place small pieces of paper, salt, or pepper on a flat surface. Slowly bring the charged part of the balloon close to them (without touching) and watch as they jump up and stick to it.
- Bend Water: Turn on a faucet so a thin, steady stream of water is flowing. Bring the charged balloon near the stream of water, and you'll see the water bend toward the balloon.
- Make it Stick: Press the charged side of the balloon against a wall or even the ceiling. If it has enough charge, it will stick there all by itself!
Pro-Tip: This experiment works best in low-humidity conditions. Dry air is a better insulator, which helps the balloon hold its static charge for longer. If the air is humid, the charge will dissipate more quickly.
Exploring these phenomena provides an excellent opportunity to discuss atoms, electrons, and positive and negative charges. You can explore a variety of hands-on science activities to further your child's interest. It's a perfect example of how science experiments for kids at home can make abstract concepts tangible and exciting.
7. Egg in a Bottle Demonstration
The Egg in a Bottle experiment is a captivating display of air pressure and thermodynamics, perfect for showing older kids the invisible forces at work all around us. This experiment uses heat to alter the air pressure inside a bottle, creating a vacuum that dramatically sucks a hard-boiled egg through an opening that appears too small for it. It’s a powerful visual lesson in the principles of the ideal gas law.
This classic demonstration is a favorite in middle and high school physics classes and is often featured in science museum shows. It provides a tangible example of atmospheric pressure, a concept also critical in understanding weather patterns and even aviation cabin pressure.
Materials You'll Need:
- A peeled, hard-boiled egg
- A glass bottle with a mouth slightly smaller than the egg (an old-fashioned milk bottle or Erlenmeyer flask works well)
- A small strip of paper
- Matches or a lighter (for adult use only)
- Safety goggles
Step-by-Step Instructions:
- Safety First: An adult must perform all steps involving fire. Ensure you are working in a clear, non-flammable area with a fire extinguisher or water nearby. Everyone should wear safety goggles.
- Prepare the Setup: Place the peeled, hard-boiled egg on the mouth of the glass bottle to show that it does not fit through.
- Heat the Air: The adult should light the strip of paper and quickly drop it into the bottle.
- Create the Seal: Immediately after dropping the burning paper inside, place the egg on the mouth of the bottle, ensuring it creates a good seal.
- Observe the Pressure Change: Watch as the flame extinguishes. As the air inside the bottle cools and contracts, the higher atmospheric pressure outside will push the egg into the bottle with a satisfying "pop."
Pro-Tip: For the best results, use an egg that is at room temperature rather than one straight from the refrigerator. Also, moistening the rim of the bottle with a little water can help create a better airtight seal for a more dramatic effect.
This experiment is a fantastic way to introduce concepts like air pressure, vacuums, and the relationship between temperature and gas volume. The surprising result makes abstract physics principles concrete and memorable.
8. Color-Changing pH Indicator with Red Cabbage
Unlock the secrets of chemistry in your kitchen with a natural pH indicator made from red cabbage. This vibrant experiment uses a pigment in the cabbage called anthocyanin, which changes color when it comes into contact with acids or bases. This provides a fantastic, visual way to introduce the concepts of pH, acidity, and alkalinity without needing a formal science lab, making it one of the most colorful science experiments for kids at home.
This experiment is a favorite in high school chemistry labs and homeschool science curricula for its reliability and use of common household items. The cabbage juice starts as a purplish color (neutral) and transforms into a spectrum of reds and pinks when mixed with acids, or blues and greens when mixed with bases.
Materials You'll Need:
- A few red cabbage leaves
- Water
- A pot for boiling
- A strainer
- Several clear cups or jars
- Various household liquids to test (e.g., lemon juice, vinegar, baking soda solution, soapy water, clear soda)
- A large bowl or pitcher for the cabbage juice
Step-by-Step Instructions:
- Create the Indicator: Chop the red cabbage leaves into small pieces. Place them in a pot and add enough water to cover them.
- Extract the Pigment: Bring the water to a boil, then reduce the heat and simmer for 10-15 minutes. The water will turn a deep purple-blue color.
- Cool and Strain: Turn off the heat and let the liquid cool completely. Strain the liquid through a sieve into a large bowl or pitcher to remove the cabbage pieces. This purple liquid is your pH indicator.
- Test Your Substances: Pour a small amount of the indicator into several clear cups. Add a few drops of a different household liquid to each cup and watch the colors change instantly.
Pro-Tip: Create a pH scale rainbow by lining up your test cups from most acidic (red/pink) to most basic (green/yellow). Use a dropper or spoon for adding test substances to control the amount and observe the reaction more clearly.
This experiment is an excellent way to teach scientific observation, classification, and the properties of common household chemicals. It's a foundational activity that can be adapted for various age groups and is a great example of STEM activities for elementary students.
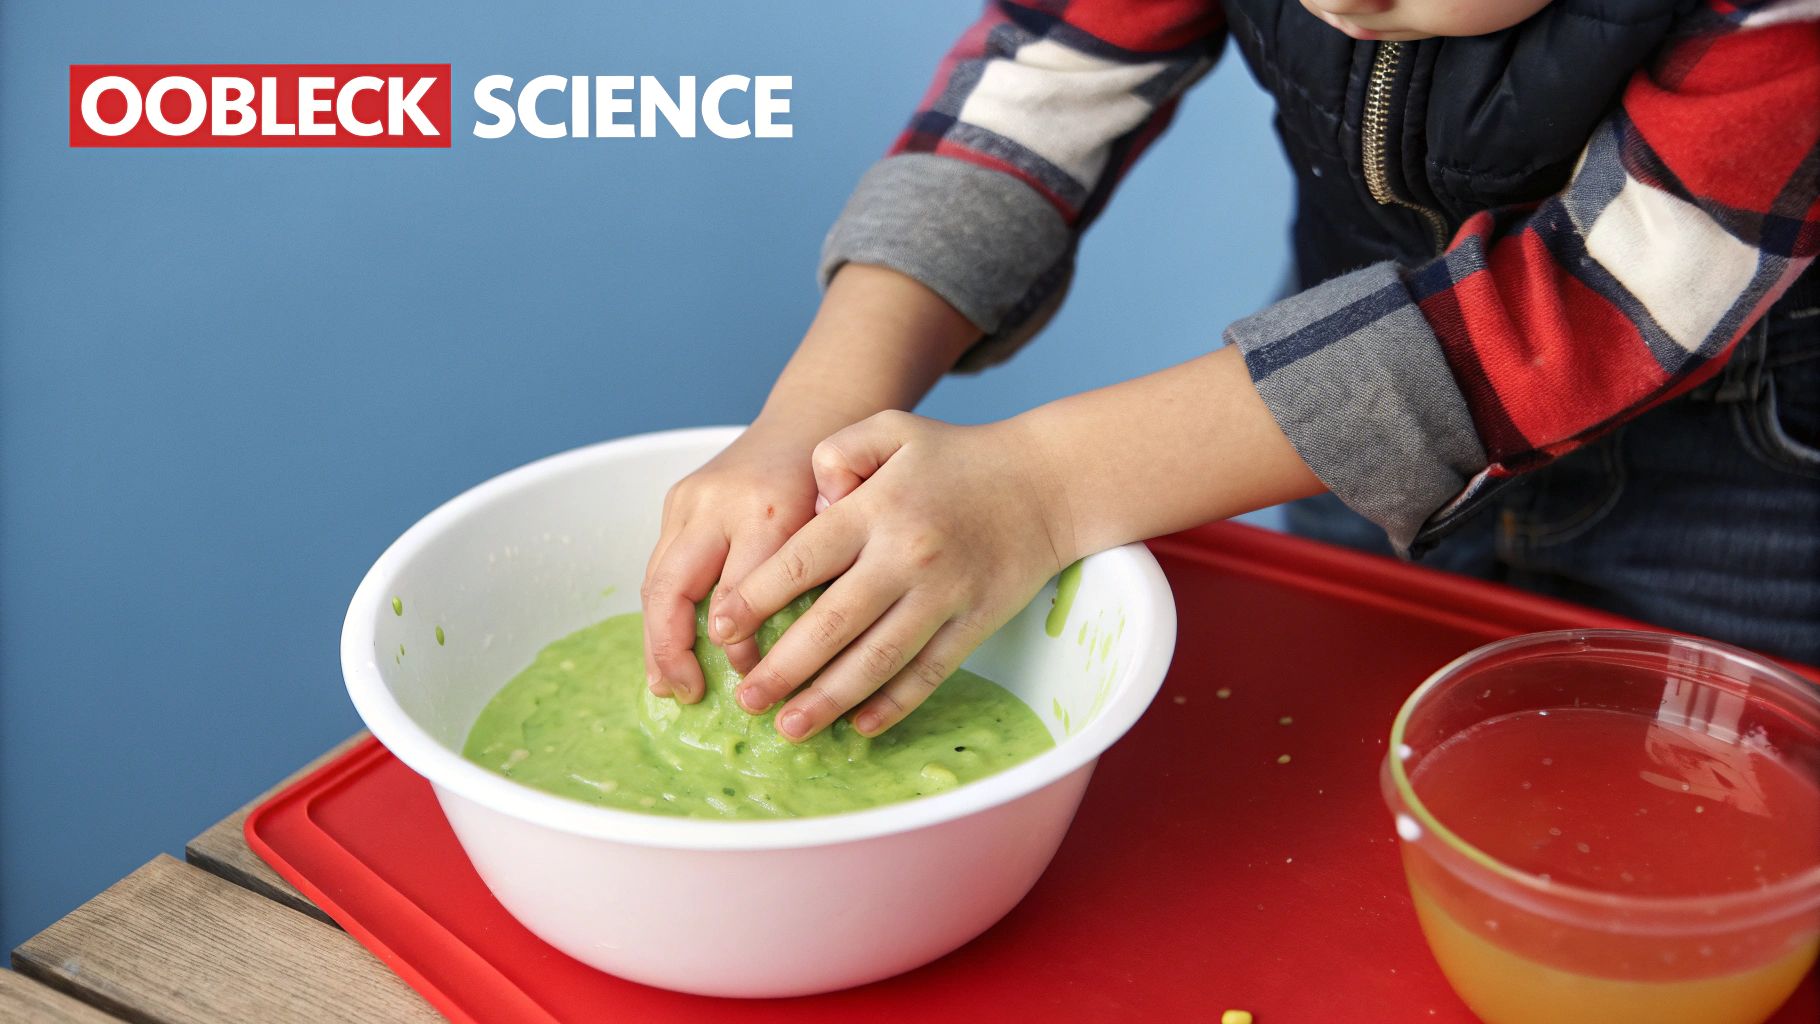
9. Non-Newtonian Fluid (Oobleck) Experiment
The Oobleck experiment introduces kids to the fascinating world of non-Newtonian fluids, substances that defy the conventional definitions of solid and liquid. This simple mixture of cornstarch and water creates a fluid that changes its properties based on the pressure applied. It flows like a liquid when poured or stirred slowly, yet becomes solid and firm when squeezed, punched, or handled quickly.
Named after the gooey green substance in Dr. Seuss's book Bartholomew and the Oobleck, this experiment is a staple in science museums and classrooms worldwide. It's a fantastic sensory activity that provides a tangible, hands-on lesson in materials science and the properties of matter, making it one of the most memorable science experiments for kids at home.
Materials You'll Need:
- Cornstarch
- Water
- A large bowl or container
- Food coloring (optional)
- A tray or plastic tablecloth to contain the mess
Step-by-Step Instructions:
- Combine Ingredients: Pour about one cup of cornstarch into the large bowl. If you're using food coloring, add a few drops to half a cup of water now.
- Mix Slowly: Gradually pour the water into the cornstarch while mixing with your hands or a spoon. Continue adding water slowly until the mixture reaches a unique consistency.
- Test the Fluid: The Oobleck is ready when it drips like a liquid when you lift it but feels solid when you tap or squeeze it. The ideal ratio is roughly two parts cornstarch to one part water.
- Experiment: Encourage kids to explore its properties. Try punching the surface quickly, then letting your fingers sink in slowly. Roll a ball in your hands and watch it melt when you stop.
Pro-Tip: Proper disposal is crucial. Do not pour Oobleck down the drain, as it can clog pipes. Scrape the mixture into a trash bag and dispose of it in the garbage.
This experiment brilliantly demonstrates how pressure affects viscosity. The cornstarch particles suspend in the water, but when sudden force is applied, they lock together, creating a temporary solid. It's an unforgettable way to teach kids that the states of matter can be more complex than they seem. To explore more engaging activities, you can discover a wide range of science experiments for kids on playzusa.com.
10. Homemade Lava Lamp Density Tower
The homemade density tower is a visually stunning science experiment for kids at home that introduces the concept of liquid density in a clear and colorful way. This activity demonstrates that different liquids have different weights for the same volume, causing them to stack on top of each other in layers from most dense at the bottom to least dense at the top. Using common household liquids like honey, corn syrup, dish soap, water, and oil creates a beautiful, layered column.
This experiment is a favorite in elementary science classrooms and science fair projects because it makes an abstract concept tangible and easy to understand. By observing how immiscible liquids like oil and water refuse to mix, children get a firsthand look at molecular polarity and intermolecular forces.
Materials You'll Need:
- A tall, clear container (like a glass, jar, or plastic bottle)
- Honey
- Corn syrup or maple syrup
- Dish soap (colored works best)
- Water (with food coloring added for contrast)
- Vegetable oil or baby oil
- Rubbing alcohol (optional, with a different food coloring)
- A tray or pan to catch any spills
Step-by-Step Instructions:
- Start with the Densest Liquid: Begin by pouring the honey into the container, being careful not to let it touch the sides. This will be your bottom layer.
- Add the Next Layer: Slowly pour the corn syrup on top of the honey. Tilting the container and pouring slowly down the side helps prevent the layers from mixing too much.
- Continue Layering: Following the same slow-pouring technique, add the dish soap, then the colored water, and finally the vegetable oil. If using rubbing alcohol, add it last.
- Observe the Layers: Watch as the liquids settle into distinct, colorful layers based on their density. You've created a density tower!
Pro-Tip: For a cleaner separation between layers, pour each new liquid slowly over the back of a spoon held just above the previous layer's surface. This minimizes disturbance and helps the liquids settle more neatly.
This experiment is an excellent way to teach about density, miscibility, and the scientific method of observation and prediction. For parents looking to expand on these foundational concepts, exploring pre-packaged educational kits can provide even more structured learning. Learn more about the educational benefits of science kits for kids for further hands-on discovery.
Top 10 Kids’ Science Experiments Comparison
| Experiment | Implementation Complexity 🔄 | Resource Requirements ⚡ | Expected Outcomes 📊 | Ideal Use Cases 💡 | Key Advantages ⭐ |
|---|---|---|---|---|---|
| Volcano Eruption | Low - simple mixing, immediate reaction | Common household items (baking soda, vinegar) | Dramatic bubbling eruption, gas production | Elementary demos, science fairs | Safe, inexpensive, visually exciting |
| Rainbow Milk | Low - simple setup, quick execution | Milk, dish soap, food coloring | Swirling color patterns, immediate effect | Hands-on learning, photography | Visually stunning, teaches surface tension |
| Crystal Growing | High - requires days/weeks, careful conditions | Salt/sugar, hot water, string | Formation of visible crystals over time | Long-term science projects | Teaches crystallization, lasting results |
| Invisible Ink | Low - simple writing and heating | Lemon juice, paper, heat source | Hidden messages appear when heated | History lessons, secret communication | Natural, safe, engaging “magic” effect |
| Dancing Raisins | Low - straightforward, continuous observation | Carbonated soda, raisins | Raisins float/sink creating dancing motion | Elementary physics demos | Engaging, teaches buoyancy and gases |
| Static Electricity Balloon | Low - rubbing balloon, quick visual results | Balloon, hair/fabric | Static charge effects: attraction, repulsion | Intro to electricity, physics demos | Immediate, safe, multiple variations |
| Egg in a Bottle | Medium - requires careful fire handling | Glass bottle, egg, lit paper | Egg sucked into bottle showing air pressure | Physics demos for older kids | Dramatic, teaches gas laws and pressure |
| Cabbage pH Indicator | Medium - prep by boiling cabbage | Red cabbage, water, test substances | Color shifts showing pH range | Chemistry labs, homeschool lessons | Natural indicator, reusable, multi-test |
| Oobleck | Low - simple mixing, hands-on play | Cornstarch, water | Fluid behaves as solid or liquid under stress | Material science demos, sensory play | Safe, tactile, challenges matter concepts |
| Density Tower | Medium - careful layering to avoid mixing | Various liquids (honey, oil, water) | Distinct colorful liquid layers | Density demos, science fairs | Visually striking, clear density illustration |
FAQs: Your At-Home Science Questions Answered
Q: What age group are these science experiments best for?
A: Most of these experiments, like the Volcano Eruption and Rainbow Milk, are perfect for ages 5-10. More complex experiments like the Egg in a Bottle or Crystal Growing are better suited for older children (8-12) with greater adult supervision. Always tailor the explanation and level of involvement to your child's age and curiosity.
Q: Are these experiments safe to do at home?
A: Yes, all these experiments use common household items and are generally safe. However, activities involving hot water (Crystal Growing) or fire (Egg in a Bottle) require strict adult supervision and appropriate safety measures, such as wearing safety goggles.
Q: How can I explain the science behind the experiment without being boring?
A: Use analogies and storytelling. For the Dancing Raisins, describe the bubbles as "tiny life jackets" lifting the raisins. For Invisible Ink, tell a story about spies sending secret messages. Focus on the "why" in a simple, relatable way that connects the cool result to a real scientific principle.
Q: What if an experiment doesn't work?
A: This is a fantastic learning opportunity! Treat it like a real scientist would. Ask your child, "Why do you think it didn't work as we expected?" and "What could we change to get a different result?" This teaches valuable lessons in troubleshooting, resilience, and the scientific method. It's not about failure; it's about discovery.
Keep the Curiosity Flowing: Your Next Adventure in Science
Congratulations on completing a whirlwind tour of ten fantastic, hands-on science experiments for kids at home! From the explosive chemical reaction of a baking soda volcano to the mind-bending properties of Oobleck, you've seen firsthand how simple household items can unlock profound scientific principles. These activities are more than just fun ways to pass an afternoon; they are foundational building blocks for a lifetime of curiosity, critical thinking, and discovery.
By guiding your child through these experiments, you've done something incredibly powerful. You have transformed abstract concepts like chemical reactions, density, pH levels, and static electricity into tangible, memorable experiences. They didn't just read about acids and bases; they created a vibrant, color-changing cabbage indicator. They didn't just learn the definition of a non-Newtonian fluid; they ran their fingers through it and felt it shift between solid and liquid. This direct engagement is what cements learning and sparks a genuine, lasting passion for STEM.
Key Takeaways for Parent-Scientists:
- Science is Play: The most effective learning happens when kids are having fun. These experiments prove that science can be exciting, messy, and magical.
- Questions are More Important than Answers: The goal isn't to know everything. It's to encourage curiosity. Asking "What do you think will happen?" is more valuable than just explaining the outcome.
- Connect to the Real World: Bridge the gap between the experiment and everyday life. The density tower explains why salad dressing separates, and the volcano shows what happens when you mix baking ingredients.
By consistently engaging in these practices, you are not just teaching science; you are cultivating a future innovator, a problem-solver, and a critical thinker. You are showing them that challenges are simply puzzles waiting to be solved and that curiosity is their most powerful tool. The confidence they gain from successfully conducting these simple science experiments for kids at home will translate into every area of their academic and personal lives.
Ready to take the next step and explore even more complex scientific concepts without the hassle of gathering supplies? The award-winning kits from Playz provide all the materials and clear, kid-friendly instructions needed to continue your scientific journey. Explore the full collection of Playz science kits today and keep the discovery flowing! Playz