


The old top usually gives up the same way. One windy week, a faded seam starts fluttering, a corner tears near a grommet, and suddenly the frame that looked fine yesterday is just an exposed skeleton. If you're shopping for a 10 x 20 replacement canopy, the frustrating part is that the size sounds simple, but the fit rarely is.
A 10 x 20 canopy is a footprint category, not a universal product. The frame shape, peak style, connector pattern, and attachment hardware decide whether a replacement cover works or turns into an expensive return. That's why the smartest buyers stop thinking about fabric alone and start measuring geometry.
Why the 10 x 20 Size Keeps Catching People Off Guard
A worn canopy usually gives itself away in pieces. The top fades, the seams loosen, and one hard gust can turn a small tear into a split panel. By the time that happens, buyers often search for a 10 x 20 replacement canopy and assume the size label is enough to guide the purchase.
That assumption is where the trouble starts. A 10 x 20 frame can be built as a carport, a storage shelter, a backyard cover, or an event structure, and those frames do not share the same roof rise, connector layout, or attachment points. The same nominal size also shows up in different product categories, so the title alone does not tell you whether the cover will sit correctly or fight the frame. Canopy measuring guidance also notes that a 10' x 20' frame typically takes a 12' x 20' tarp because the cover has to clear the pitch and extend past the frame line (measuring guidance from canopy specialists).
The number on the title is only the starting point
I tell buyers to start with footprint plus geometry. A 10 x 20 frame can be a tall peaked shelter, a low traditional carport, or a commercial cover with a very specific connector pattern, and each version asks for a different kind of replacement top. A cover that looks right on paper can still pull at the corners, sit short on the ridge, or leave the side edges exposed if the frame shape does not match.
A larger party setup makes that point fast. A marquee tent 20x20 from Forever Party Rentals may carry a familiar size label, but the structure underneath is its own system, and the same is true for smaller replacement canopies.
Family play shelters work the same way. The frame system matters as much as the roof cover, which is why product lines such as Playz tents only fit well when the frame and cover are matched as a set, not judged by shape alone.
Practical rule: if you do not know the frame geometry, the title on the replacement listing is not enough to trust.
The safest approach is to treat 10 x 20 as the starting dimension, then confirm the frame style, the connector pattern, and the peak profile before you buy. That is the difference between a cover that settles cleanly and one that needs to be forced into place.
Measuring Your Frame Before You Buy Anything
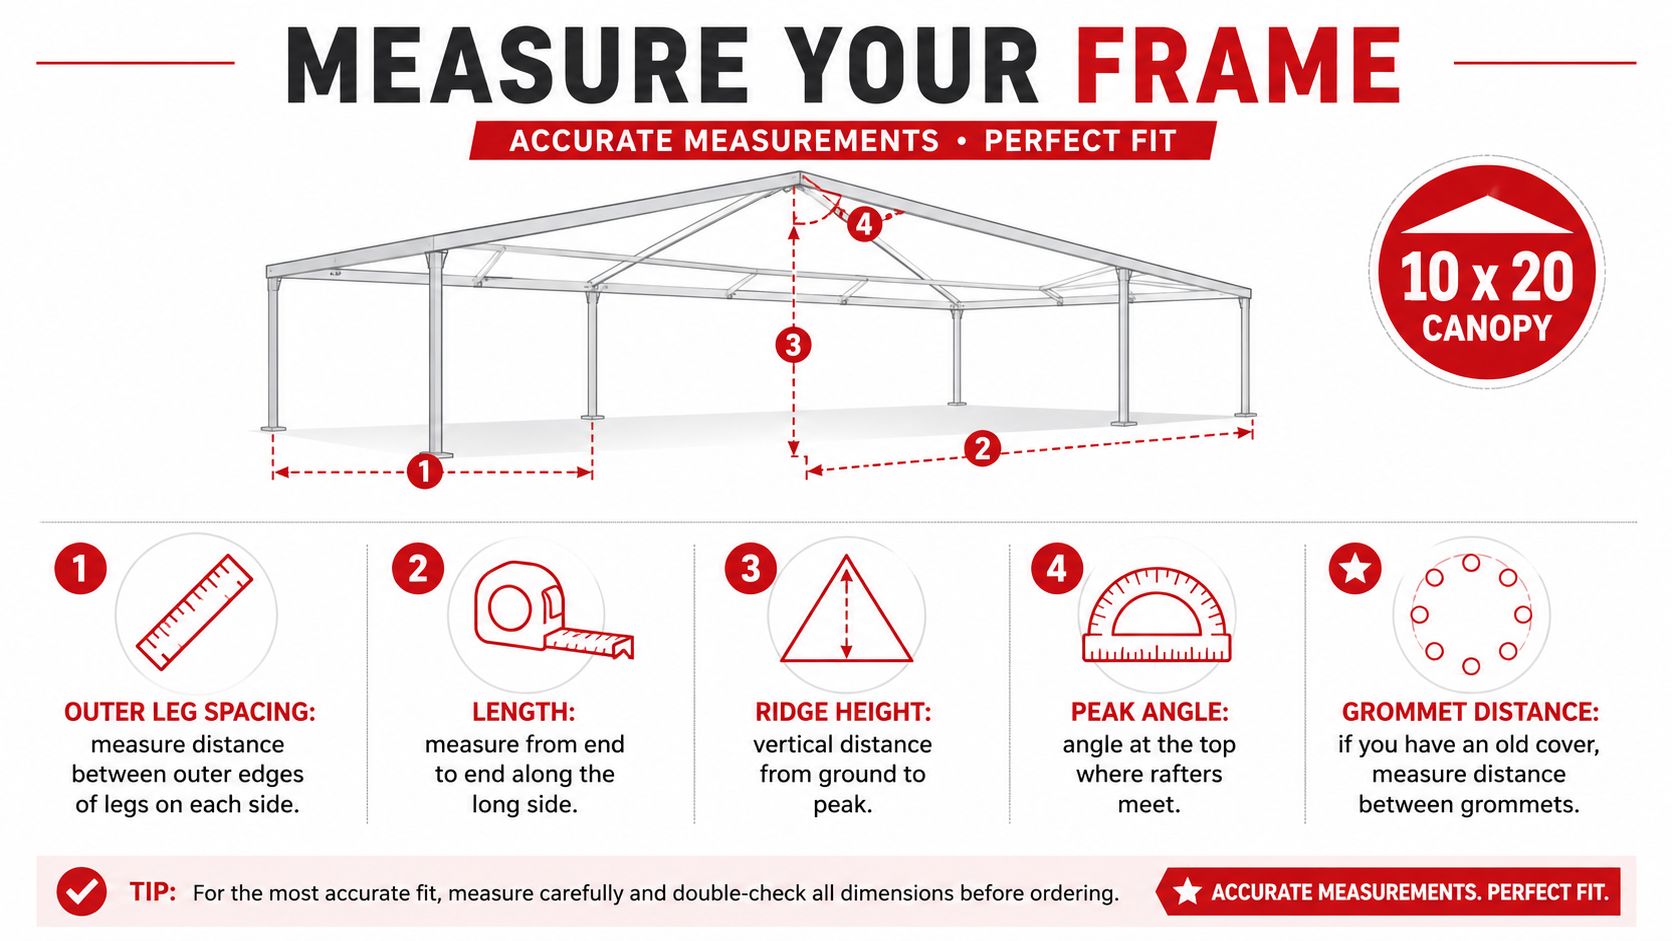
A replacement top should be chosen from the frame outward. Fabric can stretch, relax, or shrink over time, but the metal frame gives you the dimensions that control fit. Before shopping, I write down the numbers that define the structure, width, length, ridge height, peak angle, and, if the old cover is still on hand, the grommet spacing.
What to measure with a tape measure
Start with the outer leg spacing, measured from outside edge to outside edge, then measure the length along the long side. For a peaked frame, measure the ridge height straight up from the ground to the top point, since that tells you how much roof rise the cover has to clear. If the frame has a sharper roof angle, the top sits differently, and the fabric may either tension cleanly or fight the frame at the corners.
Check the old cover if it is still intact enough to inspect. The distance between the grommet holes tells you whether the new top needs the same attachment layout or whether the hardware pattern has changed. That measurement matters because a cover that is the right footprint can still pull short if the connector rhythm does not line up with the frame. For practical outdoor fabric advice, see practical outdoor fabric advice.
Why square matters more than people think
Measure the diagonals too. If the diagonal readings do not match, the frame is out of square, and a replacement cover can sit crooked even when the listed size looks correct. Installers often blame the top when the actual problem is a frame that has shifted at the joints or racked under use.
That same habit of measuring the structure first applies to other fitted covers as well. A clear example is the DIY Play structures guide, because a cover only fits properly when the frame geometry and connector style are known before the purchase.
Write the measurements down before you order anything. A 10 x 20 replacement canopy that matches the size label still has to match the ridge rise, corner layout, and attachment pattern in real use.
Choosing Fabric and Construction That Lasts
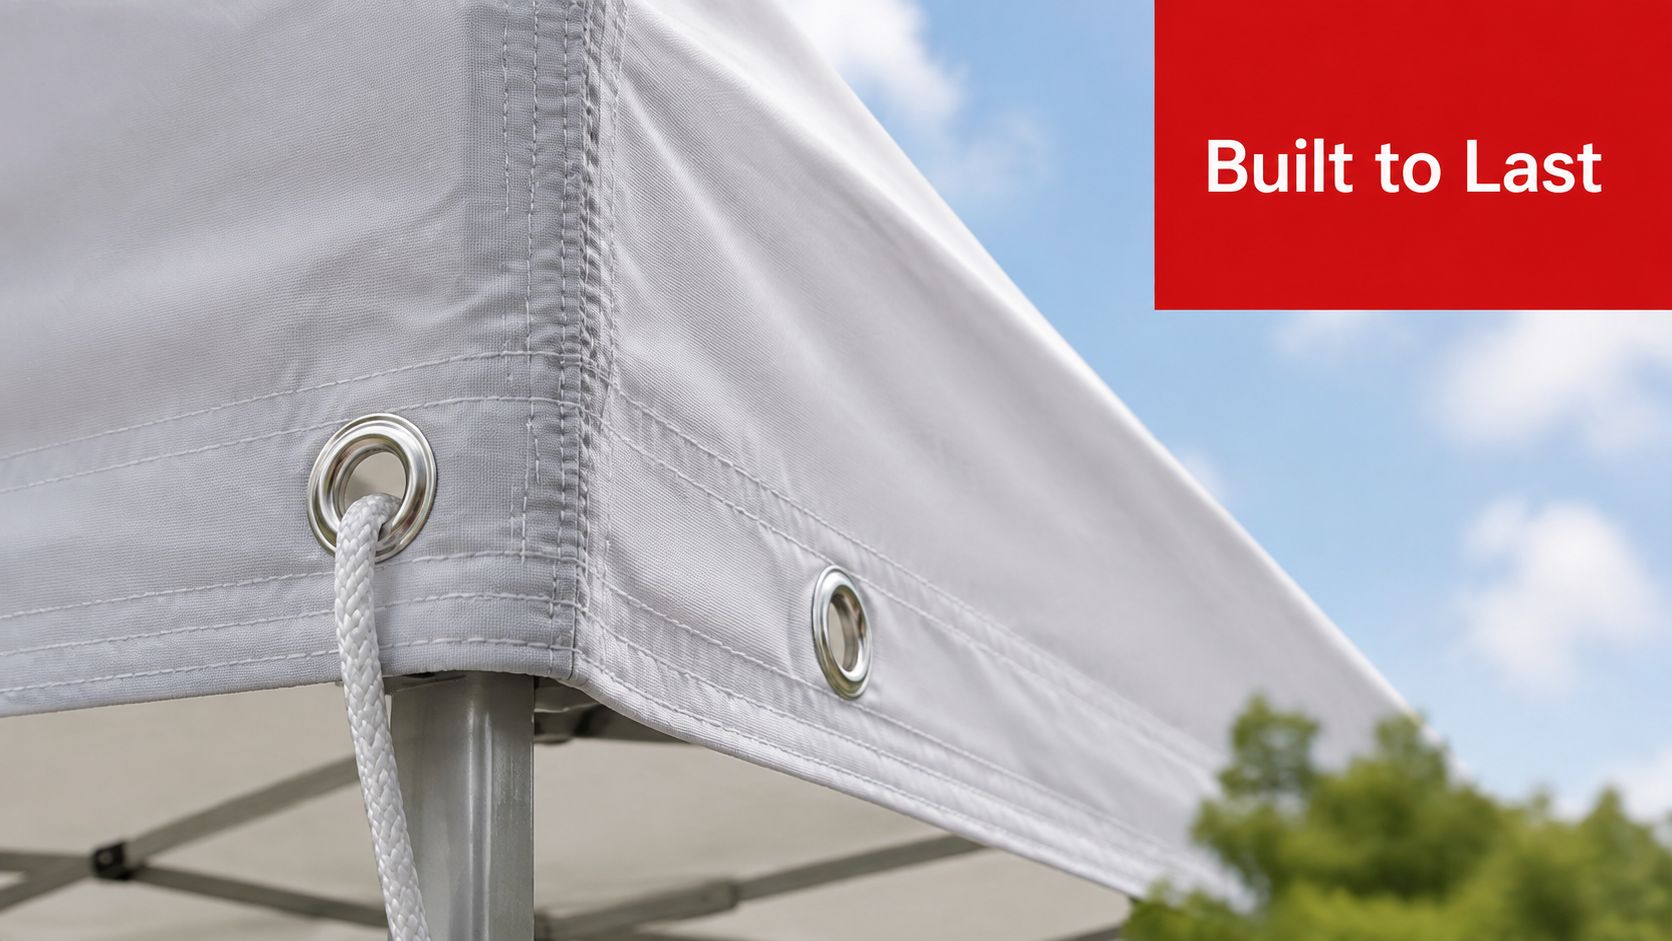
A cover can look heavy on paper and still fail early if the frame geometry is wrong for it. On a 10 x 20 replacement canopy, the key test is how the fabric meets the ridge, corners, and connector pattern, because that is where stress builds first. A decent top is usually built around reinforced edges, grommets, and a fabric spec that can take weather without stretching itself out of shape. Higher-spec covers are often made from 12 mil, 14 x 14 weave polyethylene or similar heavy-duty woven PE, and the published specs often pair that with 100% waterproofing, UV treatment, and reinforcement at stress points (fabric and performance spec).
What the spec sheet means in use
A thicker-sounding fabric does not fix poor fit. A sheet that says waterproof or UV-resistant can still wear out fast when the roof pitch does not match the frame, the corners are pulling unevenly, or the tie points force too much load into a few spots. Retail specs may claim 50+ UPF and block more than 98% of harmful UV rays, but those numbers only matter if the cover lies flat, stays tensioned, and does not rub itself apart along the edges.
Spacing is part of that. Covers with grommets set roughly every 18 inches and 36 to 40 ball bungees spread the load better than a layout that yanks hard on a few points. That reduces edge tearing and cuts down on the strain where the tarp meets the frame (hardware and spacing guidance).
Fabric choice and installation advice
Polyethylene is common because it is light, weather-resistant, and easy to handle during installation. Heavier fabrics bring more body and can resist wear better, but they also add weight and stiffness, which can make a tight frame harder to dress cleanly. practical outdoor fabric advice is useful if you want a clearer view of coatings and outdoor performance without getting pulled into marketing language.
What usually fails first: corners, seams, and attachment points. Not the color. Not the title.
Frame style matters just as much as the fabric itself. Some high-peak covers need oversize tops, such as 12 x 20 fabric on a 10 x 20 frame, so the roof rise does not pull the seams apart. On other frames, the issue is the connector style, not the cloth weight. A cover with the wrong grommet rhythm or valance layout can fit the footprint and still fight every tie point.
That same practical standard shows up in other handled, frequently adjusted shelters too. The best kids play tents follow the same basic rule, a sound structure matters more than surface claims, and flimsy fabric gives that away fast.
Matching the Right Cover to Your Specific Frame
A 10 x 20 replacement canopy only works if the frame geometry matches the cover pattern. The first mistake I see is buying by size alone, then finding out the roof pitch, connector shape, or tie-down layout does not line up with the frame. Start with the frame brand and model, then check leg spacing, ridge height, peak angle, and the attachment pattern. A listing that says “10 x 20” can still miss the mark if the frame uses a high-peak profile and the cover was cut for a traditional roof line.
Compatibility clues to check before you buy
| Frame Attribute | What to Measure | Why It Matters |
|---|---|---|
| Width and length | Outside edge to outside edge | Confirms the footprint is 10 x 20 |
| Ridge height | Ground to peak | Tells you whether the top needs oversize clearance |
| Peak angle | Angle where rafters meet | Helps identify high-peak versus traditional geometry |
| Attachment pattern | Grommet spacing or buckle layout | Determines whether the cover can secure to the frame |
A few product listings make that mismatch easy to spot. One supplier notes that a 10' x 20' high-peak frame needs a 12' x 20' top cover, and it also points out a 3 to 4 inch gap between the frame edge and tarp edge on traditional-style covers (high-peak fit reference). Another listing for a VEVOR 10' x 20' frame replacement cover describes a one-piece cover with a full valance, grommets every 18 inches, and compatibility with a 10' x 20' high-peak frame with a 120-degree corner angle (model-specific listing). That kind of detail is what keeps a cover from looking right on paper and failing at the corners.
Hardware style can decide the whole purchase
The attachment hardware often decides whether the cover installs cleanly or fights you the whole way. One Home Depot listing for a 10 ft. x 20 ft. replacement canopy cover uses 72 elastic buckles, while another 10 x 20 canopy tarp relies on polycarbonate grommets about every 24 inches and a 10 mil thickness (elastic buckle listing). That difference changes how evenly the tension spreads across the frame, and it changes how much time you spend fighting the last few tie points.
For anyone comparing accessories in other frame categories, the same fit logic applies. A practical example is 4x6 post cap sizing help, where the nominal size only works if the fit pattern is right. The same rule applies here, the title matters less than the geometry underneath it.
If you need a quick check against the right accessory set, a replacement canopy accessories selection can help you compare tie-down styles, while the frame itself still has to match the cover cut. The right cover is the one built for your exact frame geometry, not the cheapest one that happens to say 10 x 20 in the title.
Removing the Old Top and Installing the New One
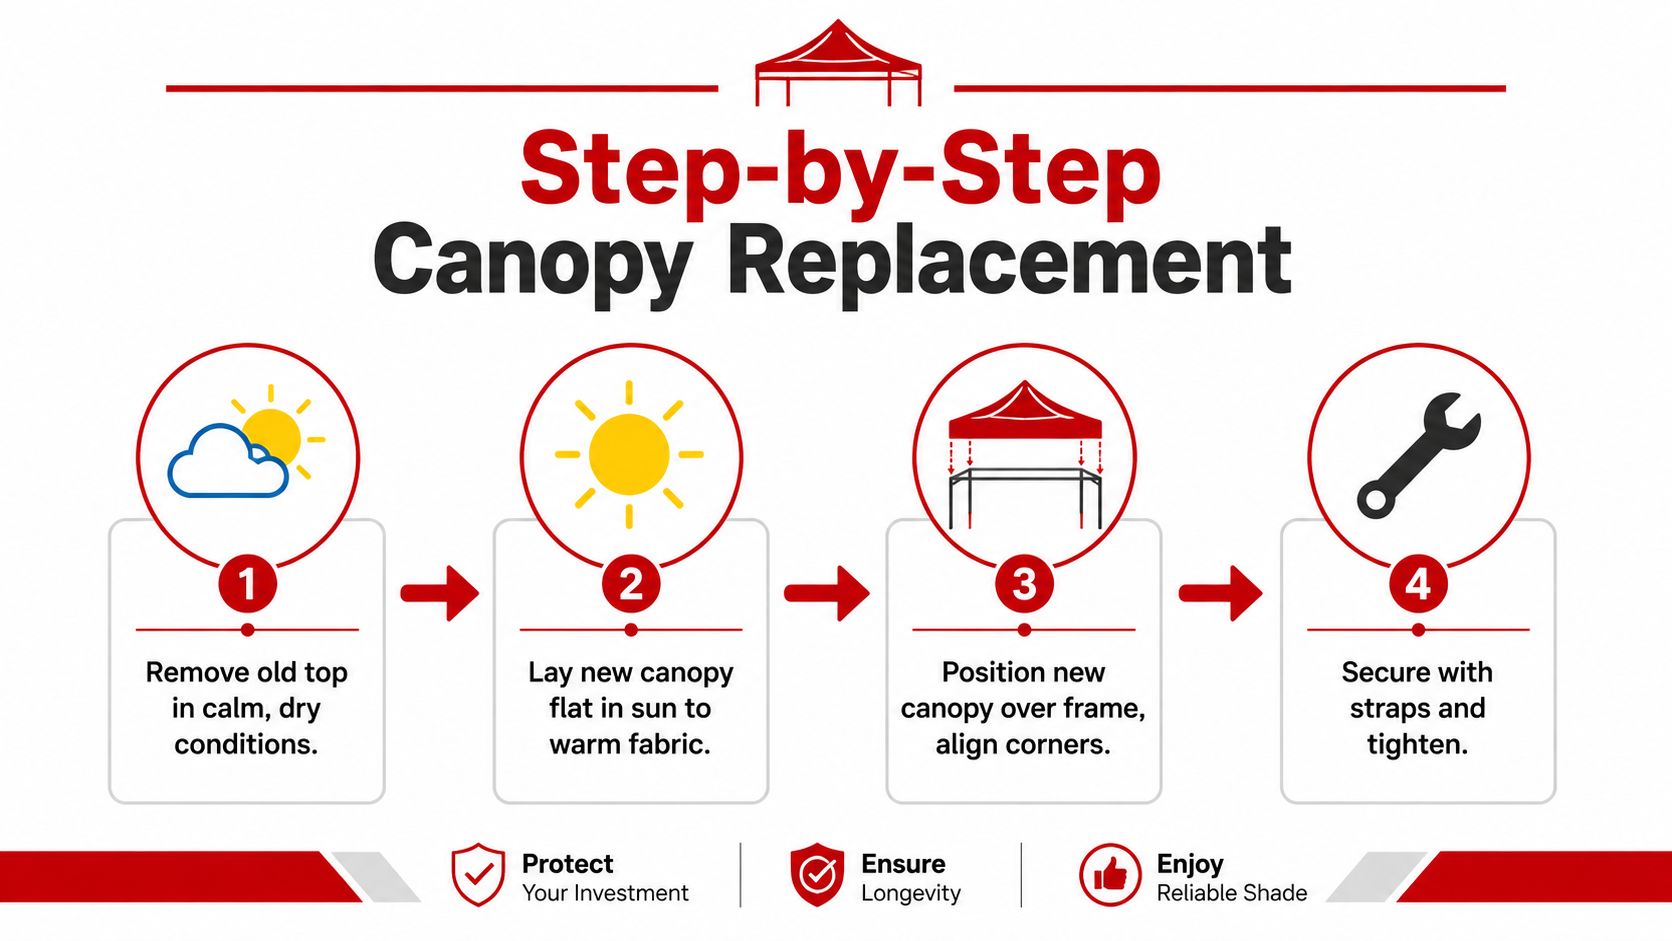
Take the old cover down on a calm, dry day if you can. Wet fabric gets heavier, dirtier, and more likely to snag on corners, and dry weather gives you room to work without fighting gusts or slippery surfaces. Before the new top goes on, lay it flat in the sun for a few minutes so the fabric relaxes and the edges stop fighting every movement.
The actual swap goes smoother when the cover lands on the frame with the corners aligned first. I've seen too many people pull one side tight too early, then spend the rest of the job chasing a twist in the fabric. The smarter move is to drape the new canopy, secure the four corners first with bungees or buckles, and then work methodically along each long side so the tension stays even.
Keep the fabric off the ground
A low ladder helps when the frame is tall, but the goal is control, not speed. You want the fabric lifted, not dragged, because a single grit-covered edge can leave a weak point before the canopy is even fully installed. Two helpers is usually enough for a typical frame, though a third pair of hands makes the first alignment much easier if the cover is stiff or the roof line is steep.
Even tension matters more than brute force. If one side is over-tightened, the frame can look square from a distance while the cover shifts, billows, or starts to untwist under load. Installation guidance stresses square-frame alignment and even pull across the structure because poor alignment is a common cause of seam stress and water pooling (installation guidance).
Practical rule: if the corners are right and the sides are balanced, the cover usually lasts longer.
This is also where the accessory system matters. A cover that uses bungees behaves differently from one that uses fixed buckles, so follow the attachment sequence that matches the hardware instead of improvising. For replacement straps, tie-downs, and related parts, the tent accessories collection is the kind of category that shows how much the hardware choice shapes the install.
Troubleshooting Wear, Wind, and Water Problems
The first sign of trouble is usually visual. Water collects in the middle, one corner flutters louder than the others, or the fabric starts to fray near a grommet after a windy week. Those symptoms usually point to the same root causes, poor tension, weak anchoring, or a top that has been stretched beyond what the frame geometry can support.
Match the symptom to the cause
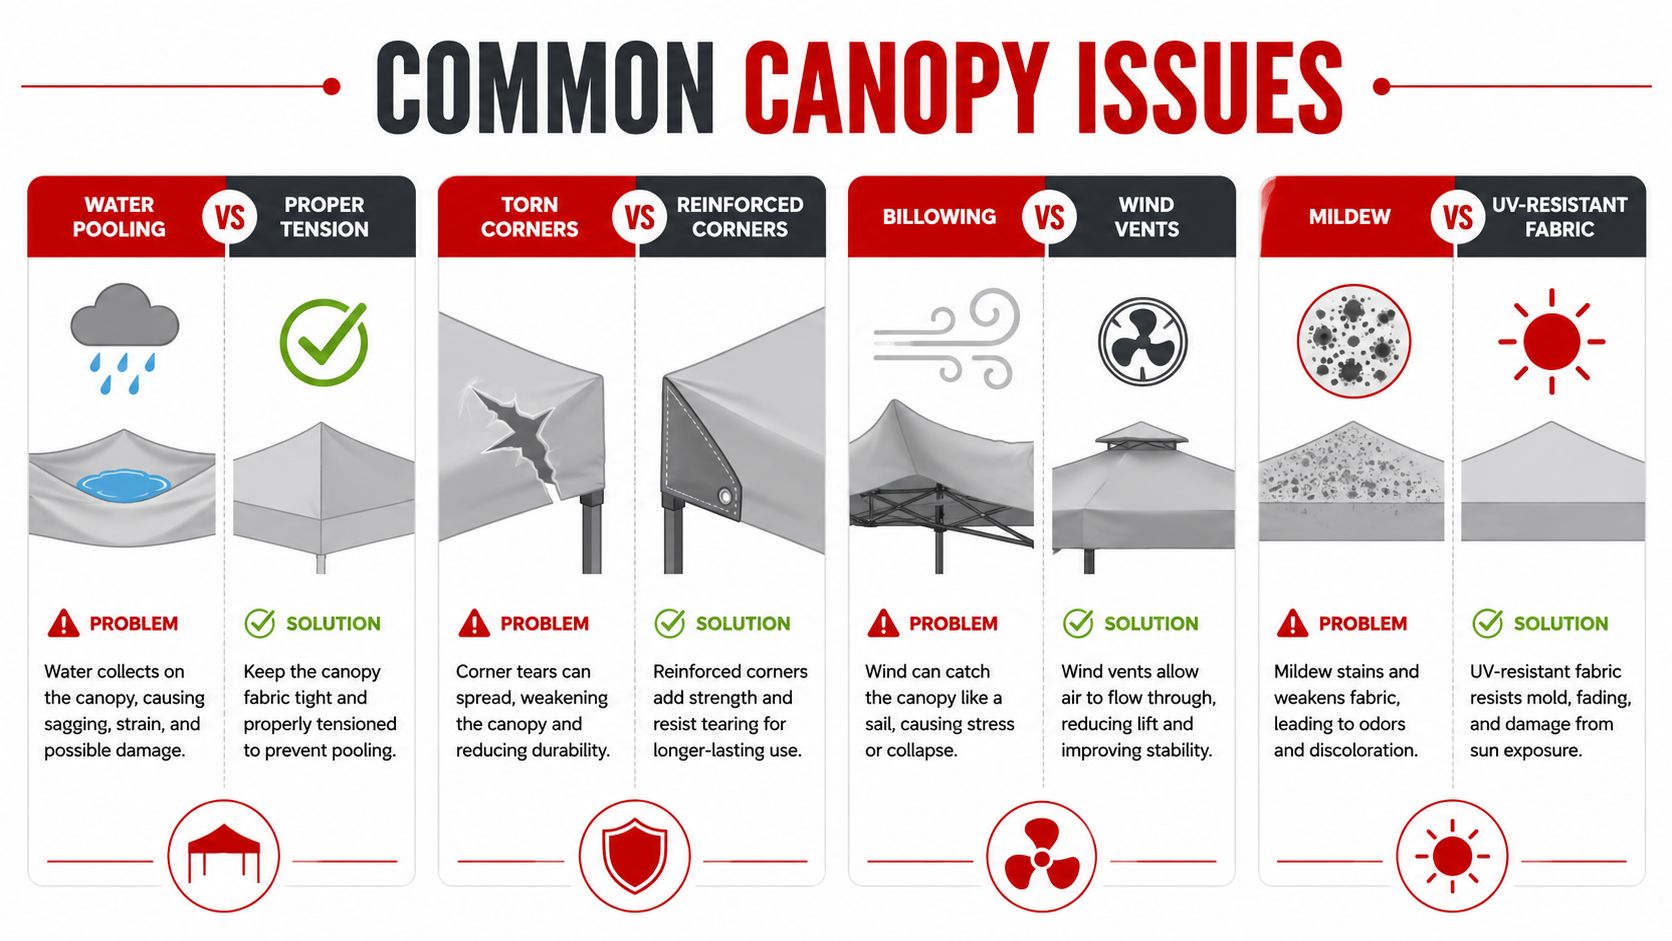
Water pooling usually means the pitch is wrong or the fabric has loosened over time. Retension the cover and check that the frame is still square, because sag creates a low spot where rain can sit. Torn corners usually point to stress at the attachment point, which is where reinforced corners and better load distribution matter most.
Billowing in gusts tells you the canopy is not anchored hard enough or the side tension is uneven. A 10 x 20 canopy may need about 370 lb of ballasting to reach a 35 mph wind rating, which shows how much restraint a large temporary structure can require (ballast and wind rating reference). That does not mean you force the cover through every forecast, it means you treat wind as part of the fit and setup, especially on a frame with open sides or a tall roofline.
Mildew usually shows up when the cover is stored damp or left dirty for too long. Cleaning and dry storage matter because UV, moisture, and grime all shorten a cover's useful life. For practical outdoor habits that carry over to shelters and small tents, the kids tents outdoor guide reinforces the value of simple maintenance and steady setup habits.
A quick mental checklist
- Pooling in the center: retension the top, then check whether the frame is square.
- Corners tearing first: inspect reinforcement, attachment spacing, and the fit at the peak.
- Fabric moving in wind: improve anchoring before you add more tension.
- Stains or mildew: dry the cover fully before storage and clean it sooner next season.
The important part is not guessing. Each symptom points to a mechanical problem, and the fix is usually structural before it is cosmetic.
Smart Buying and Care Habits for the Long Run
A good 10 x 20 replacement canopy starts with the frame in front of you, not the marketing copy on the box. I have seen plenty of covers fail early because the buyer matched the fabric first and the geometry second. Before you spend money, confirm the frame shape, connector style, ridge height, and attachment pattern, then compare those details with the replacement top. Product listings can help you verify what you are buying, but the true test is whether the cover follows your shelter's layout cleanly.
Care habits that pay off
Once the cover is on, the best results come from steady maintenance. Brush off leaves, twigs, and dust before they sit in damp spots. Retighten bungees, straps, or buckles after windy weather, because a top that flutters wears faster at the corners and seams. Store the cover dry, folded neatly, and kept away from sharp frame hardware. None of that is flashy, but it is what keeps a cover usable for longer.
Buyers ask the same questions for a reason. A warranty tells you how the product is backed, not how it will behave if the frame is out of square or the top is installed with poor tension. A 50+ UPF claim can mean the cover is built to block sun well, but only if the fabric and coating stay intact and the cover is fitted properly. If the frame is bent, racked, or built with the wrong connector layout, a new top will not fix the underlying fit problem.
The smartest purchase is the one that matches the shelter you own. On a 10 x 20 frame, that usually means checking how the peaks rise, how the rails meet the connectors, and whether the top is cut for that exact shape rather than just the nominal size. Fabric weight matters, but it does not rescue a cover that pulls against the wrong geometry. A cheaper cover often fails early because the stress lands on the wrong points, not because the material sounded thin on paper.
If you are comparing outdoor products for kids, classrooms, or backyard learning spaces, Playz builds around the same idea. Purposeful design matters more than flashy claims. Their gear is made to support active use, creative play, and weather-aware setup thinking, which is the same practical mindset that helps outdoor equipment last.
If you are ready to choose a shelter solution with the right mix of fit, durability, and practical design, visit Playz and look at the outdoor play options built for real family use. You will find products that reflect the same attention to structure, setup, and long-term value that smart buyers want in a canopy cover.