

Ready to transform a simple block of clay into something amazing? Whether you're a parent seeking engaging, screen-free activities, an educator planning a memorable class project, or an artist eager to explore a new medium, you've landed in the right place. Clay is a wonderfully versatile material that offers endless possibilities for all ages and skill levels, making it perfect for hands-on learning and artistic expression.
This guide dives straight into 10 incredibly cool stuff to make out of clay, complete with practical examples, actionable insights, and fresh inspiration for your next masterpiece. We skip the long-winded theory and get right to the fun. Inside, you'll find a curated collection of projects ranging from playful character sculptures and functional jewelry to unique home decor.
Each idea is designed to be accessible and rewarding, helping you build confidence and create items you'll be proud to display or use. If your journey with clay sparks a wider interest in artistic expression, you might wish to explore other creative arts to further develop your talents. For now, let's get our hands dirty and start creating.
1. Hand-Built Ceramic Planters
Creating hand-built ceramic planters is one of the most rewarding and cool things to make out of clay, blending artistic expression with a practical purpose. This project involves shaping clay without a pottery wheel, using fundamental techniques like pinching, coiling, or slab-building to construct custom pots for houseplants. It’s an ideal way to craft a personalized home for succulents, herbs, or small flowers, turning a simple container into a unique piece of home decor.

This trend has been popularized by creators on Etsy and Instagram, who showcase everything from boho-chic designs with intricate patterns to minimalist geometric shapes and quirky face planters. The beauty of hand-building is its accessibility; even beginners can achieve stunning results with a few basic tools and a bit of patience. This hands-on process not only yields a beautiful product but also enhances spatial awareness and fine motor skills.
Actionable Tips for Perfect Planters
- Maintain Wall Thickness: Keep the clay walls around 1/4-inch thick. This consistency ensures the planter dries evenly, reducing the risk of cracks.
- Score and Slip: Before joining two pieces of clay, scratch hash marks (scoring) into both surfaces and apply a thin layer of watered-down clay (slip). This technique creates a strong, permanent bond.
- Prioritize Drainage: Use a skewer or pencil to poke one or more drainage holes in the bottom of your pot before the clay hardens. Proper drainage is crucial for plant health.
- Seal for Durability: If using air-dry clay, apply a waterproof sealant inside and out after it has fully dried. This protects your creation from water damage and makes it a durable home for your plants.
2. Miniature Sculpture Garden Landscapes
Creating miniature sculpture garden landscapes is one of the most imaginative and cool things to make out of clay, allowing you to build entire tiny worlds from scratch. This project involves crafting intricate, small-scale scenes with tiny clay figures, plants, structures, and terrain. These dioramas combine sculptural skill with storytelling, resulting in immersive fantasy or realistic environments that capture the imagination.
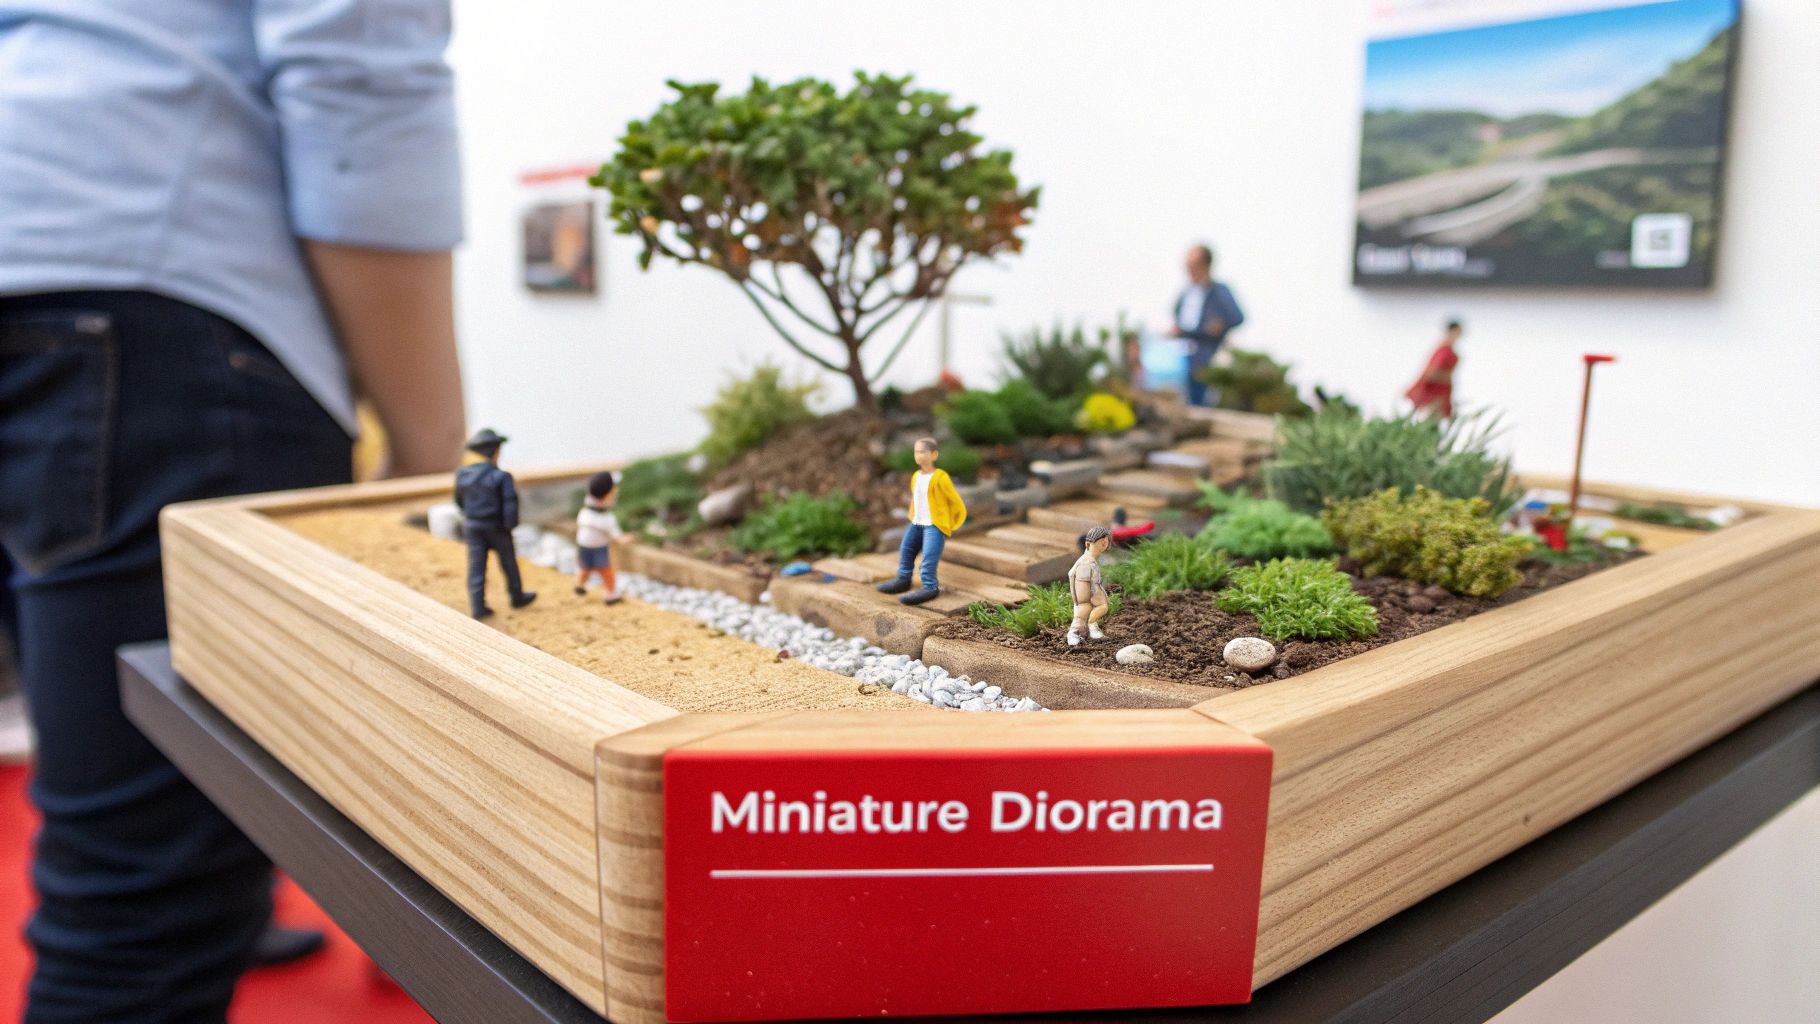
This art form has been popularized on TikTok and Instagram, where creators showcase everything from fantasy scenes inspired by Lord of the Rings to hyper-realistic natural landscapes. The beauty of these projects lies in their ability to tell a story within a small space, making them a fantastic outlet for creativity. Real-world examples include detailed fairy gardens, post-apocalyptic cityscapes, or serene Zen garden replicas, all crafted from clay and other mixed media.
Actionable Tips for Perfect Landscapes
- Build a Stable Base: Start with a sturdy base, like a block of wood, a small box, or a layer of hardened clay. This foundation ensures your delicate scene remains secure.
- Work from Large to Small: Begin by creating the largest elements of your landscape first, such as terrain, hills, or buildings. Add smaller details like figures and plants afterward.
- Use Reference Photos: For realistic scenes, use reference photos of landscapes, architecture, or plants to guide your sculpting and ensure accuracy in scale and detail.
- Paint Before Placing: It's much easier to paint tiny figures, trees, and accessories before you glue them into the final scene. This allows for cleaner, more detailed work.
3. Decorative Clay Masks and Wall Art
Crafting decorative clay masks and wall art is an ambitious and impressive project, making it one of the coolest things to make out of clay for those wanting to create a true statement piece. This involves sculpting three-dimensional forms, from theatrical masks to abstract wall hangings, that serve as bold home decor. It’s an advanced project that allows for deep artistic exploration, blending sculptural techniques with creative expression.
This art form is celebrated by contemporary sculptors and fine art institutions, with designs ranging from whimsical animal faces to profound human expressions. Creating such pieces offers a fantastic opportunity for hands-on learning, allowing you to explore anatomy, form, and texture. According to research, this type of tactile learning can significantly improve creative problem-solving skills, as detailed in the benefits of hands-on learning on Playzusa.com. The process itself is as rewarding as the final product.
Actionable Tips for Stunning Sculptures
- Build an Armature: For larger or more complex masks, construct a support structure (armature) out of crumpled newspaper, wire, or a plastic mask form. This prevents the clay from collapsing under its own weight as you work.
- Ventilate Your Piece: Hollow out the back of thick areas and poke small, discreet holes to allow air and moisture to escape during drying and firing. This step is crucial to prevent cracks or explosions in the kiln.
- Use Molds for Symmetry: If you want perfectly symmetrical features like eyes or ears, create a small press mold from a master shape. This ensures consistency and saves time.
- Plan for Mounting: Before the clay dries, create sturdy attachment points on the back, such as embedded wire loops or reinforced holes, so you can safely hang the finished piece.
4. Functional Jewelry (Beads, Pendants, Rings)
Creating functional jewelry is another one of the coolest things to make out of clay, turning a simple block of material into wearable art. This project involves hand-sculpting beads, pendants, rings, and other ornamental pieces that combine artistic flair with personal style. It's a fantastic way to design custom accessories that reflect your personality or to create heartfelt, handmade gifts for friends and family.
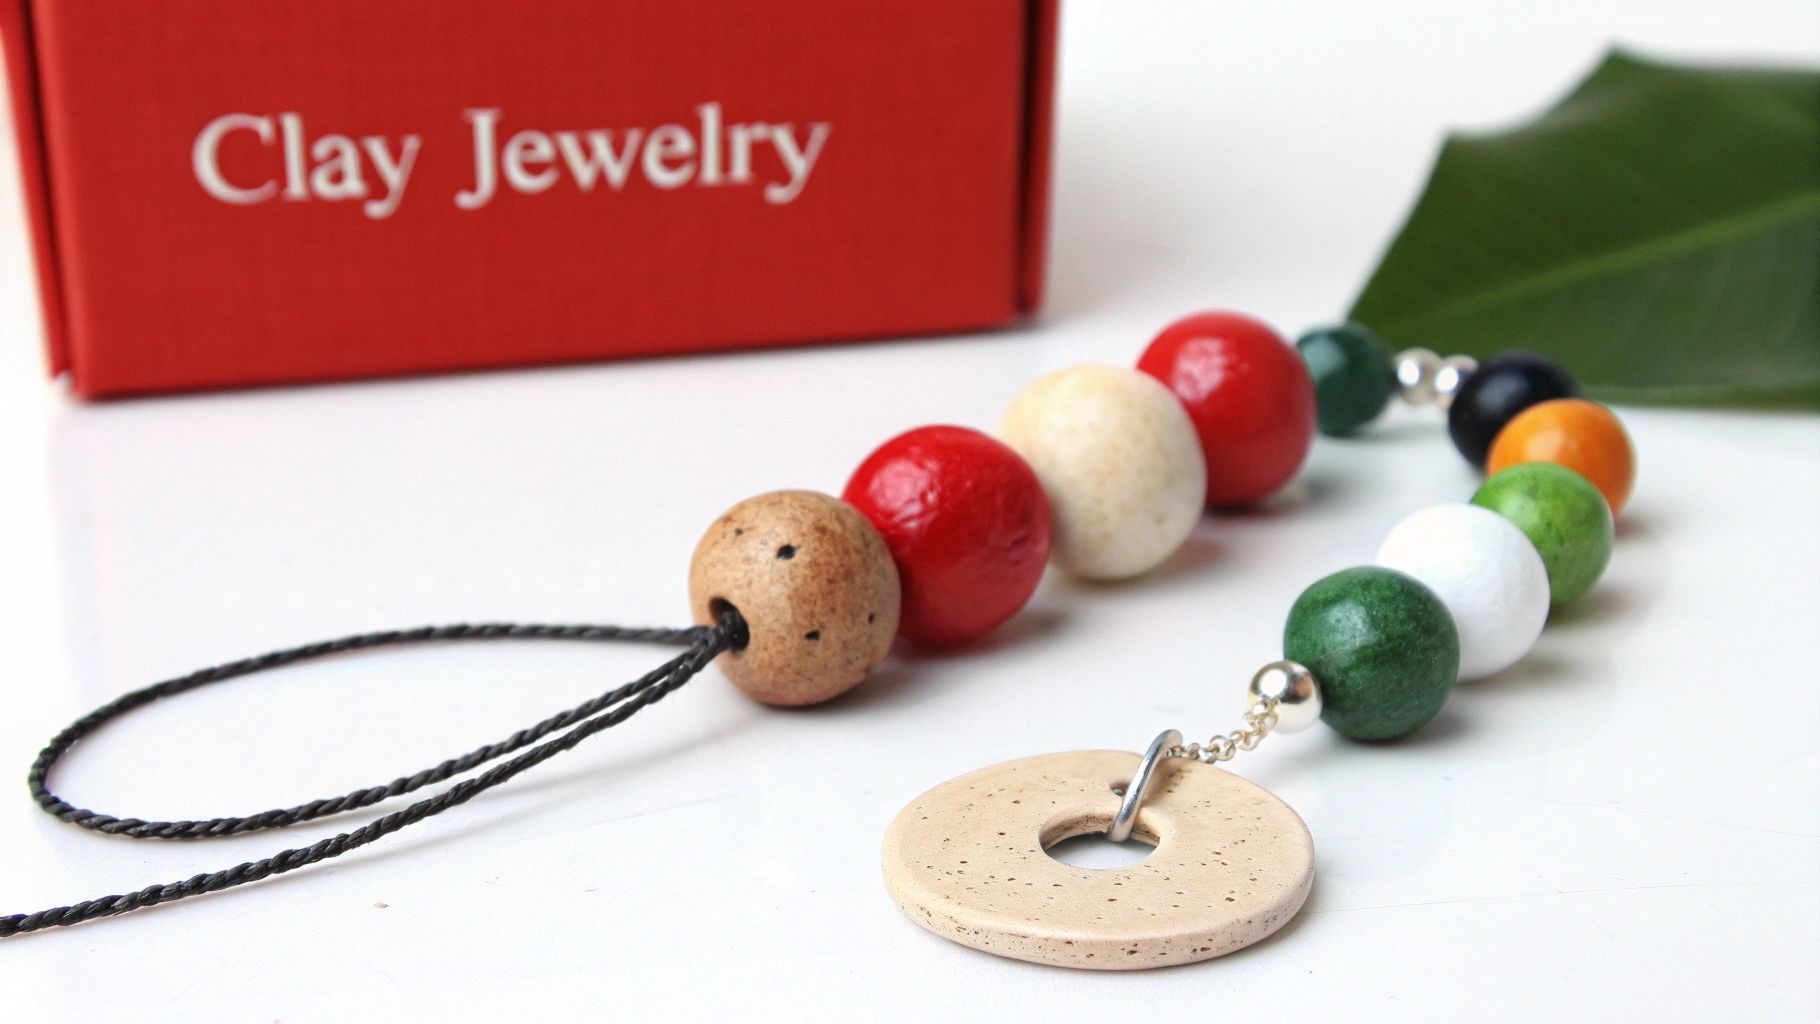
This trend is incredibly popular with Etsy makers and TikTok DIY creators, who showcase everything from boho-style beaded necklaces to intricate pendants popularized by polymer clay artisans. The appeal lies in its versatility and accessibility; polymer clay, in particular, is perfect for this as it hardens in a standard oven, no kiln required. Crafting small beads and shapes is also an excellent way to strengthen fine motor skills and hand-eye coordination.
Actionable Tips for Perfect Jewelry
- Choose Polymer Clay: For durable, colorful, and lightweight jewelry that doesn't require a kiln, polymer clay is the ideal choice.
- Size Bead Holes Correctly: When piercing holes in beads, use a needle or skewer slightly larger than your intended stringing material. The hole will shrink a bit during baking.
- Roll for Roundness: To create perfectly spherical beads, roll small balls of clay between your palms or on a smooth, clean surface like a ceramic tile.
- Add Some Shimmer: Experiment with brushing mica powders onto the clay surface before baking to give your finished pieces a beautiful, metallic sheen.
- Seal for a Professional Finish: After baking and cooling, apply a thin coat of polymer clay gloss or satin varnish to protect the surface and make the colors pop.
5. Textured Wall Tiles and Decorative Panels
Creating textured wall tiles and decorative panels is a sophisticated and cool thing to make out of clay, allowing you to transform a blank wall into a large-scale piece of custom art. This project involves crafting modular clay tiles, each featuring unique embossed patterns, relief designs, or interesting textures. When arranged together, these individual pieces create a stunning visual statement that adds depth and personality to any room.
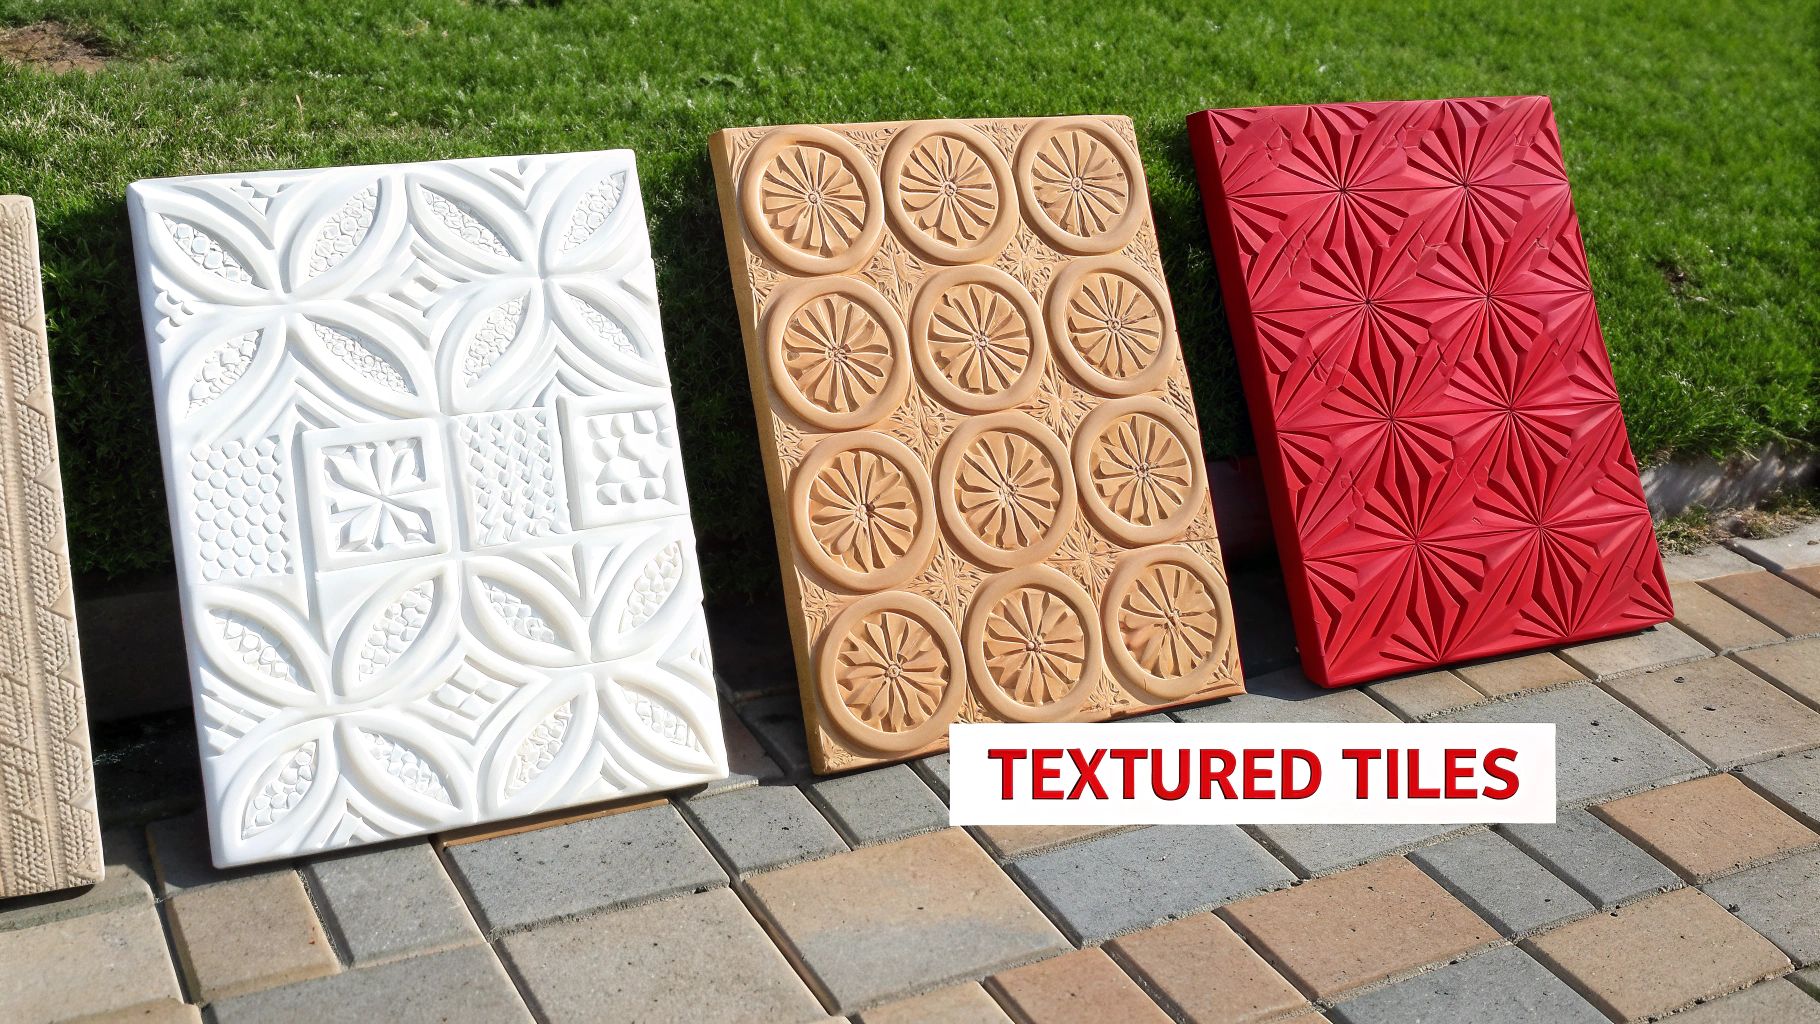
This art form is championed by interior designers and contemporary ceramicists who create everything from minimalist geometric installations to intricate, Moroccan-inspired arrangements. The beauty of making your own tiles is the complete creative freedom it offers. You can experiment with natural textures by pressing leaves, fabric, or even found objects into the clay surface. The result is a bespoke art piece that reflects your personal style and elevates your home’s aesthetic.
Actionable Tips for Perfect Panels
- Keep Thickness Uniform: Roll your clay slabs to a consistent thickness, ideally between 1/4 and 3/8-inch. This is crucial for preventing warping and cracking during drying and firing.
- Create a Template: Make a sturdy paper or cardboard template to cut all your tiles to the same size. This ensures your modular pieces will fit together perfectly in your final arrangement.
- Impress with Intention: Use tools, stamps, or natural objects to press patterns into the clay when it is leather-hard. At this stage, the clay is firm enough to hold a crisp impression without sticking.
- Plan Your Layout: Before firing, lay out your dried tiles on the floor to finalize the arrangement. This allows you to visualize the finished piece and make any necessary adjustments.
6. Polymer Clay Figurines and Character Sculptures
Sculpting detailed polymer clay figurines is one of the most creative and cool things to make out of clay, allowing you to bring characters from your imagination to life. This process involves shaping colorful, oven-bake polymer clay into small-scale figures, ranging from whimsical creatures to detailed replicas of anime or gaming characters. It’s a fantastic way to create custom collectibles, personalized Dungeons & Dragons miniatures, or unique gifts.
This artistic niche has been heavily popularized by the anime and gaming communities, with skilled artisans on Etsy and Instagram showcasing incredibly detailed character sculptures. Tutorial creators on YouTube have made the craft accessible to beginners, demonstrating techniques for everything from sculpting faces to creating intricate outfits. The appeal lies in the ability to create highly detailed, durable art pieces right from your home oven.
Actionable Tips for Perfect Figurines
- Build a Wire Armature: For any figure that isn't a simple blob, create a supportive skeleton using wire. This prevents limbs and other delicate parts from drooping or breaking during sculpting and baking.
- Start with Simple Shapes: Before tackling complex anatomy, practice by breaking down your character into basic geometric shapes like spheres, cones, and cylinders. This helps establish correct proportions.
- Bake in Stages: For complex, multi-part figures, you can bake individual components separately and join them later with liquid clay or strong adhesive. This technique, called "staging," prevents you from smudging finished details while working on another area.
- Sand and Prime: After baking, use fine-grit sandpaper to smooth out any imperfections or fingerprints. Applying a thin coat of primer before painting will ensure your acrylic paints adhere better and the colors appear more vibrant.
7. Textured Bowls and Serving Vessels
Crafting textured bowls and serving vessels is a fantastic way to create cool stuff to make out of clay that is both beautiful and functional. This project involves using techniques like pinching, coiling, or even wheel-throwing to form bowls, then adding unique surface treatments for a one-of-a-kind finish. It’s a rewarding process that bridges the gap between sculptural art and practical homeware, allowing you to make pieces for serving food or as decorative accents.
This craft is celebrated by studio potters and the handmade goods community on Etsy, where unique bowls are highly sought after. For those interested in creating their own tableware, understanding the qualities of expertly crafted pieces can inspire your projects, such as when choosing artisan ceramic dinnerware. The appeal lies in creating functional art that adds a personal touch to your home.
Actionable Tips for Perfect Bowls
- Ensure Consistent Thickness: Maintain an even wall thickness throughout the bowl to promote uniform drying and firing, which helps prevent cracks.
- Dry Slowly: Cover your freshly made bowl loosely with plastic. This slows the drying process, reducing the risk of stress fractures, especially around the rim.
- Texture at the Right Time: Apply decorative textures when the clay is leather-hard. At this stage, it’s firm enough to hold impressions without deforming the bowl's shape.
- Use Food-Safe Glazes: If your bowl will be used for serving food, it is crucial to select glazes that are certified as lead-free and food-safe. Always check the product label.
8. Air-Dry Clay Tabletop Game Terrain and Miniatures
Crafting custom terrain and miniatures for tabletop games is one of the most creatively engaging and cool things to make out of clay. This project allows hobbyists to build immersive worlds for games like Dungeons & Dragons or Warhammer, turning a simple game board into a dynamic, three-dimensional landscape. From crumbling castle walls and mysterious dungeon tiles to unique miniature figures, air-dry clay offers a versatile and accessible medium for bringing your gaming adventures to life.
This niche has exploded in popularity, driven by dedicated communities on platforms like YouTube and Reddit, inspiring millions to sculpt their own gaming environments. Etsy shops are filled with handcrafted clay miniatures and terrain pieces, showcasing the high level of detail possible. The process combines sculptural art with the strategic elements of tabletop gaming, allowing for a personalized and deeply rewarding hobby experience that enhances every game session.
Actionable Tips for Perfect Gaming Pieces
- Build on a Stable Base: Construct your terrain on a sturdy base like cardboard, foam board, or MDF. This provides structural support and prevents warping as the clay dries.
- Use Quality Clay: Opt for dense, smooth air-dry clays like Das or Fimo Air. These brands hold fine details well and are less prone to cracking, which is essential for miniature work.
- Prime Before Painting: Always apply a coat of primer to your dried clay pieces before painting. This helps the paint adhere better and brings out the vibrancy of your colors.
- Seal for Protection: After painting, apply a matte or satin varnish to your finished terrain and miniatures. This protects the paint job from chipping and wear during gameplay.
9. Clay Stamp and Texture Tools
Creating your own clay stamps and texture tools is an inventive project that empowers you to add unique, personal marks to any ceramic piece. Instead of buying generic tools, this project involves shaping clay into custom stamps with your own designs, patterns, or signature marks. These handcrafted tools can be used to embellish pots, create intricate patterns on jewelry, or add texture to sculptural forms, making it one of the coolest things to make out of clay for artists looking to personalize their work.
This practice is popular among professional potters who develop a "maker's mark" to sign their work, and it has also been embraced by the handmade goods community. Etsy sellers often offer custom stamps for branding, while craft blogs provide endless tutorials for DIY texture tools. The ability to create a one-of-a-kind impression tool opens up limitless decorative possibilities for any clay project.
Actionable Tips for Perfect Stamps
- Design in Reverse: Remember to carve your design as a mirror image of how you want the final impression to look. This is especially important for letters or logos.
- Choose Durable Clay: Use a high-quality, sturdy clay like stoneware that can withstand repeated pressure and use. Firing it at a higher temperature will maximize its durability.
- Create an Ergonomic Handle: Shape a handle that is comfortable to grip and apply even pressure with. This makes the stamping process easier and more precise.
- Test Your Designs: Always test your stamps on a scrap piece of clay before using them on a final project. This allows you to check the clarity and depth of the impression.
10. Decorative Clocks with Clay Faces and Accents
Creating a decorative clock is one of the coolest and most functional things to make out of clay, merging practical timekeeping with personal artistry. This project involves sculpting a unique clock face, custom numerals, or a textured bezel to house a simple clock mechanism. It’s a fantastic way to craft a functional piece of decor that reflects your style, whether you prefer quirky, minimalist, or rustic designs for your home or office.
This trend has been championed by Etsy artisans and the Pinterest home decor community, who showcase everything from personalized commemorative gifts to bold, geometric timepieces. The process is surprisingly straightforward, allowing even beginners to design a professional-looking clock. Making a clock is also an engaging family project that teaches about both art and the mechanics of time.
Actionable Tips for Perfect Clocks
- Buy the Mechanism First: Purchase a clock mechanism kit before you begin. This allows you to build your clay design around the specific dimensions of the shaft and hands.
- Keep the Face Flat: Ensure the clay clock face is rolled to a flat, even thickness. An uneven surface can obstruct the movement of the clock hands.
- Measure the Center Hole: Create a center hole that is just large enough for the mechanism’s shaft to fit through snugly. A hole that is too large or too small will cause assembly issues.
- Balance Your Design: When placing numerals or decorative accents, use a ruler to ensure they are positioned symmetrically for a visually balanced and professional-looking timepiece.
Clay Creations Project Comparison
| Project | Complexity 🔄 | Resources & Equipment ⚡ | Expected Outcomes ⭐ | Ideal Use Cases 📊 | Key Advantages 💡 |
|---|---|---|---|---|---|
| Hand-Built Ceramic Planters | Low to Moderate | Clay (air-dry or ceramic), hand tools, glaze (optional), kiln (optional) | Functional decorative planters; durable when fired | Houseplants, gifts, small shop listings | Custom shapes/textures; beginner-friendly air-dry option |
| Miniature Sculpture Landscapes | High | Modeling clay (polymer/air‑dry), fine sculpting tools, paints, bases | Highly detailed display pieces; strong visual/collectible impact | Gallery displays, collectors, social media portfolios | Rich storytelling, highly shareable work |
| Decorative Clay Masks & Wall Art | High | Clay, armature materials, kiln recommended, mounting hardware | Bold statement pieces; gallery or installation quality | Home statement decor, theatre, exhibitions | Expressive forms, cultural/artistic significance |
| Functional Jewelry | Low to Moderate | Polymer or ceramic clay, molds/tools, oven for polymer, findings | Wearable accessories; quick turnaround; marketable | Gifts, craft markets, beginner makers | Low material cost, no kiln with polymer, fast projects |
| Textured Wall Tiles & Panels | High | Clay, templates, kiln, glazing materials, installation supplies | Strong architectural/visual impact; scalable | Home improvement, commercial installations, feature walls | Modular configurations; unique aesthetic benefits |
| Polymer Clay Figurines | Moderate to High | Polymer clay, armature wire, oven, paints, fine tools | Collectible figures; commission potential | Collectors, fan art commissions, small business sellers | No kiln needed; strong collector community |
| Textured Bowls & Vessels | Moderate | Clay, hand/wheel tools, kiln, food‑safe glazes | Practical tableware when properly finished | Everyday use, gifts, artisan markets | Functional utility with decorative texture; steady demand |
| Air-Dry Clay Game Terrain | Low to Moderate | Air‑dry clay, bases, paints, sealant, basic sculpting tools | Lightweight, customizable terrain; less durable than fired | Tabletop RPGs, wargaming hobbyists, DIY terrain builders | No kiln, fast drying, easy repairs/modularity |
| Clay Stamps & Texture Tools | Moderate | Clay (bisque-fired recommended), carving tools, handles, kiln | Reusable tools that speed texture work; sellable | Potters, printmakers, studios needing repeatable textures | Creates unique repeatable marks; saves time in production |
| Decorative Clay Clocks | Moderate | Clay, clock mechanism kits, basic tools, mounting hardware | Functional art clocks; good gift items | Home decor, personalized gifts, artisan shops | Blends utility with art; customizable designs |
Ready to Start Creating? Your Next Project Awaits!
From functional hand-built planters to imaginative polymer clay figurines, we’ve explored a diverse landscape of creative possibilities. The common thread connecting every project is the simple, tactile joy of transforming a lump of clay into something new. You now have a comprehensive guide filled with actionable steps and practical tips, ensuring your journey into the world of clay is both fun and rewarding.
The true magic of working with clay lies in its versatility and accessibility. Whether you are a parent looking for a weekend activity, an educator, or simply someone searching for a new creative outlet, there is a project on this list for you. This article was designed to be more than just a list; it’s a launchpad for your imagination.
Key Takeaways for Your Clay Adventures
As you prepare to get your hands dirty, let’s revisit the core insights that will help you succeed:
- Embrace the Process: The most valuable part of making cool stuff out of clay is the experience itself. Enjoy the feeling of shaping the material and the lessons learned from happy accidents.
- Start with the Right Materials: Your project's success often begins with choosing the appropriate clay. Air-dry clay is perfect for simple projects, while polymer clay offers vibrant colors and durability for detailed work like jewelry and figurines.
- Safety and Cleanup are Part of the Craft: Always work in a well-ventilated area, protect your surfaces, and follow the specific safety guidelines for your chosen clay type, especially when baking polymer clay.
Your Actionable Next Steps
Feeling inspired? Here’s how you can get started right now:
- Select Your First Project: Review the list and pick one project that truly excites you. Consider starting with something rated for low complexity, like air-dry clay beads or simple pinch pot planters, to build your confidence.
- Gather Your Supplies: Use the comparison table to see what you'll need for your chosen project. Most of these items are readily available at craft stores or online.
- Create Your Workspace: Designate a crafting area, cover your table, and lay out your tools. An organized space will allow you to focus entirely on the creative flow.
The journey of a thousand creations begins with a single piece of clay. So, choose your project, gather your materials, and let your imagination take shape.
Ready to take hands-on learning to the next level? At Playz, we believe that creativity and scientific curiosity go hand in hand, which is why our science kits are designed to make learning an unforgettable adventure. Explore our collection to discover even more ways to inspire your young creator and continue the journey of learning through play.