


Your child wants a fort right now, but you're looking at the living room, the available blankets, and the clock, wondering which idea will fit. Maybe you need a five-minute retreat, a structure that can handle active play, an outdoor project, or a screen-free activity with a clear learning purpose.
These fort building ideas move from quick household shelters to play tents, cardboard builds, outdoor dens, sensory spaces, themed worlds, and measurable STEM challenges. Each one includes materials, simple assembly steps, learning benefits, safety checks, play extensions, and practical pros and cons. The right choice depends on the child's age, energy level, sensory needs, setting, and the amount of adult supervision available.
A DIY fort offers maximum flexibility and almost no special equipment, but stability depends on the builder. A ready-made play tent provides faster setup and a defined space, while a modular or educational kit adds repeatable building challenges and structured learning. Whatever you choose, keep exits open, maintain ventilation, use stable supports, check the structure before play, and supervise assembly and active use.
1. Classic Blanket and Pillow Fort
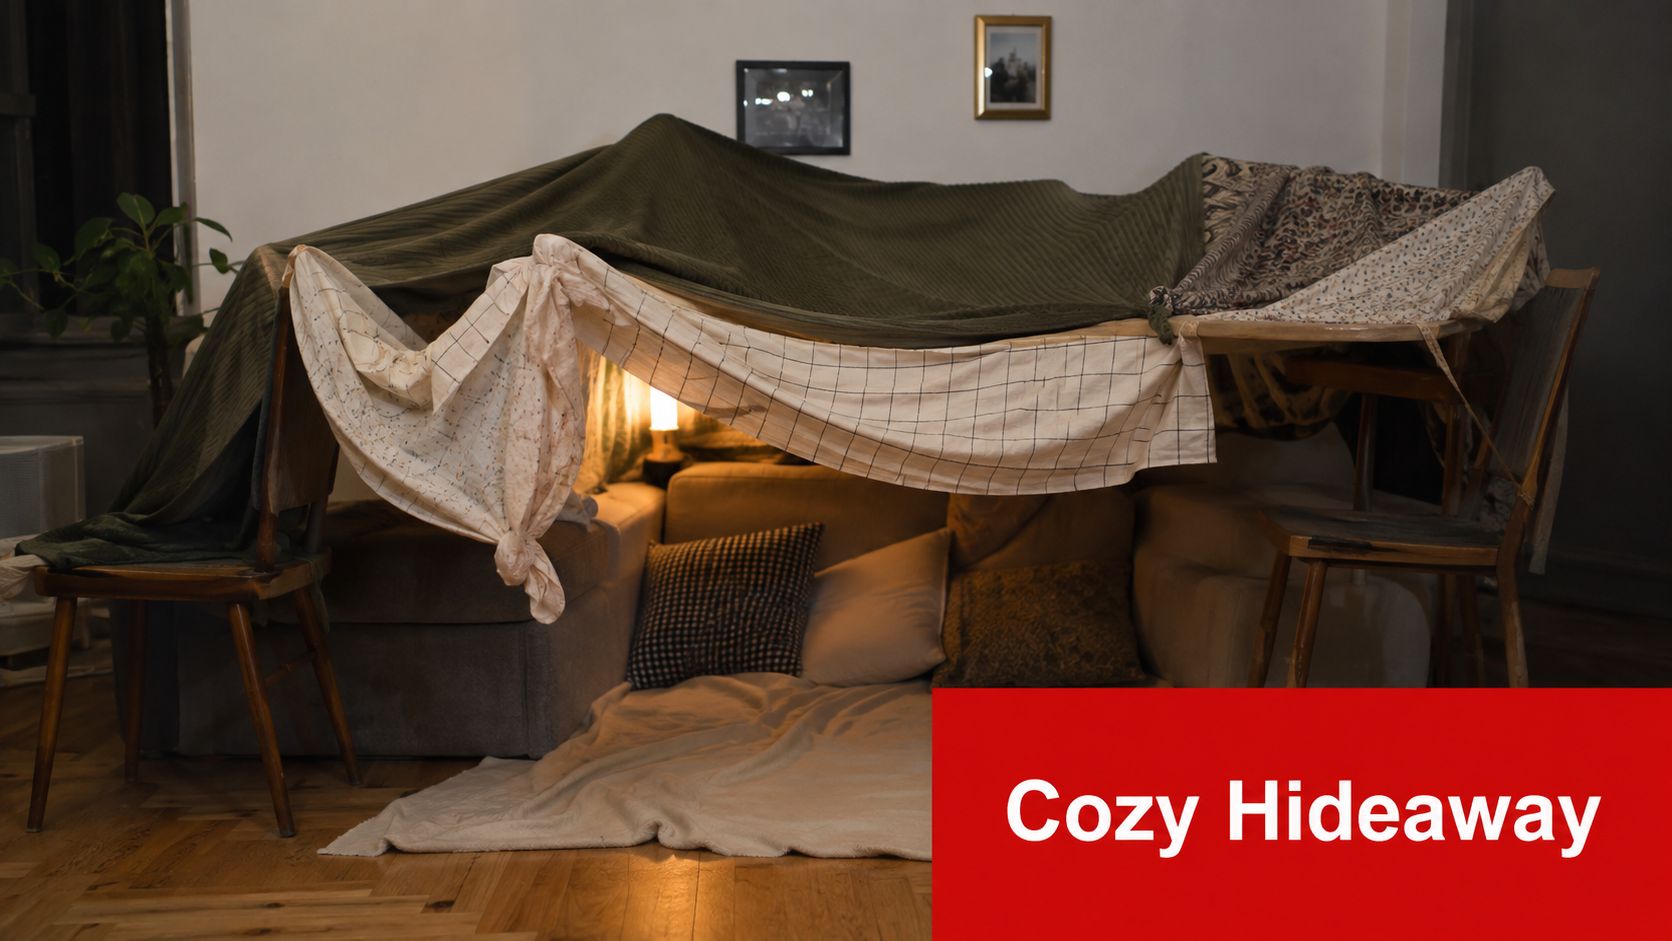
The classic blanket fort works because children can turn ordinary furniture into a private world. A sofa, chairs, cushions, bed sheets, and pillows become walls, doors, roofs, and furniture. The build is simple enough for spontaneous play, yet children still have to test which supports hold, where fabric sags, and how much space they need to crawl inside.
For a living room version, arrange four chairs in two rows, placing chairs of the same height back-to-back. Span the blanket across the gap so the chair backs create the framework, as shown in this blanket-fort setup guide. Add sofa cushions around the outside, then use pillows to weigh down corners without placing heavy objects overhead.
A bedroom fort can use a mattress and blankets draped over sturdy furniture. In a basement, children can create several connected rooms from separate blanket sections, provided every section remains low and easy to exit.
Make the retreat more inviting
Add battery-powered fairy lights, books, stuffed animals, or a pretend snack station. Multiple entry points encourage children to crawl, explore, and invent routes rather than treating the fort as a static hideaway. The activity supports spatial reasoning, problem-solving, resourcefulness, and imaginative play. Developmental guidance describes forts as a “home away from home,” connecting them with independence and private-space creation as children move from indoor forts toward outdoor dens and tree houses around age 6 or 7 (developmental fort-building guidance).
Pros: Accessible, inexpensive, easy to redesign, and excellent for collaborative play.
Cons: Blankets can slip, chairs can move, and enclosed fabric can restrict airflow. Keep the structure low, leave clear openings, and check it repeatedly.
For a step-by-step family version, use this pillow-fort tutorial from Playz.
2. Play Tent and Pop-Up Fort Systems
A play tent solves the biggest challenge of many DIY builds: reliable setup. A lightweight frame and fabric shell create a defined play space without asking children to balance blankets across furniture. That makes a pop-up tent useful when you want imaginative play to begin quickly, or when the room can't safely accommodate a large homemade structure.
Choose a theme that gives the space an immediate story. A teepee can become a campsite or reading lodge, while a castle tent supports pretend guards, royalty, and visitors. A spaceship tent turns the floor into a launch deck. Multi-room systems with connecting tunnels add movement and cooperation, especially when children assign different rooms to different roles.
Build responsibility into setup
Let children help unfold fabric, connect safe frame pieces, arrange cushions, and choose the first activity. That small responsibility gives them ownership without requiring them to manage the entire structure. Interior pockets can hold books or small toys, while multiple entrances support shared play and reduce bottlenecks.
For outdoor use, select a model suited to exterior conditions and check for features such as UV protection. Keep ventilation in view, especially in warm weather. An adult should inspect the frame, fabric, fasteners, and floor before each use, and the tent should sit on a clear, level surface.
Pros: Fast assembly, repeatable setup, defined boundaries, and strong support for role-play.
Cons: It offers less open-ended engineering than a blanket or connector fort, and it still needs careful placement and supervision.
Playz's indoor play tent ideas can help families use a tent as a stable base for imaginative, screen-free fort play.
3. Cardboard Box Fort Construction
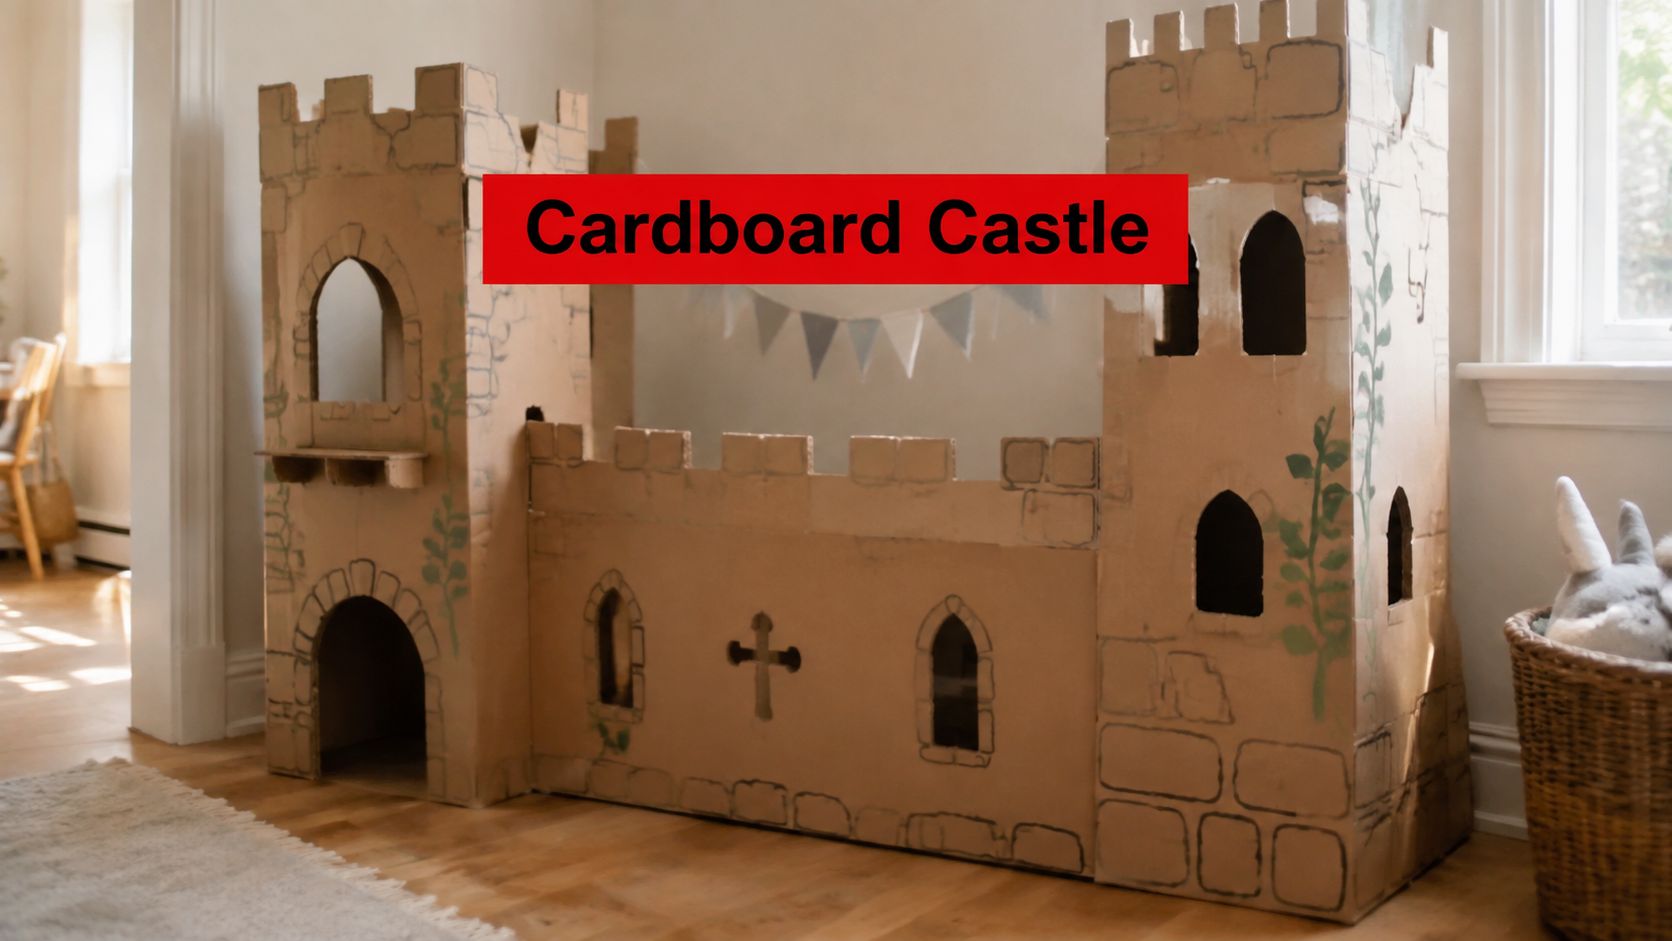
Cardboard forts turn recycling into architecture. A single large box can become a quiet hideaway, while several boxes can form rooms, tunnels, windows, shops, or castle walls. Children have to think in three dimensions, decide where openings belong, and notice which sections need reinforcement.
Start with sturdy boxes from a retailer, moving company, or household delivery. Before cutting, ask children to draw a basic floor plan. They might design a multi-room apartment, a pizza restaurant with working windows, a castle with turrets, or a connected tunnel system. Join sections with packing tape or duct tape, but let an adult handle cutting tools and inspect every edge.
Cut windows for visibility and light ventilation. Reinforce weak areas with extra cardboard or internal supports rather than stacking unstable boxes high. A low, wide structure is easier to enter, easier to monitor, and less likely to topple than a tall construction.
Turn building into a design studio
Invite children to paint signs, add flags, label rooms, and create menus or maps. Older children can make architectural sketches before construction, then compare the plan with the finished fort. Younger children can focus on decorating, matching shapes, opening windows, and carrying light pieces.
Pros: Reusable household material, strong creative ownership, and rich opportunities for design and storytelling.
Cons: Cardboard weakens with moisture and repeated handling, tape can loosen, and rough cut edges need attention.
Find more project prompts in Playz's guide to creative cardboard activities.
4. Stick and Branch Fort Building
Outdoor stick forts give children a direct experience with natural materials. A branch bends, slips, or supports weight differently from a chair or cardboard panel, so children learn through observation and adjustment. The activity also connects construction with the surrounding environment, whether the result is a simple lean-to, a woodland hideaway, or a small teepee form.
Choose a designated area with an adult, then collect fallen branches rather than breaking live trees. Begin with a sturdy tripod or a low frame made from larger fallen sticks. Lean smaller branches against it, layer leaves loosely for visual cover, and use natural binding materials only when they're safe and easy to remove. Don't build near roads, steep edges, unstable dead trees, water, or protected plants.
Teach nature care alongside construction
Set a clear boundary around the work area. Children can practice Leave No Trace principles by disturbing as little vegetation as possible, returning materials afterward, and removing string or decorations when the play session ends. Younger children can gather leaves and sort sticks by size. Older children can compare the flexibility, length, and balance of different branches.
Keep the fort low enough for easy entry and exit. Adults should test every support, remove sharp or unstable pieces, and remain nearby throughout play.
Pros: Encourages outdoor exploration, practical construction, nature awareness, and collaborative problem-solving.
Cons: Natural materials vary, weather can change the structure, and the site requires closer supervision.
For more ideas about safe, creative outdoor builds, explore Playz's DIY play-structure projects.
A short visual demonstration can help children understand how branches distribute weight:
5. Fort-Building Kits and Modular Systems
A modular fort kit sits between a ready-made tent and a completely improvised build. Rods, connectors, panels, and fabric pieces give children a repeatable framework, but the final structure can change from a tunnel to a dome, reading nook, or multi-room base. The kit becomes a construction language that children can revisit rather than a one-time activity.
Begin with the simplest configuration. Ask children to identify the base, supports, connectors, and covering before assembly. Once the first structure stands, invite them to redesign it with a different entrance, a wider floor, or a separate room. Photograph successful builds or create a simple diagram so children can reconstruct and modify them later.
Make the system grow with the child
Younger builders can practice matching connectors and following a picture sequence. Older children can plan an original configuration, predict where a frame might bend, and explain why a triangular or repeated shape feels more stable. Store rods, panels, and connectors in labeled containers so cleanup supports sorting and organization.
A kit also works well in classrooms and childcare settings because educators can create a challenge, observe the process, then reset the materials for another group. Avoid mixing incompatible parts unless the manufacturer permits it, and inspect connectors for cracks or loose fits.
Pros: Reusable, organized, adaptable, and useful for repeated engineering play.
Cons: It costs more than using household materials and may limit designs to the available components.
The strongest extension is to combine construction with discussion. Ask, “What changed when we moved this support?” and “How could we make the entrance easier to crawl through?” Children learn to test ideas rather than wait for a perfect first attempt.
6. Bedsheet and Furniture Cave Fort
A cave fort prioritizes comfort over complexity. Draping a sheet over a bed, desk, dining table, chair, or mattress creates a small retreat for reading, drawing, storytelling, or quiet pretend play. It's a practical choice for a bedroom or shared space where children need a contained activity instead of a large structure.
For a bed tent, drape the sheet over the frame without fastening it to anything unstable. An under-desk fort can use the desk as a roof, while a corner cave can combine a chair and mattress with fabric clipped around the sides. Decorative clothespins or clips are preferable to adhesive tape when you want to avoid damaging furniture or fabric.
Design for calm, not confinement
Leave small openings on more than one side for airflow and visibility. Add pillows, a blanket, soft books, and battery-powered lighting. Avoid hot bulbs, candles, heavy coverings, or anything that could fall into the child's space. Establish quiet-use expectations, such as reading, drawing, listening to a story, or telling a gentle tale.
Younger children may enjoy placing stuffed animals and naming the cave. Older children can create a reading log, write a story from inside the fort, or design a “cave rules” sign. Children who prefer lower stimulation can benefit from plain fabric and dim, adjustable light, while others may want decorations and role-play props.
Pros: Cozy, quick, space-efficient, and well suited to focused activities.
Cons: It can become too enclosed, fabric may slip, and furniture must remain stable.
An adult should check the opening, supports, lighting, and temperature before the child settles inside.
7. Blanket Fort with Obstacle Course Integration
An obstacle fort changes the question from “How can we hide?” to “How can we move through the space?” Blankets over chairs can create crawl tunnels, cushions can mark stepping zones, and separate rooms can become activity stations. This format suits children with high energy because construction and physical play happen together.
Start with a low route across a clear floor. Use cushions or folded towels as gentle boundaries, a blanket tunnel for crawling, and a visible finish point. Don't suspend ropes for climbing, create high platforms, or place furniture where a fall could cause impact. Every section should be tested by an adult before children enter.
Match the challenge to the child
A younger child might crawl through a short tunnel, carry a soft toy from one room to another, and step over a cushion. An older child can help map the route, time a cooperative mission without turning it into a race, or redesign one station after testing it. Rotate activities to keep the course interesting without adding unnecessary height or speed.
The physical design should support balance, coordination, and gross-motor movement. A safety-oriented guide recommends keeping forts low so children can bend and crawl while reducing toppling risk (low-fort guidance for active play).
Pros: Combines movement, construction, and imaginative missions.
Cons: It requires more floor space, more adult oversight, and frequent stability checks.
Give the course a story, such as delivering supplies to a space station or rescuing stuffed animals from a jungle base. The narrative keeps children engaged without needing screens.
8. Themed Fort Building
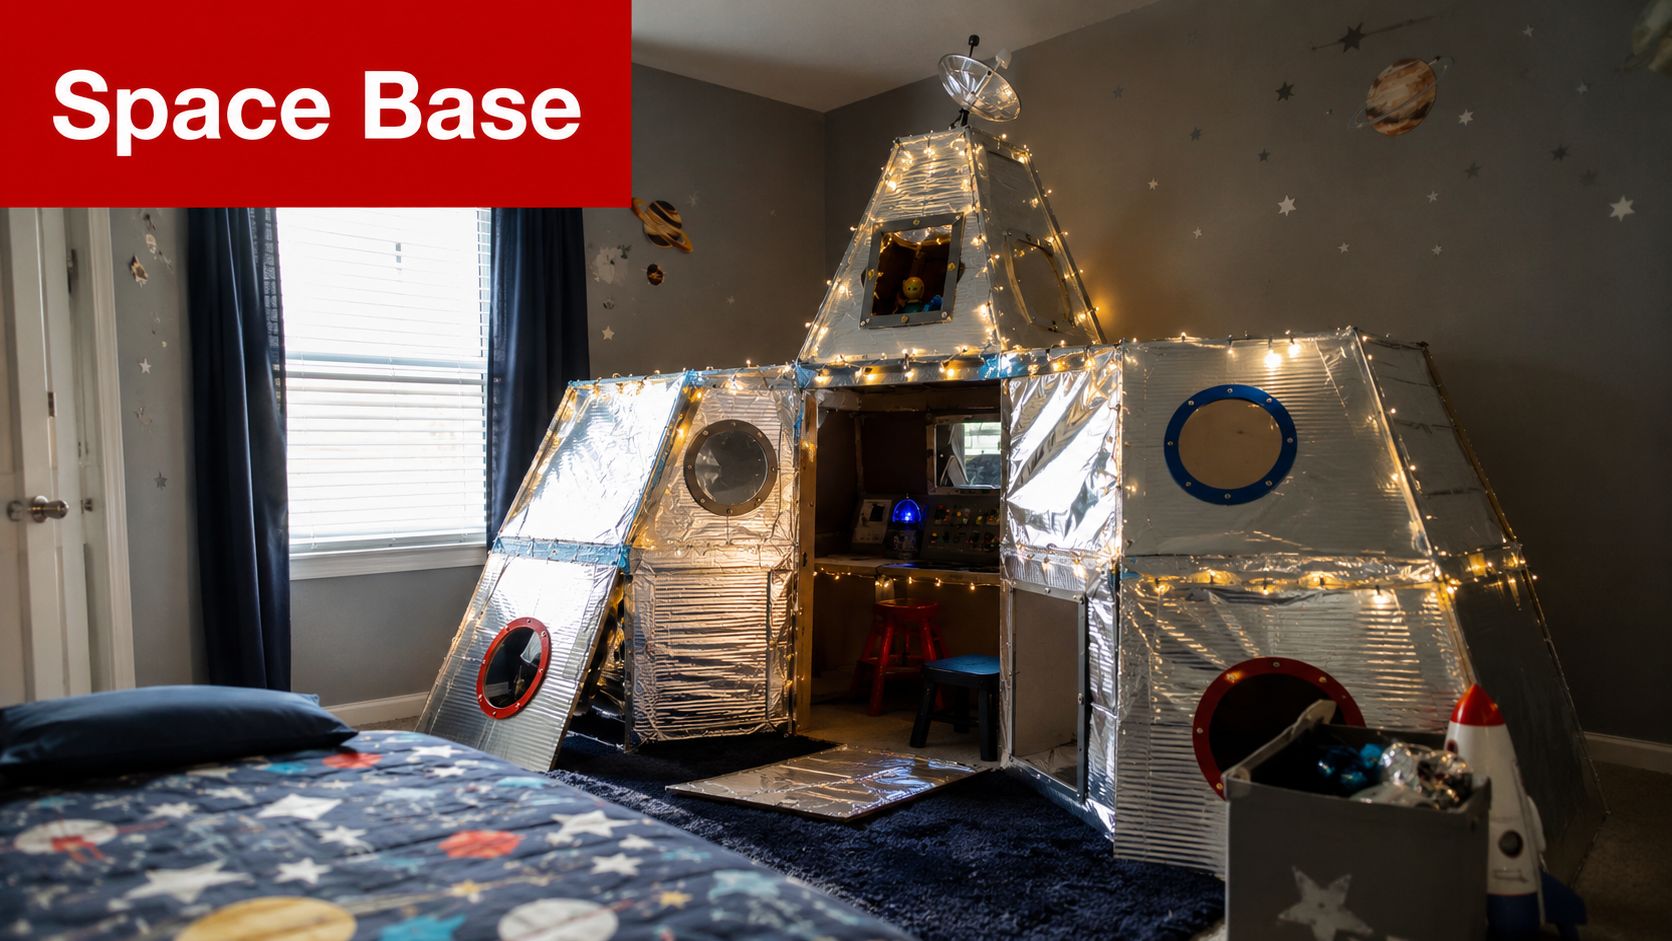
A theme gives a fort a reason to exist. The structure becomes a medieval castle, spaceship, jungle research base, or pirate ship, and children use the setting to create characters, problems, and solutions. The fort may use the same blankets and chairs as a basic build, but the story expands the play.
Begin with one simple question: “Who lives here, and what do they need?” For a castle, add cardboard turrets, flags, and a drawbridge-style entrance. For a spaceship, use safe foil-covered cardboard panels, paper control screens, and battery-powered lights. A jungle base can include leaf drawings, animal props, observation notebooks, and a pretend field station. A pirate ship might use a blanket sail, paper maps, and a treasure box.
Add learning without interrupting the story
Children can research real castles, planets, rainforest animals, or navigation before decorating. Younger children can choose colors and roles. Older children can write mission cards, draw maps, create a backstory, or explain which design details belong to the chosen setting.
Avoid sharp props, loose cords, exposed batteries, and heavy decorations overhead. Keep every entrance visible and make sure the fort remains stable after decoration. A printed curtain guide from Joey'z Shopping can provide another visual direction for themed fabric choices.
Pros: Supports long-form storytelling, vocabulary, research, and cooperative role-play.
Cons: Decorations can clutter exits, and children may focus more on appearance than structural safety.
Photograph the finished world, then invite children to redesign it as a new setting another day.
9. Multi-Sensory and Sensory-Friendly Fort Designs
A sensory fort starts with observation. Some children seek textured materials, movement, and bright visual details. Others need a quiet corner with soft fabric, low light, and fewer competing sounds. A flexible fort can serve both needs when children control which elements remain inside.
Build a soft base with cushions and washable fabrics. Offer a small selection of textures, such as smooth cloth, fleece, a woven mat, or a bumpy cushion, and let the child decide what feels comfortable. Use adjustable lighting rather than a fixed bright source. A quiet fort might include books and gentle white noise, while a more stimulating version could include colorful panels, sound-making objects, and tactile materials.
Keep sensory choices optional
Don't assume a scent, sound, or texture will calm every child. Avoid strong fragrances unless the family already knows they're suitable, and never use loose items that create a choking risk for younger children. Create a quiet zone separate from the stimulating area, maintain a comfortable temperature, and keep at least one easy exit open.
A preschool guidance source links fort building with spatial reasoning, engineering thinking, proprioceptive comfort, and imaginative play, while emphasizing that children solve problems by testing arrangements until the fort feels stable and safe (fort-building and development guidance).
Pros: Adaptable, inclusive, and useful for both exploration and emotional regulation.
Cons: Preferences differ widely, so adults need to observe rather than prescribe.
Younger children can choose between two fabric options. Older children can make a sensory menu showing which light, sound, texture, and seating choices help them feel ready to play.
10. Educational Fort-Building with STEM Integration
A STEM fort gives children a question to solve instead of a structure to copy. The challenge might be to build the strongest fort from limited materials, create a bridge between two cushions, map the floor plan, or investigate how weight distribution affects stability. The fort remains playful, but the process becomes visible and measurable.
Start by defining one learning objective. For geometry, children can identify rectangles, triangles, and repeated patterns in the frame. For measurement, they can record the fort's length, width, and entrance size. For physics, they can predict which support will move first, test a lightweight load, and redesign the structure after a failure.
Use the build-test-improve cycle
Give children paper, pencils, measuring tools, and a simple recording sheet. Ask them to hypothesize, build, test, observe, and improve. Younger children can compare “more stable” and “less stable,” count supports, and draw the result. Older children can create scale drawings, label dimensions, explain material choices, and compare two designs without turning the activity into a competition.
Never test a fort with a child inside it or add a load that could make the structure collapse. An adult should define safe materials and stop the experiment if supports shift. The learning comes from controlled observation, not risky height or weight.
Pros: Connects play with engineering, mathematics, documentation, and problem-solving.
Cons: It needs preparation and adult guidance, and too many rules can reduce creative ownership.
Use a Playz STEM toy activity to extend the investigation with a science kit or a related building challenge.
Top 10 Fort-Building Ideas Comparison
| Approach | Implementation (🔄 Complexity) | Resources & Setup (⚡ Efficiency) | Expected Outcomes (⭐📊) | Ideal Use Cases (💡) | Key Advantages |
|---|---|---|---|---|---|
| Classic Blanket and Pillow Fort | Low 🔄, simple draping and stacking | Minimal materials, near-zero cost; minutes to build ⚡⚡ | Encourages creativity, spatial reasoning; moderate durability ⭐⭐ 📊 | Spontaneous indoor play, rainy days | Cheap; highly customizable; fosters problem-solving |
| Play Tent and Pop-Up Fort Systems | Low 🔄, pre-engineered, tool-free | Higher upfront cost; instant setup and portable ⚡⚡⚡ | Reliable, durable play space; strong imaginative engagement ⭐⭐⭐ 📊 | Frequent indoor/outdoor use, group play, reliable setups | Stable and safe; themed designs; durable |
| Cardboard Box Fort Construction | Moderate 🔄, cutting, connecting, planning | Low cost if boxes available; moderate build time ⚡⚡ | Promotes engineering and art skills; variable durability ⭐⭐ 📊 | Eco projects, art-integrated play, upcycling activities | Eco-friendly; highly customizable; artistic expression |
| Stick and Branch Fort Building | High 🔄, outdoor assembly, safety considerations | Free materials but site-dependent; time-intensive ⚡ | Teaches outdoor skills, biomechanics; typically temporary ⭐⭐ 📊 | Camping, forest play, nature-based learning | Nature-connected; teaches survival and material properties |
| Fort-Building Kits and Modular Systems | Moderate 🔄, assembly learning curve | Higher cost; organized storage; reusable components ⚡⚡ | Durable, repeatable builds; supports STEM thinking ⭐⭐⭐ 📊 | STEM lessons, long-term play, progressive skill builds | Systematic assembly; reusable; educational focus |
| Bedsheet and Furniture Cave Fort | Low 🔄, simple draping for enclosed space | Minimal materials; very quick; small footprint ⚡⚡⚡ | Promotes calm, focused play and emotional regulation ⭐⭐ 📊 | Reading nooks, quiet time, bedrooms | Cozy; easy to build; supports relaxation |
| Blanket Fort with Obstacle Course Integration | Moderate–High 🔄, added complexity for challenges | Requires more space, padding, supervision; longer setup ⚡ | Improves gross motor skills and coordination; high engagement ⭐⭐⭐ 📊 | High-energy play, indoor activity sessions, PE-style games | Combines physical activity with creative play; scalable difficulty |
| Themed Fort Building (Castle, Spaceship, Jungle) | Moderate 🔄, planning for narrative and props | Variable cost; moderate prep for decoration and props ⚡⚡ | Deep role-play and storytelling; thematic learning opportunities ⭐⭐⭐ 📊 | Role-play sessions, parties, curriculum tie-ins | Enhances engagement; supports narrative literacy and topic learning |
| Multi-Sensory & Sensory-Friendly Fort Designs | Moderate 🔄, intentional material selection | May need specialized fabrics/lights; moderate setup ⚡ | Supports sensory regulation and inclusive play; therapeutic benefits ⭐⭐⭐ 📊 | Children with sensory needs, therapy settings, calming zones | Inclusive design; promotes emotional regulation; adaptable inputs |
| Educational Fort-Building with STEM Integration | High 🔄, planned objectives and assessment | Requires tools, measurement materials, prep time; moderate–high cost ⚡ | Strong STEM learning outcomes; measurable skills in engineering/math ⭐⭐⭐ 📊 | Classrooms, afterschool programs, structured learning environments | Tangible STEM learning; assessment opportunities; problem-solving focus |
Build, Test, Imagine, Repeat
The best fort isn't necessarily the largest or most elaborate. Choose a blanket and pillow fort when you need a quick household retreat and want children to make design decisions with familiar materials. Choose a play tent when fast setup, a defined space, and repeatable use matter more than open-ended construction. A cardboard fort works well for families who want drawing, cutting, decorating, and recycling to share the same project.
Outdoor settings call for a different standard. A stick and branch fort can connect children with nature, but adults need to choose the site, inspect every support, protect vegetation, and remove materials afterward. Modular kits suit repeated construction and classroom rotation. A cave fort supports reading and quiet play, while an obstacle-course fort gives active children a safe route for crawling, balancing, and imaginative missions.
Age isn't the only factor. Consider the child's energy level, sensory preferences, available floor space, and the adult's supervision capacity. The WHO recommends at least 180 minutes of physical activity each day for children aged 2 to 4, including at least 60 minutes of moderate-to-vigorous activity, alongside no more than 1 hour of sedentary screen time. For 1-year-olds, sedentary screen time isn't recommended (WHO activity and screen-time guidance). A fort won't replace every kind of movement, but an obstacle route, crawl tunnel, or floor-based construction session can support active play.
Use this safety check before opening the fort:
- Stable supports: Push gently on chairs, boxes, frames, and branches before children enter.
- Open exits: Keep at least one clear route out, and make sure children can find it.
- Ventilation: Leave openings in enclosed spaces, especially when fabric covers the structure.
- Safe lighting: Use battery-powered lights, keep cords out of the play path, and avoid heat sources.
- Suitable materials: Remove sharp edges, brittle connectors, heavy overhead objects, and unstable decorations.
- Outdoor boundaries: Stay away from roads, drops, water, unstable trees, and protected vegetation.
- Cleanup: Remove loose parts, return natural materials, and store reusable components after play.
Practical rule: If a child starts climbing, shaking, hanging from, or pulling on the structure, stop and redesign it for that behavior instead of assuming the original build will hold.
Let children choose one idea, sketch it or gather materials, build the first version, and test it with an adult. Then ask what worked, what shifted, and what they want to change. A fort can be a reading nook, an outdoor engineering challenge, an imaginative world, an active-play course, or a structured STEM investigation. The value comes from giving children room to build, revise, explain, and imagine.
Explore Playz play tents, science kits, and creative toys at Playz to extend purposeful, screen-free fort play at home, in classrooms, or in childcare settings.
Playz offers play tents, science kits, and creative toys that can give children a dependable base for imaginative forts and hands-on building challenges. Choose a fort idea that fits your space, then visit Playz to find materials that help turn the next build into purposeful play.