

Welcome, parents and educators! Are you searching for engaging ways to make learning unforgettable for your third grader? You've come to the right place. Third grade is a magical time when curiosity is at its peak, making it the perfect age to dive into the world of hands-on science. Forget boring textbooks; we're talking about bubbling volcanoes, growing crystals, and bending water with static electricity. This guide is packed with incredible, safe, and easy-to-follow science experiments for 3rd graders that use everyday household items.
We provide everything you need for each activity, from simple materials lists and step-by-step instructions to the scientific "why" behind the "wow." Each experiment is designed to introduce foundational principles, such as chemical reactions, density, and plant biology, in an entertaining and memorable way. You won't just be making a mess; you'll be building a foundation for critical thinking and a lifelong love of learning.
Let’s empower your young scientist to predict, observe, and discover the principles that govern the world around them. Get ready to transform your kitchen into a laboratory of fun!
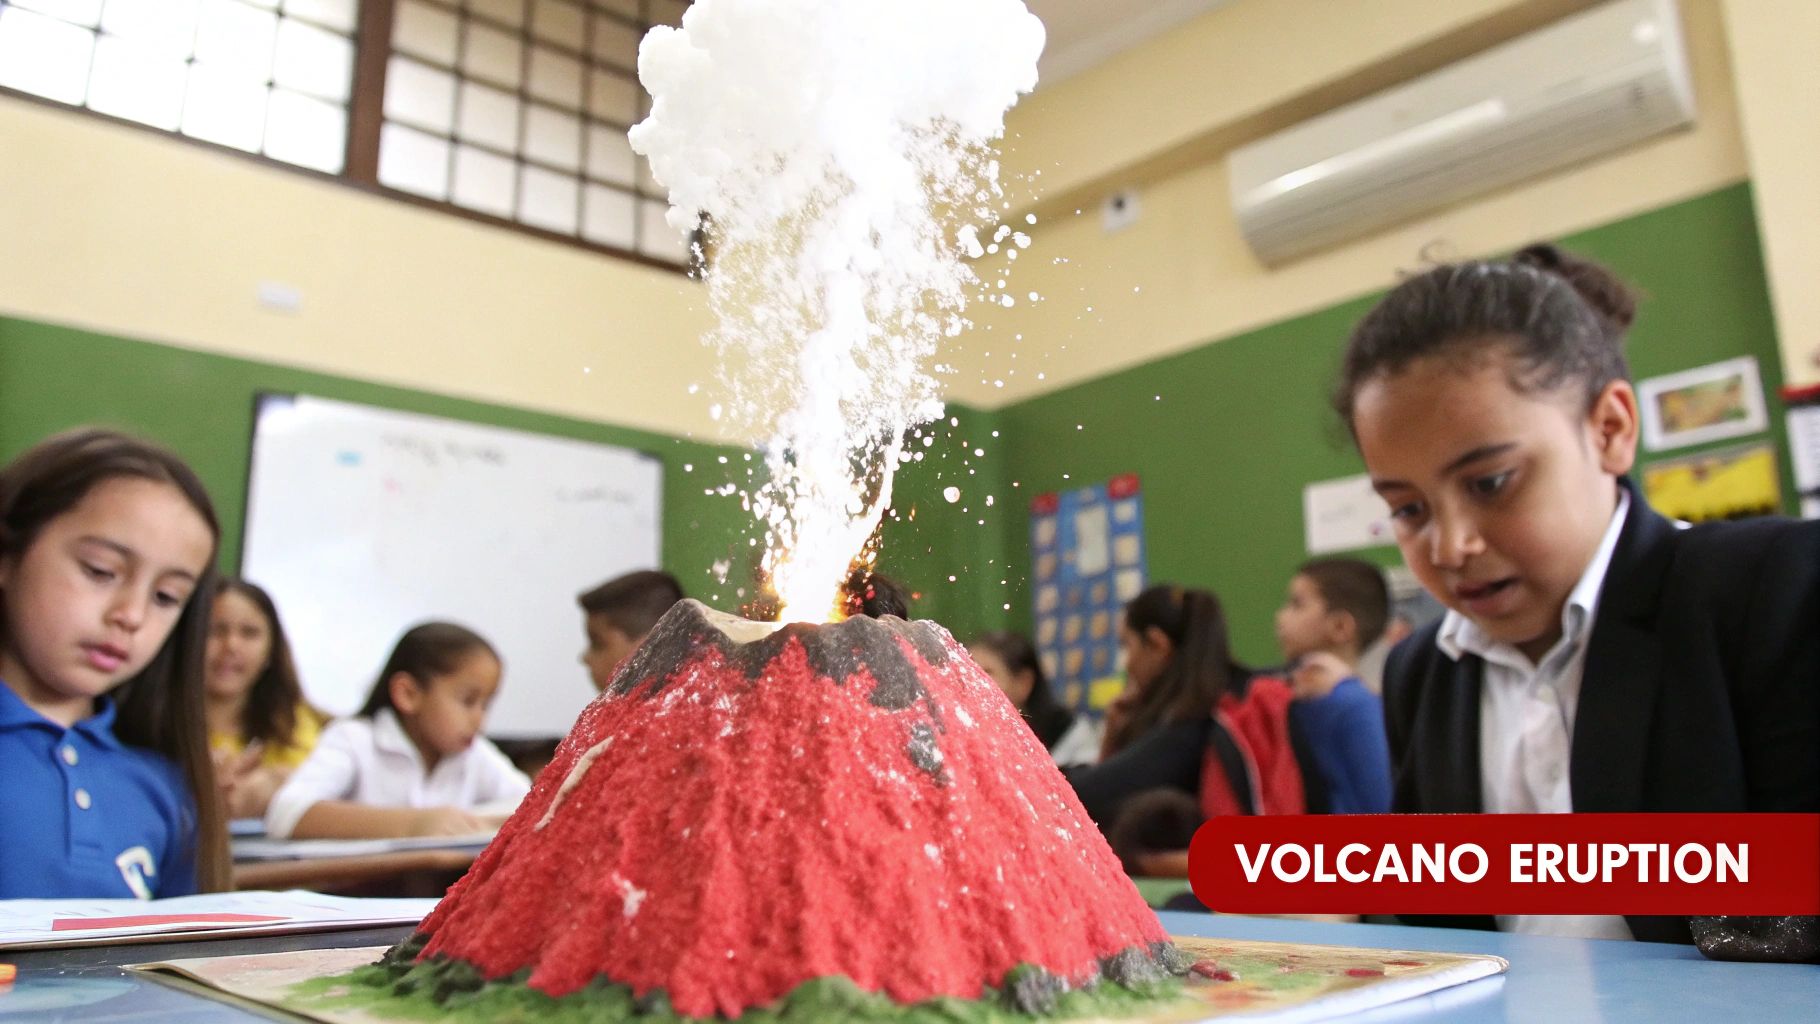
1. Baking Soda and Vinegar Volcano
The baking soda and vinegar volcano is a classic for a reason: it's visual, exciting, and an excellent introduction to chemistry. This experiment demonstrates a fundamental acid-base reaction. When baking soda (a base) mixes with vinegar (an acid), it creates a chemical reaction that releases carbon dioxide gas. This gas rapidly forms bubbles, which expand and surge upwards, mimicking a volcanic eruption.
This hands-on project allows young scientists to observe a chemical change firsthand. The fizzing "lava" provides immediate, tangible results that connect an action (mixing ingredients) to a dramatic reaction, making abstract scientific concepts concrete and memorable.
Why It's a Great Experiment for Third Graders
At this age, students are developing their ability to predict, observe, and explain scientific phenomena. The volcano experiment is perfect because it's safe, uses common household items, and can be creatively customized. Building the volcano model itself integrates art and engineering skills, while the chemical reaction teaches core chemistry principles in an unforgettable way. It’s an ideal project for visual and hands-on learners.
Materials You'll Need
- A small plastic bottle (16-20 oz)
- Baking soda (about 2 tablespoons)
- White vinegar (about ½ cup)
- Warm water (about ¼ cup)
- Liquid dish soap (1 tablespoon)
- Red or orange food coloring (a few drops)
- A tray or baking pan to contain the mess
- Modeling clay, playdough, or papier-mâché to build your volcano cone
Step-by-Step Instructions
- Build Your Volcano: Place the plastic bottle in the center of your tray. Mold the clay or other material around the bottle to form a volcano shape, leaving the top opening clear.
- Prepare the Mixture: Pour the warm water, dish soap, and a few drops of food coloring into the bottle. Swirl gently to mix.
- Add the "Fuel": Add the baking soda to the bottle. A paper funnel can make this step easier.
- Time to Erupt!: Quickly pour the vinegar into the bottle and step back to watch the eruption.
Pro-Tip: Adding a tablespoon of dish soap is the secret to a much foamier and more impressive eruption. The soap traps the carbon dioxide gas bubbles, creating a slower, more lava-like flow instead of just a quick fizz. For those looking to take this to the next level, you can explore detailed examples of science fair project setups for a more structured presentation. Discover more about building a great science fair volcano project on playzusa.com.
2. Growing Crystals with Sugar or Salt
Growing crystals is a captivating experiment that beautifully illustrates chemistry and physics principles in action. This activity introduces third graders to the concepts of solutions, saturation, and crystallization. By dissolving sugar or salt in hot water to create a supersaturated solution, students set the stage for magic. As the solution cools and water slowly evaporates, the dissolved particles reform into organized, solid crystal structures.
This patient, multi-day project teaches valuable lessons in observation and delayed gratification. Watching the intricate, geometric shapes emerge from a simple clear liquid provides a tangible connection to the invisible world of molecules, making abstract concepts like molecular structure both visible and understandable.
Why It's a Great Experiment for Third Graders
This experiment is perfect for third graders because it combines patience with a visually stunning result. It shifts the focus from immediate reactions to long-term observation, encouraging students to keep a science journal and document changes over time. The process of creating rock candy or salt crystal gardens uses safe, everyday kitchen ingredients. It's an excellent way to introduce concepts of solubility and molecular patterns, as students can even compare the different shapes of salt (cubic) and sugar (monoclinic) crystals.
Materials You'll Need
- A clean glass jar or cup
- Sugar or salt (about 1 cup)
- Water (about ½ cup)
- A wooden skewer, popsicle stick, or a piece of cotton string
- A pencil or clothes-pin to suspend the skewer/string
- A small saucepan and stove (adult supervision required)
- Food coloring (optional, for colored crystals)
Step-by-Step Instructions
- Create the Supersaturated Solution: With adult help, heat the water in a saucepan. Gradually stir in the sugar or salt, one spoonful at a time, until no more will dissolve. This is your supersaturated solution. Let it cool slightly.
- Prepare the Crystal Starter: If using a skewer or string, wet it and roll it in a little sugar or salt. This "seed" gives the crystals a surface to grow on.
- Set Up the Jar: Pour the warm solution into the glass jar. If you're using food coloring, add a few drops now.
- Suspend and Wait: Lay the pencil across the top of the jar and suspend the string or skewer into the solution, ensuring it doesn’t touch the bottom or sides. Place the jar in a safe place where it won’t be disturbed.
- Observe: Crystals should start forming within a day. Observe the growth over the next week.
Pro-Tip: Patience is key for this experiment. To grow large, well-defined crystals, it is crucial to let the solution cool as slowly as possible. Placing the jar in a spot with a consistent temperature away from drafts or vibrations will prevent tiny, clustered crystals from forming and encourage larger ones. You can find more detailed guides on how to optimize your crystal growing at science-sparks.com.
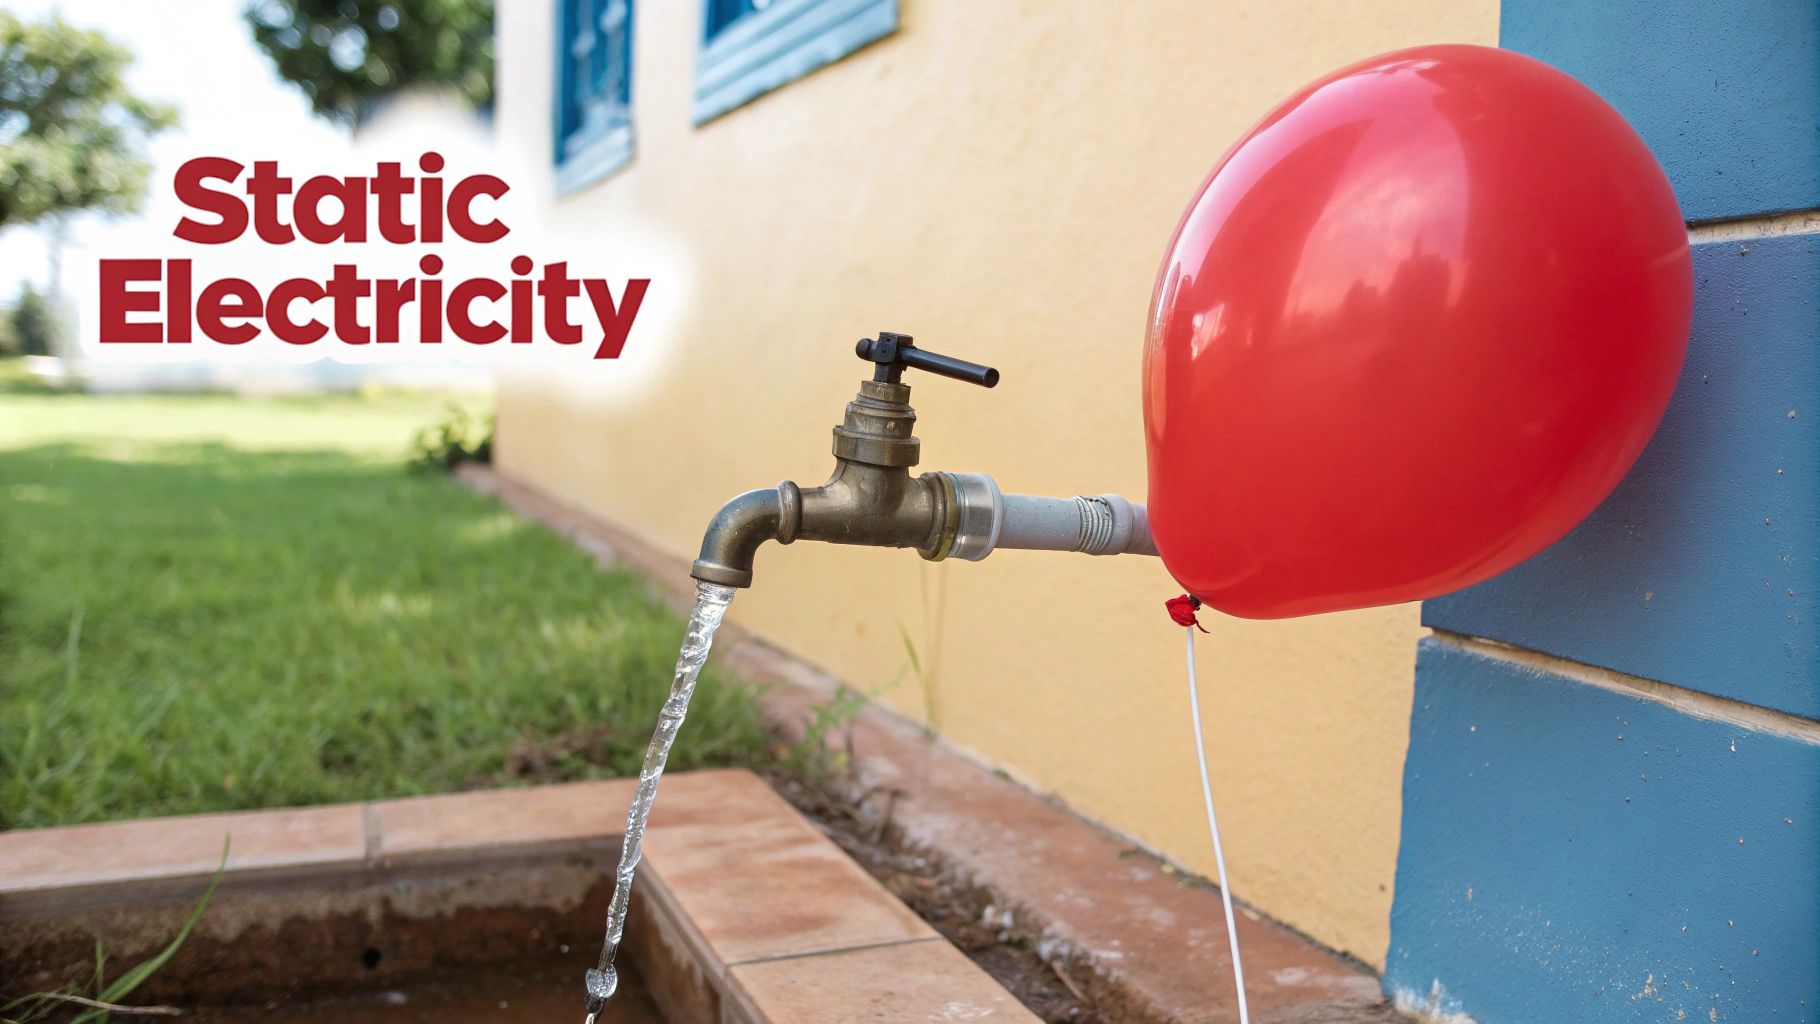
3. Static Electricity with Balloons
Static electricity experiments with balloons are a fantastic way to introduce young learners to the invisible world of electrical charges. This simple yet captivating activity demonstrates how rubbing a balloon against hair or a wool sweater transfers tiny particles called electrons, giving the balloon a negative static charge. This charge creates an electrical field that can attract or repel other objects, making abstract physics concepts visible and interactive.
This hands-on experiment allows students to directly manipulate forces they cannot see. When the charged balloon makes their hair stand on end or picks up small pieces of paper, it provides a powerful "Aha!" moment. It's one of the most accessible science experiments for 3rd graders that connects a simple action to a surprising and scientific outcome.
Why It's a Great Experiment for Third Graders
Third graders are natural investigators, and this experiment encourages them to ask "why" and "how." It's extremely low-cost, requires no complex setup, and provides immediate results. The experiment teaches fundamental principles of physics, including opposite charges attracting and like charges repelling, in a safe and memorable way. It’s a perfect activity to spark curiosity about electricity and the forces that govern the world around us.
Materials You'll Need
- An inflated balloon (latex works best)
- A head of clean, dry hair or a wool sweater
- Small, lightweight objects (e.g., tiny pieces of tissue paper, salt, pepper)
- An aluminum can (optional)
- A faucet with a thin stream of running water (optional)
Step-by-Step Instructions
- Charge the Balloon: Vigorously rub the inflated balloon back and forth on your hair or a wool sweater for about 30-60 seconds. This builds up a static charge.
- Attract Paper: Sprinkle the small pieces of tissue paper on a flat surface. Slowly bring the charged side of the balloon near the paper without touching it and watch as the pieces jump up to stick to it.
- Bend Water: Turn on a faucet so it produces a very thin, steady stream of water. Bring the charged balloon near the stream (again, without touching) and observe the water bend toward the balloon.
- Repel Another Balloon: If you have a second balloon, charge it the same way. Tie them to strings and hold them close together to see them push each other away.
Pro-Tip: Static electricity works best in dry conditions. If the air is humid, the water vapor can dissipate the static charge from the balloon, making the experiment less effective. Try this on a dry day for the most dramatic results. For more ideas on how to engage young learners, explore other exciting STEM activities for elementary students at playzusa.com.
4. Sink or Float Density Experiment
The Sink or Float experiment is a fundamental introduction to the physics of density and buoyancy. This simple yet profound activity challenges students to predict whether various objects will sink or float in water. The core scientific principle at play is density: an object will float if it is less dense than the water it displaces, and it will sink if it is more dense.
This hands-on investigation perfectly illustrates the scientific method. Students form a hypothesis (predicting the outcome), conduct the experiment (testing the objects), and then analyze their results. It powerfully demonstrates that an object's weight alone doesn't determine if it will float; a heavy log can float while a small pebble sinks, introducing the more complex and fascinating concept of density.
Why It's a Great Experiment for Third Graders
Third graders are beginning to grasp cause-and-effect relationships and are ready to move beyond simple observation to making predictions and testing them. The Sink or Float experiment capitalizes on their natural curiosity and provides immediate, clear results. It's a low-cost, safe, and easily accessible experiment that requires only a few common household items, making it perfect for both classrooms and at-home learning. The activity fosters critical thinking, observation skills, and data collection.
Materials You'll Need
- A large, clear container (like a plastic tub, fishbowl, or large jar)
- Water
- A variety of small, waterproof objects to test (e.g., crayon, rubber duck, toy car, coin, key, sponge, cork, plastic bottle cap, rock, leaf)
- A towel to clean up spills
- Optional: A chart or notebook to record predictions and results
Step-by-Step Instructions
- Set Up Your Lab: Fill the clear container about two-thirds full with water and place it on a towel.
- Make Predictions: Lay out all the objects you will be testing. Ask your young scientist to predict whether each item will sink or float. Record these predictions on a chart.
- Test Each Object: One by one, gently place each object into the water. Observe what happens. Does it sink to the bottom, or does it float on the surface?
- Record the Results: After testing each object, record the actual result next to your prediction. Discuss any surprising outcomes, like why a heavy piece of wood floats.
Pro-Tip: Take the experiment a step further by introducing salt. Dissolve several tablespoons of salt in a new container of water and repeat the experiment with the same objects. Some items that sank in fresh water may now float, demonstrating how increasing the water's density changes buoyancy. For more fun investigations, you can discover a wide range of science experiments for kids on playzusa.com.
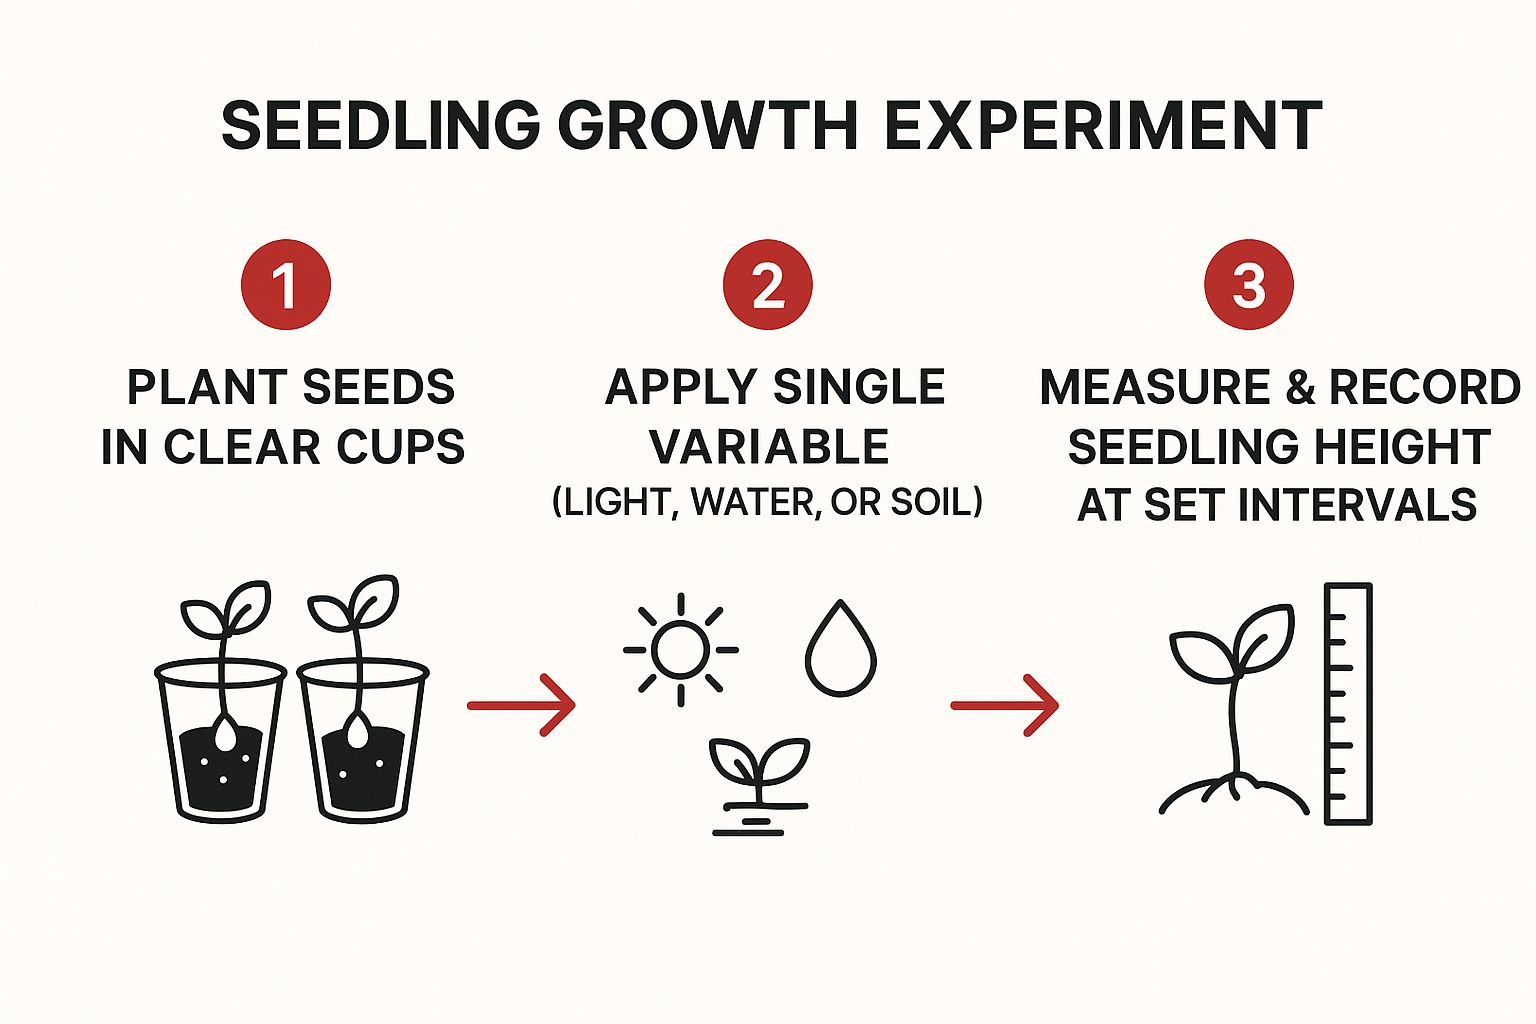
5. Plant Growth and What Plants Need
Observing a tiny seed sprout and grow into a plant is a magical experience for a child, making it one of the most rewarding science experiments for 3rd graders. This long-term project introduces fundamental concepts of biology and the scientific method. By growing seeds under different conditions, students learn firsthand what plants need to survive: light, water, nutrients, and the right temperature.
This experiment is a perfect introduction to controlled variables. Students set up a "control" plant with ideal conditions and compare it to others where one variable, like light or water, is intentionally changed. This process teaches them how to isolate factors and draw conclusions based on evidence, turning their windowsill into a living laboratory.
Why It's a Great Experiment for Third Graders
Third graders are capable of long-term observation and data collection. This experiment builds patience and reinforces skills like measuring, recording data, and creating charts. It connects abstract concepts like photosynthesis to a tangible, growing organism they can care for. The hands-on nature of planting and watering fosters a sense of responsibility and a deeper appreciation for the natural world.
Materials You'll Need
- Fast-growing seeds (beans, radishes, or sunflowers work well)
- Several small, identical containers or clear plastic cups
- Potting soil
- Water
- A sunny location (like a windowsill)
- A dark location (like a closet)
- A ruler or measuring tape
- Labels and a marker
- A notebook or chart to record observations
Step-by-Step Instructions
- Prepare Your Pots: Fill each cup with an equal amount of potting soil. Plant 2-3 seeds in each cup at the same depth.
- Label Everything: Clearly label each cup. Create a "Control" group that will get both sunlight and water. Then, create your variable groups: "No Light," "No Water," etc.
- Set Up the Experiment: Place the "Control" and "No Water" cups in a sunny spot. Place the "No Light" cup in a dark closet or under a box.
- Observe and Record: Water the "Control" and "No Light" cups every few days, but do not water the "No Water" cup. Every 2-3 days, measure any plant growth and record your observations in a chart.
Pro-Tip: Use clear plastic cups so students can see the roots growing beneath the soil, adding another layer of discovery. Before starting, have the class form a hypothesis about what they think will happen to each plant, which they can compare to the final results.
6. Making Slime (Polymer Chemistry)
Making slime is more than just a gooey trend; it's one of the most engaging science experiments for 3rd graders that introduces the fascinating world of polymer chemistry. The experiment involves mixing a glue base (containing polyvinyl acetate) with an "activator" like a borax solution or contact lens solution. This activator causes the long, stringy glue molecules (monomers) to link together, forming a vast network of long chains called polymers. This process, known as polymerization, transforms the liquid glue into a semi-solid, stretchy substance.
This hands-on activity is a perfect demonstration of how a chemical reaction can create a new substance with entirely different properties. Students can directly feel and observe the change from a liquid to a non-Newtonian fluid, a substance that acts like both a solid and a liquid. The immediate and tactile results make the abstract concept of molecules and chemical bonds tangible and exciting.
Why It's a Great Experiment for Third Graders
Third graders are naturally curious and love sensory-based learning. Making slime taps into this by allowing them to mix, knead, and play with their creation. It’s a fantastic way to teach them about states of matter, polymers, and the importance of following a procedure. The ability to customize slime with colors and glitter also adds a creative art component, making it a well-rounded STEAM activity that feels more like play than a lesson.
Materials You'll Need
- White or clear school glue (like Elmer's, 4-6 oz bottle)
- Water (½ cup)
- An "activator":
- Option 1 (Borax): 1 teaspoon of Borax powder dissolved in 1 cup of warm water.
- Option 2 (Safer): 1 tablespoon of contact lens solution (must contain boric acid) and ½ teaspoon of baking soda.
- A mixing bowl and a spoon or craft stick
- Food coloring and/or glitter (optional)
- An airtight container for storage
Step-by-Step Instructions
- Create the Glue Base: Empty the entire bottle of glue into the mixing bowl. Add ½ cup of water and a few drops of food coloring, then stir until completely combined.
- Prepare the Activator: If using the borax method, fully dissolve the borax powder in warm water in a separate container.
- Combine and Mix: Slowly add the activator to the glue mixture, a little at a time, while stirring continuously. If using the contact lens solution method, add the baking soda to your glue first, then add the contact lens solution.
- Knead the Slime: Once the mixture starts pulling away from the sides of the bowl, take it out and knead it with your hands. It will be sticky at first but will become smoother as you work it.
Pro-Tip: The key to perfect slime is adding the activator slowly. Pouring it in all at once can make the slime rubbery and stiff. Add just a little bit at a time and mix thoroughly before deciding if you need more. For even more hands-on fun, you can explore other creative learning activities for preschoolers on playzusa.com.
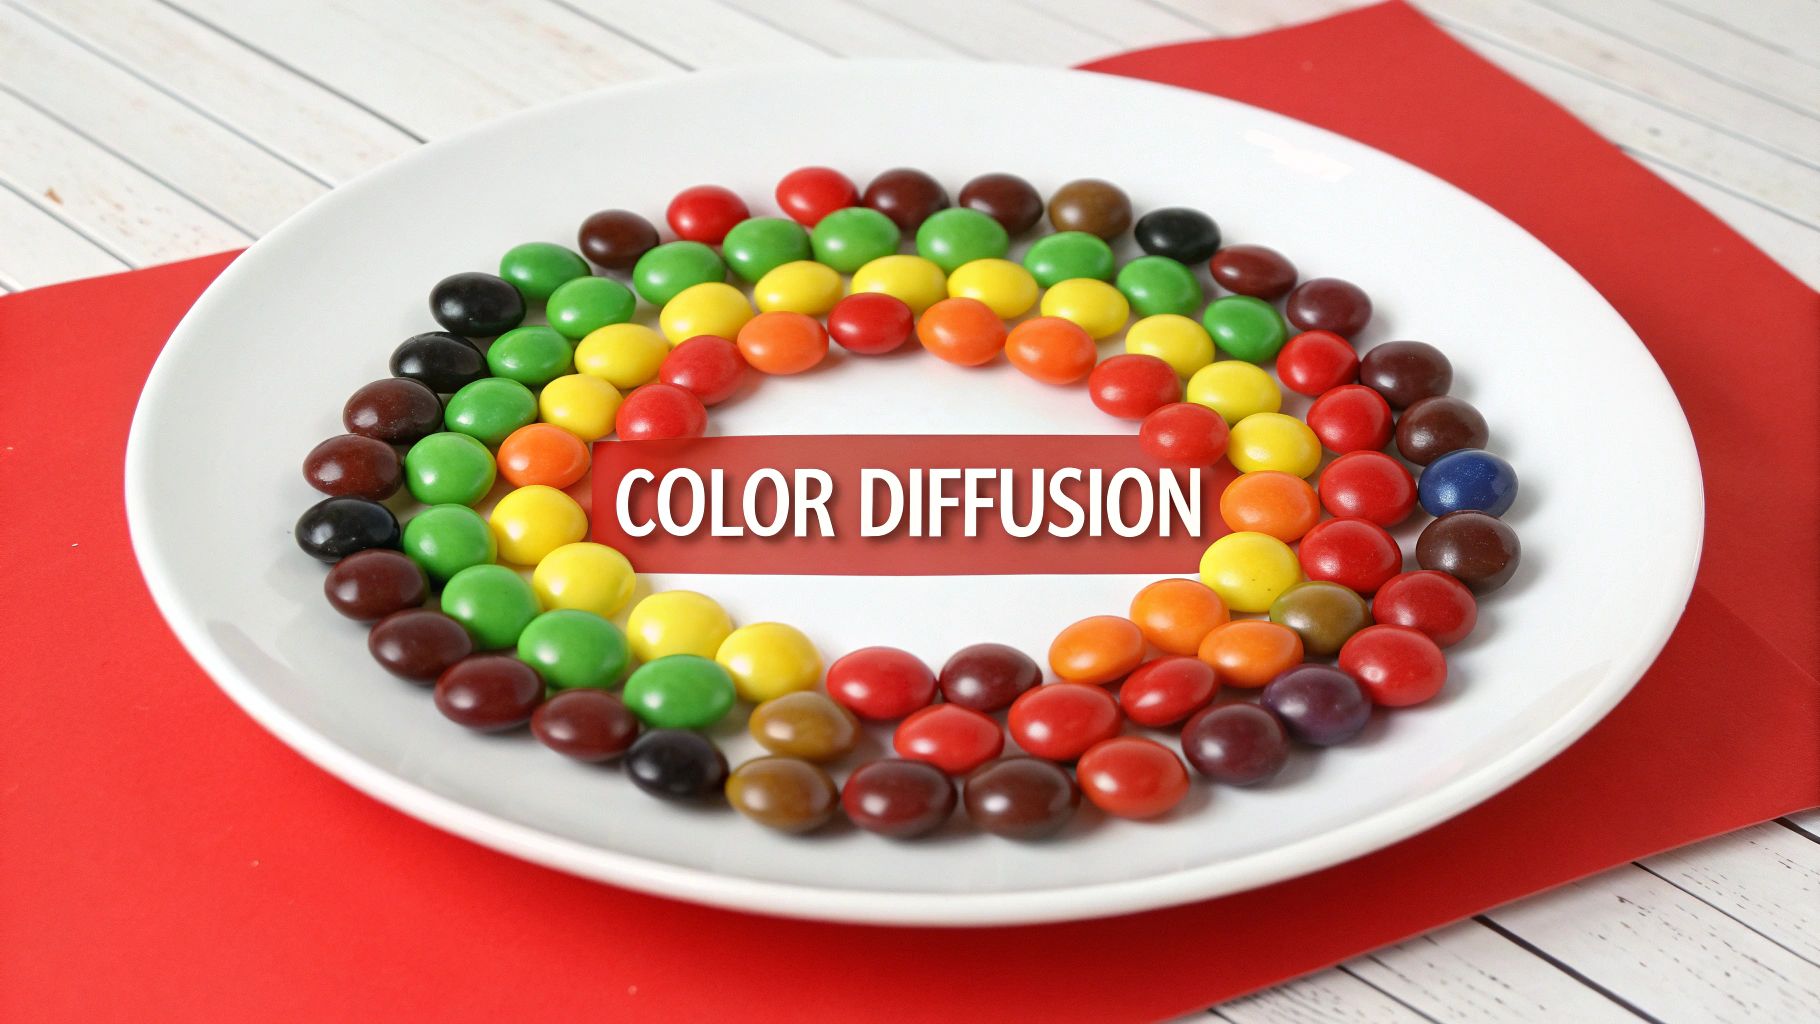
7. Skittles or M&M Rainbow Science
The Skittles rainbow is one of the most visually stunning and simple science experiments for 3rd graders, offering a beautiful demonstration of diffusion and solutions. This experiment uses the colorful sugar coatings of candies to show how molecules move. When warm water is poured onto the plate, the colored sugar on the candies dissolves, creating a concentrated solution. This solution then diffuses, or moves, from an area of high concentration (around the candy) to an area of low concentration (the clear water), resulting in a vibrant rainbow.
This activity is a fantastic way to introduce complex concepts like molecular movement and water stratification in a simple, observable manner. Students are immediately captivated by the brilliant colors flowing toward the center without mixing, providing a perfect opportunity to discuss scientific principles in a way that feels like magic.
Why It's a Great Experiment for Third Graders
Third graders are at an ideal age to grasp the basics of how matter behaves. This experiment requires minimal setup, uses readily available materials, and produces a "wow" moment every time. It encourages students to make predictions, observe changes over time, and ask questions about why the colors behave the way they do. The activity also reinforces skills like pattern creation and color recognition, seamlessly blending art with science.
Materials You'll Need
- A bag of Skittles or M&Ms
- A plain white plate with a slight lip or rim
- Warm water (about ½ cup)
- A measuring cup or small pitcher for pouring
Step-by-Step Instructions
- Arrange the Candies: Create a single-file circle with the candies around the very edge of the white plate. You can alternate colors to make a specific pattern.
- Make a Prediction: Ask your young scientist what they think will happen when the water is added. Will the colors mix? Will they stay separate?
- Add the Water: Slowly and carefully pour the warm water into the center of the plate until it just touches all the candies. Avoid pouring directly onto the candies.
- Observe the Rainbow: Watch as the colors begin to dissolve and spread toward the center of the plate, creating a beautiful rainbow effect. The process happens within a minute or two.
Pro-Tip: Use warm water for a faster and more vibrant reaction. The heat provides more energy to the water molecules, causing the sugar coating to dissolve and diffuse more quickly. You can turn this into a secondary experiment by comparing the results of warm water versus cold water side-by-side. For a deeper dive into simple chemistry concepts, you can find more about the science of solutions on sites like BYJU'S FutureSchool.
8. Egg in Vinegar (Osmosis and Chemical Reactions)
The "Egg in Vinegar" experiment is a fascinating multi-day project that brilliantly showcases both a chemical reaction and a biological process. It transforms a familiar object, an egg, into something strange and rubbery. When a raw egg is submerged in vinegar, the acetic acid reacts with the calcium carbonate of the eggshell, dissolving it completely and releasing carbon dioxide gas bubbles.
This hands-on experiment reveals the semipermeable membrane just beneath the shell. Once the shell is gone, the "naked" egg becomes an excellent model for demonstrating osmosis, the process by which water moves across a membrane to balance concentrations. Students get to observe a slow but dramatic change, learning about acids, bases, and cellular biology in a way they can see and touch.
Why It's a Great Experiment for Third Graders
Third graders are beginning to understand that changes can happen over time, and this experiment is perfect for teaching patience and systematic observation. They can document the changes daily, practicing scientific journaling. The experiment uses safe, everyday kitchen ingredients, making it accessible for home or school. It transitions from a cool chemical reaction (dissolving the shell) to a fundamental biology lesson (osmosis), covering multiple science standards in one engaging activity.
Materials You'll Need
- A raw egg
- White vinegar (enough to cover the egg)
- A clear glass or jar with a lid
- Optional for osmosis extension: Corn syrup, salt water, and plain water
Step-by-Step Instructions
- Submerge the Egg: Carefully place the raw egg into the empty jar. Pour in enough white vinegar to completely cover the egg.
- Observe the Reaction: Almost immediately, you will see tiny bubbles forming on the eggshell. This is the carbon dioxide gas being released as the acid dissolves the shell.
- Wait and Watch: Cover the jar and place it in the refrigerator. Let it sit for at least 24-48 hours. You may want to change the vinegar after the first 24 hours for a faster result.
- Reveal the Naked Egg: After two days, gently pour out the vinegar. Carefully rinse the egg under cool water, rubbing away any remaining shell bits. You will be left with a translucent, bouncy egg!
Pro-Tip: Take the experiment a step further to demonstrate osmosis. Place the shell-less egg in a glass of corn syrup for a day and watch it shrink as water leaves the egg. Then, move the shrunken egg to a glass of plain water and watch it swell back up, sometimes even larger than its original size! This provides a powerful visual for how cell membranes work.
Quick Comparison of 3rd Grade Science Experiments
| Experiment Name | Core Science Concept | Time Required | Mess Level | Key Advantage |
|---|---|---|---|---|
| Baking Soda Volcano | Chemical Reactions (Acid-Base) | 15 Minutes | High | Visually explosive and exciting |
| Growing Sugar Crystals | Solutions & Crystallization | 1 Week | Low | Teaches patience and observation |
| Balloon Static Electricity | Physics (Static Charges) | 5 Minutes | Very Low | Quick, easy, and surprising results |
| Sink or Float | Physics (Density & Buoyancy) | 20 Minutes | Medium | Promotes prediction and testing |
| Plant Growth | Biology (Photosynthesis) | 2-3 Weeks | Low | Connects science to the natural world |
| Making Slime | Polymer Chemistry | 15 Minutes | High | Fun, sensory, and tactile learning |
| Skittles Rainbow | Chemistry (Diffusion) | 5 Minutes | Low | Beautiful, fast, and captivating |
| Egg in Vinegar | Chemistry & Biology (Osmosis) | 2-3 Days | Medium | Shows a slow, dramatic transformation |
Your Adventure in Science Has Just Begun!
You've just explored eight fantastic, hands-on science experiments for 3rd graders, each designed to transform your kitchen or classroom into a vibrant laboratory of discovery. From the explosive chemical reaction of a baking soda volcano to the slow, magical process of growing sugar crystals, these activities are more than just fun ways to spend an afternoon. They are carefully chosen stepping stones into the vast and exciting world of scientific inquiry.
The real magic of these experiments isn't just in the final result, whether it's a colorful Skittles rainbow or a bouncy, shell-less egg. The true learning happens in the process: the "what if" questions, the careful measurements, the detailed observations, and even the experiments that don't go exactly as planned. These moments are where critical thinking skills are born and a genuine passion for understanding the world takes root.
Key Takeaways for Your Young Scientist
As you move forward, remember the core principles we've uncovered. Each experiment offers a unique lesson that connects directly to the world around us:
- Chemical Reactions Are Everywhere: From the classic volcano to the dissolving eggshell, these activities show how substances can combine to create something entirely new, just like baking a cake.
- Physical Properties Matter: Understanding concepts like density (sink or float), solubility (M&M rainbow), and states of matter is fundamental. These experiments make abstract ideas tangible.
- The Scientific Method Is a Superpower: Each activity encourages your third grader to think like a scientist by asking questions, forming a hypothesis, experimenting, and analyzing the results.
Actionable Next Steps for Continued Discovery
The end of this list is not the end of your scientific journey; it's the beginning. The most important takeaway is that science isn't confined to a textbook or a laboratory. It’s an active, hands-on process of asking questions and seeking answers.
A great next step is to start a "Science Discovery Journal." Use a simple notebook where your child can document their experiments with drawings, observations, and photos of their results. This practice reinforces the scientific method and creates a wonderful keepsake. Challenge them to think of variations for the experiments you’ve already done. What happens if you use salt water for the sink or float test? Can you make a rainbow with other types of candy? Let their questions guide your next science experiments for 3rd graders. This approach empowers them, showing them that their ideas are valuable and worth exploring.
Ready to take the guesswork out of your next science night? The Playz science kits are packed with dozens of exciting, safe, and educational experiments that come with all the materials and easy-to-follow instructions you need. Explore our award-winning kits and find the perfect adventure for your young scientist at Playz today