

Ready to transform your classroom or living room into a buzzing laboratory of discovery? You've come to the right place. For 4th graders, science isn't just about memorizing facts from a textbook; it's about doing, creating, and asking "why?" This guide is packed with 10 of the most engaging, hands-on 4th grade science experiments designed to ignite a genuine passion for STEM subjects.
We move beyond generic instructions to give you actionable insights, clear learning objectives, and practical tips for each activity. From the explosive fun of an erupting volcano to the quiet wonder of growing crystals, these projects use everyday materials to explain complex concepts in a way that’s both fun and educational. Each experiment is structured to simplify core scientific principles, making abstract ideas tangible and memorable for young learners.
This collection is your go-to resource for fostering critical thinking and problem-solving skills. By building simple circuits or visualizing sound waves, students see science in action, connecting classroom lessons to the world around them. This practical approach not only solidifies their understanding but also builds confidence and curiosity. For further inspiration where science meets practical application, consider exploring books about technology to inspire young innovators to complement these hands-on activities. Let’s dive in and prove that the best learning happens through direct, hands-on experience.
1. Volcano Eruption - Chemical Reaction Model
The classic baking soda and vinegar volcano is a staple in science education for a reason: it's a visually spectacular and simple way to demonstrate a fundamental chemical reaction. This experiment provides a hands-on model of how an acid (vinegar) and a base (baking soda) react to produce a gas (carbon dioxide), which is the driving force behind the fizzy "eruption." It’s an unforgettable introduction to chemistry concepts that are foundational for 4th grade science experiments.
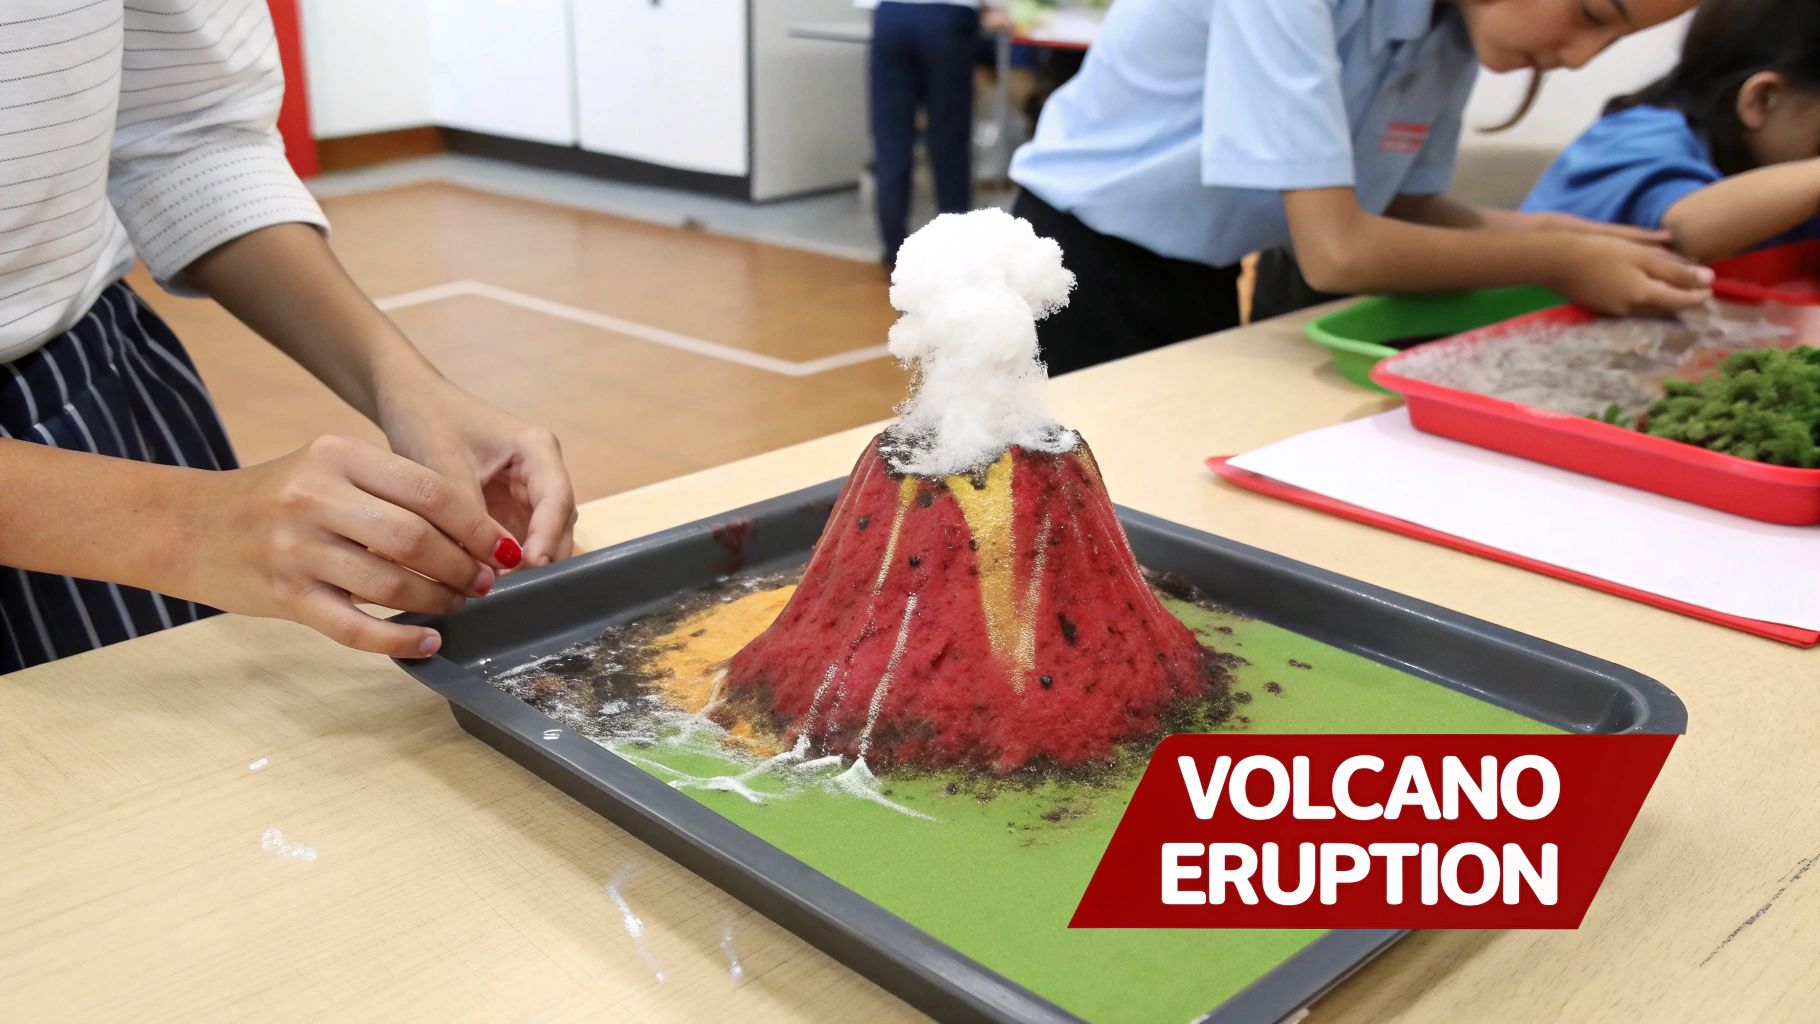
This experiment brilliantly connects an abstract chemical process to a tangible, real-world phenomenon. Students learn about acid-base reactions, the creation of new substances, and how gas pressure can cause dramatic physical changes, all while building and erupting their own miniature volcano.
How to Implement This Experiment
Setting up this classic experiment is straightforward and uses common household items, making it perfect for both classrooms and at-home learning.
- Materials You'll Need: A plastic bottle, modeling clay or play-doh, baking soda, vinegar, red food coloring, dish soap (optional for extra foam), and a large tray or bin to contain the mess.
-
Step-by-Step Process:
- Place the plastic bottle in the center of the tray.
- Mold the clay around the bottle to form a volcano shape, leaving the opening at the top clear.
- Add a few tablespoons of baking soda, a few drops of red food coloring, and a squirt of dish soap into the bottle.
- When ready for the eruption, pour the vinegar into the bottle and watch the foamy lava flow!
Actionable Tips for Success
Key Takeaway: The real learning happens when you move beyond just the "wow" factor. Encourage students to form a hypothesis before the experiment. Ask them to predict what will happen when the vinegar is added and why.
For an enhanced learning experience, have students vary the amounts of baking soda or vinegar to see how it affects the eruption's intensity. This introduces the concept of variables. Discuss the difference between this chemical reaction and a real volcanic eruption, which is caused by molten rock and gas pressure from within the Earth. To explore this topic further with more structured kits and materials, you can find a variety of volcano-themed science kits that provide everything you need.
2. Seed Germination & Plant Growth Observation
Observing a seed sprout and grow into a plant is a powerful, long-term experiment that connects students directly to the life sciences. This project allows fourth graders to witness the life cycle of a plant firsthand, from germination to maturation. It’s one of the most fundamental 4th grade science experiments, teaching patience, careful observation, and the essential requirements for life, such as water, light, and warmth.
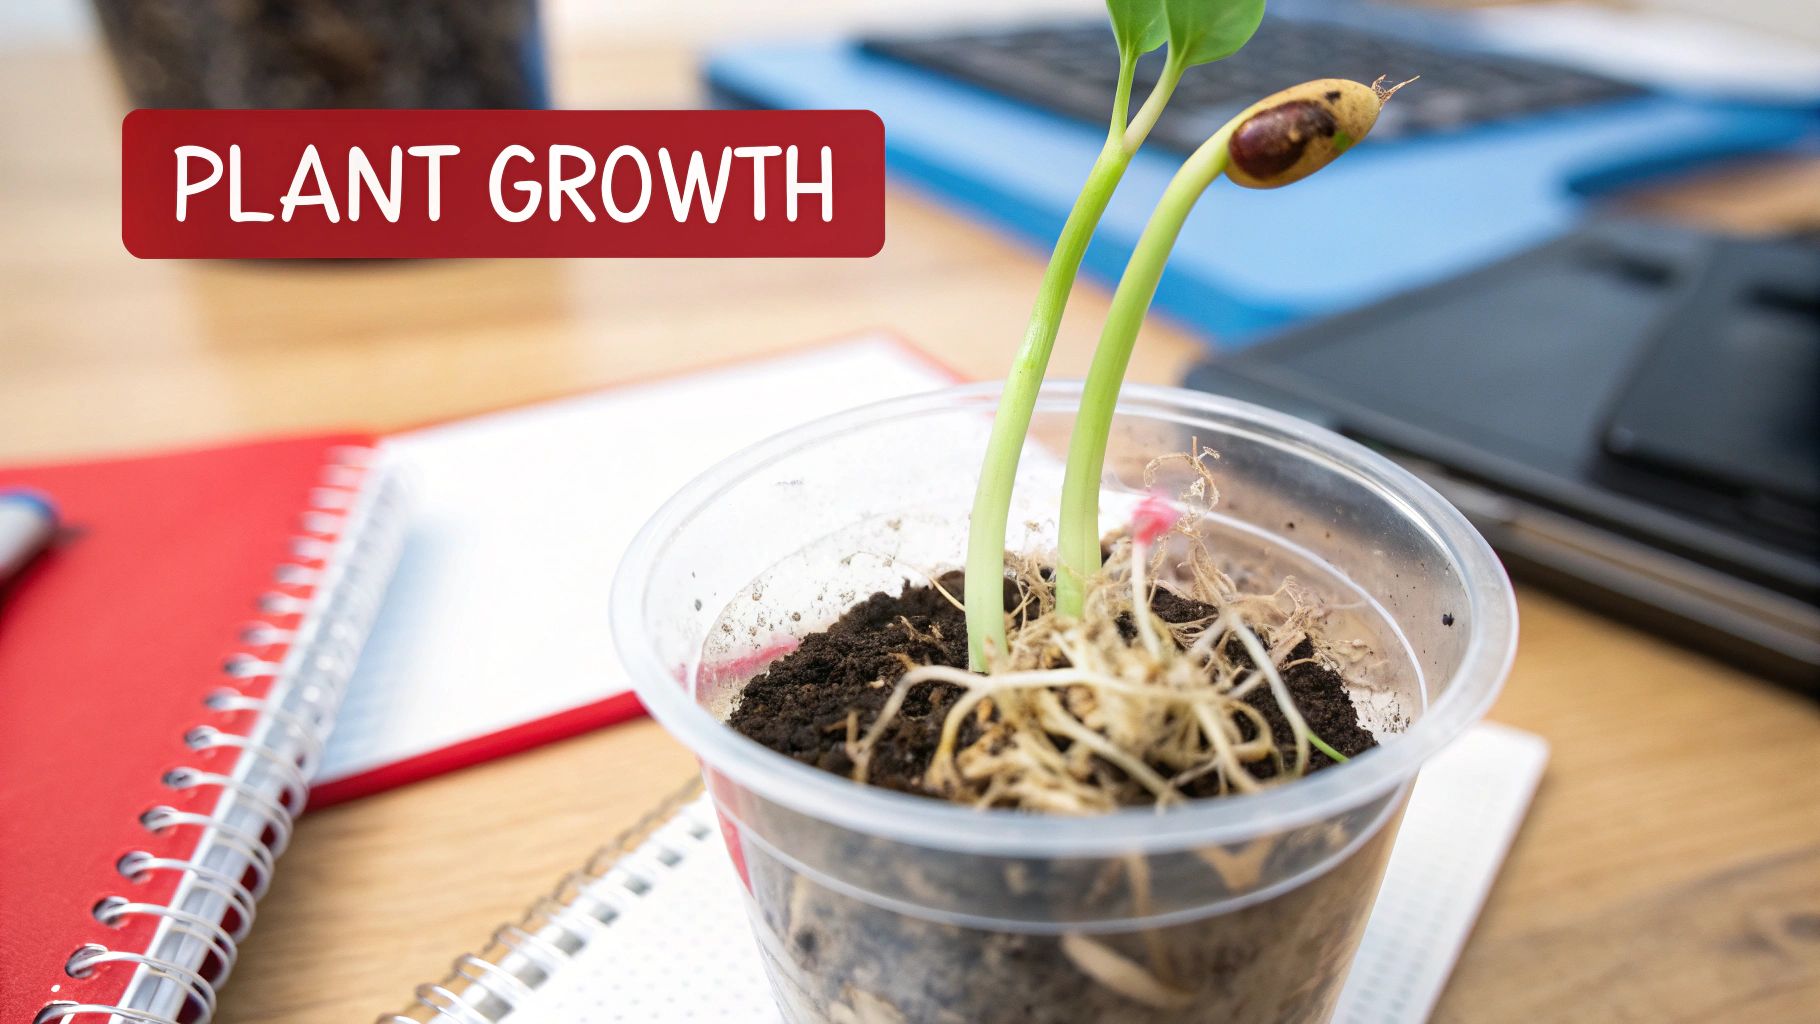
This experiment transforms an abstract biological concept into a tangible, observable process. Students learn about botany, the scientific method, and data collection by tracking changes over several weeks. It’s a foundational project often integrated into school garden programs and is a standard at science fairs for its reliability and clear learning outcomes.
How to Implement This Experiment
Setting up a germination station is simple and uses easily accessible materials, making it ideal for tracking plant development over time in any learning environment.
- Materials You'll Need: Clear plastic cups or jars, cotton balls or paper towels, fast-germinating seeds (like bean, pea, or radish seeds), water, a spray bottle, and a science journal or logbook.
-
Step-by-Step Process:
- Place a few damp cotton balls or a folded, moist paper towel inside the clear cup.
- Position two or three seeds against the side of the cup so they are visible.
- Lightly spray the cotton or paper towel with water to ensure it stays moist but not waterlogged.
- Place the cup in a warm, well-lit area, such as a windowsill.
- Observe the seeds daily, record changes in the journal, and add water as needed to keep the medium damp.
Actionable Tips for Success
Key Takeaway: The core of this experiment is consistent observation and data recording. Encourage students to create a detailed logbook with dates, written descriptions, and scaled drawings of the plant's progress.
To elevate this activity, set up control and experimental groups. For example, place one cup in a dark closet to test the effects of light deprivation. This real-world example demonstrates the scientific method in action. Students can use rulers to measure stem and root growth, gathering quantitative data. For a deeper dive into plant growth experiments, explore guides on mastering seed germination to try different variables. You can also discover more about how flowers grow to expand on the complete plant life cycle.
3. Crystal Growing - Supersaturated Solution
Growing crystals is a mesmerizing experiment that beautifully illustrates the principles of solubility, molecular structure, and supersaturated solutions. By dissolving a solute like sugar or salt in a hot solvent (water), students create a solution that holds more solute than it normally could at room temperature. As the solution cools and water evaporates, the solute molecules come together and arrange themselves into a repeating, structured pattern, forming beautiful crystals.
This experiment is a perfect lesson in patience and observation, one of the most compelling 4th grade science experiments for teaching long-term scientific processes. Students learn about the states of matter, how temperature affects solubility, and the fascinating world of crystalline structures. The slow, visible growth over several days provides a powerful visual for abstract scientific concepts.
How to Implement This Experiment
This experiment requires minimal active time but provides a fantastic opportunity for daily observation and documentation. It primarily uses common kitchen ingredients.
- Materials You'll Need: A glass jar, sugar or salt, water, a wooden skewer or string, a clothespin or pencil, and a saucepan.
-
Step-by-Step Process:
- With adult supervision, bring water to a boil in a saucepan.
- Gradually stir in the sugar or salt, one spoonful at a time, until no more will dissolve. This creates the supersaturated solution.
- Carefully pour the hot solution into the glass jar and let it cool slightly.
- Tie a string to a pencil and lay it across the jar's opening, or use a clothespin to hold a skewer so it is suspended in the solution without touching the bottom or sides.
- Place the jar in a location where it will not be disturbed and observe it over the next several days as crystals form.
Actionable Tips for Success
Key Takeaway: The key to large, well-formed crystals is a slow cooling and evaporation process. A perfectly still environment allows molecules the time they need to arrange themselves into an orderly lattice structure.
To deepen the learning, encourage students to keep a daily observation journal with drawings or photos to document the crystal growth. Discuss where crystals appear in nature as a real-world example—from snowflakes and quartz to diamonds. For a more detailed guide and troubleshooting tips, you can review a complete set of crystal growing kit instructions to ensure a successful outcome. This transforms a simple activity into a detailed scientific study of crystallization.
4. Simple Electric Circuit Building
Understanding how electricity works is fundamental to modern life, and building a simple electric circuit is one of the most effective 4th grade science experiments for demystifying this powerful force. This activity introduces students to the core principles of electrical engineering in a safe, hands-on manner. They learn how energy flows from a power source (like a battery), through a conductive path (wires), to power a component (like a light bulb), and back again to complete the circuit.
This experiment makes the abstract concept of electrical flow tangible and visible. Students directly manipulate components to understand concepts like open vs. closed circuits, conductors, insulators, and the necessity of a complete path for electricity to work. It’s the foundational lesson for all modern electronics, from the lights in their room to the device they're using to read this.
How to Implement This Experiment
Building a basic circuit is a rewarding challenge that uses specialized but readily available components, making it ideal for classroom or home use with proper supervision.
- Materials You'll Need: A low-voltage battery (e.g., a D-cell or a 9V), insulated wires with alligator clips, a small light bulb or LED in a holder, and a simple switch.
-
Step-by-Step Process:
- Clearly identify and label the positive (+) and negative (-) terminals on the battery.
- Connect one wire from the positive terminal of the battery to one side of the switch.
- Connect a second wire from the other side of the switch to one terminal of the light bulb holder.
- Connect a third wire from the other terminal of the light bulb holder directly back to the negative terminal of the battery.
- Flip the switch to close the circuit and watch the bulb light up!
Actionable Tips for Success
Key Takeaway: The true learning potential is unlocked when students troubleshoot and experiment. Encourage them to predict what will happen if a wire is disconnected (an open circuit) or if they replace a wire with a non-conductive item like a rubber band (an insulator).
To deepen their understanding, have students draw a diagram of their circuit before building it. After mastering a basic series circuit, challenge them to build a parallel circuit. You can also test the conductivity of various household objects like paper clips, pencils (graphite), and plastic rulers to see which ones complete the circuit. For a more detailed guide and additional ideas, you can learn more about how to build a simple circuit. This transforms a simple activity into a comprehensive investigation of electrical principles.
5. Invisible Ink & Secret Messages
This experiment merges the thrill of spycraft with the fundamentals of chemistry, making it a standout among 4th grade science experiments. Students use common household substances like lemon juice or milk to write messages that are invisible when dry. When heat is applied, the message is revealed, offering a magical and memorable demonstration of chemical change, specifically oxidation.
This activity excellently illustrates how substances can be altered by external factors like heat. Students learn that the organic compounds in the lemon juice or milk oxidize and turn brown faster than the paper they are on, making the secret message appear. It's a fantastic way to introduce concepts of chemical reactions, properties of matter, and even a bit of history related to espionage and secret codes.
How to Implement This Experiment
Setting up your own secret message lab is incredibly simple and safe with adult supervision, using materials you likely already have in your kitchen.
- Materials You'll Need: Lemon juice (or milk, or a solution of baking soda and water), a cotton swab or small paintbrush, white paper, and a heat source like a light bulb, an iron, or a hairdryer (with adult help).
-
Step-by-Step Process:
- Dip the cotton swab into your chosen "ink" (e.g., lemon juice).
- Write a secret message on the white paper.
- Let the paper dry completely. The message will become invisible.
- To reveal the message, an adult should carefully apply heat by holding the paper near a warm light bulb or gently going over it with an iron set to low. The message will slowly turn brown and appear!
Actionable Tips for Success
Key Takeaway: The scientific inquiry deepens when students experiment with different "inks." Have them hypothesize which substances will work best and why. This transforms the activity from a simple magic trick into a comparative analysis.
To enhance the lesson, try different potential inks like onion juice, vinegar, or diluted honey. Challenge students to record their observations and rank the inks based on clarity and ease of reveal. You can also connect this to history by discussing how ciphers and secret messages were used in historical events. This approach makes complex chemistry tangible and links scientific principles to real-world applications in a fun, engaging way.
6. Water Cycle in a Bag - Miniature Ecosystem Model
The Water Cycle in a Bag is an elegant and effective way to visualize one of Earth's most critical processes. This experiment creates a self-contained, miniature ecosystem in a simple plastic bag, allowing students to observe evaporation, condensation, and precipitation in real time. It’s one of the most fundamental and impactful 4th grade science experiments for teaching Earth science concepts.
This activity makes the abstract concept of the water cycle tangible and visible. Students directly witness how the sun's energy drives the cycle, turning liquid water into vapor, which then cools to form clouds (condensation) and eventually falls back down as rain (precipitation). It’s a powerful demonstration of a closed system, mirroring the way water continuously cycles through our planet's atmosphere and surface.
How to Implement This Experiment
This classic experiment requires minimal materials and setup, making it an excellent choice for any classroom or home learning environment. It is a long-term observation activity that unfolds over several days.
- Materials You'll Need: A clear, sealable plastic bag (like a Ziploc), water, blue food coloring (optional), a permanent marker, and strong tape.
-
Step-by-Step Process:
- Use the permanent marker to draw the sun, clouds, and a body of water (like an ocean or lake) on the outside of the plastic bag.
- Add a small amount of water to the bag (about a quarter cup), adding a drop of blue food coloring to make it more visible.
- Seal the bag tightly, ensuring there are no leaks.
- Tape the bag to a window that receives plenty of direct sunlight, with the drawn water at the bottom.
- Observe the bag over the next few days, noting the changes.
Actionable Tips for Success
Key Takeaway: The learning is amplified through consistent observation and documentation. Encourage students to keep a science journal, drawing what they see in the bag each day and labeling the stages of the water cycle as they appear.
To deepen the investigation, have students place a second bag in a shady spot and compare the results. This introduces the concept of variables and demonstrates the critical role of solar energy in driving the water cycle. You can also discuss how this small-scale model relates to Earth's global weather patterns and ecosystems. For a more detailed guide on this activity, you can explore this water cycle experiment and get additional ideas for extending the learning.
7. Magnet Exploration & Magnetic Field Visualization
Exploring the invisible forces of magnetism is a captivating experience for young learners, and this experiment brings those forces to life. By using common magnets and iron filings, students can directly observe and map the magnetic fields that are typically unseen, providing a powerful visual representation of concepts like magnetic poles, attraction, and repulsion. This activity is one of the most foundational 4th grade science experiments, as it demystifies a fundamental force of nature.
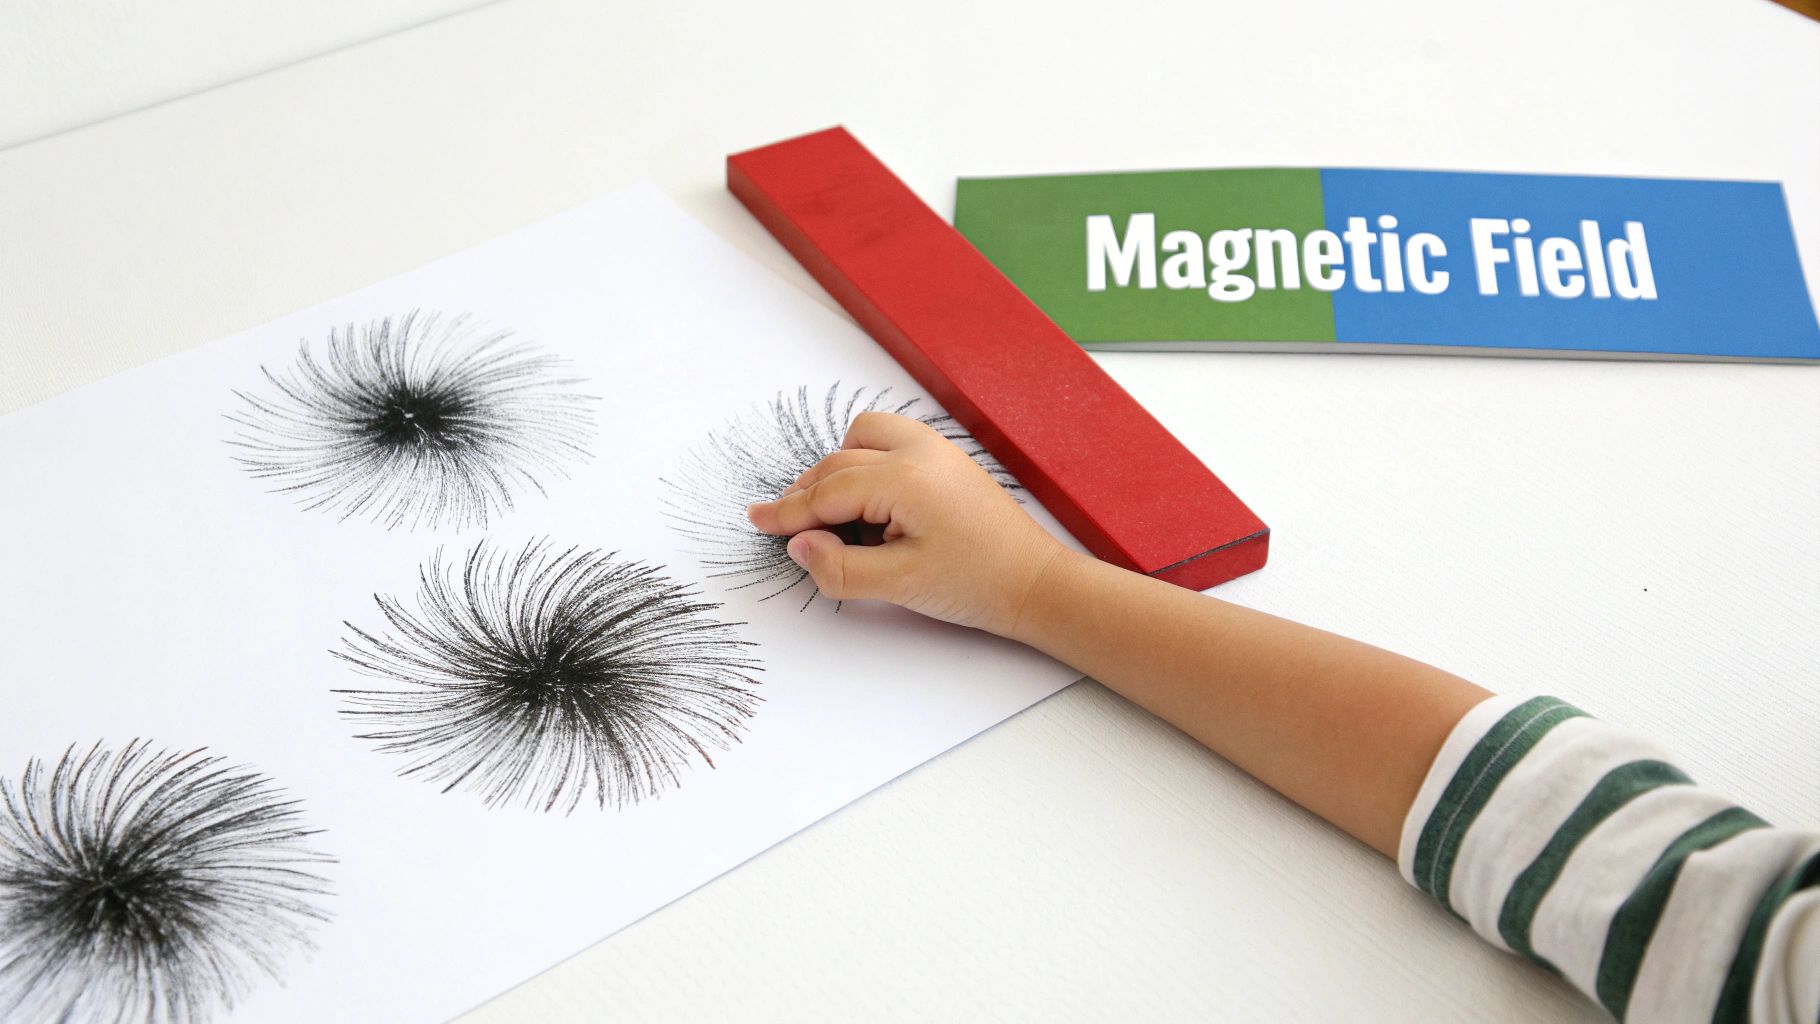
This hands-on investigation connects abstract physics principles to concrete observations. Students learn why some objects are magnetic while others are not, how opposite poles attract and like poles repel, and how magnets are used in countless everyday technologies, from refrigerator doors to complex motors.
How to Implement This Experiment
This experiment requires minimal setup and offers a high level of engagement, making it ideal for classroom stations or an interactive home science lesson.
- Materials You'll Need: Various types of magnets (bar, horseshoe, ring), iron filings (or a substitute like finely chopped steel wool), a clear plastic bag or a shallow tray, a sheet of white paper, and a collection of small objects to test for magnetism (paper clips, coins, erasers, aluminum foil).
-
Step-by-Step Process:
- First, encourage students to test which objects from their collection are attracted to the magnets.
- Place a bar magnet on a flat surface and cover it with the sheet of paper.
- Carefully and slowly sprinkle the iron filings onto the paper directly above the magnet.
- Gently tap the paper to help the filings align, revealing the curved lines of the magnetic field from the north to the south pole.
Actionable Tips for Success
Key Takeaway: To make clean-up a breeze and enhance safety, place the iron filings in a sealed, clear plastic bag. Students can then place the bag over the magnet to see the field lines without any mess.
Extend the learning by having students compare the field shapes of different magnet types, such as a ring magnet versus a bar magnet. Discuss how Earth itself acts like a giant magnet, which is why compasses work. Connecting this experiment to real-world applications, like how magnets are used in speakers, scrap yards, or medical MRI machines, helps solidify the concepts and highlights the importance of this invisible force in our daily lives.
8. Sink or Float Density Exploration
The simple question of "will it sink or will it float?" opens a gateway to understanding complex physics principles like density, buoyancy, and displacement. This hands-on investigation challenges students to predict outcomes and then test their hypotheses, providing an immediate and clear demonstration of how an object's properties relate to its behavior in water. It’s one of the most effective 4th grade science experiments for making abstract concepts tangible.
This experiment masterfully illustrates why a massive steel ship can float while a tiny pebble sinks. Students discover that it isn't just about weight, but about how mass is distributed over a volume. This lays the groundwork for understanding real-world engineering marvels, from ship design to submarine operations, all through a simple tub of water.
How to Implement This Experiment
Setting up a density lab is incredibly easy and encourages curiosity with a wide variety of testable items. It's an ideal activity for group work and scientific discussion in any learning environment.
- Materials You'll Need: A large clear container or tub of water, a variety of small objects (e.g., cork, toy car, orange, aluminum foil, paperclip, rubber duck, stone), towels, and a chart for recording predictions and results.
-
Step-by-Step Process:
- Fill the container with water.
- Lay out the objects and have students create a chart with three columns: "Object," "Prediction (Sink/Float)," and "Result (Sink/Float)."
- Students should observe each object and record their prediction.
- One by one, have students gently place each object into the water and record the actual result, comparing it to their prediction.
Actionable Tips for Success
Key Takeaway: The most profound learning happens during the "why" discussion. After testing, guide a conversation about why a flat piece of foil sinks but the same foil shaped into a boat floats. This directly connects the concept of shape to displacement and buoyancy.
To elevate the experiment, introduce salt to the water to show how increasing the water's density makes it easier for objects to float. Challenge students with a creative problem: can they make a sinking object (like a small ball of clay) float? This encourages them to apply what they've learned about shape and displacement to solve an engineering problem, transforming the activity into a powerful lesson in scientific principles and innovation.
9. Sound Wave Visualization with Tuning Forks & Water
Sound can feel like an abstract concept, but this experiment makes it visible and tangible. By using a tuning fork and a simple bowl of water, students can directly observe the vibrations that create sound waves. This activity provides a powerful, hands-on demonstration of how sound is produced and travels, connecting the abstract physics of waves to something students can see and feel. It’s an ideal way to introduce key concepts like frequency, vibration, and wave propagation.
This experiment masterfully translates an auditory experience into a visual one. Fourth graders learn that the sound they hear is not magic; it is a physical phenomenon caused by vibrations moving through a medium. Watching the ripples spread from the vibrating fork is a memorable "aha" moment that builds a foundational understanding of acoustics and wave mechanics, crucial for many 4th grade science experiments.
How to Implement This Experiment
Bringing sound waves to life is remarkably simple and requires minimal, specialized equipment, making it a fantastic activity for any learning environment.
- Materials You'll Need: A tuning fork, a shallow bowl or pie plate, water, and a towel to place underneath. For variations, you can use a small drum or a speaker covered in plastic wrap with salt or sand on top.
-
Step-by-Step Process:
- Fill the shallow bowl with water and place it on a stable surface on top of the towel.
- Gently strike the tuning fork against a soft but firm object (like the heel of your shoe or a rubber mallet) to make it vibrate. You should hear a clear tone.
- Carefully touch the tip of the vibrating tuning fork to the surface of the water.
- Observe the ripples and splashes created by the vibrations. Discuss how these visible waves are similar to the invisible sound waves traveling through the air.
Actionable Tips for Success
Key Takeaway: The core learning objective is to connect the action of vibration to the result of sound. Before touching the water, ask students to hold the vibrating fork near their ear and then lightly touch it to their fingertip to feel the vibration.
To deepen the investigation, use tuning forks with different frequencies. Students can hypothesize whether a higher-pitched fork (higher frequency) will create different ripples than a lower-pitched one. For a real-world example, sprinkle salt on a surface stretched over a speaker and watch the grains dance to the vibrations of music. Discuss how this principle applies to everything from musical instruments to how our own eardrums work.
10. Simple Machine Exploration - Levers, Pulleys & Inclined Planes
Understanding simple machines is a cornerstone of physics and engineering, and this hands-on exploration provides a tangible way to grasp complex concepts like force, work, and mechanical advantage. This experiment allows students to build and test their own levers, pulleys, and inclined planes, demonstrating how these foundational tools make work easier. It’s one of the most practical 4th grade science experiments, connecting abstract physics principles to everyday objects.
This investigation brilliantly illustrates how machines can reduce the effort needed to perform a task, change the direction of a force, or increase the distance over which a force is applied. Students gain a foundational understanding that serves as a building block for more advanced STEM concepts, including robotics and complex engineering design.
How to Implement This Experiment
Setting up simple machine stations is an excellent way to engage students, using readily available materials to create a mini-physics lab in the classroom or at home.
- Materials You'll Need: For a lever: a ruler, a fulcrum (like a book or pencil), and small objects to lift. For an inclined plane: a piece of cardboard or wood and books for height. For a pulley: string, a small toy bucket, and a spool or small pulley from a hardware store.
-
Step-by-Step Process:
- Lever: Place the ruler over the book (fulcrum) and try lifting an object placed on one end by pushing down on the other.
- Inclined Plane: Prop one end of the cardboard up on books to create a ramp. Compare the effort of lifting an object straight up versus pulling it up the ramp.
- Pulley: Attach the pulley to a high point. Thread the string through it, tying one end to the bucket and pulling on the other to lift it.
Actionable Tips for Success
Key Takeaway: The core learning objective is to have students compare the effort required with and without the simple machine. Encourage them to quantify their observations, even if it's just describing it as "much easier" or "a little easier."
To deepen the investigation, challenge students to find real-world examples of each simple machine around them, like a seesaw (lever), a wheelchair ramp (inclined plane), or a flagpole (pulley). Discuss how combining these simple tools creates compound machines like a bicycle or a can opener. This approach transforms a simple demonstration into a powerful lesson in engineering and critical thinking.
4th Grade Science Experiments: 10-Item Comparison
| Activity (Title) | Implementation complexity 🔄 | Resource requirements ⚡ | Expected outcomes 📊 | Ideal use cases 💡 | Key advantages ⭐ |
|---|---|---|---|---|---|
| Volcano Eruption - Chemical Reaction Model | Low — single-step demo, easy to follow | Common household items; tray & supervision | Visual acid–base reaction, gas production, engagement | Short demos, science fairs, chemistry intro | Highly engaging, immediate results, low cost |
| Seed Germination & Plant Growth Observation | Moderate — daily monitoring over weeks | Seeds, clear containers, soil/paper towels, space | Long-term growth data, life cycle understanding | Longitudinal projects, data collection, responsibility lessons | Teaches patience, multiple testable variables, real-world link |
| Crystal Growing - Supersaturated Solution | Low–Moderate — prep hot solution; multi-day wait | Sugar/salt, jars, string, hot water (adult-handled) | Crystallization, molecular arrangement, keepsakes | After-school, chemistry units, camps | Aesthetic, low maintenance after setup, repeatable |
| Simple Electric Circuit Building | Moderate — basic wiring and safety awareness | Batteries, wires, LEDs/bulbs, switches or kits | Circuit behavior, conductors/insulators, immediate feedback | Hands-on electronics intro, STEM clubs, progressive lessons | Reusable components, scalable complexity, real-world tech prep |
| Invisible Ink & Secret Messages | Low — simple writing plus controlled heating | Lemon/milk/baking soda solutions, paper, heat source (teacher-controlled) | Oxidation demonstration, creative engagement | Intro to chemical change, cross-curricular history activities | Extremely low cost, highly engaging, creative opportunities |
| Water Cycle in a Bag | Low — simple sealed setup, minimal upkeep | Ziplock bag, water, tape, sunny window | Visible evaporation/condensation, closed-system observation | Environmental science, classroom displays, short projects | Self-contained, safe, long-lasting visual display |
| Magnet Exploration & Magnetic Field Visualization | Low–Moderate — hands-on with possible mess | Magnets, iron filings (or substitutes), objects, paper | Magnetic fields visualization, force and poles concepts | Physics stations, demonstrations, introductions to magnetism | Reusable materials, immediate visual results, multiple experiments |
| Sink or Float Density Exploration | Low — quick tests and prediction cycles | Container of water, variety of objects (low cost) | Density and buoyancy understanding, hypothesis testing | Quick labs, formative assessment, diverse-ability lessons | Fast setup, safe, easily adaptable difficulty |
| Sound Wave Visualization with Tuning Forks & Water | Low–Moderate — delicate equipment; controlled setup | Tuning forks, shallow pan, sand/salt, speaker (optional) | Sound as vibration, frequency and medium effects | Music–physics crossover, acoustics demos, museum-style exhibits | Makes sound visible, multiple variables to explore |
| Simple Machine Exploration - Levers, Pulleys & Inclined Planes | Moderate — multiple builds and measurements | Rulers, fulcrums, string/pulleys, ramps, weights, space | Mechanical advantage, force relationships, measurements | Engineering intro, kinesthetic learners, compound machine lessons | Hands-on, measurable results, scalable challenge levels |
From Experiment to Expertise: Keep the Discovery Going
You've just explored a fantastic collection of 4th grade science experiments, each designed to do more than just fill an afternoon. From the explosive chemical reaction of a baking soda volcano to the quiet observation of seed germination, these activities are gateways to understanding the fundamental principles that govern our world. The true value lies not just in a successful outcome, but in the process of discovery itself. It’s in the "what if" questions and the triumphant "aha!" moments that a genuine, lifelong passion for science is ignited.
Remember, the journey from a simple experiment to true scientific expertise is built on a foundation of curiosity and exploration. These activities are the building blocks, introducing core concepts in chemistry, biology, physics, and earth science in a tangible and memorable way. When a child sees iron filings trace a magnet's invisible field or watches a simple circuit light a bulb, they aren't just learning a fact; they are experiencing a scientific principle in action.
The Power of the Process Over the Product
One of the most important takeaways from this collection of 4th grade science experiments is the emphasis on the scientific process. It's easy to focus on whether the crystal grew perfectly. However, the real learning happens when things don't go as planned.
A "failed" experiment is not a failure at all; it's an invaluable data point. It’s an opportunity to ask critical questions: "Why didn't that work?" "What could we change next time?" "What does this unexpected result tell us?"
Encourage your young scientist to document their process. A simple science journal where they can sketch their setup, write their hypothesis, record observations, and note conclusions is an incredibly powerful tool. This practice develops critical skills in observation, data collection, and analytical thinking that extend far beyond the science lab.
Actionable Next Steps for Continued Learning
The conclusion of one experiment should be the beginning of the next question. To keep the momentum going, here are some actionable steps you can take to foster that budding expertise:
- Encourage Deeper Questioning: After an experiment, prompt your child with open-ended questions. For the water cycle in a bag, ask, "Where else do we see evaporation in our daily lives?" or "How do you think the sun's heat affects the real water cycle?"
- Connect to Real-World Phenomena: Bridge the gap between the experiment and the world around them. When exploring simple machines, point out the levers on a seesaw, the pulley system on a flagpole, or the inclined plane of a wheelchair ramp. Making these connections reinforces the relevance of scientific concepts.
- Introduce Variables: Elevate a simple experiment by introducing a variable. For the seed germination project, test different conditions. Plant one seed in a sunny window and another in a dark closet. Use different types of soil or vary the amount of water. This is the essence of controlled experimentation.
- Explore Variations: Don't be afraid to go "off-script." What happens if you use lemon juice instead of vinegar in the volcano? Can you build a circuit that powers a small motor instead of a light bulb? This kind of creative exploration fosters innovation and problem-solving skills.
By embracing these practices, you transform a simple list of 4th grade science experiments into a dynamic, ongoing learning adventure. You are not just teaching science; you are nurturing a scientific mindset. The confidence, curiosity, and critical thinking skills developed through these hands-on activities will empower your child to explore, question, and understand their world with a deeper perspective. The fizzing bubbles of today are cultivating the innovators of tomorrow.
Ready to take the guesswork out of gathering supplies and dive straight into the fun? The expertly curated science kits from Playz provide everything you need for these and many other exciting 4th grade science experiments, complete with clear, kid-friendly instructions. Explore the full collection at Playz and give your child the tools to build, discover, and learn through the power of play.