


A child opens a crystal kit at the kitchen table and pauses over the contents: a packet of white powder, a small seed rock, a container, and instructions that promise something remarkable. To a young experimenter, it looks like a toy. To the adult preparing hot water and clearing space near the sink, it looks a little more like a chemistry set.
That second impression is the useful one. Crystal growing kits are hands-on chemistry experiences that turn a solution into an ordered solid children can observe, measure, and discuss. They can produce a memorable result, but the quality of that result depends on concentration, temperature, cleanliness, patience, and supervision. A thoughtful setup makes the activity safer and teaches much more than watching something sparkle.
What Crystal Growing Kits Are and Why They Endure
A crystal growing kit turns a small precipitation experiment into a guided activity for home or classroom use. The box commonly contains a solute, such as a crystal-growing chemical, a seed surface, a vessel, coloring materials, and directions. An adult dissolves the chemical in hot water, then places a rock or another growth surface into the solution. As temperature or evaporation changes, dissolved material leaves the liquid and builds an ordered solid.
The kit behaves like a compact chemistry set, not a toy. The adult must identify the materials, follow the mixing directions, and decide how much help the child needs. That hidden difference explains why supervision affects both safety and the quality of the final crystal.
This classroom format has a long history. An educational crystal kit archived by California State University, Northridge includes instructions dated 2002. Its directions focus on dissolving a crystal-growing chemical in hot water and placing a rock or seed object into a growing vessel. The same basic arrangement has continued in educational products that connect crystal growth with lessons and guided activities.
The activity also fits family learning. A crystal-growing kit market overview describes broad international demand for crystal-growth experiments as a STEM toy format. Products commonly describe visible growth within 3 to 4 days, 7 to 10 days, or about one week, depending on the formula and design. Those time ranges are expectations, not guarantees. Temperature, dust, movement, and the cleanliness of the container can change the result.
Why the format still works
Children can watch a physical change instead of only reading about one. A clear liquid may become cloudy or colored, while a rough seed surface develops facets that can be examined from different angles. Parents and educators can use that progression to ask about solutions, solids, temperature, and Earth materials.
The age range remains flexible. Retail and education listings commonly target children 8 years and up or learners roughly in the grade 7 to 14 range, but the right level of independence depends on the chemicals and instructions in the specific kit. A useful overview of related hands-on learning appears in science kits for kids.
Practical rule: Treat the kit as a supervised lab activity that ends with a displayable crystal.
Adults do not need to make the experiment intimidating. They do need to keep children away from hot water, powders, and any unlabeled solution. Crystal kits have endured because they connect simple materials with foundational chemistry and geology while asking learners to observe carefully, follow conditions, and explain what changed.
The Simple Science Behind How Crystals Form
Every solution-grown crystal kit depends on supersaturation, nucleation, and crystal habit. These terms sound advanced, but a parent can introduce them with a familiar kitchen example.
Dissolve sugar in hot water and the liquid can hold more sugar than it can at a cooler temperature. If the mixture cools or some water evaporates, the solution may reach its saturation point. Add more dissolved sugar than the cooler liquid can comfortably retain, and the solution becomes supersaturated. The excess sugar has to leave the liquid, which is why crystals can form on a stick or string in a rock-candy experiment.
Commercial kits use a crystal-growing chemical rather than table sugar. Depending on the product, that may be monoammonium phosphate, potassium alum, or another listed compound. The underlying principle remains the same. Hot water dissolves the powder, and controlled cooling or evaporation moves the solution toward a state where the dissolved particles can assemble into a solid.
Nucleation gives the process a starting point
Nucleation is the moment crystal formation gets organized. A dissolved particle may attach to a rough surface, such as the supplied seed rock, and attract other particles into a repeating arrangement. Once a stable starting cluster forms, additional material can deposit onto it.
A smooth plastic surface may offer fewer useful places for that first cluster to settle. A rough rock, string, pipe cleaner, or another porous base can provide more attachment points. The seed doesn't magically create crystals, but it gives the solution a preferred location for growth.
Habit explains the final shape
Crystal habit means the outward form a crystal develops as its internal structure grows. The chemical type, concentration, temperature, and evaporation conditions all influence whether the result looks like plates, prisms, needles, clusters, or irregular crusts.
The physical chemistry of solution crystal growth explains why the degree of supersaturation matters. Crystal growth begins after a saturated solution is pushed into supersaturation, creating the driving force for material to deposit until equilibrium returns. Higher supersaturation can alter how crystal surfaces accept new material, which helps explain changes in growth rate and shape.
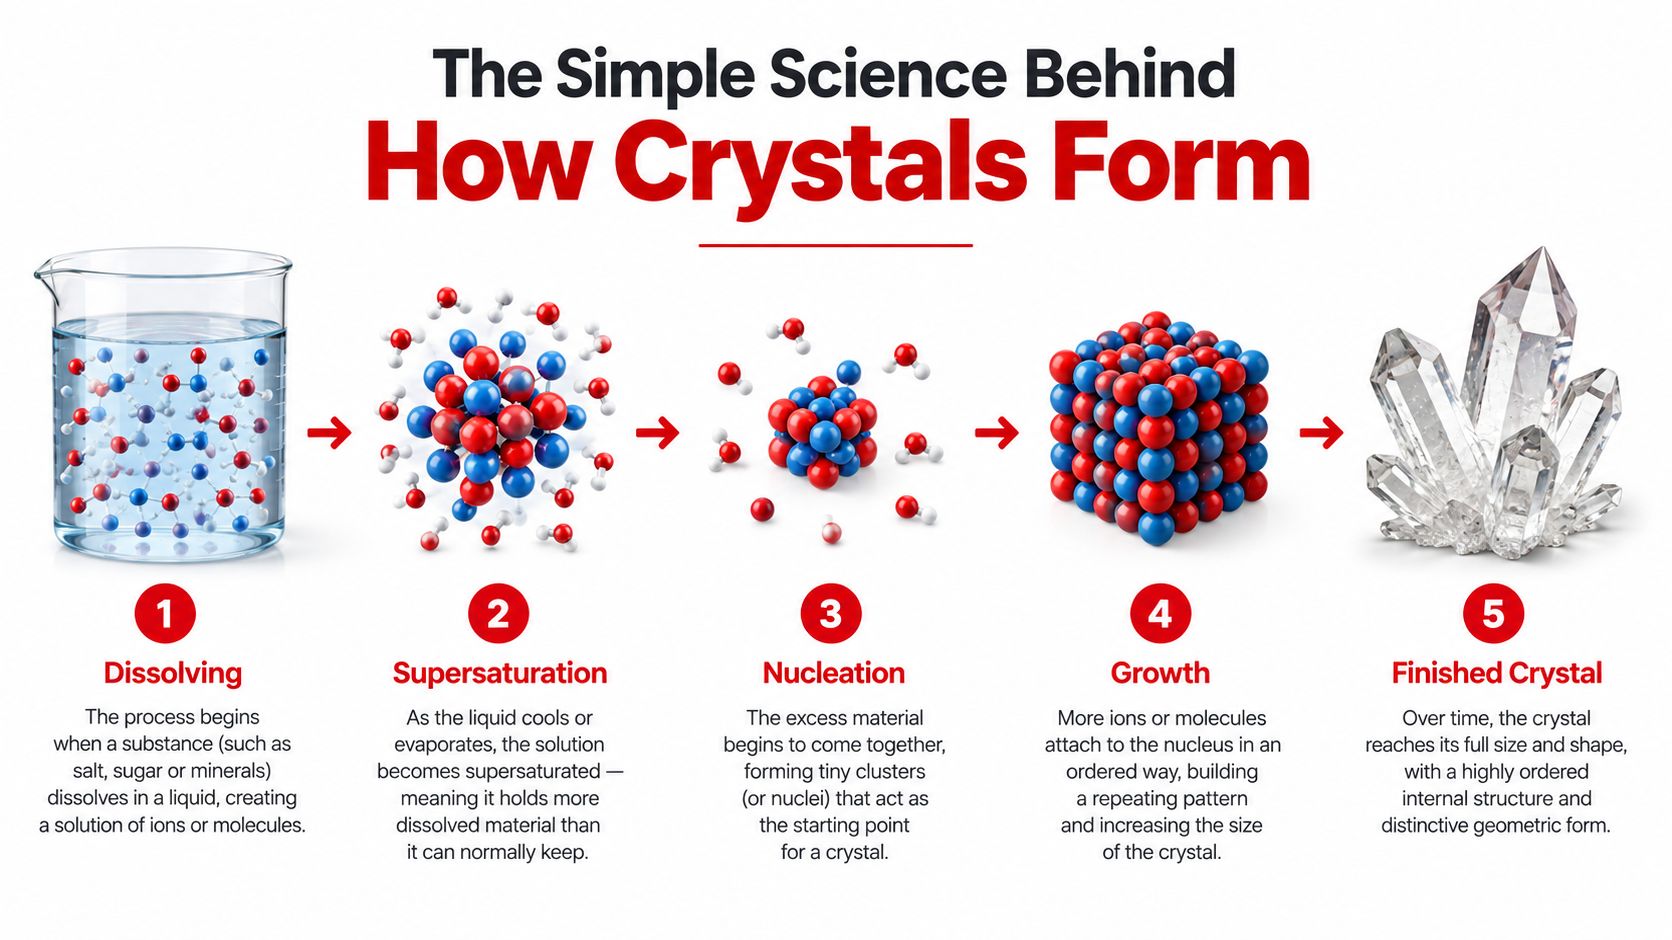
Slow cooling or evaporation usually gives particles more time to arrange themselves cleanly. Rapid supersaturation can encourage defects, fine particles, and uneven deposits. That's why a container left undisturbed often produces larger, clearer crystals than one moved repeatedly. For more approachable home chemistry ideas, chemistry experiments at home can help place this activity in a broader learning sequence.
What Comes in the Box and Who It Is Really For
A box may look like a child's craft project, but its contents function more like a small chemistry set. The chemical packet provides the dissolved material. Common examples include monoammonium phosphate, potassium alum, and copper sulfate. The exact substance varies, so check the packaging or manual before preparing anything.
The seed rock or growth platform gives crystals a surface where growth can begin. A measuring cup helps control the water volume, and a stirring stick helps distribute the powder through the solution. Dye packets change the color or appearance, not the crystal's internal structure. A display base gives children a way to examine the finished specimen. The instruction booklet explains how these parts work together and should be read before the chemical packet is opened.
The contents also reveal who the kit is really for. A younger child may be able to observe changes and record drawings, while an adult handles hot water and prepares the solution. A kit for older learners may involve more exact measurements, stronger chemicals, or a longer observation period. The age label is a starting point, not a substitute for judging the child's ability to follow instructions and the adult's ability to supervise.
Crystal Kit Chemical Comparison
| Chemical | Typical Age Range | Growth Time | Supervision Level |
|---|---|---|---|
| Potassium alum | Varies by product, commonly school-age learners | Varies by formula and conditions | Adult setup and supervision according to the manual |
| Monoammonium phosphate | Commonly older school-age learners | Some products describe 3 to 4 days or 7 to 10 days for visible growth, as reported in science kit product information | Adult supervision, especially during preparation |
| Copper sulfate | Product-specific, often intended for more experienced learners | Varies by formula and conditions | Close adult supervision and careful chemical handling |
Growth timing depends on the formula and conditions, so the table cannot replace the product manual. One manufacturer lists a minimum age of 8 years and requires adult supervision in its crystal-growing instructions. Separate crystal kit safety instructions warn that chemicals can be harmful if misused and must not be swallowed or brought near the eyes, mouth, or skin.
A kit is suitable for a child when the child can follow directions with help, not simply when the box displays an appealing age label.
The intended user is a curious child with an attentive adult. Very young children can observe, discuss, and document the process, but they should not handle powders or prepared solutions independently.
Fun Ways to Use Crystal Kits at Home and in Class
The same kit can support different learning experiences depending on the setting. A family may want a short weekend project, while an educator may use the activity to compare variables over several observations. The best format is the one that matches the available time, the group's needs, and the adult's ability to supervise.
Crystal Kit Activity Formats Compared
| Setting | Activity Type | Typical Duration | Group Size | Supervision Level |
|---|---|---|---|---|
| Home | Parent-child growing session | One focused afternoon plus observation days | One child or a small family group | Close adult supervision during setup |
| Homeschool | Chemistry and geology unit | Several lessons with a growth journal | Individual learner or small group | Adult-guided |
| Classroom | Station rotation | A lesson period for setup, followed by scheduled checks | Small groups at a station | Teacher-directed |
| Science fair | Controlled comparison | Multi-day observation and presentation | Individual or project partners | Regular adult review |
| Birthday activity | Demonstration and decorating | Short group session with later display | Small supervised group | High adult involvement |
| Observation project | Growth diary with drawings and measurements | A repeated schedule across the growth period | Individual or pairs | Adult check-ins |
At home, keep the questions low-pressure. Ask, “What changed since yesterday?” or “Where do you see the first growth?” A child doesn't need to name every chemical process to practice observation. A simple drawing, date, and sentence can turn a one-time surprise into a record of evidence.
Homeschool families can connect the activity with states of matter, mixtures, solutions, geology, and crystal shape. In a classroom, students can compare containers or seed surfaces only when the teacher can keep the variables clear and the materials safe. The point isn't to make every child produce an identical crystal. It's to help learners notice how conditions affect results.
Choose the format by the learning goal
A solo weekend project suits a child who enjoys independent observation but still needs an adult for preparation. A classroom station works well when the teacher has already established rules for goggles, spills, labeling, and cleanup. A science fair entry becomes stronger when the student documents a clear question rather than presenting a crystal as a finished craft.
A broader early-years activity collection, such as top 10 space activities for EYFS, can also help educators build a themed environment around observation, exploration, and scientific questioning. The crystal activity doesn't need to stand alone. It can sit alongside discussions of planets, rocks, materials, and how scientists record what they see.
For teachers looking for ways to make the activity more participatory, how to increase student engagement offers useful context for turning demonstrations into student-led discussion. Invite learners to predict, observe, sketch, and explain. Those habits matter more than producing a perfect specimen.
Troubleshooting Tricks for Bigger and Clearer Crystals
A crystal that turns cloudy, stays tiny, or grows against the container is giving you useful evidence. These results usually come from temperature, concentration, cleanliness, or movement, so troubleshoot the conditions before blaming the kit. A crystal-growing kit behaves more like a small chemistry set than a toy: careful preparation and patient observation shape the outcome.
When crystals look cloudy or fuzzy
Cloudiness often means many tiny particles formed together. Filter the prepared solution before transferring it, choose a clean vessel, and cover the container to keep out dust. Cool the solution gradually. Rapid cooling can create excessive supersaturation, encouraging irregular deposits instead of one clearer structure.
Tiny or absent growth calls for a separate check. Confirm that the water reached the temperature stated in the manual, measure the chemical and water accurately, and check that the powder dissolved as directed. If those conditions are correct, wait. Moving the container because the surface looks unchanged can disturb early growth.
When growth collects on the walls
A crust on the walls competes with the seed crystal for dissolved material. If the instructions permit it, use clean tools to move the seed into fresh solution and place it in a clean glass. The intended specimen then has a better chance to grow rather than leaving the walls as the main growth surface.
Water quality can also change the result. Distilled water limits minerals introduced by tap water, which can matter in hard-water areas. A rough or porous base usually offers more nucleation sites than smooth plastic. If the kit permits alternatives, string, pipe cleaner, or suitable porous rock may work better than a polished platform.
Observation habit: Photograph or sketch the crystal from the same viewing angle each time, then record temperature, container location, and visible changes.
Different kits give different timelines. Some show visible results within 3 to 4 days, while others describe 7 to 10 days or a one-week observation period, as shown by these documented crystal kit product timings. Follow the manual's harvest guidance and handle the specimen gently. Let it dry gradually on a protected surface. Heat can force out moisture too quickly and damage a fragile structure.
For a lesson, record the waiting and imperfect attempts rather than presenting only a polished final result. Advice on creating videos that actually teach can help children distinguish observation from a flashy montage. Careful volume work can also become more concrete with a small laboratory vessel such as a 10 ml beaker, when the kit directions allow it.
Safety Habits Every Crystal Kit User Should Practice
The safest setup begins before the powder packet is opened. Read the complete manual, identify the chemical, and choose a clear, wipeable surface away from food, drinks, pets, and younger children. Tie back long hair, put on eye protection during mixing, and use ventilation when dissolving powders in hot water.
A practical setup checklist
- Prepare the workspace. Cover the table with newspaper or waterproof sheeting, keep food away, and place all materials within an adult's reach.
- Use protective equipment. Wear safety goggles, and use gloves if the product instructions call for them. Several manuals specifically instruct users to wear supplied goggles, protect the work surface, and wash hands after handling materials, as shown in these crystal kit handling directions.
- Control hot water carefully. Use a heat-safe container and oven mitts where appropriate. Keep the mixture still while it cools, and don't let distractions interrupt the adult handling the hot solution.
- Respond to spills promptly. Keep children away from the spill, follow the manual's cleanup directions, and wash exposed skin with water. Never taste the powder or solution.
- Store leftovers securely. Seal unused chemicals and keep them away from children and pets. Some manuals say finished crystals and liquid containers should remain out of reach of children under 10 years old, showing that storage remains important after growth ends, as stated in this finished-crystal storage guidance.
Most crystal kits are labeled 8 years or older and require adult supervision. Don't assume a child can work independently just because they can read the steps. Supervision should reflect the actual task, especially when hot water or chemical exposure is involved.
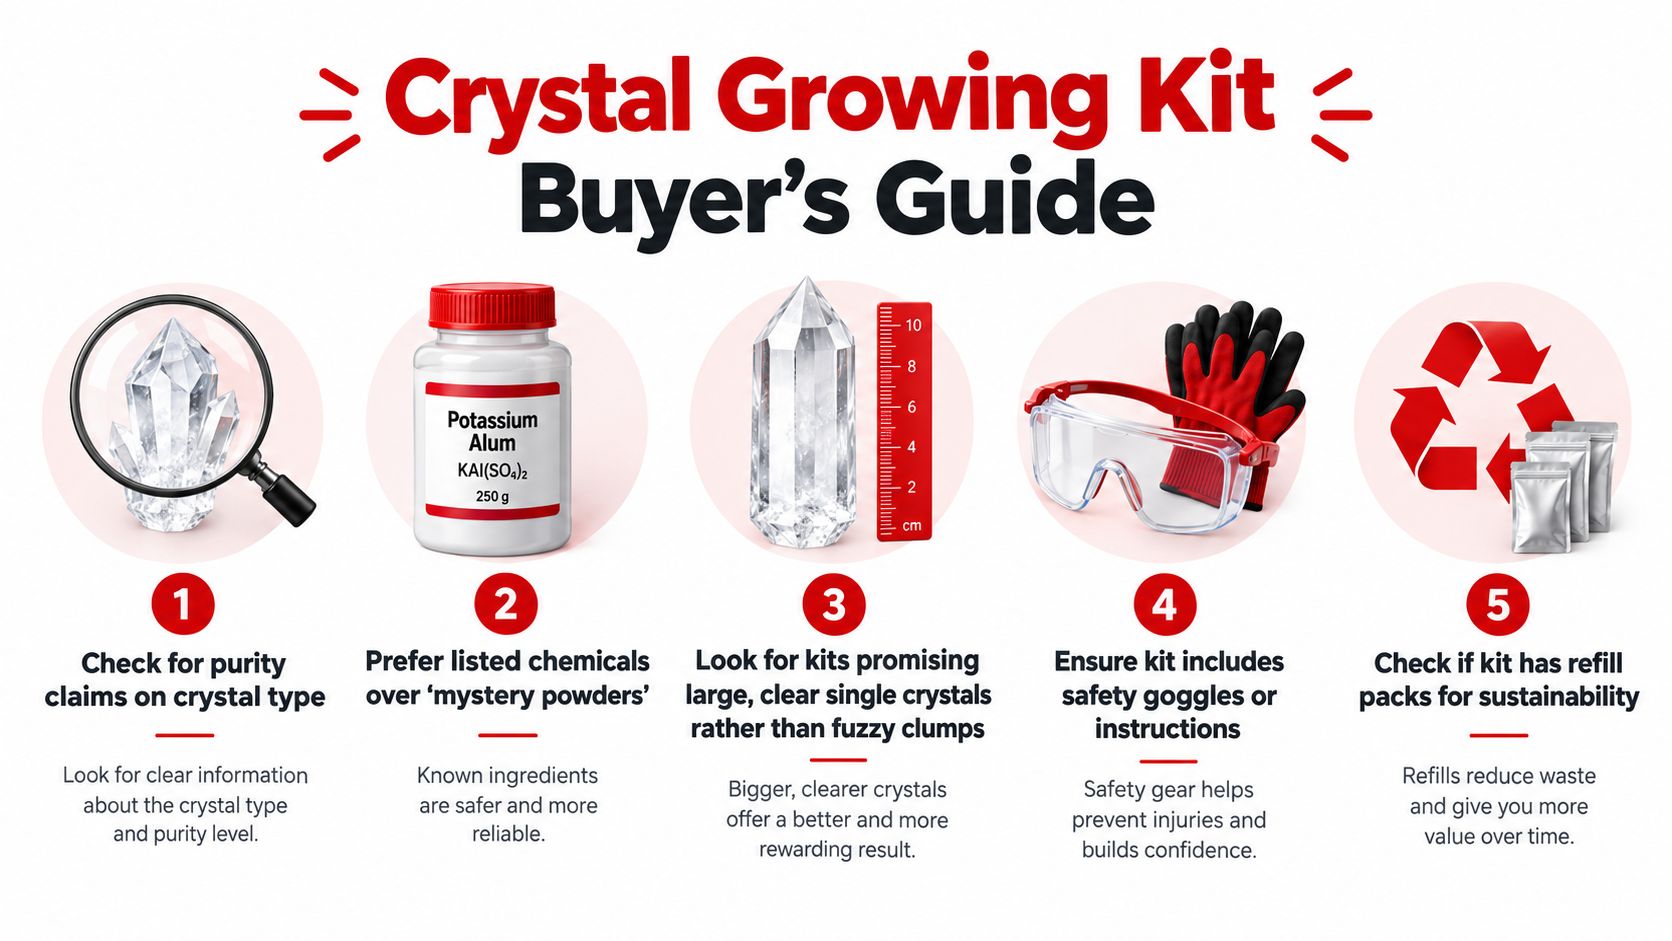
For a visual reminder, place the safety message where the activity happens rather than relying on memory.
Dispose of used solution according to the product directions. Where the manual permits drain disposal, use running water rather than pouring the solution into garden soil. Keep all chemicals out of mouths, eyes, and skin. They may resemble sugar or salt, but kit chemicals are not food. Avoid using household chemicals such as 90% isopropyl alcohol as substitutes or additions unless a qualified adult and the product instructions specifically require them.
Buying Checklist and Final Word on Crystal Growing Kits
A good purchase starts with the label, not the color of the box. Look for the chemical name, the intended age, adult-supervision language, safety equipment requirements, and clear disposal instructions. A kit that explains its risks is more trustworthy for learning than one that presents the activity as effortless free play.
What to check before buying
- Named chemicals: Prefer a product that identifies the compound rather than supplying a mystery powder.
- Clear age guidance: Match the kit to the child's ability to follow directions and the adult's comfort with hot water and chemical handling.
- Useful safety information: Check for goggles, protective setup guidance, ventilation advice, and hand-washing instructions.
- A suitable growth design: Decide whether the child wants one large display crystal, several smaller crystals, a glowing specimen, or a geode-style result.
- Realistic timing: Choose a kit whose observation period fits your schedule. Product descriptions commonly promise growth over several days or about a week, but results depend on conditions.
- Refill options: A refill can extend the learning activity and reduce the need to buy a complete setup again.
- A readable manual: Instructions should explain measurements, temperature, placement, storage, and disposal in plain language.
- Room for documentation: A container, journal prompt, or display base can help the child continue learning after the first visible growth.
Budget, mid-range, and premium kits can each be reasonable choices, but they may offer different levels of equipment, chemical variety, presentation, and guidance. A lower-cost set may suit a first supervised demonstration. A more developed kit may provide multiple experiments or stronger support for classroom comparison. The price alone doesn't tell you whether the activity fits your learner.
The central decision is educational. Crystal growing kits are legitimate chemistry experiences packaged in a toy-friendly format. Choose one that matches the child's age, the adult's availability, the workspace, and the question you want to explore. A cloudy or uneven result isn't wasted if the child can identify what happened and suggest a better-controlled attempt.
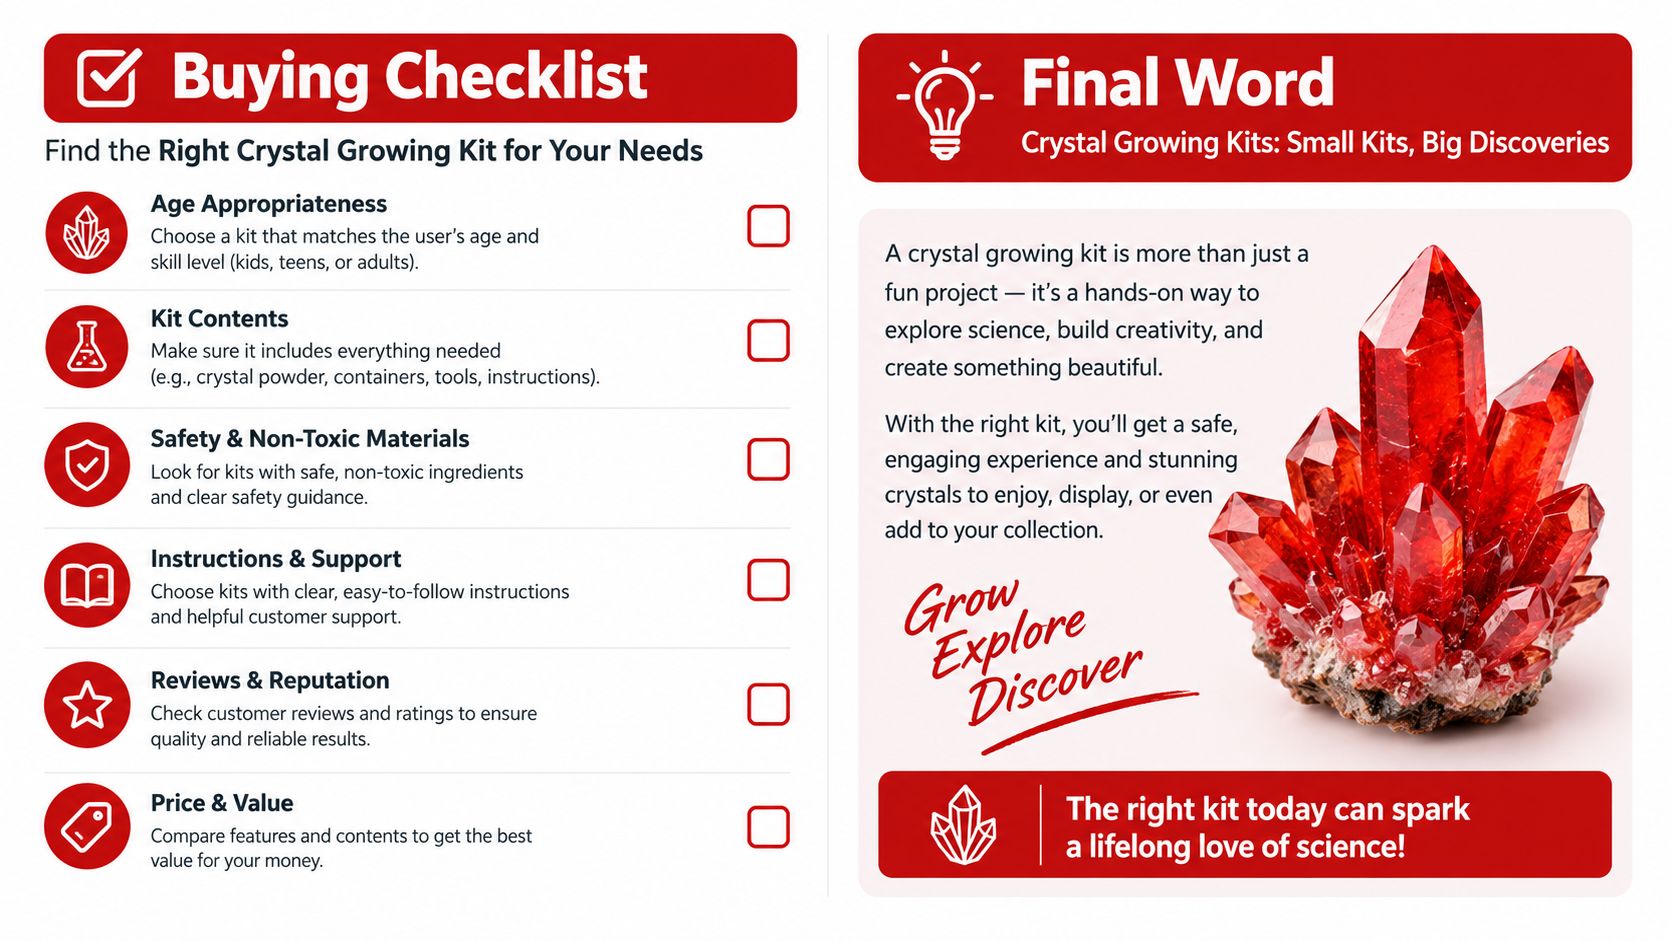
Choose one kit this week, read its manual before opening the packet, set a specific grow date, and start a simple record with a drawing and observation for each check. Treat the first batch as a real experiment, not a performance test, and let the child explain what changed, what went wrong, and what they'd try next.
Playz offers hands-on science products, including a Unicorn Slime & Crystals Science Kit, that can give children a structured way to explore crystal-related activities at home. Visit Playz to compare its science kits and choose an activity that fits your child's curiosity, age, and available supervision.