


Your child is tugging at your sleeve, asking for bubbles, and the bottle in the cupboard is almost empty. The few bubbles it makes pop before they clear the wand. A homemade diy bubble solution fixes that moment with familiar ingredients and gives you control over the result, whether you need quick indoor play, durable backyard bubbles, or large bubbles from a string wand.
The useful idea is simple: water provides the bulk, dish soap forms the flexible film, and glycerin, sugar, or syrup helps that film hold moisture. Small changes to soap concentration, water quality, and additives can change how the mixture behaves.
Why Homemade Bubbles Beat the Store Bottle
A homemade mixture is easier to adapt than a half-used bottle. You can prepare a refill for a small wand, make a gentler batch for sensitive skin, or increase the film-strengthening additive when the weather is dry. You can also pour it into a reusable container instead of relying on another single-use bottle.
The basic ingredients are inexpensive pantry or household supplies. Hand dish soap, water, and a humectant such as glycerin or sugar form the core pattern found in educational bubble recipes. Historical accounts trace more formal bubble formulations to scientific writing from around 1880, including Castile soap, water, glycerin, and sugar, while later researchers explored polymer additives by the 1960s. That history shows that homemade bubbles belong to a long scientific and educational tradition, not just a modern craft idea. The history of soap bubbles and their formulations provides that background.
The three controls that matter
Soap concentration affects how readily a film forms, but more soap isn't automatically better. Too much can create unstable foam and leave a mixture that produces many small bubbles instead of durable ones.
Water type matters because hard tap water can interfere with performance. Distilled or filtered water gives you a cleaner starting point, especially when a batch behaves poorly for no obvious reason.
Additives change how quickly the bubble loses water. Glycerin, sugar, and light syrup can slow evaporation, but each recipe needs balance. I've found that adding a little glycerin moves bubble life more reliably than pouring in extra soap.
Practical rule: Tune one ingredient at a time. If you change the soap, water, and additive together, you won't know which adjustment solved the problem.
The science is approachable. Pure water has high surface tension, so it doesn't easily stretch around air. Soap changes the water's surface behavior, allowing a thin film to form. Additives then help that film stay moist long enough for you to see, chase, or catch the bubble.
The Safe Basic DIY Bubble Solution Recipe
For everyday play, start with six cups of distilled or filtered water and one cup of hand dish soap. This six-to-one water-to-soap base is also used in a widely shared super-bubble recipe, which recommends adding glycerin or corn syrup and allowing the mixture to sit overnight for the strongest results. The super-bubble recipe and explanation offers that comparison.
Pour the water into a wide pitcher or mixing bowl. Warm water can help the ingredients combine, but it shouldn't be hot enough to create a safety concern around children. Add the soap slowly down the side of the container, rather than pouring it into the center where it will trap air.
Use a long spoon and make one slow, gentle stirring motion until the liquid is combined. Don't whisk, shake, or stir quickly. Vigorous mixing creates a layer of foam, and that foam uses up the surface-active ingredients that should be forming strong bubble films.
For a stronger everyday batch, add one tablespoon of glycerin and fold it in with the same gentle motion. Glycerin slows evaporation and can help bubbles last longer, particularly when outdoor air feels dry. Fragrance-free hand dish soap is a sensible choice for children with sensitive skin, although caregivers should still prevent swallowing and supervise young children around the solution.
Use a clean wand, then cover the mixture and let it rest for at least fifteen minutes before play. Longer resting can improve consistency, but the short pause gives the soap time to distribute without asking a child to wait for a complicated preparation. Guidance from Poison Control on safer bubble-solution ingredients and handling specifically recommends hand dish soap rather than dishwasher or laundry detergent.
For accurate measuring, a dedicated one-cup measuring cup helps children watch the process without guessing at the proportions. Keep the container within adult reach, label it clearly, and don't let children drink from it. The batch makes a generous refill for repeated play, but avoid promising an exact yield because the final volume depends on foam, pouring, and the size of your containers.
Three Recipes for Three Different Play Sessions
The right mixture depends on the activity. A quick wand session needs simplicity, a sunny backyard session benefits from moisture retention, and giant bubbles need a flexible film that can travel across a large loop.
| Recipe & Use Case | Water | Dish Soap | Key Additive | Rest Time | Best For |
|---|---|---|---|---|---|
| Everyday kid play | 6 cups | 1 cup | 1 tablespoon glycerin | 15 minutes or longer | Small handheld wands |
| Longer-lasting backyard play | 3 cups | 1 cup | 1/2 cup corn syrup, with a small amount of baking powder | Several hours or overnight | Standard wands in sunny outdoor play |
| Giant outdoor bubbles | 4 cups | 1 cup | 1/3 cup glycerin | Overnight | String wands and tri-string tools |
The everyday recipe is the easiest place to begin. It produces a manageable film for ordinary wands and doesn't require a thick additive. If the bubbles pop quickly, improve the water or resting time before increasing the soap.
The backyard version uses corn syrup as the main moisture-holding ingredient. A small amount of baking powder is an optional experimental tweak, not a universal requirement. Add it cautiously, mix without frothing, and judge the result by bubble behavior rather than assuming every additive improves every batch.
The giant-bubble mixture uses more glycerin relative to the water and benefits from an overnight rest. It may feel heavier and can be less convenient for quick play, but the thicker film suits large loops and string tools. KiwiCo's collection of DIY bubble solution recipes also emphasizes that water temperature, gentle mixing, humectants, and resting time can vary by use case.
Choose a wand that matches the formula. Small plastic loops work well for the everyday mix, while string wands need enough solution to coat the full line without dripping excessively. For more water-based play ideas, see these kids' water games.
If your chosen recipe underperforms, don't remix the entire bucket immediately. Use the symptom-based fixes below, changing the smallest likely cause first.
The Simple Science Behind Stronger Bubbles
A bubble is a thin liquid film wrapped around air. The film needs enough flexibility to stretch, enough strength to resist tearing, and enough moisture to avoid drying out before the bubble floats away.
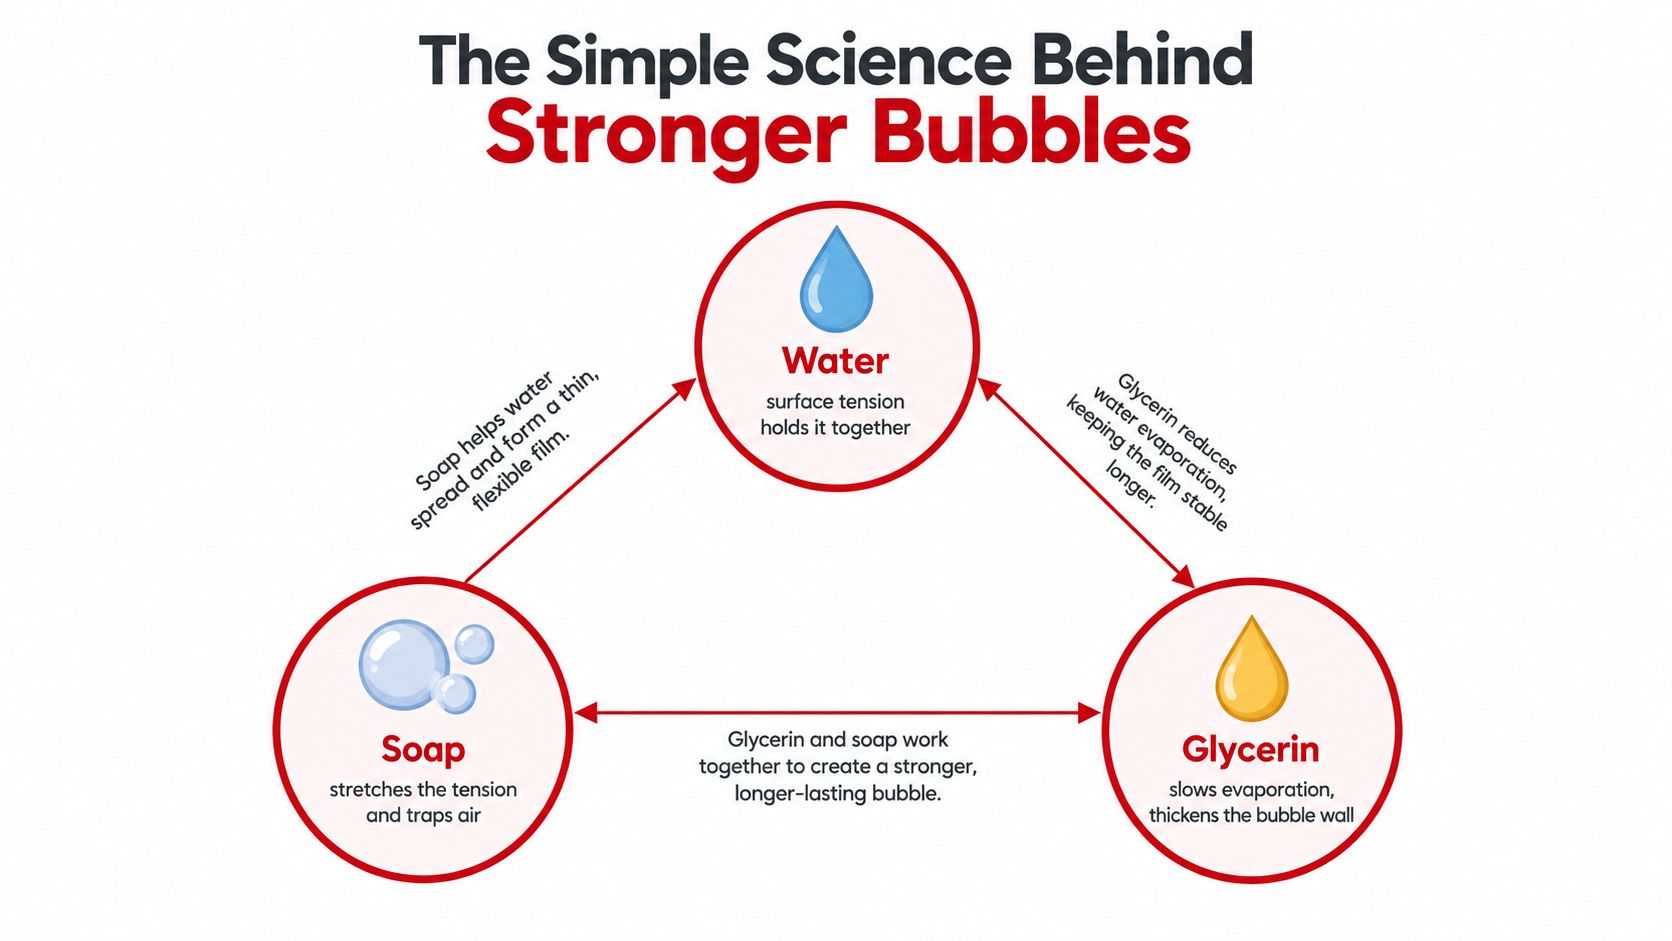
Water and soap work as a pair
Water molecules pull toward one another, creating surface tension, a skin-like force at the surface. That force makes pure water resist stretching. Dish-soap molecules position themselves at the surface and change that tension, allowing the liquid to spread into a film around air.
Soap doesn't make the mixture “strong.” It makes bubble formation possible by helping the film stretch. If you add too much soap, you may create froth rather than a balanced film. That's why a measured ratio and gentle stirring matter more than a bottle filled with extra detergent.
Additives slow the main cause of popping
Evaporation removes water from the film. As the film dries, it becomes less able to flex and eventually breaks. Glycerin, sugar water, and light corn syrup attract moisture, so they can slow water loss and help the bubble wall remain workable for longer.
An educational recipe from the American Chemical Society's bubble activity uses one cup of water, two tablespoons of dish soap, one tablespoon of glycerin, and one teaspoon of sugar. The same source contrasts that with a larger mixture using one-half cup of dish detergent, four and one-half cups of water, and four tablespoons of glycerin. These are different formulas for different balances, not contradictions.
A fast, fragile bubble usually points to water loss, turbulence, poor water quality, or an unbalanced ratio.
Think in the triangle shown in the infographic. Water supplies the liquid, soap enables the film, and glycerin controls moisture loss. Change one corner and you'll see a corresponding change in bubble size, speed, stickiness, or lifespan.
For another child-friendly way to connect household ingredients with observation, explore water-based science experiments.
Troubleshooting Bubbles That Pop Too Fast
When bubbles fail, look at the symptom before adding ingredients. A one-minute check can prevent you from turning a usable solution into a sticky, over-concentrated one.
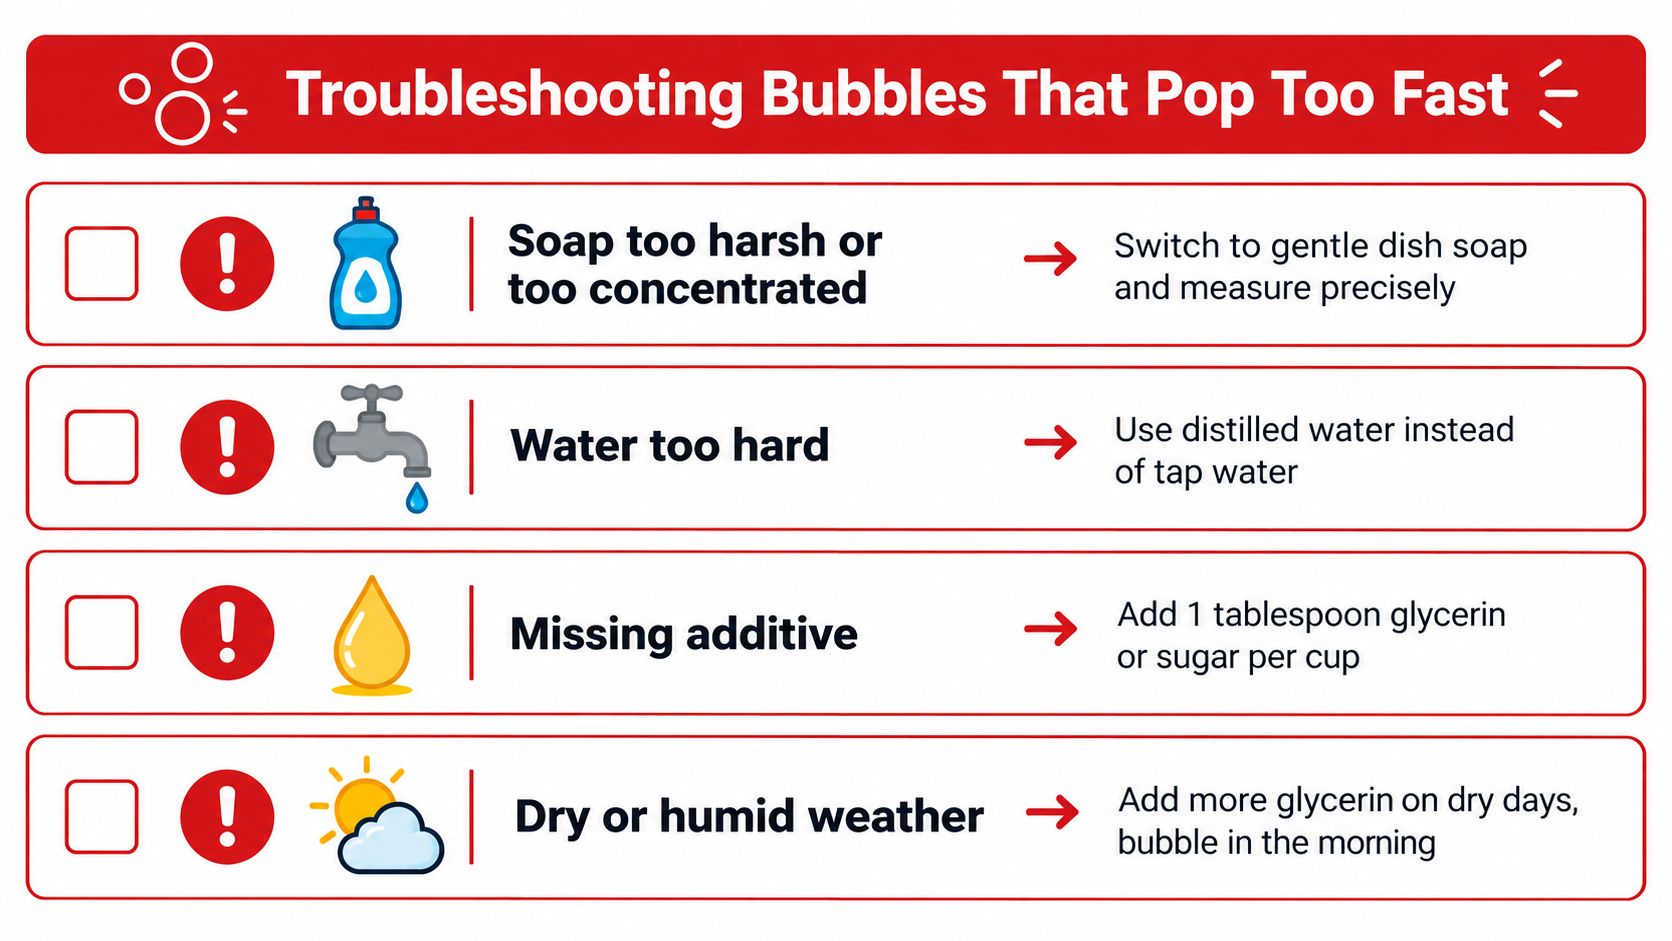
Match the symptom to one adjustment
- The surface is covered in foam: You probably mixed too vigorously. Skim off excess foam, then leave the liquid still before testing again.
- Bubbles form but burst immediately: Switch to distilled or filtered water. Hard tap water can reduce performance, so water quality is the smallest useful change.
- The mixture feels harsh or produces tiny unstable bubbles: Replace a strong detergent with a gentle hand dish soap and measure the soap carefully. Don't use dishwasher detergent or laundry detergent.
- Bubbles are quick and small in dry air: Add glycerin gradually rather than adding more soap. Expert formulations commonly use about 10% to 15% glycerin by volume, or approximately a six-to-one water-to-glycerin ratio, depending on the rest of the formula. This longer-lasting bubble formulation guide explains the role of glycerin and also identifies 62.0 grams of USP-grade vegetable glycerin in an advanced mixture.
- The solution works poorly on a windy day: Move into a sheltered area or bubble when the air is calmer. Wind strips moisture from the film and pushes bubbles into objects before they have time to travel.
- The wand leaves dirty streaks: Wash and rinse the wand, then test again. Dust, skin oils, and residue can break the film at the point where it starts.
- The batch was mixed moments ago: Cover it and let it rest. Some recipes work immediately, but resting from 15 minutes to overnight often improves consistency. One recipe source recommends waiting at least 24 hours, while another says overnight gives better results. This comparison of resting guidance shows why maturation is a practical variable, not just a decorative recipe note.
The most common mistake is changing several variables at once. If the bubbles pop fast, first identify whether the problem is foam, water, weather, wand cleanliness, or rest time. Then make one targeted adjustment and test a fresh dip.
Glycerin can also be overused. Too much may make the solution heavy or sticky, so don't keep adding it just because the first test failed. Fix mixing and water quality first, then adjust the additive.
Storage, Reuse, and Kid-Friendly STEM Activities
Pour cooled solution into a clean, sealed jar or lidded bucket. Label the container with the recipe and date, keep it out of direct sunlight, and aim to use it within two to four weeks. Check the smell and appearance before play, and discard any batch that looks contaminated or has changed noticeably.
Glycerin-heavy mixtures often improve after resting overnight, so storing a covered batch can be useful when you know outdoor play is planned for the next day. A wide container makes dipping easier, while a smaller bottle works well for travel. One-quart mason jars can hold a larger batch, provided an adult handles filling and sealing.
Reuse the mixture thoughtfully
Refill a small travel bottle from the larger container instead of carrying the whole batch. If a bucket still contains clean solution after play, cover it rather than leaving it exposed to dust and leaves. You can also top off an active bucket with a splash of fresh water and soap when the mixture becomes depleted, but don't keep adding ingredients indefinitely without checking its consistency.
Bubble play naturally becomes STEM learning when children make predictions. Ask which wand shape will create the largest bubble, whether a loop or string tool holds more film, and which surface lets a bubble sit longest. Have them record the wand, weather, mixture, and result in a simple notebook.
Try this observation: Change only the wand shape, then compare the bubbles. Next time, keep the wand the same and change the additive. Children can see how a controlled test works without needing complicated equipment.
Caregivers can turn the activity into a small investigation. Children can count successful bubbles, sketch shapes, compare sunny and shaded spots, and discuss why a bubble changes as it dries. The activity teaches measurement and prediction through play, while the adult keeps the handling safe and the variables understandable.
Gather a clean container, distilled water, hand dish soap, and one additive, then make the everyday batch first. After your child tests it, use a string wand or a Playz science activity to extend the experiment into a hands-on learning session. Visit Playz to explore science kits and creative toys that connect active play with curiosity, making your next bubble session both playful and purposeful.