


Rain is tapping the windows, the kitchen table is covered with restless elbows, and you want an activity that feels educational without turning the room into a laboratory. Water gives you a practical middle ground. With a bowl, a few cups, and ordinary household materials, children can explore color, movement, floating, pressure, density, and clean-water design while adults keep the setup manageable.
The right experiment depends on the child, not just the materials. A preschooler needs safe sensory play with pouring and filling, while an older child can measure results, change one variable, and design a filtration system. The activities below grow with learners, include realistic notes about mess and supervision, and connect playful observations to environmental science and engineering.
Why Water Experiments Belong in Every Playroom
Water works well as a STEM material because children can see it move, feel it flow, and change what happens by adding, removing, warming, or cooling something. A toddler may notice that one cup is full and another is empty. An elementary student may ask why pepper races away from soap. A middle schooler can investigate how a filter removes visible particles or how water pressure changes with depth.
That progression matters. Hands-on exploration gives children opportunities to predict, observe, compare, explain, and try again. Those habits are more valuable than memorizing the name of a single trick. A child who says, “I thought the sponge would hold more water, but the towel absorbed more,” is already practicing evidence-based reasoning.
Practical rule: Choose an activity that gives the child something meaningful to do, not just something exciting to watch.
Water play also supports early development. Preschool resources distinguish activities built around pouring, filling, and observing water movement from broad experiment collections, because young children learn through repeated sensory action rather than through a long sequence of demonstrations. The guidance in this resource on hands-on learning aligns with that approach, especially when adults let children handle materials and describe what they notice.
The historical story of water science shows how observation can grow into formal investigation. In 1627, Francis Bacon published thousands of experiments involving purification methods such as percolation, filtration, boiling, distillation, and coagulation, helping move water study toward systematic testing. Later work in the 1640s included Gasparo Berti's water-barometer vacuum experiment around 1641. (Water purification history)
At home or in class, start with the child's developmental stage. The preschool activities focus on sensory language and fine-motor control, the elementary experiments introduce measurable properties, and the older-kid projects turn water questions into engineering challenges. Use a rimmed tray for wet work, keep towels close, and expect some spills. A small amount of controlled mess is often part of the learning.
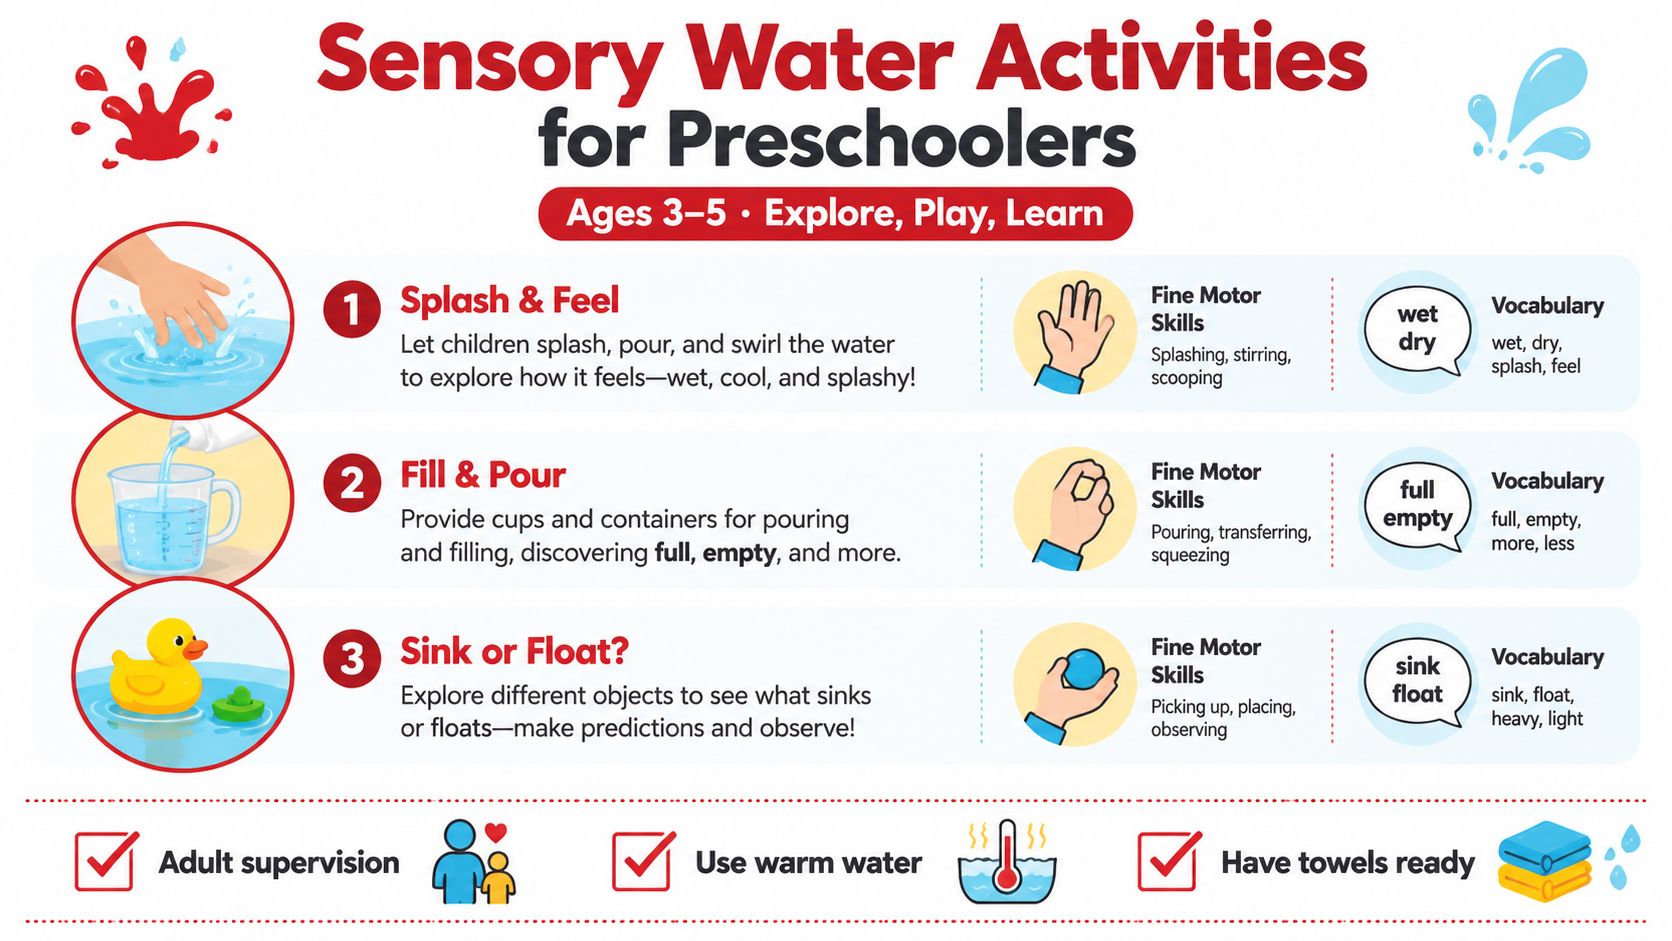
Sensory Water Activities for Preschoolers
Children ages 3–5 learn best when water activities stay open-ended, repeatable, and easy to describe. Use plastic containers, supervise closely, and introduce words such as full, empty, heavy, light, sink, float, wet, and dry. The purpose isn't to produce a perfect result. It's to help children notice what changes when they pour, mix, squeeze, or test.
Color mixing station
Materials: Clear plastic cups, water, droppers, a shallow tray, and small amounts of food coloring.
- Fill several cups with water.
- Add a little coloring to separate cups.
- Give the child a dropper and let them transfer colors into an empty cup.
- Ask the child to describe the new color.
The simple explanation is, “Two colors are mixing to make a different color.” Children practice squeezing the dropper, controlling small movements, and using words such as darker, lighter, more, and less.
For less mess, put every cup inside a tray and use only a small amount of water. Older preschoolers can predict the result before mixing. Younger children can choose colors and observe. Adults should avoid correcting every guess. Ask, “What do you think will happen if we add another drop?” The sensory-play ideas in this guide to sensory play can help adults think beyond a single finished product.
Sink-or-float sorting
Materials: A tub of water and safe objects such as a plastic lid, sponge, wooden block, smooth stone, large toy, and metal spoon.
- Show one object at a time.
- Ask the child to predict whether it'll sink or float.
- Place it gently in the water.
- Sort the objects into two groups after testing.
Say, “Floating means the object stays on top. Sinking means it goes down.” Children are classifying objects and comparing predictions with results. They may notice that size alone doesn't decide the outcome. A small stone can sink, while a larger plastic object may float.
Keep objects large enough not to present a choking hazard, and count the activity as a water-play session rather than a formal lesson. With mixed ages, let younger children make the predictions while older children draw a two-column chart or ask whether changing the object, rather than the water, changes the result.
Pour, fill, and squeeze
Materials: Graduated plastic containers, cups, a funnel, a sponge, and a shallow basin.
- Place the containers in the basin.
- Let the child pour water from one container into another.
- Add a funnel and compare pouring with and without it.
- Soak the sponge, hold it over a cup, and squeeze.
- Use the words full, empty, more, less, heavy, and light.
The explanation can stay concrete: “The container holds water. When we add water, it gets fuller. When we squeeze the sponge, water comes out.” Children begin building volume intuition while strengthening hand muscles and coordination.
Expect the highest mess level here, especially when children discover that squeezing harder changes the stream. Put the basin on a washable floor or outdoor table, keep a change of clothes nearby, and stop before fatigue turns curiosity into splashing. For an older child, mark fill lines on the containers and ask which one holds more. Preschool science guidance emphasizes observing, comparing, measuring, communicating, and predicting as foundations for later scientific thinking. (Preschool water exploration)
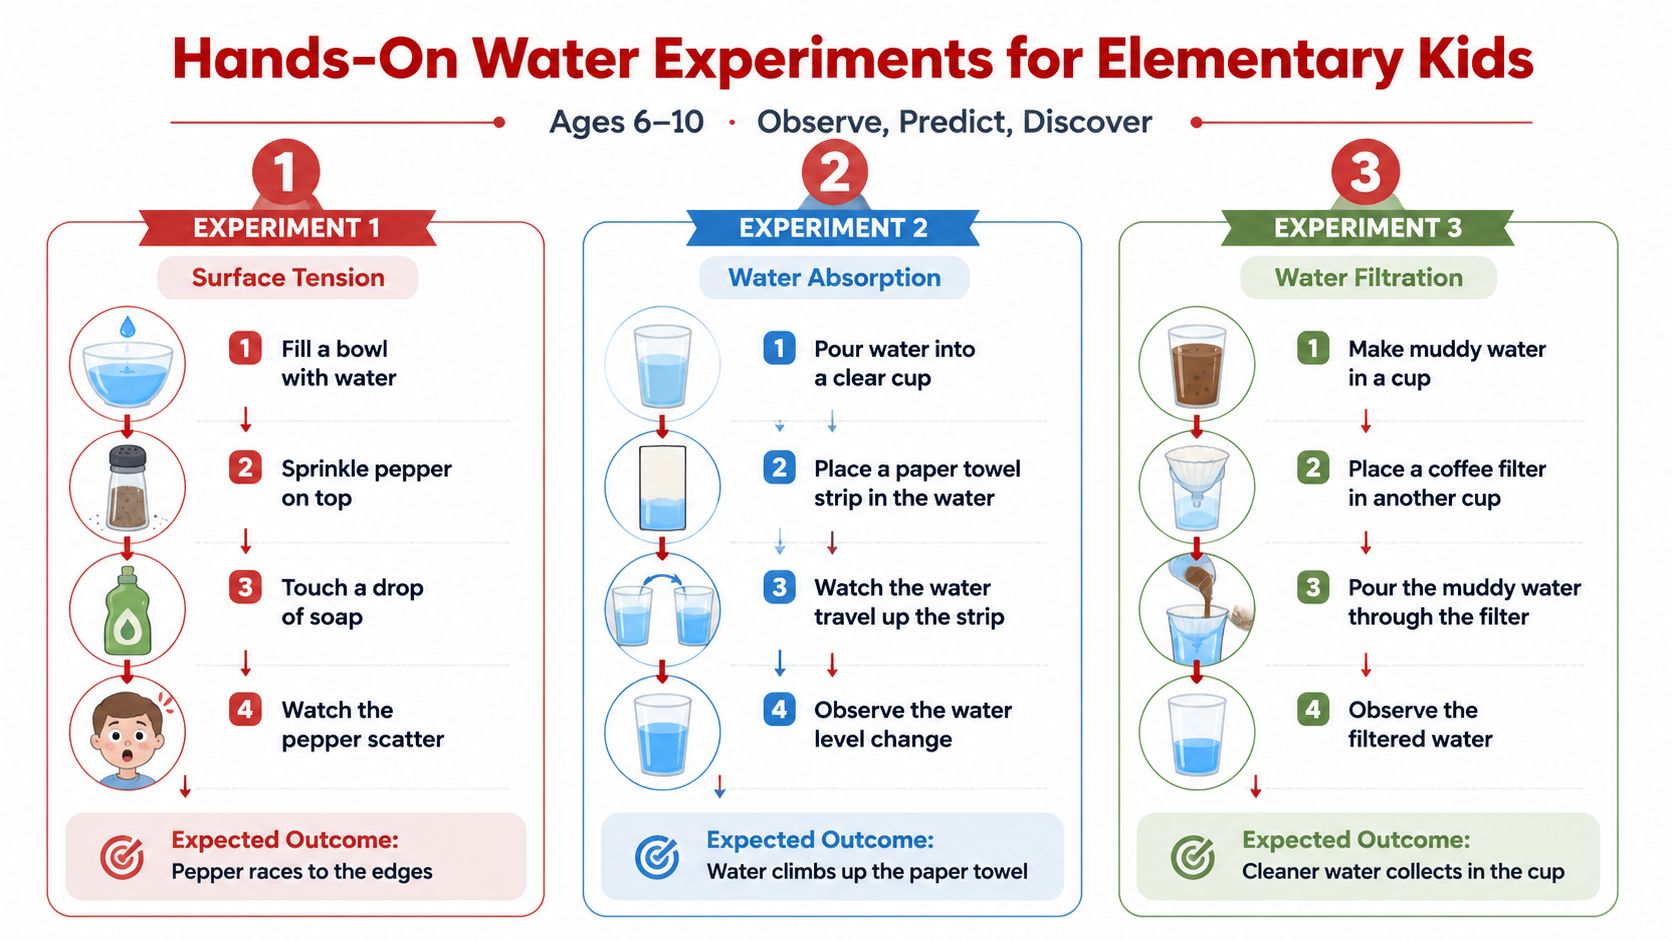
Hands-On Water Experiments for Elementary Kids
A child aged 6–10 can move beyond “What happened?” and begin asking, “What changed, and how can we compare it?” Start each activity with a prediction, then repeat the test before drawing a conclusion. A notebook helps children record results with words, sketches, or a simple table.
Pepper and soap surface tension
Materials: A shallow bowl, water, ground pepper, dish soap, and cotton swabs.
- Fill the bowl with water.
- Sprinkle pepper across the surface.
- Touch the water with a dry swab and observe.
- Put a small amount of soap on another swab.
- Touch the soapy swab to the water.
What to expect: The pepper usually moves quickly toward the edges.
Why it works: Water molecules at the surface pull together, forming a flexible film. Soap disrupts that arrangement. Water then moves away from the contact point, carrying the pepper with it. Temperature and dissolved salt can change the strength of surface tension. (Surface tension demonstration)
A weak result usually points to a practical problem. Use fresh pepper, a clean bowl, and a new drop of soap. Grease left on the bowl can interfere. Older children can turn this into a fair test by changing one factor, such as water temperature, soap amount, or salt, while keeping the other conditions the same. The mess level is low, although a shallow tray catches drips and makes cleanup easier.
A layered liquid tower
Materials: A tall clear glass, honey, water, cooking oil, rubbing alcohol, food coloring, and a spoon.
- Add honey slowly.
- Pour colored water down the side of the glass or over the back of a spoon.
- Add oil very slowly.
- Finish with rubbing alcohol, pouring gently.
- Leave the glass still and observe the layers.
What to expect: The liquids form visible layers instead of blending immediately.
Why it works: Liquids with different densities settle in different positions. Denser liquids stay lower, while less dense liquids remain above them. Density also changes with temperature. Water is denser when cool than when hot, so children can compare chilled and room-temperature samples without needing to memorize exact values.
Pouring technique matters. A fast stream creates turbulence and makes the boundaries cloudy. A slow stream gives each liquid time to settle. Older children can compare different pouring speeds or record how long the layers take to become clear. This turns a striking display into an investigation of variables and control conditions.
Rubbing alcohol is flammable. An adult should handle it, keep it away from heat and children's mouths, and substitute a plastic container for younger groups. The activity has a moderate mess level because spills make the layers difficult to interpret.
Celery and capillary action
Materials: A celery stalk with leaves, a clear cup, water, and food coloring. Paper towels can provide a second test.
- Fill the cup with colored water.
- Place the celery stalk in the cup.
- Mark the starting water level.
- Observe the stalk and leaves over time.
- Record visible color movement.
What to expect: Dye travels upward through the celery's narrow pathways, and the leaves may gradually show color.
Why it works: Water moves through tiny spaces in porous materials. Adhesion helps water interact with those spaces, while cohesion keeps water molecules connected as they move. With paper towels, children can compare brands, folding patterns, or strip widths. This connects a kitchen activity with how plants transport water from roots toward leaves.
Change one factor at a time, such as the number of stalks, the water color, or the paper towel brand. Do not promise a particular speed or distance. Light, plant freshness, and room conditions can affect the result, so observations are more useful than a predetermined answer.
A related floating egg activity extends the discussion to buoyancy and dissolved substances. Ask children to explain their prediction first, then compare the result with their original reasoning.
Environmental Engineering Projects for Older Kids
Older children can use water experiments to study problems people solve outside the classroom. Clean water, runoff, pressure, and flow aren't just science vocabulary. They're design questions with constraints, tradeoffs, and imperfect results.
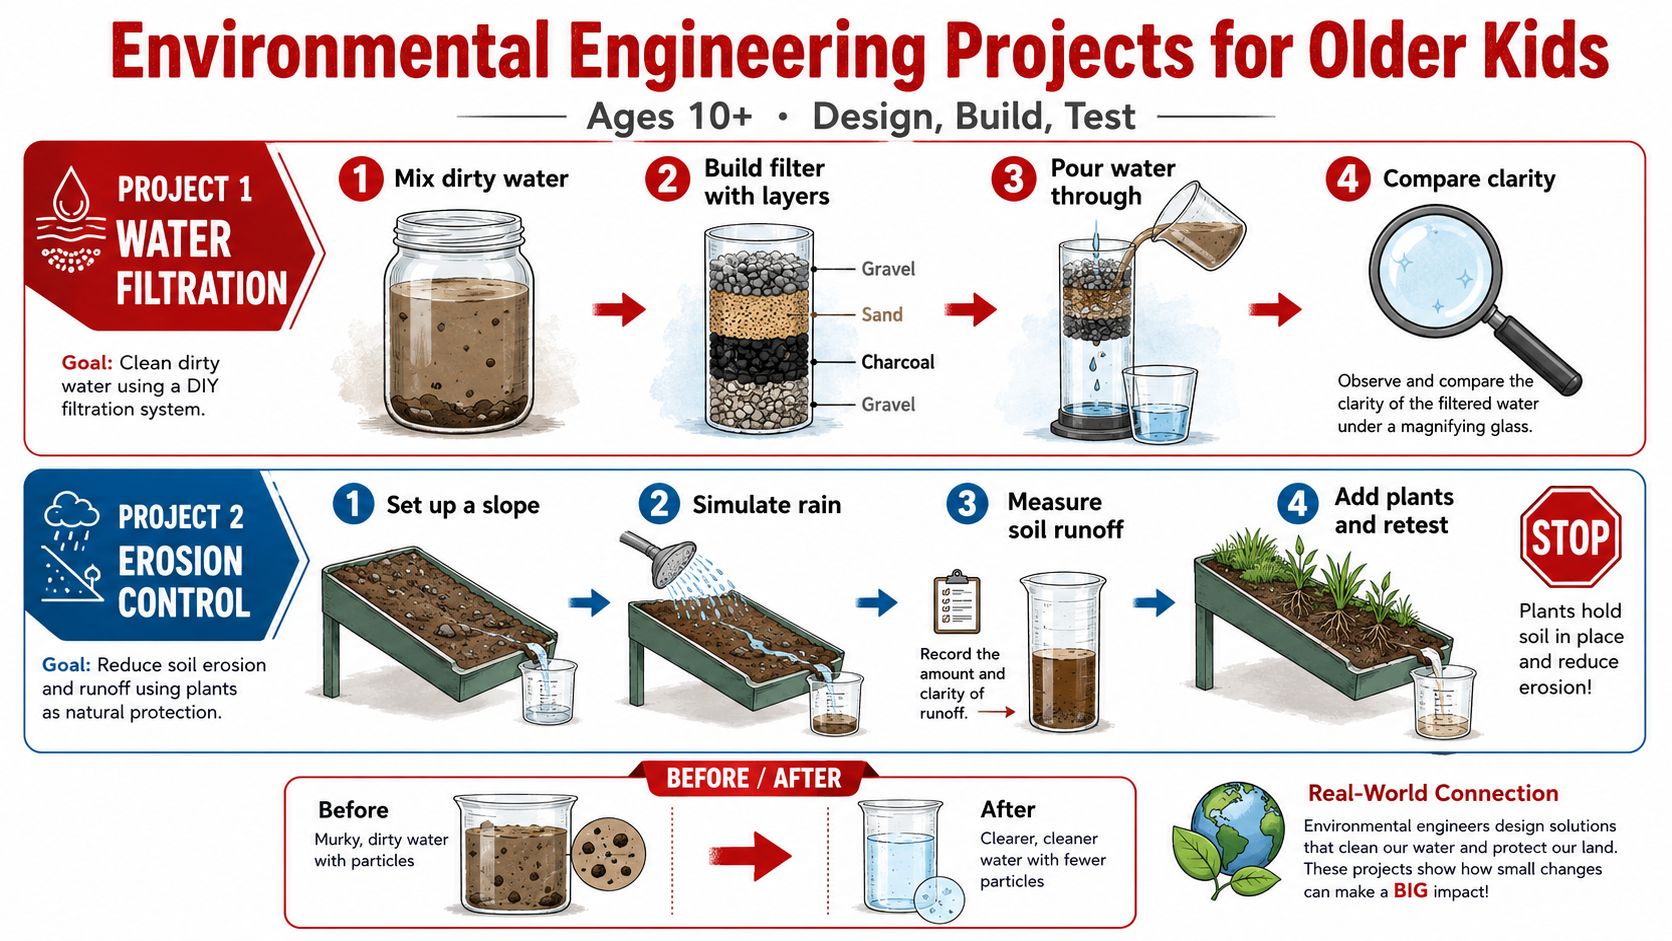
Build a layered water filter
Materials: A plastic bottle, gravel, sand, activated charcoal, coffee filters, two clear cups, and water mixed with clean soil.
An adult should cut the bottle. Children shouldn't drink the filtered water, because a classroom filter can improve visible clarity without making water safe.
- Place a coffee filter over the bottle opening.
- Turn the bottle upside down over a cup.
- Add activated charcoal, sand, and gravel as separate layers.
- Mix the test water thoroughly.
- Pour the same amount through the filter.
- Compare the untreated and filtered samples in clear cups.
Expected outcome: The filtered sample may look clearer because layers catch some suspended particles. The setup demonstrates particulate removal, not complete purification. A separate DIY filtration activity connects water treatment with evaporation, condensation, and precipitation, the same processes involved in the water cycle. (Water purification experiment)
If filtration is slow, check whether the sand is packed too tightly or the coffee filter is folded unevenly. If the result is cloudy, let the layers settle and compare the water again. Older students can test different layer orders, record clarity with a written observation scale, and discuss how municipal treatment uses multiple stages rather than one household column.
Test pressure with a bottle tower
Materials: A plastic bottle, water, a tray, a marker, and adult-managed tools for making holes.
- Mark several points down the bottle.
- With adult help, make holes at different heights.
- Cover the holes while filling the bottle.
- Place the bottle in a tray.
- Uncover the holes together and observe the streams.
- Compare how far each stream travels.
Expected outcome: Water from a deeper hole generally leaves with greater force and travels farther because more water sits above it.
The project becomes more useful when children measure the streams, sketch their paths, and explain why the lowest opening behaves differently. They can alter one feature, such as the water level or hole position, then retest. Uneven holes can make comparisons difficult, so mark them carefully and keep the bottle upright.
Discuss pumps, pipes, reservoirs, and water-treatment plants. The engineering design process for kids offers a useful framework for defining a problem, building a model, testing it, and improving the design. For middle schoolers, add a design brief, a materials constraint, and a written justification for each change.
The Science Behind the Splash
A child may watch pepper scatter, liquid separate, or water rise, then ask, “Why?” A clear explanation turns that surprising moment into a pattern they can use in another experiment. Younger children can describe what they see. Older learners can identify the force, property, or variable involved.
Surface tension and cohesion
In the pepper test, water molecules attract one another and form a thin surface film. The film works like a stretchy trampoline. Soap changes the balance at the surface, causing the film to pull differently and carry the pepper away. Use a clean bowl and a clean water surface, since grease or leftover soap can weaken the effect.
Density and layering
Density describes how much mass fits into a given volume. In a liquid tower, honey settles below oil because it is denser. Oil remains above water because the liquids have different properties and do not mix easily. Dissolved salt adds mass to water and can change its density, giving older children a useful comparison between salt water and plain water. They can predict which sample will support an object, then test that prediction and record the result.
Water also behaves unusually near freezing. Between 0°C and 4°C, it becomes denser as it warms, reaching its greatest density around 4°C. This exception fits older learners who are ready to question the simple rule that warmer liquids are always less dense. Younger children can focus on observing floating, sinking, and layering without needing the full explanation.
Pressure and moving water
Atmospheric pressure is the push from the surrounding air. In a rising-water demonstration, an adult places a candle on a plate of water and covers it with a glass. After the flame goes out, pressure inside the glass drops, and air pressure outside pushes water into the glass. The candle and glass water experiment gives children a concrete way to observe that invisible force.
An inverted-glass activity shows the same idea without a flame. A card seals the opening, and air pressure pushes upward against it, helping hold the water in place. Children can predict the outcome and discuss the result, while an adult performs any candle demonstration.
Capillary action explains why water travels through celery or paper towels. Water adheres to the material and stays connected through cohesion, allowing it to move through narrow spaces. For educators selecting equipment beyond home demonstrations, lab water system selection tips explain how laboratories match water quality to experimental needs.
Safety Tips and Setup for Mess-Free Learning
Water experiments are easiest to manage when the workspace is prepared before children sit down. Use plastic tablecloths, rimmed trays, and washable containers. Keep towels and a change of clothes nearby for younger children, and use goggles when splashing or unfamiliar materials could reach the eyes.
Match supervision to the learner
Preschoolers need direct, hands-on supervision. Keep containers stable, use warm rather than hot water, and remove small objects when the activity ends. Elementary children can take more responsibility for pouring and recording, but adults should still handle rubbing alcohol, cutting tools, and any heat source. Older kids can work more independently with clear boundaries and regular check-ins.
Avoid the common setup failures
- Glass with toddlers: Replace it with sturdy plastic.
- Overfilled vessels: Leave room for movement and spills.
- Unplanned materials: Test the activity yourself before introducing it.
- Drinking experimental water: Label every sample and dispose of it afterward.
- Uncontrolled workspace: Put the activity inside a tray before adding water.
A simple toy-room organization routine can make it easier to keep trays, towels, droppers, and recording supplies together without creating clutter.
Extend the learning
Ask children to keep a small lab notebook with a prediction, an observation, and a conclusion. Change one variable at a time, such as water temperature, pouring speed, filter-layer order, or container shape. Older learners can turn the strongest question into a mini science-fair project with a clear test, repeated observations, and an explanation of what they'd improve.
Use this quick checklist before starting:
- Protect: Cover the table and place materials in a tray.
- Prepare: Set out towels, labels, tools, and a disposal container.
- Adjust: Match the activity and materials to the child's age.
- Test: Run the demonstration first.
- Record: Leave space for predictions and observations.
- Reset: Empty containers, wipe surfaces, and store supplies safely.
Playz offers science kits, creative toys, and active-play products that can complement hands-on learning when children are ready to move from simple water exploration to structured STEM challenges. Visit Playz to find tools that help turn curiosity, building, and experimentation into screen-free play.