


A parent kneels on the living-room floor while a child studies a tiny wing, holding it upside down. Plastic sprues cover the rug, the instruction sheet is folded back on itself, and everyone is beginning to wonder whether this was meant to be relaxing.
That scene is common because model building kits aren't one simple type of toy. A snap-fit plastic car, a balsa glider, a small metal locomotive, and a circuit-driven STEM vehicle each demand different tools, patience, hand control, and time. The right choice can produce a satisfying first success. The wrong one can leave an unfinished box in a closet.
The useful question isn't just which kit looks most realistic. It's which step on the skill ladder matches the builder today, while leaving room to progress tomorrow.
Why Model Building Kits Deserve a Second Look
The child with the upside-down wing hasn't failed. They're learning that parts have an order, a direction, and a relationship to the larger structure. A patient adult can turn that mistake into a quick investigation: compare the wing to the diagram, find the matching notch, and test the fit before using glue.
That kind of hands-on activity is easy to overlook in a toy aisle crowded with screens and instant rewards. Model building kits ask children to slow down, observe, manipulate, and complete a sequence. The learning can feel like play because the immediate goal is tangible, but the builder is also practicing planning and correction. Research on the benefits of hands-on learning describes why physical manipulation can make abstract ideas easier to understand.
One category, several experiences
A color-molded plastic car may click together quickly. A wooden ship introduces sanding and glue. A metal locomotive may require pliers and careful handling of small fasteners. A solar robot combines construction with a simple functional system, so the finished model may move or respond to light.
Those differences matter more than a broad age label. A child who loves vehicles may enjoy a car kit but struggle with a delicate aircraft canopy. A learner who likes experiments may find a gear assembly more rewarding than a highly detailed display model.
Practical rule: Choose the kit that makes the builder curious enough to continue after the first mistake.
The category also has a long history of adapting to wider audiences. Airfix launched its first fully commercial kit in 1952 and became the oldest UK manufacturer of scale plastic model kits, according to Hornby Hobbies' Airfix history. During the 1950s and 1960s, Airfix reportedly reached annual production of 20 million kits, a sign of how quickly injection-molded plastic models spread.
The rest of the decision comes down to matching enjoyment, completion, and learning value. A kit doesn't need the highest part count to teach well, and a simple first build isn't a lesser choice. It may be the rung that makes the next one possible.
The Main Types of Model Building Kits
Start with the material, because material predicts much of the building experience. It affects how parts connect, what tools you'll need, and how forgiving the kit will be when a beginner makes a small mistake.
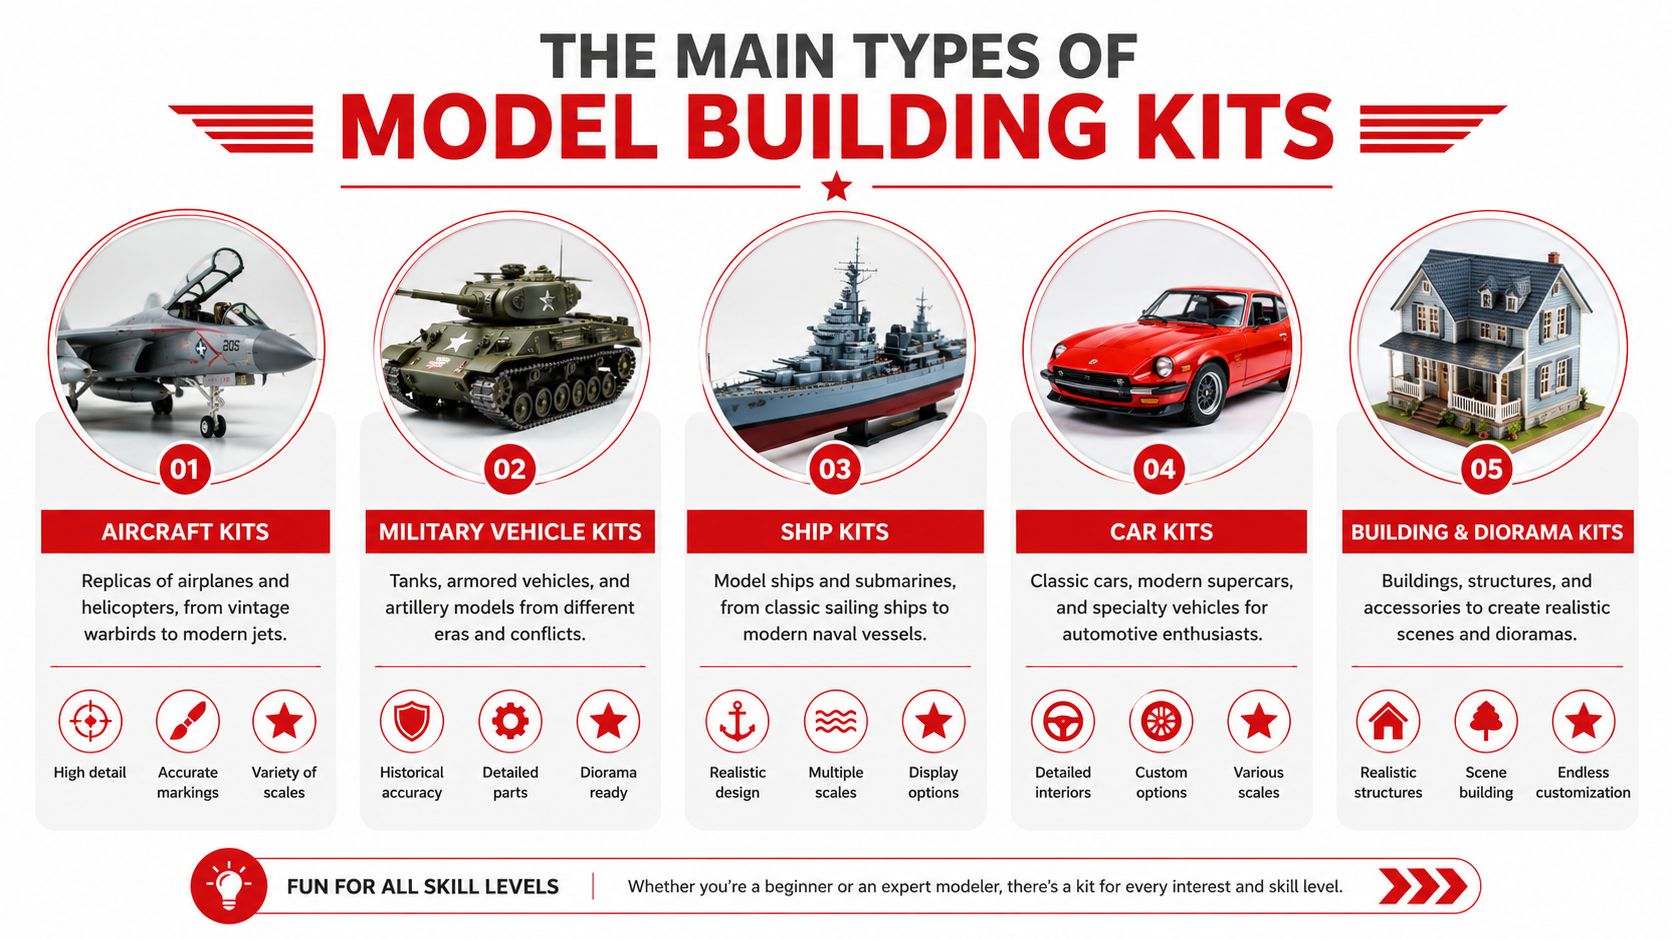
Plastic kits
Plastic is often the easiest starting point, particularly when the kit uses snap-fit assembly. A Revell-style car or aircraft may include molded surface detail and color-molded parts, reducing the amount of painting required at the beginning. Parts usually come on sprues, and the builder removes them, cleans the attachment points, and follows the numbered sequence.
Snap-fit doesn't mean effortless. A child still has to identify left from right, avoid forcing a part, and understand that some pieces are intentionally added later. But the material is relatively consistent, and a model can look recognizable before advanced painting begins.
Wood kits
Wood changes the pace. A balsa glider offers a direct introduction to shape, balance, and airflow, while a laser-cut ship deck brings grain, thin pieces, sanding, and often real glue into the process. Wood can feel warm and forgiving, but it may split, bend, or absorb adhesive unevenly.
The builder needs a stable surface and a willingness to dry-fit parts before committing. Children who enjoy making and testing may prefer wood because the material invites adjustment rather than following a fixed plastic assembly.
Metal kits
Metal models, such as a small-scale locomotive or armor build, reward a steady hand. The builder may use pliers, tweezers, and careful pressure to shape tabs or position tiny fasteners. Metal can offer a satisfying sense of permanence, but it usually punishes rushed handling more than a beginner-friendly plastic kit.
This category suits someone who already enjoys detailed work. It's less suitable as a first family project if the child expects large parts and quick progress.
Mixed and STEM kits
Mixed-material kits combine plastic, wood, metal, gears, wires, motors, or other learning components. A solar robot or circuit-driven car gives the builder a reason to understand the mechanism, not just the appearance. A gear that turns another gear, for example, makes cause and effect visible.
For children who learn by testing, STEM building kits can provide a natural bridge from construction into engineering. The same hobbyist may begin with plastic, move to wood, and later explore metal or electronics as interests develop.
Skill Levels and What Each One Really Demands
Difficulty labels help, but they're not universal. A “beginner” aircraft can still frustrate a child if the instructions are dense, the parts are tiny, or the subject doesn't hold their attention. Part count and estimated time provide a more useful starting point.
Independent hobby guidance places beginner kits at fewer than 50 pieces and roughly 2 to 6 hours, intermediate kits at 100 to 200 parts and 8 to 20 hours, and advanced kits at several hundred pieces with 20 or more hours, as outlined by Hearn's Hobbies.
Skill Tiers at a Glance
| Tier | Part Count | Time Needed | Builder Demands |
|---|---|---|---|
| Beginner | Fewer than 50 | 2 to 6 hours | Sorting, matching, simple assembly, adult support |
| Intermediate | 100 to 200 | 8 to 20 hours | Glue control, decals, sequencing, repeated sessions |
| Advanced | Several hundred or more | 20+ hours | Fine motor control, troubleshooting, finishing, sustained focus |
A beginner kit should offer frequent visible wins. The child may still need an adult to read instructions aloud, identify a part, or explain why a piece won't fit. That support isn't a sign the kit is too easy. It gives the builder a chance to practice without turning every step into a test.
An intermediate kit introduces more decisions. Cement, decals, paint choices, and alignment can all create pauses. A child may be able to assemble the parts but still need help protecting a painted surface or understanding why glue should be applied sparingly.
Advanced kits belong with focused hobbyists or highly motivated older builders. The challenge isn't only the number of pieces. It's the need to tolerate slow progress, revisit mistakes, and manage finishing work after the main structure is assembled.
One calculator uses a practical estimate based on parts count multiplied by 8 minutes per part, then adjusts for complexity, experience, and aftermarket additions. It also estimates weeks by dividing total hours by sessions per week multiplied by hours per session, according to Hobbyco's model-building calculator guidance.
Remember the hidden workload. Cleanup, drying, tool changes, and searching for a tiny part don't always appear on the box.
For families choosing activities for younger learners, STEM kits for 9-year-olds can be a useful comparison point, but the child's attention, confidence, and interest should guide the final choice.
Tools, Workspace, and Setup for a Smooth First Build
Most first-build frustration comes from preparation rather than construction. A few simple tools can prevent damaged parts, lost decals, and glue applied in the wrong place.
For plastic sprues, flush-cut nippers remove parts close to the attachment point. A sharp hobby knife with replaceable blades cleans the remaining nub, but an adult should control the knife when the child isn't ready. Tweezers help position decals, sandpaper sticks smooth rough edges, and a self-healing cutting mat protects the table.
A workable setup doesn't need to be elaborate. A 2x2-foot workspace with good lighting gives the builder enough room to separate instructions, parts, and tools. Keep a shallow tray nearby for tiny pieces, and use ventilation whenever adhesives or paints require it.
Match the adhesive to the material
| Material or connection | Suitable choice | Why it fits |
|---|---|---|
| Polystyrene plastic | Polystyrene cement | Bonds compatible plastic surfaces |
| Wood or metal | CA glue | Creates a strong bond on many small joints |
| Paper kits | PVA | Dries clearly and suits porous paper |
| Snap-fit parts | Often no glue | Allows a cleaner, lower-friction first build |
Dry-fit before gluing. If a piece doesn't seat properly, check orientation, remove a leftover sprue nub, and compare the part with the diagram. More adhesive won't solve a misaligned joint.
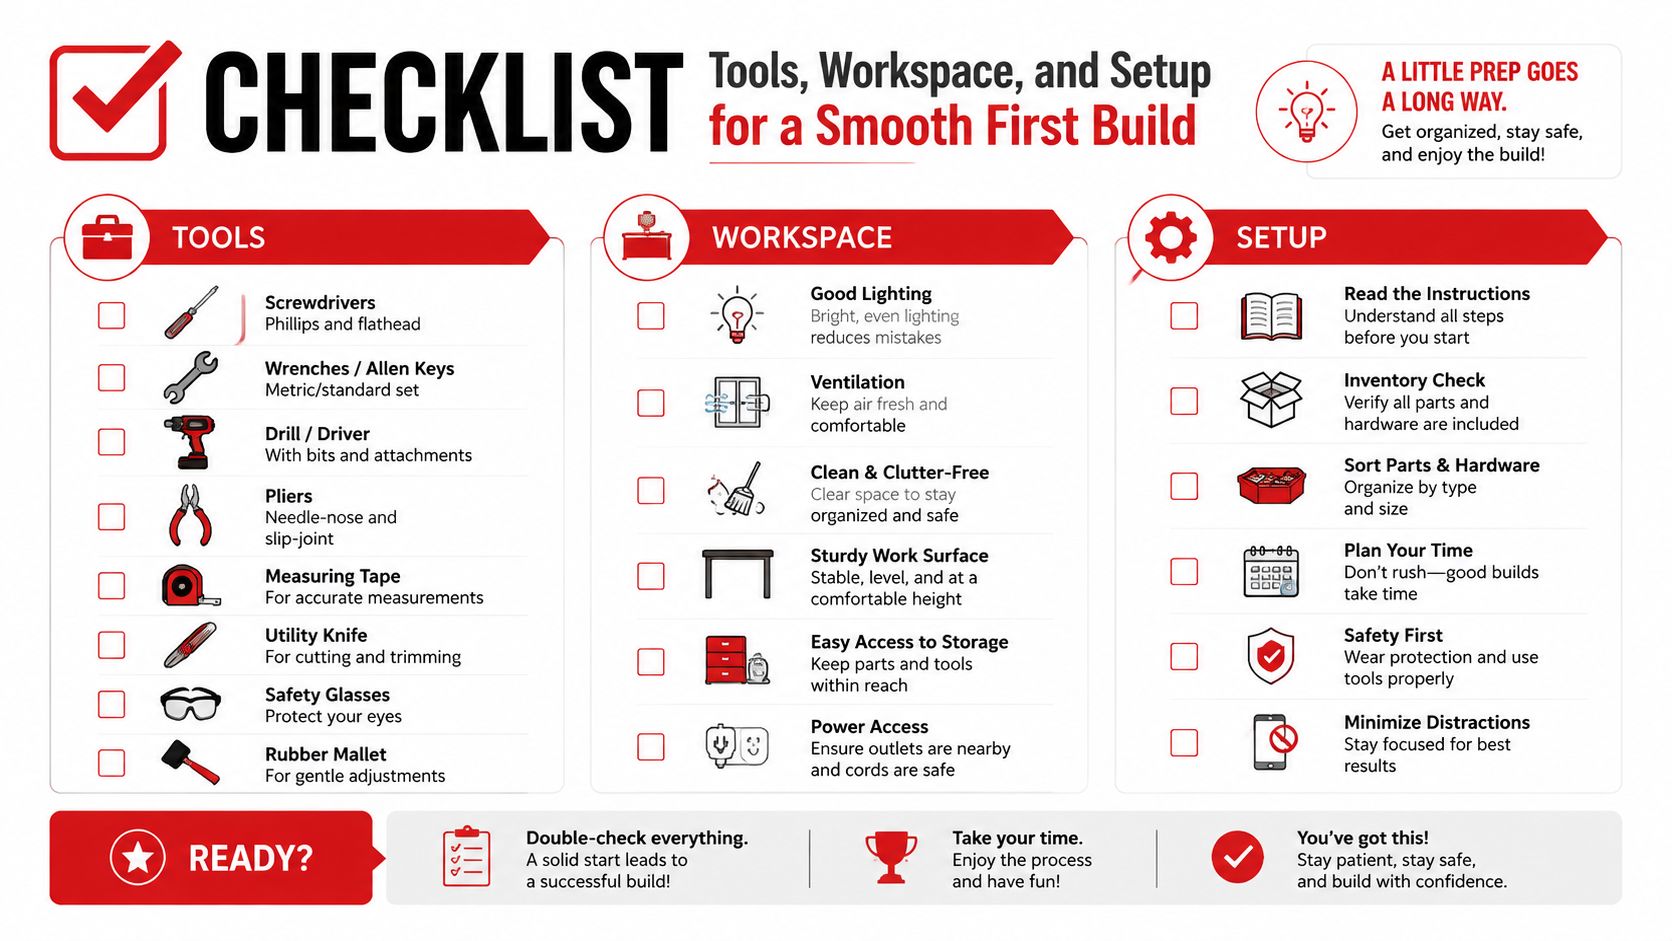
Prepare before opening the glue
Use this short checklist:
- Sort first: Keep parts with their original sprue or bag until the instructions call for them.
- Read through: Scan the instructions from beginning to end so late-stage requirements don't come as a surprise.
- Stage tools: Place nippers, tweezers, sanding sticks, and adhesive within reach.
- Protect the surface: Use the mat and a tray so loose pieces don't disappear into carpet.
- Plan pauses: Stop at a natural assembly stage instead of leaving a delicate joint unsupported.
Digital design can also add context before a physical build. A guide to 3D creation tools and trends can help older learners understand how digital shapes relate to the models they assemble by hand. For a project with a clear sequence, building a rocket model can offer a focused way to practice sorting, joining, and checking alignment.
Learning Benefits That Go Beyond the Finished Model
A model teaches most effectively when the builder can see why each part matters. Snapping a beam into place, for example, creates a physical lesson in support and load distribution. Changing a joint angle or beam length can alter stability, which turns assembly into a small cause-and-effect experiment.
Construction kits support this kind of learning because children manipulate three-dimensional objects rather than only viewing diagrams or descriptions. A study of construction kits as learning environments connects tactile model building with clearer understanding of architecture, engineering, and physics concepts.
What the hands are learning
Clipping a part from a sprue, sanding an edge, and placing a small component develop controlled hand movements. Interpreting an exploded diagram asks the builder to rotate shapes mentally and connect a two-dimensional image with a three-dimensional object.
A multi-session build adds a different challenge. The child must remember where they stopped, protect unfinished work, and return to the task without losing the thread. Completion matters because it gives the builder evidence that careful effort can produce a visible result.
A finished simple model often teaches more than an abandoned detailed one.
Where engineering becomes visible
Mechanical and structural kits make principles especially concrete. Gears demonstrate force transmission and mechanical advantage. Pulleys and levers show how a small input can change movement. Structural pieces reveal load paths, while moving assemblies offer a practical way to observe energy transfer and Newton's laws.
The STEM Mechanics Master Set from Engino is described as supporting 100 models, with gears, pulleys, levers, and structural elements that let learners compare configurations, as shown on the Engino product page. The educational value doesn't come from the number alone. It comes from rebuilding, changing one feature, and asking what caused the new result.
Scale models add measurement and proportion. A builder who compares a wing, wheel, or cabin to the reference diagram practices careful observation. Parents and teachers can extend that learning with questions from activities that encourage critical thinking, such as “What would happen if this support were shorter?” or “Why does this part need to be added before the outer shell?”
The strongest learning per hour usually comes from kits with repeatable parts, visible mechanisms, clear instructions, and enough variety for more than one outcome. Those features invite investigation instead of turning the child into a parts assembler.
How to Choose the Right Kit for Your Builder
Age is a useful safety and complexity filter, but it isn't a complete decision system. Start with three questions: What can the child handle, what do they care about, and what kind of support is available?
A seven-year-old who loves dinosaurs may do well with a snap-fit or wood kit with under 30 parts, provided the pieces are large enough to handle and the adult is ready to help. A twelve-year-old fascinated by WWII aircraft may be ready for a plastic kit with 100 parts and glue, especially if they already enjoy drawing, puzzles, or careful craft work.
The theme must belong to the builder, not only the adult buying the gift. A highly realistic ship may appeal to a parent, but a child who wants motion, color, or a creature may abandon it quickly.
Choosing a Model Building Kit by Age and Interest
| Age Group | Interest / Theme | Recommended Kit Type | Typical Part Count | Budget Range |
|---|---|---|---|---|
| Younger beginner | Animals, dinosaurs, bright vehicles | Large-part snap-fit or simple wood | Under 30 | Entry-level |
| Early independent builder | Cars, aircraft, buildings | Color-molded plastic | Fewer than 50 | Entry to mid-range |
| Older guided builder | WWII aircraft, ships, engineering | Plastic with glue and decals | Around 100 | Mid-range |
| Focused hobbyist | Historical armor, locomotives, detailed scenes | Metal, advanced plastic, or mixed media | Several hundred or more | Premium |
These budget labels are intentionally qualitative. Plastic kits often keep the first purchase straightforward. Wood may cost more when it includes shaped or laser-cut pieces. Metal and advanced mixed kits can charge for finer detail, specialized components, or a more demanding experience. A higher price may buy realism, but it can also reflect packaging or branding rather than better learning.
Watch for three common mismatches:
- Attention span versus part count: A long project can lose a child before the interesting stage arrives.
- Material toughness versus experience: Brittle parts punish mistakes that a beginner doesn't yet know how to avoid.
- Adult theme versus child motivation: The buyer's enthusiasm can't substitute for the builder's curiosity.
Safety deserves a separate check. In the United States, Section 106 of the Consumer Product Safety Improvement Act of 2008 made ASTM F963 a mandatory toy-safety standard, while CPSC testing and certification requirements apply to products designed or intended primarily for children 12 years of age or younger. ASTM F963 itself covers products intended for children under 14, as explained in this overview of US toy-safety requirements. Always follow the product's stated age guidance and supervise tools, adhesives, and small parts.
Smarter Building and What to Try Next
More detail doesn't automatically create a better experience. A kit packed with tiny decals, photo-etched brass, delicate parts, and dense instructions may be perfect for a committed hobbyist, but it can overwhelm a child who still needs practice identifying parts and planning sequences.
The market reflects both ends of the hobby. One estimate values the global hobbyist model-kit market at US$1.1 billion in 2024 and projects US$1.3 billion by 2030, with a 3.0% CAGR from 2024 to 2030, according to IndexBox's global model-kit market analysis. Another estimate places the US market at roughly $500–$700 million in retail value in 2026, with annual unit volume of 25–35 million kits and five-year growth of 3–5% annually, according to IndexBox's US market analysis. These figures point to a broadening category, not a single ideal format.
Build just beyond comfort
Choose a project that feels slightly more challenging than the last successful one. Finish it before moving up again. That approach gives the builder a concrete readiness signal: they've managed the parts, the pauses, the mistakes, and the final details.
For a parent or teacher, the progression might look like this:
- Begin with a guided snap-fit or simple STEM build.
- Ask the child to explain one mechanism or assembly decision.
- Move to a glue-based plastic model when sorting and sequencing feel comfortable.
- Add painting, decals, or a diorama only after the basic structure is enjoyable.
- Try motorized, metal, or highly detailed kits when the builder asks for more challenge.
Instruction quality matters at every rung. Some retailers make downloadable PDF manuals available, and one catalog reports hosting 3,621 building-instruction files organized by manufacturer and product type, as noted by Innovative Hobby Supply. Clear documentation can turn a confusing project into a manageable one.
A Playz beginner model kit or similar guided STEM option can help a young builder gain momentum before moving toward scale models, dioramas, or motorized sets. Visit Playz to compare hands-on building options that connect construction with curiosity, then choose the kit that the child is most likely to finish and want to build again.