


The cardboard hand sits on the table, its strings gathered at the wrist. A child pulls gently, one finger curls, then another, and the homemade hand closes around a crumpled paper ball. The first reaction is usually delight. The second is better: “How does it work?”
A mechanical toy hand turns that question into a practical STEM investigation. Children build a moving object with ordinary materials, then use observation and troubleshooting to improve it. They see force, motion, structure, and anatomy working together instead of meeting those ideas only in a diagram.
Why Build a Mechanical Toy Hand
A child who makes a hand move has done more than complete a craft. They've created a simple machine and tested whether their design can perform a task. That difference matters. Cutting cardboard develops control, threading string demands patience, and fixing a finger that refuses to bend requires the child to form a theory, test it, and revise it.
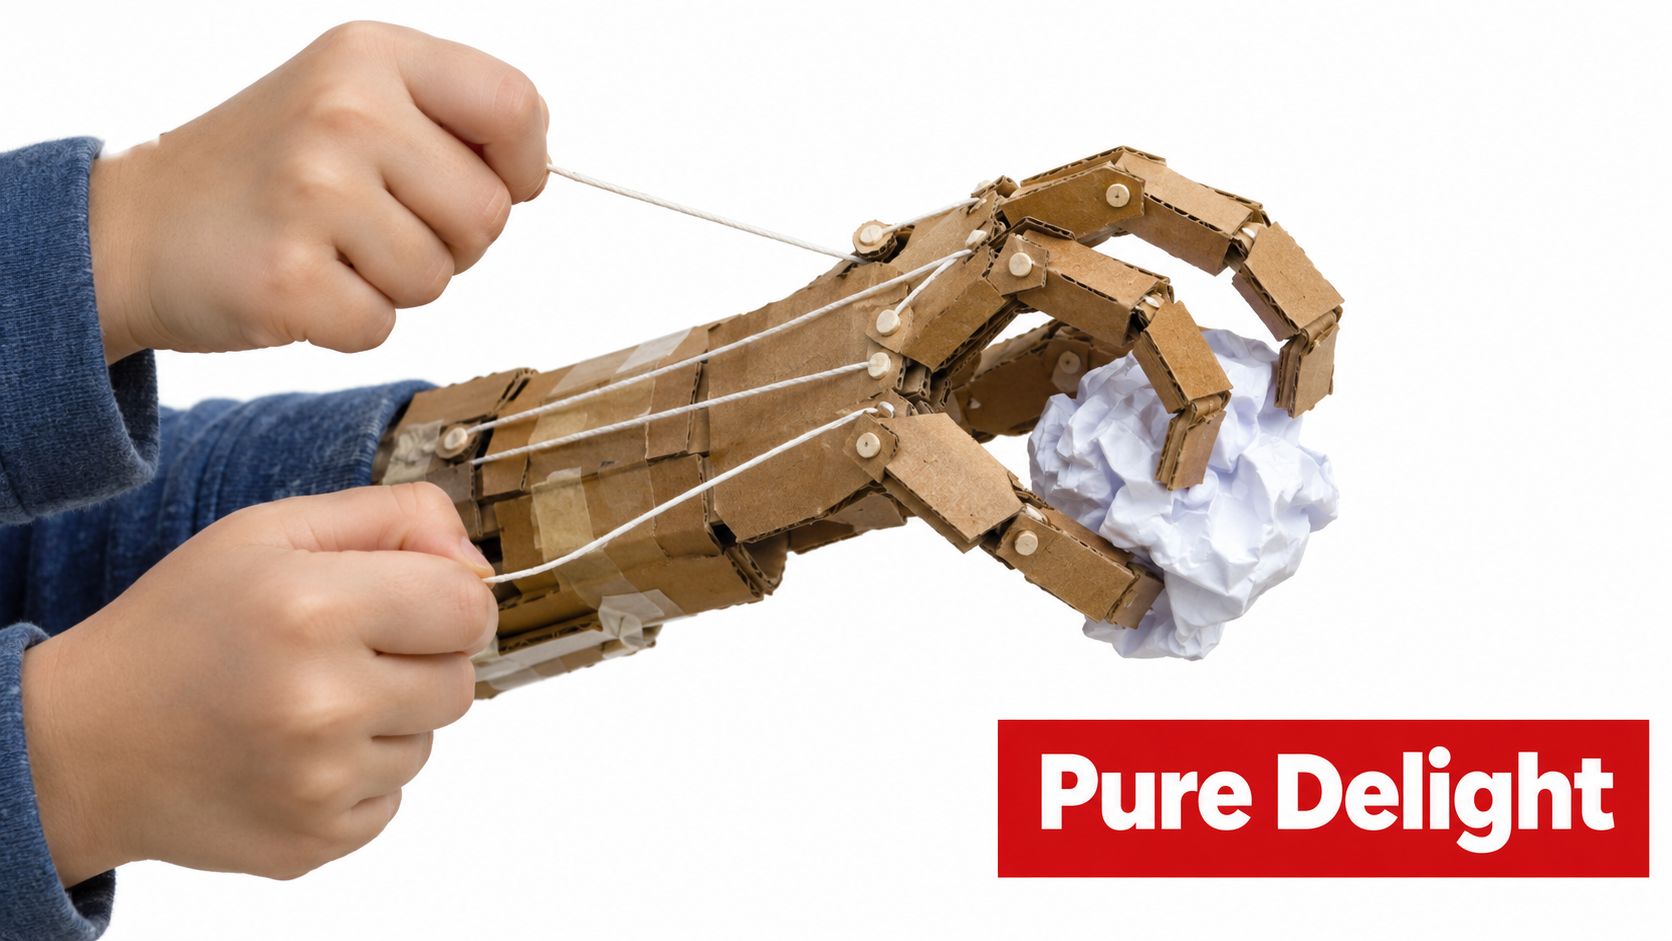
I've seen the strongest learning happen after the exciting first grab. A student notices that the index finger bends farther than the others. Instead of treating that as failure, we compare string paths, look for friction, and adjust the elastic return force. The hand becomes a small engineering laboratory, and the child becomes the investigator.
A project with a long mechanical history
Mechanical hands belong to the broader tradition of automata and mechanical toys. That history reaches back to ancient Greece and China, later flourishing in Renaissance Europe. Archytas of Tarentum's flying pigeon, dated to roughly 400–350 BC, is often cited as an influential early example in this tradition, while Leonardo da Vinci's mechanical lion could walk and reveal lilies from its chest as a diplomatic gift for King Louis XII. These examples show that moving figures have long combined craftsmanship, performance, and technical ingenuity. A historical overview of automata and mechanical toys
By the eighteenth century, automata had become highly refined status objects. Pierre Jaquet-Droz produced the Writer, the Draftsman, and the Musician between 1768 and 1774, important benchmarks in mechanical toy engineering. A modern cardboard hand is much simpler, but it gives children access to the same central idea: designed parts can transform a small input into visible movement.
For parents and teachers, this is the value of hands-on learning. The finished object is fun, but the deeper reward comes from making a prediction, testing it, and discovering why the result changed.
Materials and Basic Science Explained
Start with a work surface where cardboard scraps, string, and glue can stay organized. The build doesn't require specialized equipment, and substitutions make it easier to begin with materials already at home.
Gather the build materials
You'll need:
- Cardboard or chipboard: Use it for the palm and fingers. A paper plate can serve as a flexible palm base.
- Drinking straws: Cut them into short segments for finger joints and string channels.
- Craft sticks or wooden dowels: Add stiffness behind the fingers. An old plastic card can work as a slim stiffener.
- Rubber bands or elastic string: Provide the return force that helps the fingers open.
- Push pins or paper brads: Create pivot points. Adults should handle sharp tools and supervise their use.
- String or yarn: Forms the pulling mechanism. Yarn is a useful substitute for specialty cord.
- Scissors, tape, and glue: Choose scissors appropriate to the child's age and allow glue to dry fully.
- Markers or paint: Add decoration after the mechanism works.
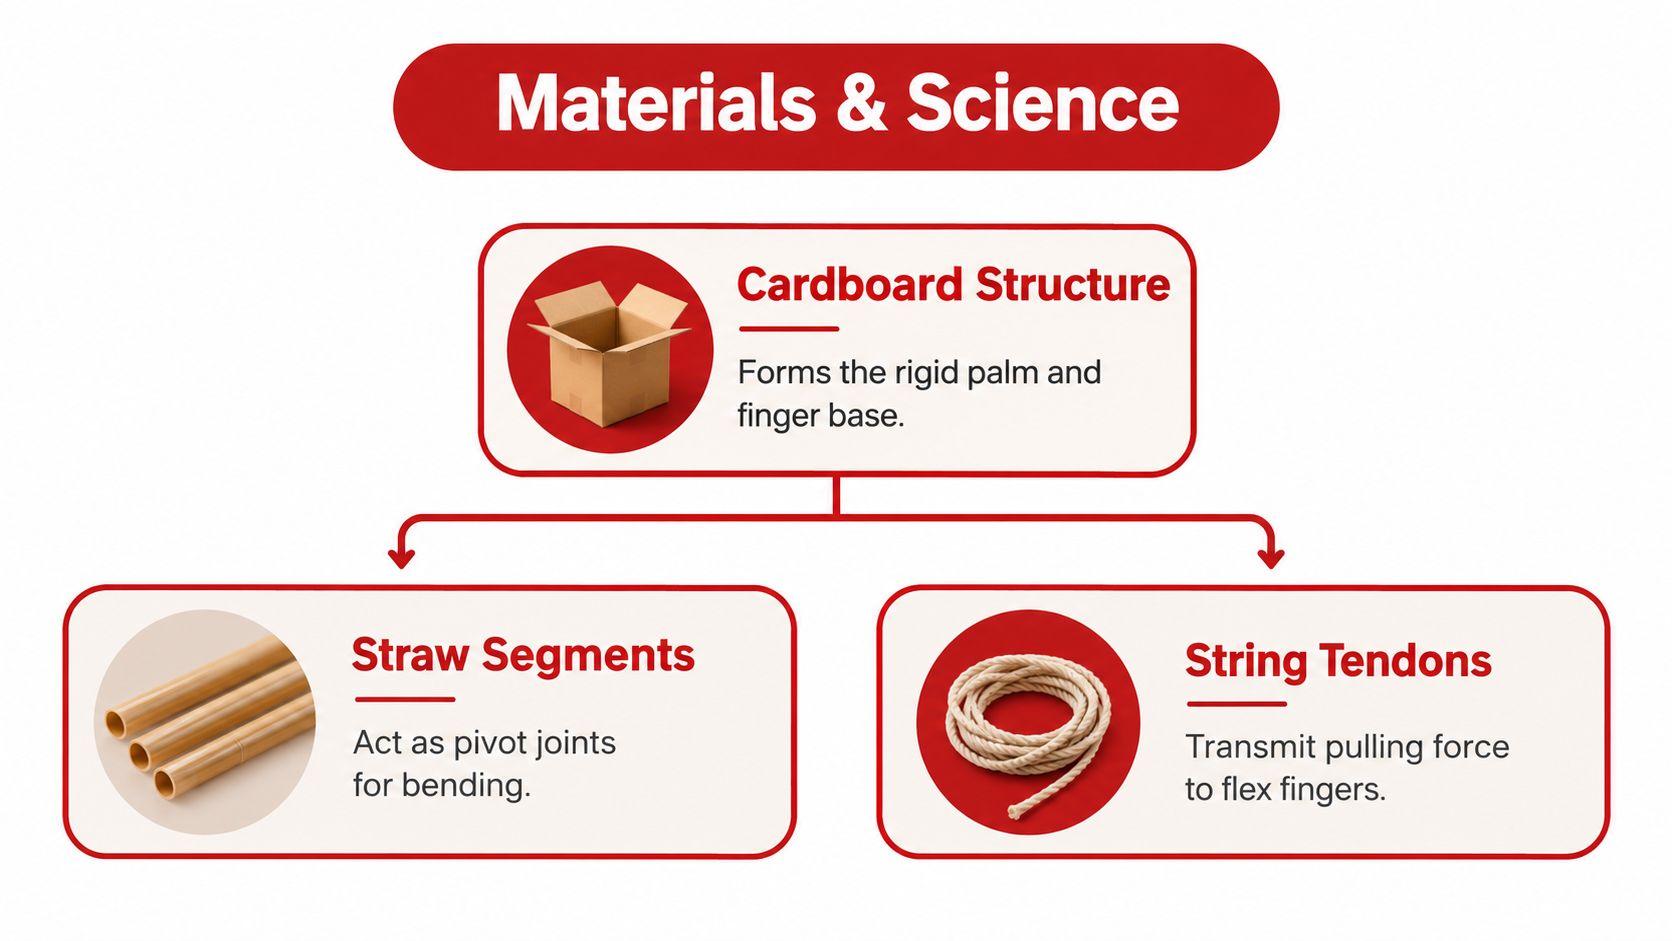
A wooden Mechanical Hand kit described in an engineering guide uses wooden pieces and rubber bands to teach children how gears and mechanical systems transmit force through step-by-step assembly. That same educational principle works with cardboard: each material has a job, and changing one part changes the behavior of the whole hand. See how mechanical toys model force transmission
Follow the force
Each finger behaves like a lever. The straw segment sits near a bending point and acts as a simple fulcrum. When a child pulls the string, the string transmits force along the finger, causing the cardboard sections to rotate around that joint.
The string imitates a tendon. In a real hand, muscles pull on tendons, and tendons transmit that pull to bones. The rubber band supplies an opposing force, helping the finger return toward its open position when the child releases the string.
This is different from a simple electrical project, where energy travels through a circuit to activate a component. Comparing the two builds can help children distinguish mechanical transmission, through strings and joints, from electrical transmission, through wires and components. A related simple circuits activity makes that contrast especially clear.
Building Your Mechanical Toy Hand Step by Step
The best build is adjustable. Don't glue every part permanently before testing the movement, because small changes in alignment can determine whether a finger curls smoothly or locks in place.
Shape the structure
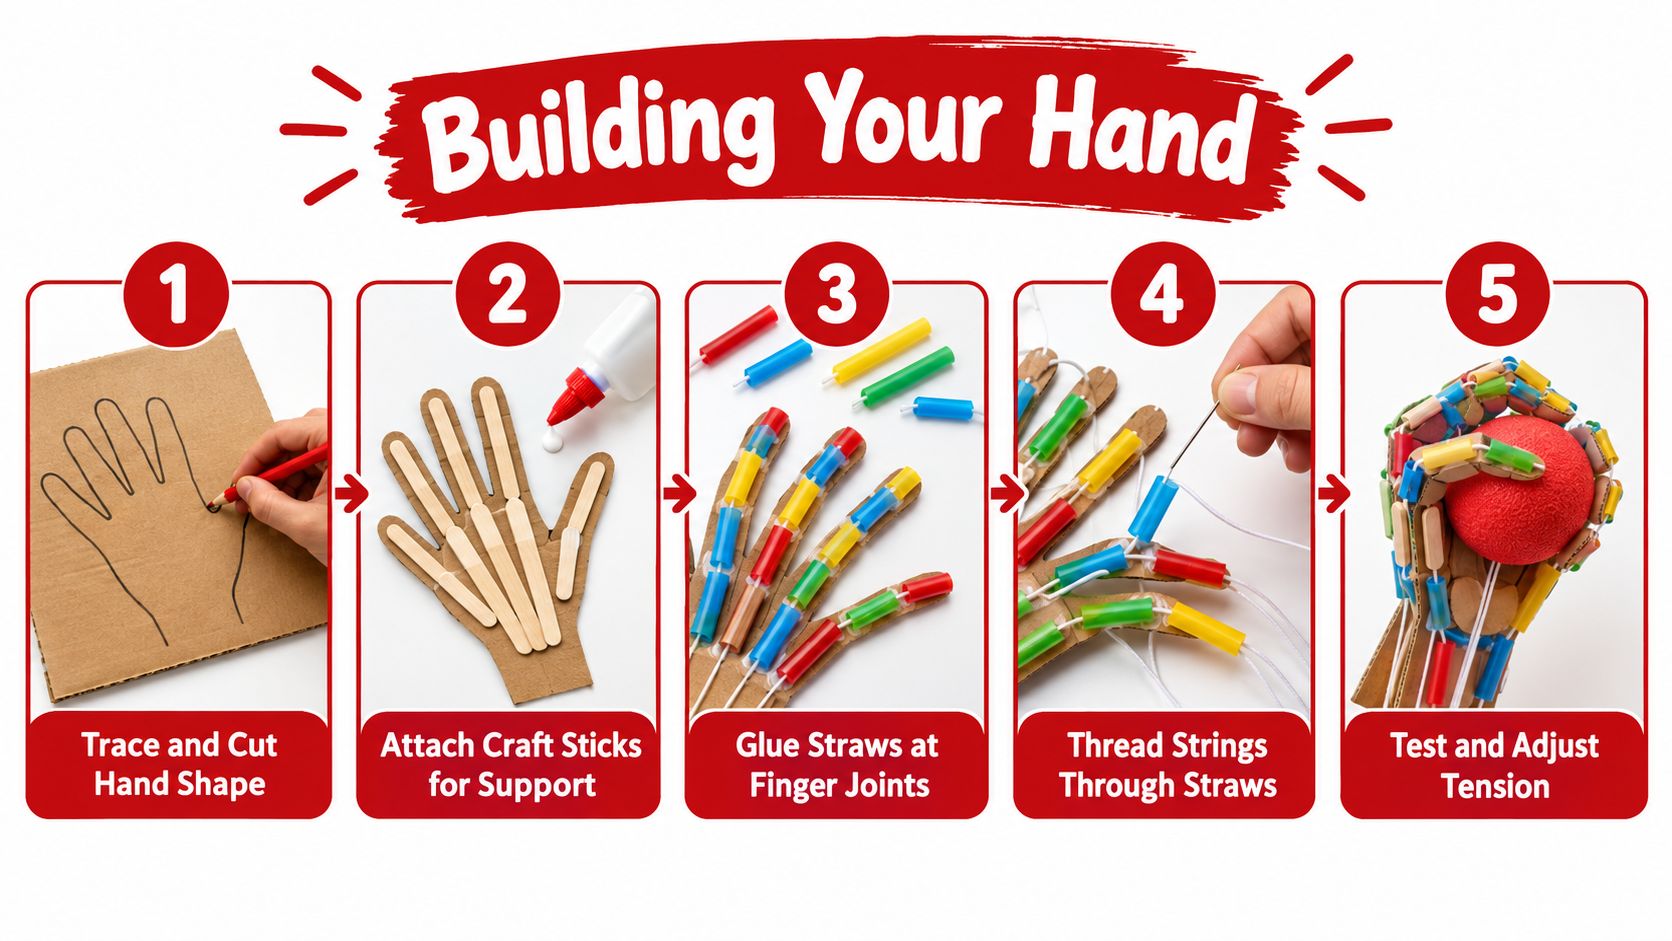
- Trace and cut the hand. Draw a palm and fingers on cardboard, then cut the shape carefully. Slightly tapered fingers look natural, but broad fingers may be sturdier for younger builders. Keep the wrist wide enough to support the string bundle.
- Reinforce the fingers. Attach craft sticks or wooden dowels along the back of each finger. Leave the intended bending areas flexible. If a stick crosses a joint, the finger may act like a rigid plank instead of a chain of moving sections.
- Create the joint channels. Cut straw pieces about three-quarters of an inch long and position them over each finger joint. Secure them with push pins or brads through the straw and into the cardboard. The straw should stay firmly attached while leaving a clear path for the string.
Practical rule: A tendon string needs a smooth route more than a tight route. If it rubs hard against cardboard, adding tension won't solve the real problem.
Add tendons and return force
- Thread the strings. Cut five equal lengths of string, about eight inches each. Tie one end to the tip of each finger, then guide each string through the straw channels toward the palm. Knot securely, but keep the knot small enough that it won't catch inside a straw.
- Attach the rubber bands. On the palm side, connect rubber bands between each finger base and the palm structure. These bands should pull the fingers open without overpowering the strings. If the band is stretched too far, the child will need excessive force to close the hand.
- Bundle at the wrist. Test every finger on its own first. Once each one bends and returns, gather the strings near the wrist with tape, leaving enough length for a comfortable grip. Bundling too early hides individual problems.
Troubleshoot before decorating
If a finger stays bent, check for a twisted straw, excess glue, or a rubber band that has shifted. If it barely moves, look for loose knots, too much slack, or a string that's trapped under a reinforcement stick. A string that pulls sideways instead of along the finger can also waste force.
Use a marker to label each string while testing. Pull one at a time, observe the joint, and adjust only one variable before testing again. That simple habit teaches controlled experimentation instead of random rebuilding.
This cardboard craft project collection can provide additional ideas for strengthening, shaping, and decorating the structure.
Understanding How It Works
The hand moves because each component handles a different part of the force. The string pulls, the straw guides, the cardboard rotates, and the rubber band helps reset the position. Remove or misalign one element, and the whole system changes.
From string pull to finger curl
A finger joint is the location where one cardboard section can move relative to another. The straw provides a smoother channel and helps keep the tendon path consistent. As the string shortens the effective distance between the fingertip and the wrist, the finger bends around the supported joint.
The rubber band stores elastic energy when it stretches. When the child releases the string, that stored energy pulls the finger back toward its starting position. The balance between string tension and elastic force determines whether the movement feels light, stiff, weak, or jerky.
Children often confuse the tendon with the joint. The tendon is the pulling element, while the joint is the place where movement occurs. In the model, the string doesn't bend the finger because it is flexible by itself. It bends the finger because the string pulls on a structure designed to rotate.
Compare the model with a real hand
A human hand uses tendons that run through protective sheaths, specialized ligaments around joints, and neural pathways that coordinate precise movement. The cardboard version has none of that biological complexity. It's a deliberately simplified system that isolates a few principles so children can observe them directly.
That simplification creates a useful conversation about biomimicry. Engineers study natural structures, identify a function, and recreate part of it with different materials. Children who want visual inspiration can explore mechanical concept art with AI to compare imagined mechanisms with the physical model they've built.
Ask learners to predict what will happen if a straw moves closer to the fingertip, if the string becomes shorter, or if a stronger rubber band is added. Then let them test one change at a time through an engineering design process for kids.
Learning Outcomes and Skill Development
A mechanical hand gives children several kinds of practice in one connected task. They cut, measure, tie, observe, explain, and revise. Because the project produces visible movement, children can connect an action with a result instead of completing isolated worksheets about force or anatomy.
Fine-motor and mathematical practice
Cutting along a curved outline, threading string through narrow straw channels, and tying knots all demand controlled hand movements. These actions support coordination and hand strength, especially when the child must hold one material steady while manipulating another. More ideas for this area appear in fine-motor skill activities for children.
Measurement enters naturally. Builders compare finger lengths, aim for equal string lengths, and consider symmetry between the left and right sides of the hand. They also encounter proportional reasoning when a small change in joint position produces a larger or smaller curl.
Engineering habits
The project rewards children who work like engineers:
- Observe: Identify which finger fails and describe the movement precisely.
- Hypothesize: Suggest a cause, such as friction, slack, or excessive elastic force.
- Modify: Change one feature rather than rebuilding everything at once.
- Test: Repeat the same pull and compare the result.
- Communicate: Explain the design choice to a partner or group.
The educational value is not limited to a hand that works perfectly. A failed prototype can provide better evidence than a lucky first attempt, because it gives the child a reason to investigate.
Make performance measurable
Older learners can test the hand with objects from different categories, such as a paper ball, a cylinder, a ring, or a small cuboid. Robotic-hand researchers often use YCB-style objects because they represent varied shapes, textures, weights, and rigidity, with physical properties and meshes that support repeatable testing. A robotic manipulation study explains YCB-style benchmarking and repeated trials
Have children record whether the hand completes a task, which finger slips, and what changed after an adjustment. One comparative study found that task order affected performance significantly, with p<0.05, while changing degrees of freedom didn't significantly change completion time for most toddler-like manipulation tasks. That finding supports a simple classroom rule: vary the order of tasks instead of trusting one impressive demonstration.
Classroom and Activity Variations
The same mechanical hand can serve different learners if the challenge changes. The structure should become more manageable for beginners and more adjustable for experienced builders, while the central question stays constant: how can a design create a reliable grasp?
Choose a suitable starting point
| Learner group | Adaptation | Main investigation |
|---|---|---|
| Younger children, ages 6 to 8 | Provide pre-cut cardboard and larger straw pieces | Explore pulling and releasing |
| Elementary groups | Build hands with different finger layouts | Compare which designs grasp selected objects |
| Middle school students | Add pulleys, gears, or adjustable elastic tension | Study force transmission and grip control |
| Advanced builders | Try syringes and tubing or add electronics | Compare hydraulic and motorized actuation |
For younger children, realism matters less than success. A large, clearly visible finger movement gives them an immediate connection between pulling and bending. An adult can cut the cardboard while the child positions straws, threads yarn, and tests the mechanism.
Turn testing into an investigation
Elementary classrooms can form small teams and assign each group a target object. Rather than declaring a winner after one grab, students can keep a simple record of successful and unsuccessful attempts by object type and finger configuration. A broader grasping study used 250 diverse toy objects, 2,500 demonstrations, and 64 to 65 YCB benchmark objects, with 16 trials per object. Its model reached a 67% real-world grasp success rate, illustrating why varied objects and repeated trials reveal more than easy toy-only testing. Read the diverse-object grasping study
Extend beyond the desk
Homeschool families can connect the build to automata history, biomedical engineering, or robot hand design. Outdoor groups might use safe natural materials collected during a supervised scavenger hunt, then compare how flexible twigs or broad leaves change the mechanism.
Hydraulic versions offer a strong next challenge, but they require careful supervision and leak checks. Motorized versions can connect the hand to a basic circuit, giving older learners a way to compare manual tendon control with powered movement.
Getting Started and Next Steps
Place the cardboard, straws, string, rubber bands, tape, glue, scissors, and decorating materials where everyone can reach them. A tidy workspace makes each part easier to identify and keeps loose string from catching on scraps. Adults should choose age-appropriate materials and supervise scissors, push pins, brads, and any cutting beyond the child's ability.
Plan for adjustment. If a finger sticks, inspect the mechanism rather than judging the builder. The string may be rubbing against a straw, a joint may need reinforcement, or the elastic may not provide enough return force. Small changes often reveal more about the design than a perfect first attempt.
Use a simple testing ladder
Start with a light object, such as a cotton ball, so the hand can succeed without a strong grip. Continue with a crumpled paper ball, a cardboard tube, a ring-shaped object, and another safe item with a different surface or shape. Change one feature at a time. That makes cause and effect easier to see.
A simple observation sheet can include:
- Object: What shape and texture did the hand encounter?
- Movement: Which fingers curled, slipped, or stayed still?
- Cause to investigate: Did the string rub, loosen, or pull unevenly?
- Revision: What single change did the builder make?
- Result: Did the next attempt improve, weaken, or stay the same?
Test slowly enough to notice the first failure. A hand that closes but cannot release may need a clearer return path, while a hand that twists may have uneven string lengths or misaligned guides.
Photos or a short video preserve the design process. Children can explain why they moved a straw, changed elastic tension, or reinforced a finger. That explanation turns a craft into an engineering portfolio because it connects an observed problem with a chosen revision.
Explore more projects
After the hand works reliably, compare it with robotic grippers, simple machines, biomimicry, or automata. Ask how a hydraulic hand might feel different from a string-operated hand, and what a motor would change about control. Adults should inspect materials before use and supervise tools, pins, and small parts throughout the activity. Review the toy safety principles relevant to STEM mechanics kits
Build, test, revise, and celebrate the improvements as much as the final grasp. Then visit Playz for more science kits, creative toys, and active play ideas. Choose a project that lets children build, test, and explain something real, then give them room to make the next experiment their own.