


You're standing in a toy aisle, comparing boxes covered in words like STEM, engineering, and working coaster. One kit promises a thrilling loop. Another has a large parts count. A third looks wonderfully realistic, but you're wondering whether your child will finish it, whether you'll need to assemble half of it, and whether the track will still work after the first enthusiastic rebuild.
That hesitation makes sense. Model roller coaster kits can be simple marble-run activities, precision scale models, classroom physics tools, or construction-toy accessories. The label alone tells you very little about the experience inside the box. The right choice depends on the builder's age, reading ability, patience, previous experience, available supervision, and willingness to rebuild when the first car stalls.
Why Model Roller Coaster Kits Capture Young Builders
A 9-year-old sits on the classroom floor with a screwdriver in one hand and a half-finished loop in the other. Three classmates lean closer as the marble starts its first descent. It reaches the curve, climbs partway, and stops. Nobody walks away. They immediately begin debating whether the hill should be taller or the turn should be wider.
That moment explains the appeal of model roller coaster kits better than a product label can. A coaster combines the imaginative excitement of an amusement park with a physical problem a child can touch, change, and test. The builder doesn't just hear that height creates stored energy. They raise a track section, release the car, and watch the result.
The experience also fits the principles behind hands-on learning, where children learn by manipulating materials and seeing consequences. A completed coaster becomes more than a display model. It acts as a working demonstration of cause and effect.
The story makes the science memorable
Children often give their rides names, design entrance signs, and invent a backstory for the station. That imaginative layer keeps a physics problem from feeling like a worksheet. A failed run becomes part of the ride's story, not merely an incorrect answer.
The strongest kits support this cycle:
- Build: Assemble a hill, curve, loop, or support.
- Test: Release the car or marble and observe its motion.
- Adjust: Change an angle, joint, weight, or connection.
- Explain: Describe why the new design worked better or worse.
The educational value comes from the repeated cycle, not from the word STEM printed on the package. A kit that looks impressive but permits only one fragile build may offer less learning than a simpler system that encourages frequent redesign.
Classroom rule: A working failure often teaches more than a perfect first run, provided the child can identify what changed and try again.
That's why this guide focuses on the price-to-complexity gap. Some model roller coaster kits are excellent for young experimenters. Others are better suited to experienced hobbyists who enjoy careful alignment, adhesives, painting, and troubleshooting. The box may show the same exciting loop, but the building experience can be completely different.
The Four Main Types of Model Roller Coaster Kits
Start by identifying the kit category before comparing brands. The phrase model roller coaster kit covers four distinct formats, and each one asks the builder to do a different kind of work.
Scale-model hobby kits
These are miniature architectural models. They're aimed mainly at serious teenage and adult hobbyists who care about realistic supports, station details, track geometry, paint, and finish quality. The builder isn't only trying to make a car complete a circuit. They're reproducing the appearance and mechanical character of an amusement ride.
Scale matters here. CoasterDynamix helped establish a modern dedicated category after its founding in the United States in 2003, producing realistic kits in O scale, 1:48, and HO scale, 1:87 formats, as described in this historical overview of model roller coaster kits. These systems belong to established model-making traditions, not just toy play.
Snap-together STEM kits
Snap-together kits trade some realism for accessibility. Parts usually connect with simple tabs, clips, or flexible track sections, allowing school-age children to build and rebuild without advanced tools. The main objective is experimentation, such as testing how slope, height, weight, or curve shape affects motion.
Think of this category as a laboratory with colorful parts. It suits children who want quick feedback and may lose interest during long sequences of tiny assembly steps.
Construction-toy add-ons
These roller coaster modules connect to an existing brick-based construction system. They're useful when a child already enjoys open-ended building and wants to add a ride, station, or amusement-park theme to a larger creation.
Realism varies widely. The learning focus usually sits in structural design, creative planning, and mechanical play rather than precise scale modeling.
Classroom-grade experiment kits
These arrive with lesson plans, multiple track pieces, and explicit experiments. Current educational examples advertise 20 experiments, a 32-page manual, 305 parts, and adjustable-weight cars, as shown in this roller coaster designer kit overview. The numbers describe one example, not a universal standard, but they illustrate what a classroom-ready package may include.
| Kit Type | Typical Builder | Primary Learning Focus | Realism |
|---|---|---|---|
| Scale-model hobby kit | Experienced teens and adults | Detail, alignment, model engineering | High |
| Snap-together STEM kit | School-age children | Cause and effect, repeated testing | Moderate |
| Construction-toy add-on | Children familiar with brick systems | Open-ended design and themed play | Low to moderate |
| Classroom experiment kit | Students with an educator | Controlled experiments and documentation | Moderate |
If a child wants to decorate a theme park, choose for creative flexibility. If they need a science-fair investigation, choose for repeatability and clear instructions. If they want a realistic miniature ride, accept that the project will demand more patience.
The Physics Behind Every Working Roller Coaster Kit
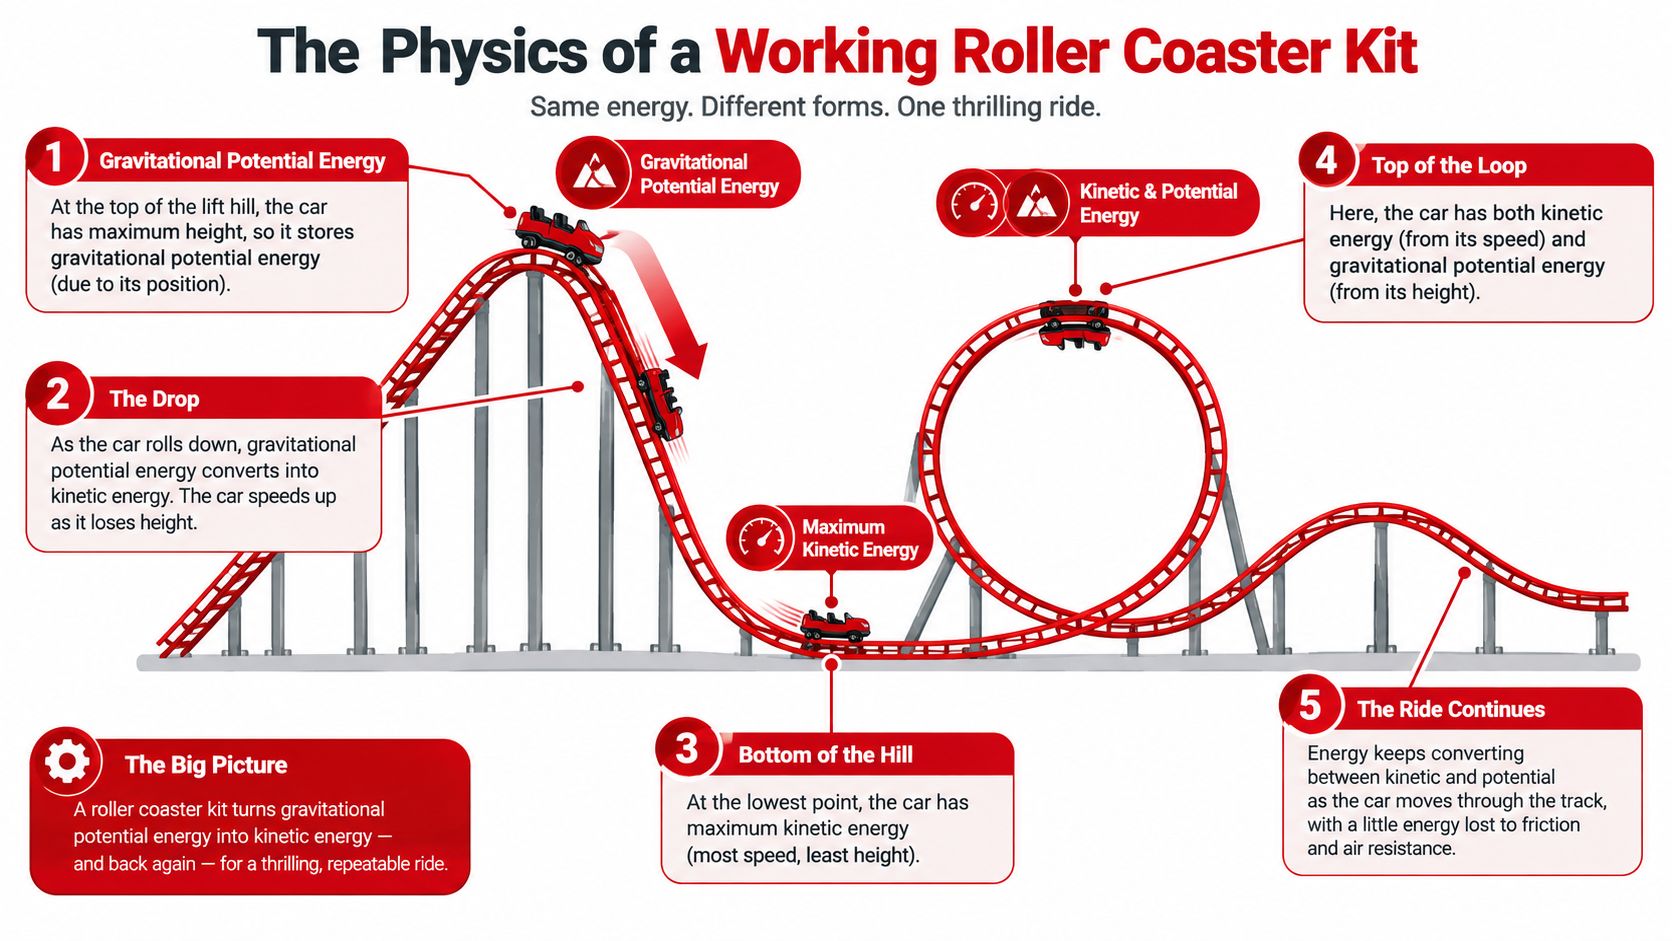
A marble reaches the first loop, slows halfway up, and rolls backward. That small failure gives a child a useful question: where did the motion go? At the top of a lift hill, the car has stored energy because gravity can pull it downward. As it descends, gravitational potential energy converts into kinetic energy, the energy of motion. Friction, wheel contact, air resistance, and imperfect joints remove some of that mechanical energy along the way.
The same pattern applies to a marble, a small plastic car, or a carefully assembled scale model. The Roller Coaster Physics toolkit uses conservation of energy, reaction forces, and friction to explain how coaster models work. For a related classroom format, see this guide to physics projects for science fair.
What a hill and loop reveal
Children can understand the basic pattern without equations:
- At the hilltop: The car has more gravitational potential energy because it is higher.
- During the descent: Stored energy changes into motion, so the car speeds up.
- At the bottom: The car usually moves fastest after converting much of its height into kinetic energy.
- Through the loop: The car needs enough speed and a suitable track shape to stay guided by the rail.
- Near the end: Friction and repeated rises leave less available energy.
A car that stalls on a later hill has lost too much energy earlier. A marble that leaves a curve may be moving too quickly for that curve's radius, or the track may be misaligned. These failures make invisible forces visible.
Why kit quality changes performance
Two kits can include similar loops yet behave very differently. Flexible track may forgive a small alignment error but struggle to hold a precise curve. Rigid joints preserve the geometry more reliably, though they can frustrate a younger builder who has not learned to apply even pressure.
Track height, curvature, car mass, and joint stiffness all affect reliability. A workable design saves enough energy for high-drag sections and keeps the car guided through turns. For parents and teachers, that creates a price-to-complexity test: a kit with more parts may offer more experiments, but it can also require longer building time and closer supervision.
During a classroom build, change one feature at a time. Raise the first hill while keeping the car and loop unchanged, then compare the result. Changing the entire layout at once makes the cause harder to identify. The model becomes a small, visible physics laboratory.
Matching Kits to Age, Skill, and Supervision Level
Age ratings help, but they don't tell you whether a child can read the instructions, tolerate repeated failure, or manage a long fine-motor sequence. Match the kit to the child's working habits, not only the number printed on the packaging.
A 6-year-old who builds confidently with large blocks may still need constant help with small marbles, tight clips, or parts that require steady pressure. A 10-year-old who reads independently may assemble a snap-together layout with limited help but still need an adult to diagnose why the car repeatedly leaves the track.
A practical age guide
| Age Band | Best Kit Features | Supervision Needed | Watch Out For |
|---|---|---|---|
| Ages 6 to 8 | Large parts, pictograms, simple clips, short builds | Parent or educator at every step | Small marbles, pinch points, unclear orientation |
| Ages 9 to 11 | Illustrated instructions, repeatable track pieces, adjustable layouts | Guided support at setup and troubleshooting | Long fine-motor sequences, fragile tabs |
| Ages 12 to 14 | More detailed track, optional tools, design freedom | Occasional help, especially with mechanisms | Soldering wires, trimming track, adhesives |
| Ages 15 and up | Precision parts, motors, paint, glue, scale details | Safety guidance and project planning | Tight tolerances, complex alignment, extended builds |
Read the child before choosing the box
A snap-together kit aimed at an 8-year-old may be the right choice for a child who wants to see a result quickly. A wooden track hobby set rated for 12 and older may suit a younger child only as a shared project, with an adult handling cutting, drilling, glue, or structural alignment.
Use these questions before buying:
- Can the child read the instructions independently?
- Will they accept a stalled run as a problem to solve?
- Have they built kits with multiple connected stages before?
- Can they distinguish a decorative part from a load-bearing support?
- Are small parts safe and manageable in the intended setting?
The STEM toys for kids guide can help families compare hands-on activities more broadly, but the coaster's complexity still needs a child-specific judgment.
Parent test: If you expect to complete most of the track while the child watches, treat the kit as a joint hobby project rather than an independent toy.
Supervision also changes over time. A child may need help with the first layout, then manage later redesigns alone once they understand the connection system. That progression is a sign of learning, not a reason to avoid a demanding kit entirely.
Build Time, Materials, and Durability Compared
A kit's build time changes the kind of learning it supports. A short project can work well for a birthday activity or one class period. A longer build can support a detailed science-fair entry, but only if the builder has space to store unfinished work and enough patience to return to it.
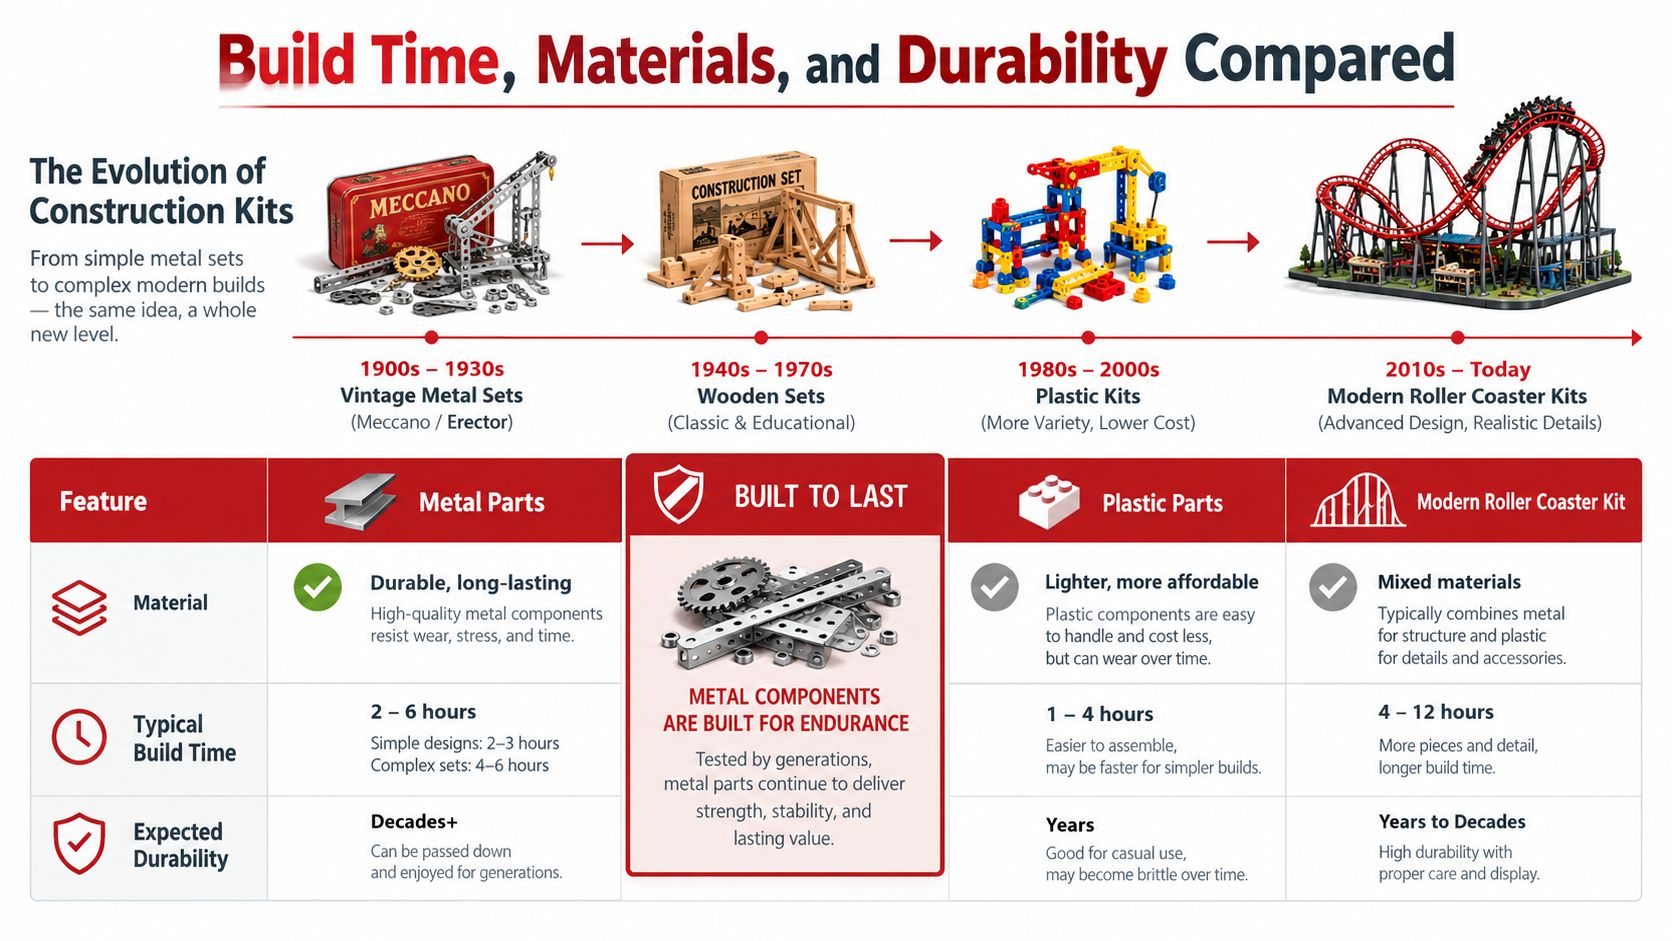
Construction kits have long connected play with working machines. Historical examples include Erector Sets, introduced in 1913, which enabled constructions such as Ferris wheels, cranes, roller coasters, and robots, according to this history of tracked demonstrations and construction toys. The enduring lesson is practical. Parts must remain stable long enough for the builder to test the machine.
Match the material to the project
Flexible plastic track is forgiving during early experimentation. It can bend into curves without demanding perfect fabrication, although it may shift if supports are weak. Rigid ABS-style parts can preserve tighter tolerances, but they expose alignment errors more clearly.
Wooden systems offer a different experience. Plywood and dowels can create a satisfying architectural model, yet they may require more preparation, glue, trimming, or adult assistance. Thin cardstock kits can look striking for a display, but they aren't usually the strongest choice for repeated running.
The following build-time ranges are practical planning estimates for these kit categories, not universal guarantees:
- Snap-together STEM kits: about 30 to 90 minutes for an initial build.
- Mid-tier plastic track kits: about 2 to 4 hours, often spread across a weekend.
- Detailed hobby sets: about 8 to 20 hours, commonly divided across a week.
Ask how the kit fails
The cheapest kit isn't automatically poor value, but a builder needs to know whether worn parts can be repaired. A replaceable connector gives a child another design cycle. An unrepairable tab may turn one mistake into the end of the project.
Look for track joints that can be reseated, supports that don't depend on one fragile clip, and cars that can be cleaned or adjusted. Builders using computer-aided design or 3D printing face the same material question. A useful comparison is additive manufacturing for defense contractors, where material selection and dimensional accuracy matter because the finished part must perform, not merely resemble the design.
Store the completed model away from heavy handling if the track depends on delicate joints. A durable kit doesn't need to be indestructible. It needs to survive the kind of testing its instructions encourage.
Evaluating a Kit Before You Buy
The useful question isn't “Is this educational?” Almost any coaster can support a conversation about motion. The better question is, what does this kit deliver for its price, build time, and adult effort?
Construction toys are attracting demand from both premium STEM systems and more affordable, short-form products. One market report projects the construction-toy category to rise from about USD 11.7 billion in 2025 to USD 12.67 billion in 2026, with growth connected to STEM learning, digital play, and sustainability, as reported by construction-toy market coverage. That broad context doesn't tell you which coaster to buy, but it does explain why packaging increasingly uses educational language.
Six checks for a more honest comparison
Parts count versus price. A large count can include tiny decorative elements rather than useful track, supports, or replacement connectors. Ask how many meaningful layouts the pieces can create.
Replacement parts. Find out whether the manufacturer sells extra cars, clips, track sections, or support pieces. A system with accessible replacements can remain useful after the first build.
Instruction quality. Look for diagrams that show orientation, connection order, and troubleshooting. A single page of general directions may leave a child unable to diagnose a stalled run.
Expansion options. Check whether the system accepts extra track, alternate cars, motors, or compatible construction pieces. Re-playability depends on what the builder can change after the first circuit works.
Joint fatigue. Read carefully for comments about loose connections, slipping supports, or parts that become unreliable after repeated assembly. A visually impressive kit may still perform poorly if its geometry changes during testing.
Physics support. Strong educational kits explain ideas such as gravitational potential energy, friction, speed, and centripetal force. They should help the adult ask better questions, not just tell the child to “build and explore.”
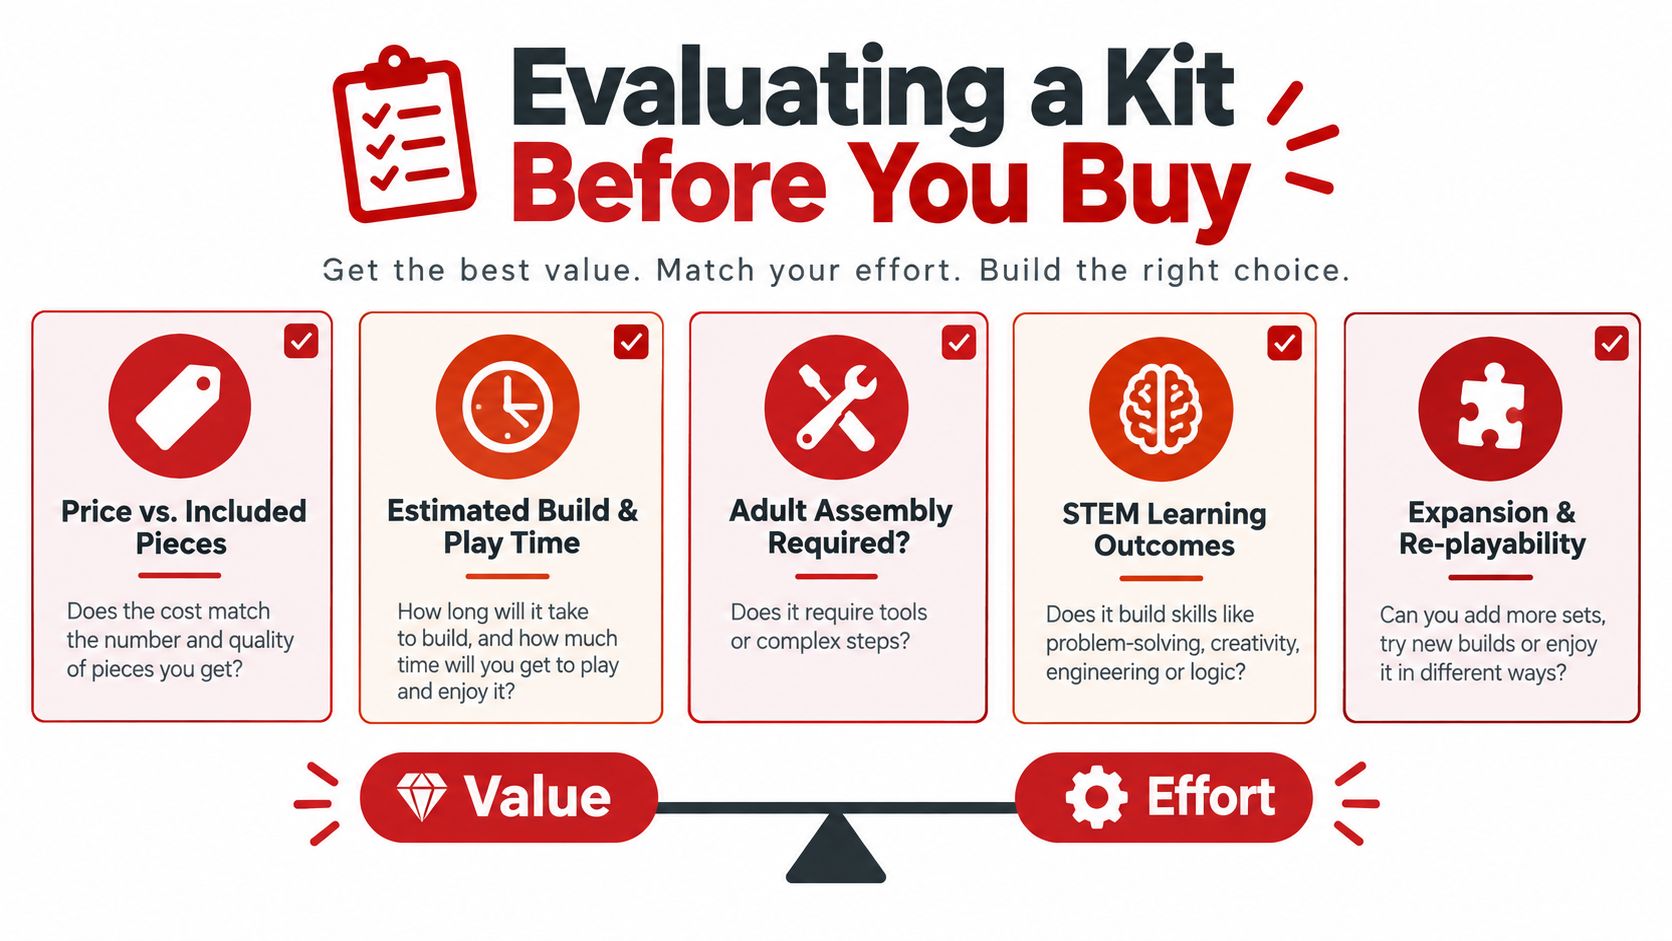
Before checkout, ask one question the box almost never answers: Will a second child be able to build it next year? If the answer depends on one-time adhesive joints, irreplaceable parts, or an adult who remembers every hidden step, the kit may have limited long-term value.
The STEM building kits collection offers another way to think about hands-on construction, but the same evaluation remains useful across brands. Buzzwords don't compensate for flimsy tabs, unclear diagrams, or a layout that can't be rebuilt.
Creative Project Ideas and Classroom Applications
A coaster kit can serve as a birthday activity, a homeschool physics unit, or a science-fair foundation. The difference comes from the question the builder investigates.
For a party, divide children into small teams and give each team the same basic pieces. Their task might be to build a ride that completes a loop, stays stable, or carries a chosen object. The focus is collaboration, quick testing, and explaining design decisions.
For homeschool, keep the layout stable while changing one variable. Students can compare track materials, adjust the starting height, measure travel time, or test how added mass affects motion. A marble roller coaster project gives families a related hands-on format for extending the activity beyond the kit's original instructions.
Four ways to turn a kit into a project
- Marble-run challenge: Redesign the same track to maximize loop height while keeping the supports stable.
- Friction investigation: Compare how different track surfaces affect the car's speed and stopping point.
- Storytelling build: Give each coaster section a narrative role, then write a ride description that follows the car through the station, hill, loop, and return.
- Engineering fair: Judge entries for height, stability, creativity, clarity of explanation, and evidence from repeated tests.
Math enters naturally through slope, distance, timing, measurement, and comparison. Language arts students can write advertisements, safety announcements, or first-person ride reviews. Art students can design the station, theme the supports, and create a visual identity for the attraction.
For assessment, educators can adapt transparent criteria from resources discussing assessment rules under CBE. The important point is to score the process as well as the final run. A coaster that fails but includes careful observations and thoughtful revisions may demonstrate stronger engineering thinking than a stable model assembled without explanation.
The video below can help families and classrooms add a visual demonstration to the build.
Print or share this buyer's checklist before choosing a kit:
- Age fit: Can the intended builder manage the parts and instructions?
- Build time: Does the project suit the available session or schedule?
- Durability: Will the track survive repeated testing?
- Replacement parts: Can worn or broken components be replaced?
- Clear instructions: Does the manual explain both assembly and troubleshooting?
A model roller coaster kit earns its place when the child can build, test, revise, and explain. Choose the system that supports those actions, not just the box with the most dramatic picture.
Playz offers hands-on science kits, model-building activities, and creative toys that can help families connect play with practical STEM exploration. Visit Playz to find an activity that matches your child's age, patience, and interest in building working projects.