


You're on the sofa while your toddler crawls through a pop-up tunnel, disappears for a moment, then tumbles into a shallow pool of soft balls. The play looks simple, but your child is practicing movement planning, body awareness, grasping, and social interaction all at once. The design of the equipment still matters, because the wrong tunnel opening, ball size, material, or cleaning routine can turn an inviting activity into an avoidable concern.
A ball pit and tunnel works best as one connected play environment. The tunnel creates a route, while the pit gives children a destination, a sensory surface, and a place to continue the game. This guide connects practical buying choices with formal safety guidance, then adjusts the developmental picture for babies, toddlers, preschoolers, classrooms, and shared family spaces.
What a Ball Pit and Tunnel Setup Really Is
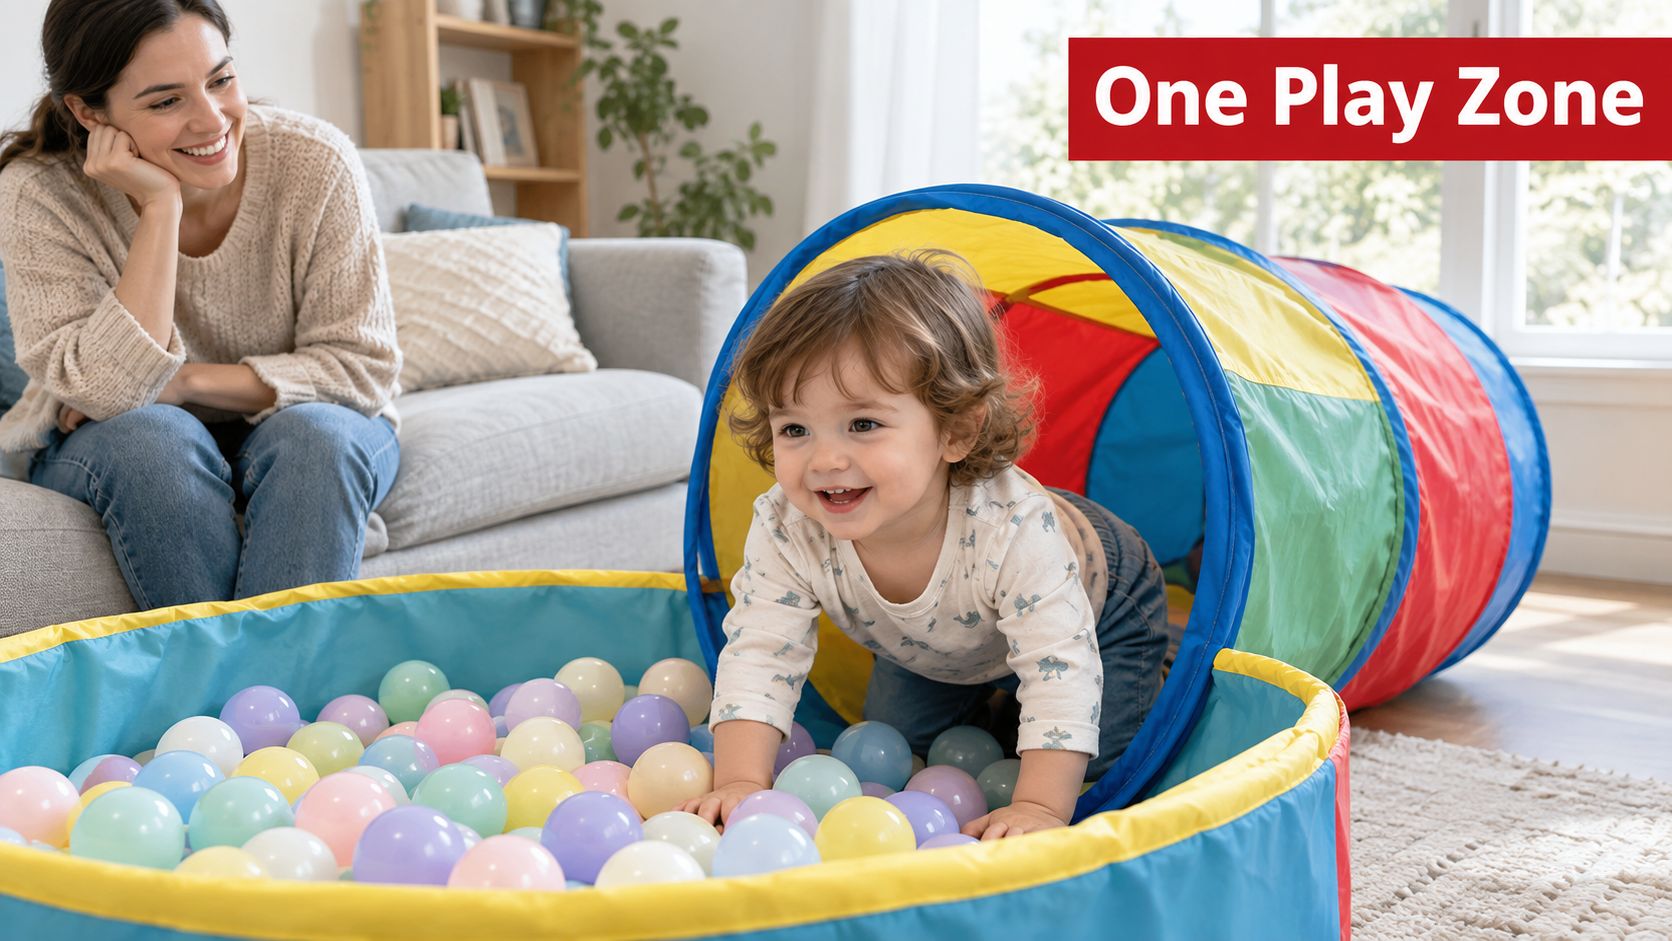
A ball pit and tunnel isn't a small pool beside a crawl tube. It's a connected play system in which the tunnel provides an entrance, an exit, or both. A child might crawl through it, pause halfway for peek-a-boo, emerge into the pit, and then use the balls as objects to carry, sort, hide, or throw.
Modern ball pits have a documented history reaching back to the early 1970s. IKEA reports having a ball pit in 1971 at Kungens Kurva in Sweden, designed by Charlotte Rude and Hjördis Olsson-Une, while Eric McMillan is credited with creating a ball pit in 1976 at SeaWorld Captain Kids World in San Diego, as summarized in this history of ball-pit play. That makes the format more than a passing novelty. It has developed across retail spaces, themed attractions, indoor play centers, restaurants, and family venues.
Common home formats
Families usually encounter three pit constructions:
- Inflatable pits, which are quick to set up and soft to the touch, but can puncture or lose shape.
- Foldable fabric pits, which store easily and often pair with collapsible tunnels.
- Frame-based pits, which provide a more fixed boundary and may suit classrooms or frequent use.
Home kits often pair these pits with fabric crawl tubes that fold into storage. Some include straight tunnels, while others use curved or connected sections. Product descriptions commonly advertise 200 to 500 balls, but the exact contents vary, so check the package rather than assuming a full pit will come with the right amount.
The combined setup encourages a continuous movement sequence, from climbing into crawling, then diving, reaching, emerging, and starting again. In a smaller room, place it where adults can see the full route without placing the equipment against unstable furniture. A foldable set may take only a short time to unfold and connect, but the first setup should include checking seams, fasteners, padding, and ventilation openings.
For sensory-focused spaces, caregivers may also find broader layout inspiration in these autism sensory room ideas. For more examples of how tents and tunnels can work together, see Playz's guide to play tents and play tunnels.
Practical rule: Treat the tunnel, pit, floor surface, and surrounding clearance as one play area. A safe pit can still become difficult to supervise if the tunnel disappears behind furniture.
Developmental Benefits by Age and Stage
The meaningful benefit depends less on owning the equipment and more on how an adult presents it. A baby who crawls through a short, well-lit tunnel is using the space differently from a preschooler who negotiates turns, sorts colors, and invents a rescue game.
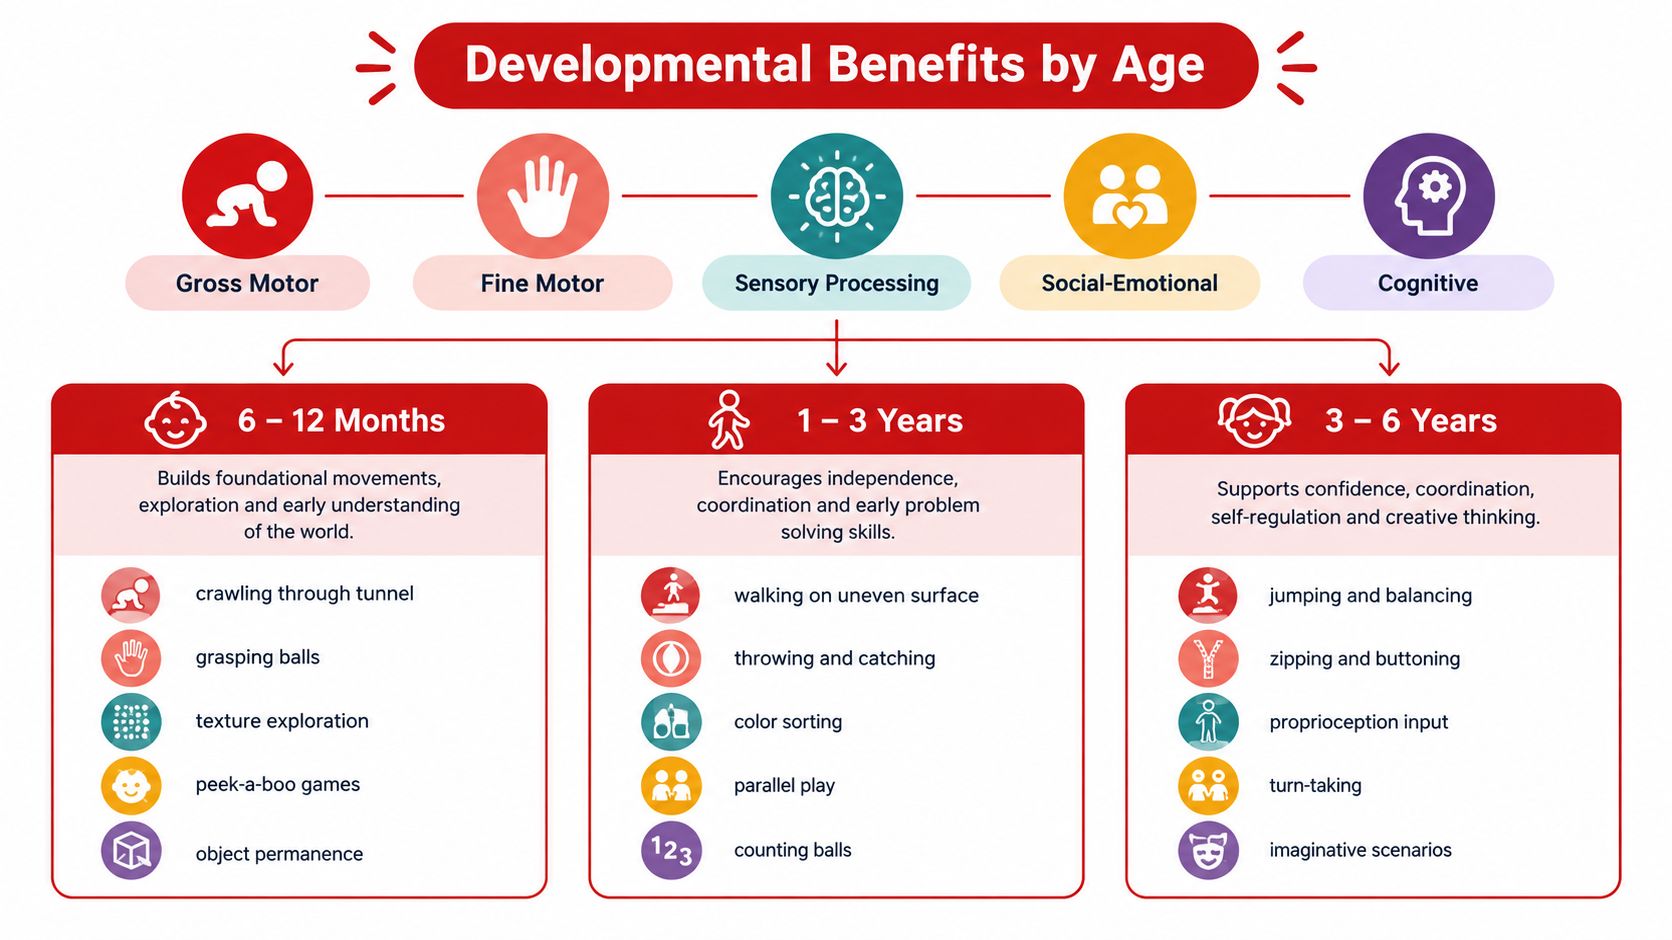
For 6 to 12 months, the tunnel can invite crawling, reaching, and turning. Moving through a confined route asks the baby to coordinate both sides of the body and notice where arms, knees, and feet are positioned. Touching or rolling over the balls adds varied tactile feedback and gentle resistance. Keep the route short, visible, and fully supervised, especially if the child is still learning to sit, crawl, or transition between positions.
Toddlers build movement through repetition
Between 1 and 2 years, children often repeat the same route because repetition helps them understand cause and effect. Climbing into the pit, pulling themselves out, and crawling through the tunnel works the trunk and shoulder muscles. Picking up, releasing, and carrying balls gives the hands useful resistance and supports developing grasp control.
An adult can add language without turning play into a lesson. Say “in,” “out,” “under,” “red,” or “more” as the child acts. If an older sibling crawls first and waits at the exit, the toddler gets a model for movement, a reason to communicate, and a manageable social challenge. Guidance on broader early skills and childhood development milestones can help caregivers place this play alongside other everyday experiences.
Preschoolers add rules and imagination
For ages 3 to 5, the equipment becomes a setting for shared ideas. Children can take turns entering the tunnel, sort balls by color, count objects into containers, or pretend the tunnel is a train, cave, or animal den. These games rehearse early numeracy, vocabulary, sequencing, cooperation, and flexible thinking.
Enclosed ball play may also provide proprioceptive input, meaning children receive information about body position as they push, shift, crawl, and move against resistance. Occupational therapists may include this type of activity in sensory-motor routines, but children respond differently. Some settle with the pressure and enclosure, while others find the texture or crowding overwhelming.
Benefits are conditional, not automatic
A ball pit and tunnel won't guarantee a developmental outcome. The setup is most useful when the child can enter and exit comfortably, the activity matches their current ability, and an adult adjusts the challenge. Long, dark, or crowded routes may reduce engagement for a cautious toddler, while an older preschooler may need a story, obstacle, or turn-taking rule to stay interested.
Choosing the Right Size, Materials, and Design
Start with the room, not the product photograph. Measure the usable floor area, account for the tunnel's full extension, and leave an unobstructed route for an adult to reach the child. A tunnel that fits inside the box may still make the room hard to supervise once it's attached to a pit.
For solo toddler play, a pit diameter of at least 90 cm is a practical starting point. Shared play needs more room, with 120 to 150 cm often used as a planning range for multiple children. These are buying guidelines, not substitutes for the manufacturer's age, weight, and supervision instructions.
Match the tunnel to the child
A short tunnel around 90 cm to 180 cm can provide a clear beginning and end. Younger crawlers may manage a shorter route more confidently, while older children may enjoy a longer or curved tunnel that requires more planning. Don't choose length alone. Check the opening, visibility, ventilation, attachment method, and whether the tunnel keeps its shape during active crawling.
Ball diameter deserves careful attention. Retail kits commonly use balls in the 5.5 cm to 7.5 cm range, but caregivers should verify the actual measurement. Alberta Health Services recommends balls of at least 70 mm to reduce choking risk in indoor play areas, alongside age-appropriate supervision and pit-depth guidance in its ball-pit health recommendations.
| Age Range | Pit Diameter | Tunnel Length | Ball Diameter | Suggested Ball Count |
|---|---|---|---|---|
| Crawling babies | Compact, with clear adult access | Short route | Follow the product's age guidance and local safety advice | Enough for a shallow, visible layer |
| Young toddlers | At least 90 cm for solo play | About 90 cm to 120 cm | Verify the measured diameter before purchase | A partial fill that keeps the floor visible |
| Older toddlers | Around 90 cm to 120 cm | About 120 cm to 180 cm | Consider larger balls where recommended | A moderate fill that supports reaching and climbing out |
| Preschool group play | 120 cm to 150 cm or larger | Longer routes only with suitable openings and visibility | Use balls that meet the setting's safety requirements | Fill according to the manufacturer's capacity guidance |
Compare the materials
Coated polyester or nylon fabric can fold neatly and may be easier to wipe than untreated cloth. Woven fabric with foam padding can feel comfortable, but moisture can remain in seams if it isn't dried completely. Inflatable PVC is convenient and soft, though punctures can change the shape and stability of the play area.
A classroom needs a different priority from occasional living-room play. Frequent use favors reinforced stitching, removable or wipeable covers, and a stable base. Storage-conscious families may prefer a foldable pit and tunnel that can be aired out fully before being packed away. Playz's overview of an indoor play tent offers another way to think about compact indoor layouts.
Safety Standards and Hygiene That Protect Play
Many parents hesitate at the thought of shared balls, and that concern deserves a practical answer rather than a promise that the equipment is “germ-free.” A study of six ball pits used for children's physical therapy found 31 bacterial species and one yeast species, including organisms associated with skin, blood, urinary tract, and eye infections, as reported in this public-health review of ball pits. The reporting also described facilities that went days or weeks without cleaning.
The lesson isn't to eliminate sensory play. It's to treat cleaning, illness rules, supervision, and equipment inspection as part of the design.
Translate standards into purchasing questions
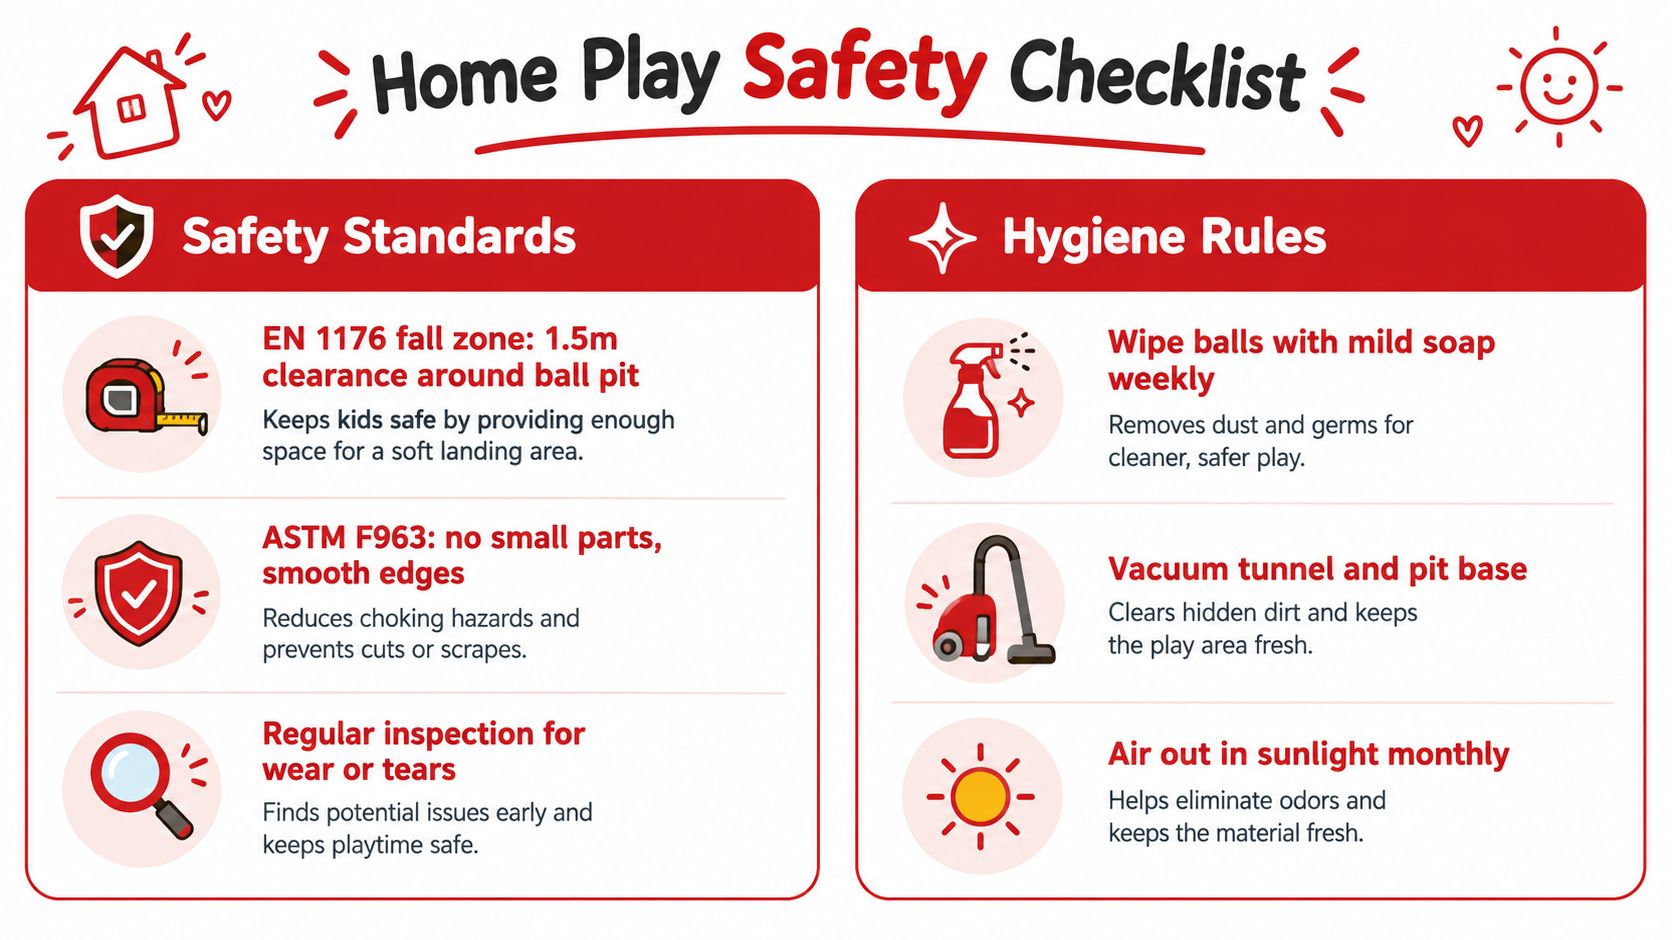
EN 1176-1 sets a maximum tunnel length of 10,000 mm. For an open-ended tunnel where the exit is always visible, the internal diameter should be at least 400 mm. If the tunnel is longer than 2 m or slopes above 15 degrees, guidance calls for an internal diameter greater than 750 mm, supporting easier access and reducing entrapment risk, as shown in the EN 1176-1 playground standard.pdf).
For home use, ask the seller whether the product is intended for the age group and environment you have. Look for smooth openings, secure attachments, intact padding, and no exposed structural elements. Indoor ball pits are treated as enclosed play structures, so inspection also covers containment walls, structural integrity, and padding. The loose balls fall under EN 71 toy-safety requirements involving durability, flammability, and toxicity, according to this indoor play inspection guidance.
Build a routine people can follow
- After each session: Remove visible debris, food, and damaged balls. Close the area if there's fecal, urine, or vomit contamination, then clean and disinfect it before reopening.
- Weekly: Wash balls and wipe tunnel surfaces with a product appropriate for the material. Follow the disinfectant label, rinse when required, and dry every component completely.
- Monthly: Inspect seams, zippers, fasteners, padding, and ventilation openings. Air the equipment out rather than packing damp fabric into storage.
For a more formal shared-space reference, consult this playground cleaning protocol for 2026. A home routine can be simpler, but it still needs a named person, a repeatable schedule, and a clear rule that children who are unwell don't use shared equipment. Playz also provides a discussion of 90% isopropyl alcohol, though caregivers should never apply a chemical without checking material compatibility and label directions.
Activity Ideas for Everyday Play Sessions
A strong play session doesn't need elaborate equipment. An adult can set one clear invitation, watch how the child responds, and change the challenge without rushing. The following activities fit naturally into a short afternoon routine and can be adapted for home or classroom use.
Five guided play moments
- Color hunt, toddlers. Provide a few containers and balls in different colors. Ask the child to carry or roll each ball from the pit to a matching container, naming the color as they go. The target skills are classification, vocabulary, reaching, and repeated movement.
- Peek-a-boo crawl, young toddlers and preschoolers. Sit near the tunnel exit and pause as the child approaches. Say their name, respond when they emerge, then invite them to wait while another child takes a turn. This rehearses anticipation, body control, confidence, and early turn-taking.
- Counting relay, older toddlers and preschoolers. Place a container outside the tunnel and ask the child to move balls one at a time from the pit through the tunnel. Keep the counting playful rather than testing. The activity links one-to-one movement with early numeracy and bilateral coordination.
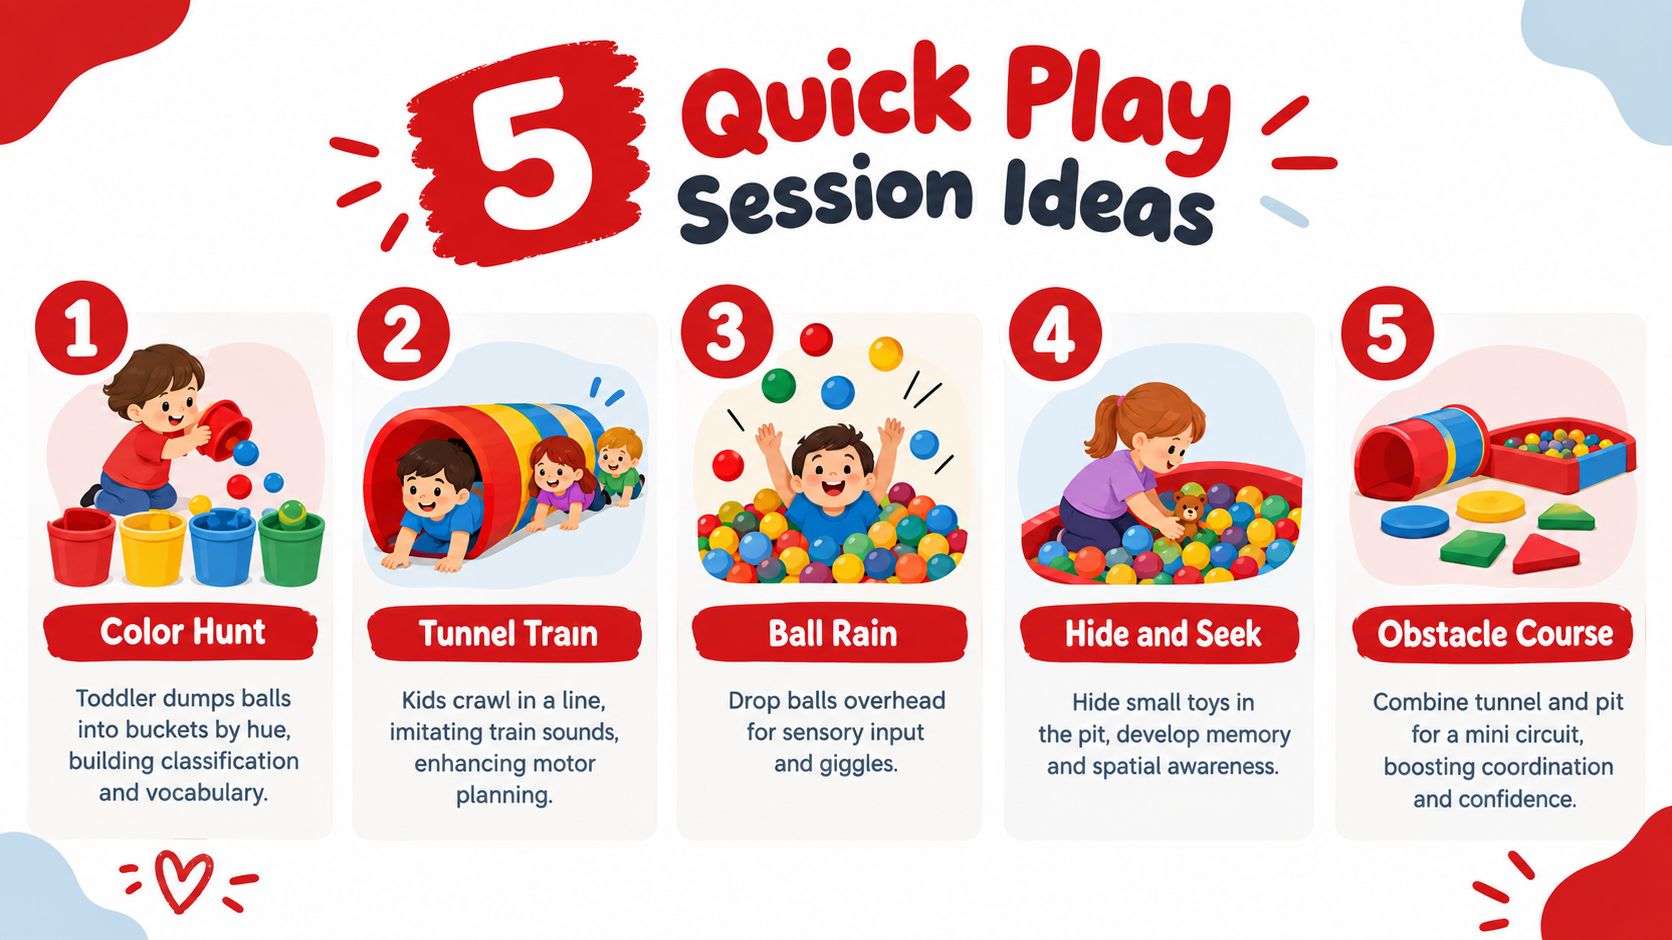
- Calm body route, children who need a quieter reset. Reduce noise, invite slow crawling, and let the child rub a ball gently against their arms or cheeks only if they choose. This can offer tactile and proprioceptive input, but stop if the child pulls away, becomes distressed, or shows discomfort.
- Ball arch challenge, preschoolers. Give two children a small set of balls and ask them to work out how to make an arch or pathway. The structure may collapse repeatedly, which creates opportunities for negotiation, spatial reasoning, and shared problem-solving.
Watch before adding rules. If a child keeps repeating one action, that repetition may be the learning. Add a new prompt only when the current play no longer holds their attention.
The tunnel can also become part of a larger movement circuit, with a soft stopping point, a carrying task, and a return route. For more variations, use these indoor obstacle course ideas.
Buying Versus DIY Setup Decisions
A commercial set and a homemade setup solve different problems. A finished product reduces design decisions and may include tested balls, reinforced tunnel stitching, assembly guidance, and warranty support. A DIY version can fit an awkward corner, a narrow classroom, or a room where standard dimensions waste space.
The hidden work in DIY is easy to underestimate. You may need pool-grade balls, anti-slip flooring, a stable frame, padding, washable covers, and a way to stop the tunnel from collapsing during active crawling. Material safety also requires research. A low starting spend doesn't automatically mean a lower total effort or a safer finished system.
| Factor | Commercial Set | DIY Build |
|---|---|---|
| Upfront cost | Usually higher at purchase, with components bundled together | May begin lower, but separate balls, flooring, padding, and framing add expense |
| Material safety | May include EN 71 or ASTM-tested balls and stated product guidance | The builder must verify every material and component |
| Assembly time | Designed for repeatable setup and storage | Requires measuring, cutting, fastening, and testing |
| Durability | Reinforced stitching, manufactured padding, and support policies may help | Depends on construction quality and how often children use it |
| Space customization | Limited to the supplied shapes and dimensions | Flexible for irregular rooms and unusual layouts |
Use the setting to make the decision
Families that need a ready-to-use setup within the same week and want documented safety information may prefer a commercial set. Educators or craft-minded parents with an irregular room, suitable tools, and time to test the structure may value DIY flexibility more.
A hybrid approach can work well. Buy balls from a source that provides clear safety information, then build a simple tunnel support only if you can create stable openings, protect edges, and maintain full visibility. Don't improvise a structure that traps a child or blocks an adult's access.
Playz offers tent, tunnel, and ball-pit sets in several configurations, including options described as having a crawl tunnel and a ball pit. Treat those sets as one commercial option among others, and compare their dimensions, included balls, material details, and care instructions with your actual room and age group.
Quick Action Plan for Parents and Educators
A reliable setup comes from making the decisions in the right order. Use this checklist before buying, assembling, or introducing a ball pit and tunnel.
- Confirm the footprint. Measure the clear floor area, the route around the equipment, and the space needed for an adult to reach the child. If you're considering a tunnel longer than 150 cm, measure ceiling height and nearby furniture clearance before ordering.
- Match balls and tunnel to age. Check the measured ball diameter rather than relying on product photographs. For children under three, confirm the product's age guidance and consider the Alberta Health Services recommendation for balls at least 70 mm in indoor play areas. Choose a shorter, visible tunnel for a new crawler and a more challenging route only when the child can manage it confidently.
- Verify safety information. For a commercial set, ask for EN 1176 or equivalent playground guidance where applicable, and check whether the balls meet relevant EN 71 toy-safety requirements. For a home product, inspect openings, seams, padding, fasteners, and ventilation before the first use.
- Choose the construction for your routine. Soft foam and fabric may suit gentle, occasional play. A frequently used classroom needs stronger stitching, washable surfaces, and a stable base. Inflatable equipment requires regular checks for air loss and punctures.
- Write down the cleaning schedule. Assign weekly ball and surface cleaning, immediate response to bodily-fluid contamination, and complete drying before storage. In a classroom, record which group used the equipment and when it was cleaned.
- Select three starter activities. Begin with a color hunt, a peek-a-boo crawl, and a counting relay, then observe which activity matches the child's interests. Add sensory or cooperative challenges only when the child appears comfortable.
- Inspect the system monthly. Check seams, zippers, tunnel attachments, ball condition, floor padding, and ventilation. Remove cracked or damaged balls and take the equipment out of use if the structure no longer holds its intended shape.
A well-chosen ball pit and tunnel becomes a durable living-room or classroom resource when caregivers match the design to the child, supervise the route, and maintain the materials consistently.
Playz offers tent, tunnel, and ball-pit play sets that bring crawling, active movement, and imaginative play into one setup. Visit Playz to compare play options and choose a configuration that fits your child's space, age, and everyday play routine.