

Are you ready to transform your kitchen into a bubbling laboratory of discovery? Science isn't just about textbooks and complicated formulas; it's about curiosity, exploration, and the thrill of seeing a reaction unfold before your very eyes. This guide is your ultimate resource, packed with ten of the most exciting and educational chemical reaction experiments for kids, specifically chosen to spark a lifelong passion for science.
We have curated these activities to be safe, easy to set up with common household items, and incredibly fun. Whether you are a parent looking for a screen-free weekend activity, an educator planning an unforgettable lesson, or a gift buyer seeking an engaging present, you are in the right place. Each experiment provides a hands-on opportunity to learn foundational scientific principles in a memorable way.
Inside, you will find a comprehensive roundup of fantastic projects, from classic baking soda volcano eruptions and gooey slime creation to mesmerizing crystal gardens and colorful density towers. These experiments are more than just about making a delightful mess (though that is certainly part of the fun!). They are about understanding the incredible science that happens all around us every single day. By observing these reactions, children learn about states of matter, acids and bases, and the fundamental properties of different substances.
This collection offers more than just instructions. We provide the "why" behind the "wow," explaining the science in simple terms to help foster genuine understanding. If you're looking for even more ways to engage young minds and explore scientific concepts, check out these 6 fun science activities for primary school kids. Let's dive in and start experimenting!
1. Volcano Eruption Experiment
The Volcano Eruption is a quintessential first step into the world of chemistry for young learners. This classic experiment showcases a visually dramatic acid-base reaction. When baking soda (a base, sodium bicarbonate) mixes with vinegar (an acid, acetic acid), they react to produce carbon dioxide gas. This gas rapidly expands, creating fizzy bubbles that erupt from the "volcano," mimicking a real volcanic eruption.
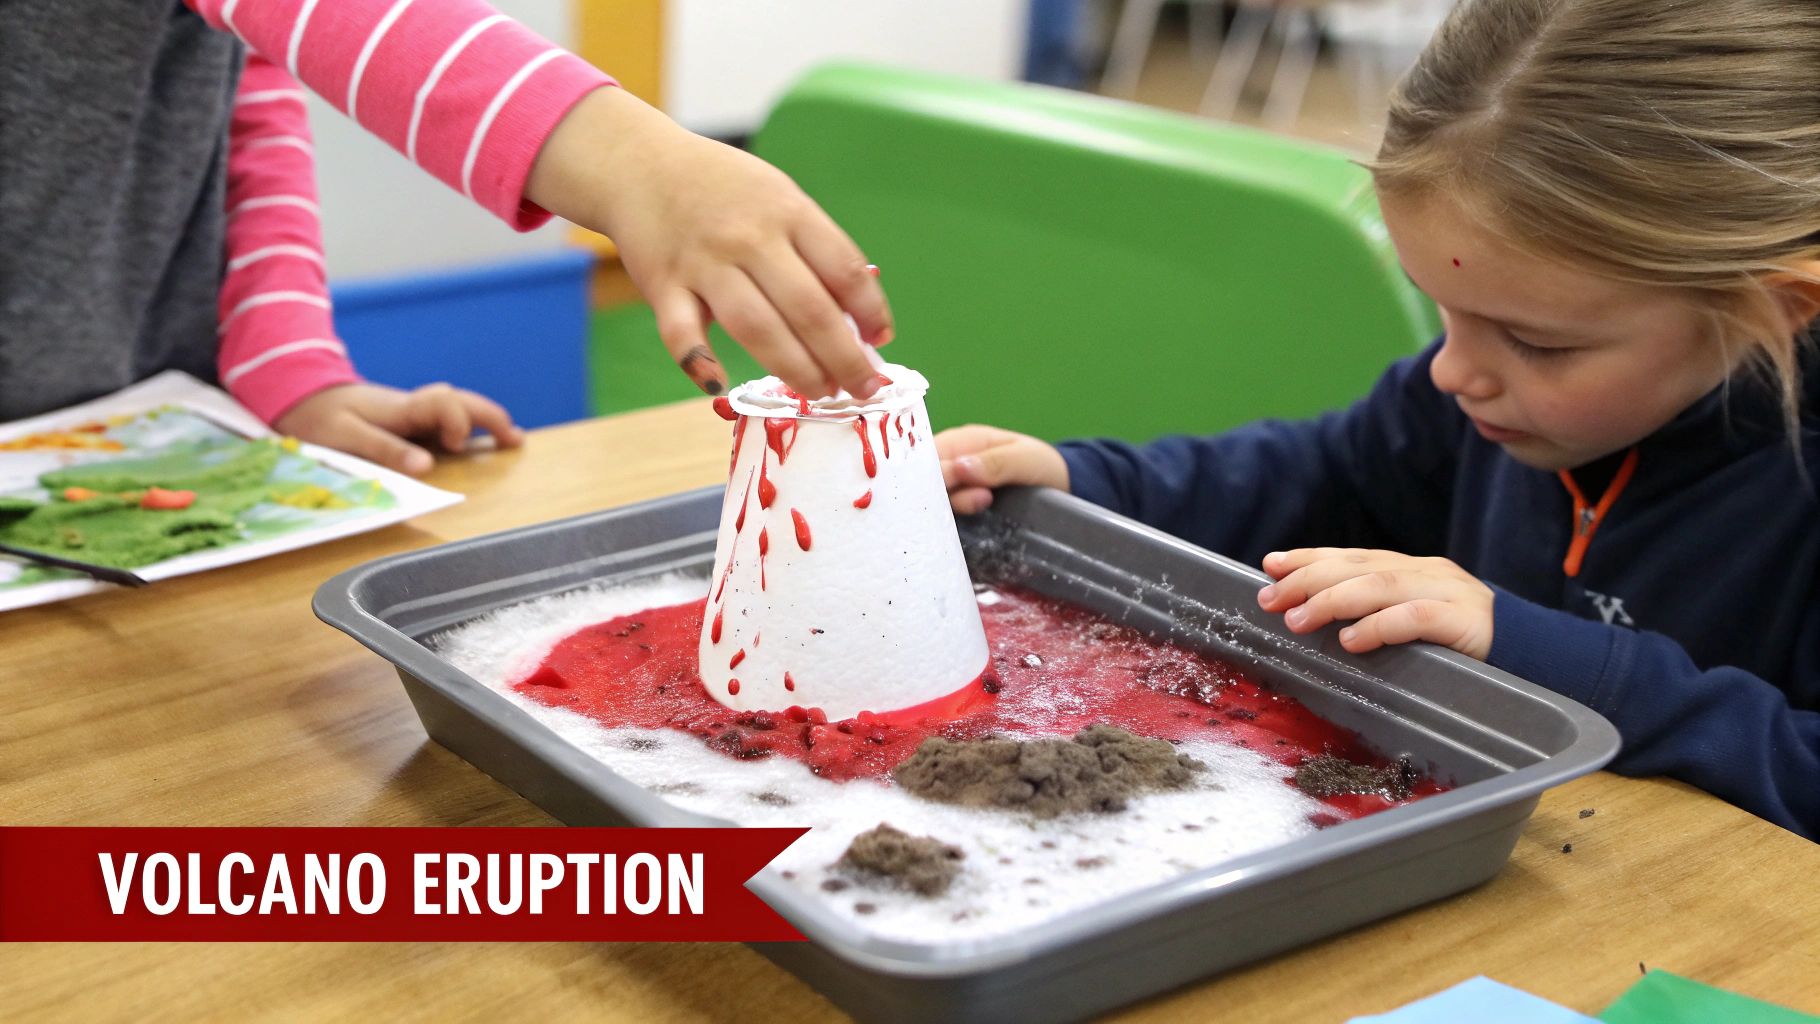
Its enduring popularity in school science fairs and educational programs worldwide speaks to its effectiveness. This experiment is a fantastic introduction to chemical reaction experiments for kids because it's safe, uses common household ingredients, and provides immediate, exciting results that spark curiosity.
How to Conduct the Experiment
- Build Your Volcano: Form a cone shape around a small plastic bottle or cup using modeling clay, play-dough, or even packed dirt outside. Place the entire structure inside a baking tray or plastic bin to contain the "lava" flow.
- Add Ingredients: Pour a few tablespoons of baking soda into the opening of the bottle. For a more dramatic effect, add a few drops of red or orange food coloring and a squirt of dish soap.
- Trigger the Eruption: Quickly pour about half a cup of vinegar into the volcano and watch the reaction begin! The mixture will fizz up and overflow, creating a colorful, bubbling eruption.
Tips for a Successful Reaction
To get the most out of this activity, encourage children to make predictions about what will happen when the vinegar is added. After the first eruption, try experimenting with different amounts of baking soda or vinegar to see how it changes the reaction's intensity. Conducting multiple trials helps reinforce the cause-and-effect relationship. For more ideas tailored to this age group, explore these 4th-grade science experiments. This experiment is perfect for demonstrating fundamental scientific principles like gas production and acid-base chemistry in a hands-on, memorable way.
2. Slime Creation Experiment
The Slime Creation Experiment has become a modern classic, captivating children with its gooey, tactile nature. This activity is a fantastic introduction to polymer chemistry. The reaction occurs when polyvinyl acetate, found in white school glue, cross-links with an activator like borate ions (from borax or contact lens solution). This process creates a polymer network, transforming the liquid glue into a semi-solid, non-Newtonian fluid.
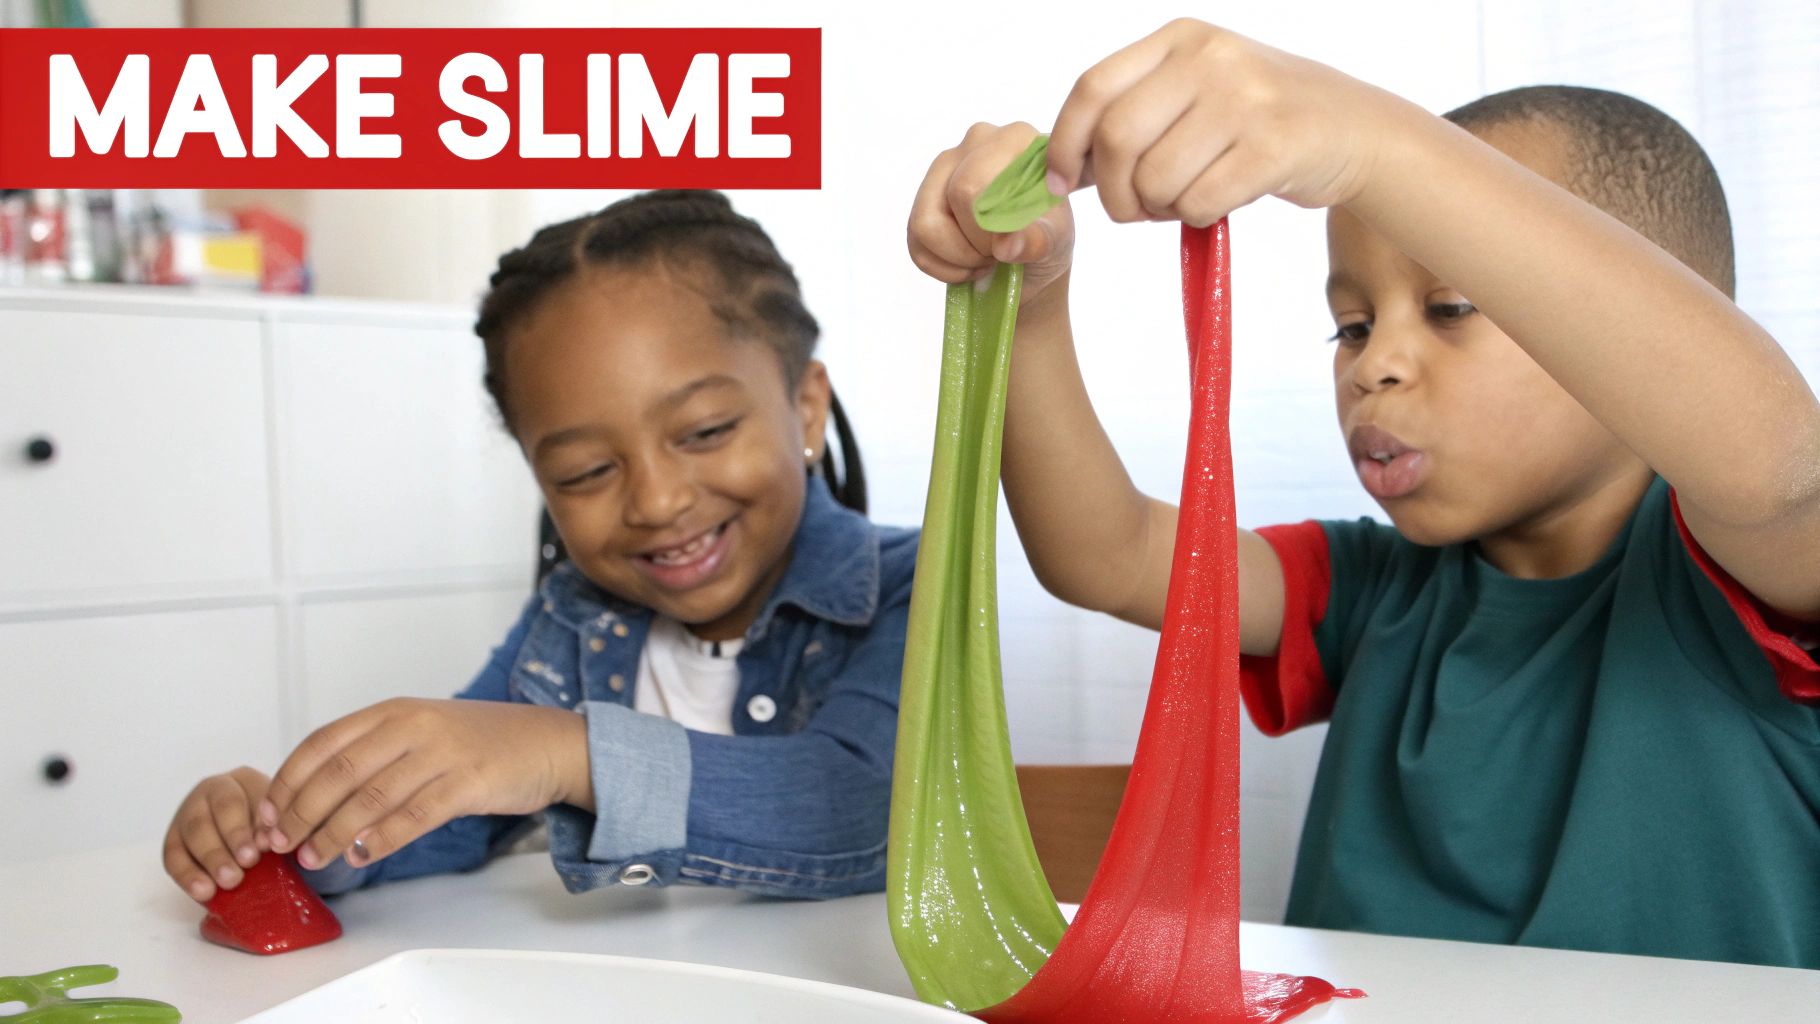
This experiment's immense popularity, seen in countless DIY videos on social media and the billions in annual retail sales of slime products, highlights its appeal. It's a standout among chemical reaction experiments for kids because it allows them to physically feel the results of a chemical change, exploring concepts like viscosity and states of matter in a memorable, hands-on way.
How to Conduct the Experiment
- Prepare Your Base: In a mixing bowl, combine about half a cup of clear or white school glue with half a cup of water. Stir until the mixture is completely smooth. This is the time to add a few drops of your desired food coloring, glitter, or foam beads.
- Create the Activator: In a separate cup, dissolve one teaspoon of borax in one cup of warm water (adult supervision required). A safer alternative is to use about one tablespoon of contact lens solution containing boric acid and sodium borate.
- Combine and Knead: Slowly pour the activator solution into the glue mixture while stirring continuously. You will see the slime start to form immediately. Once it pulls away from the sides of the bowl, take it out and knead it with your hands until it reaches the desired consistency.
Tips for a Successful Reaction
For the best results, add the activator slowly to control the slime's final texture; adding too much at once can make it stiff. Encourage children to describe how the texture changes as the ingredients combine. After playing, store the slime in an airtight container to prevent it from drying out. For an easier and more guided experience, you can explore various science kits for kids that often include slime-making activities. This experiment is perfect for demonstrating polymerization and the fascinating properties of non-Newtonian fluids.
3. Crystal Growing Experiment
The Crystal Growing Experiment offers a fascinating glimpse into the world of molecular geometry and physical chemistry. This activity demonstrates how a solid (like salt, sugar, or borax) can dissolve in a liquid to form a supersaturated solution. As the solution cools and the water evaporates, the dissolved particles come together in a highly organized, repeating pattern, forming beautiful, structured crystals.
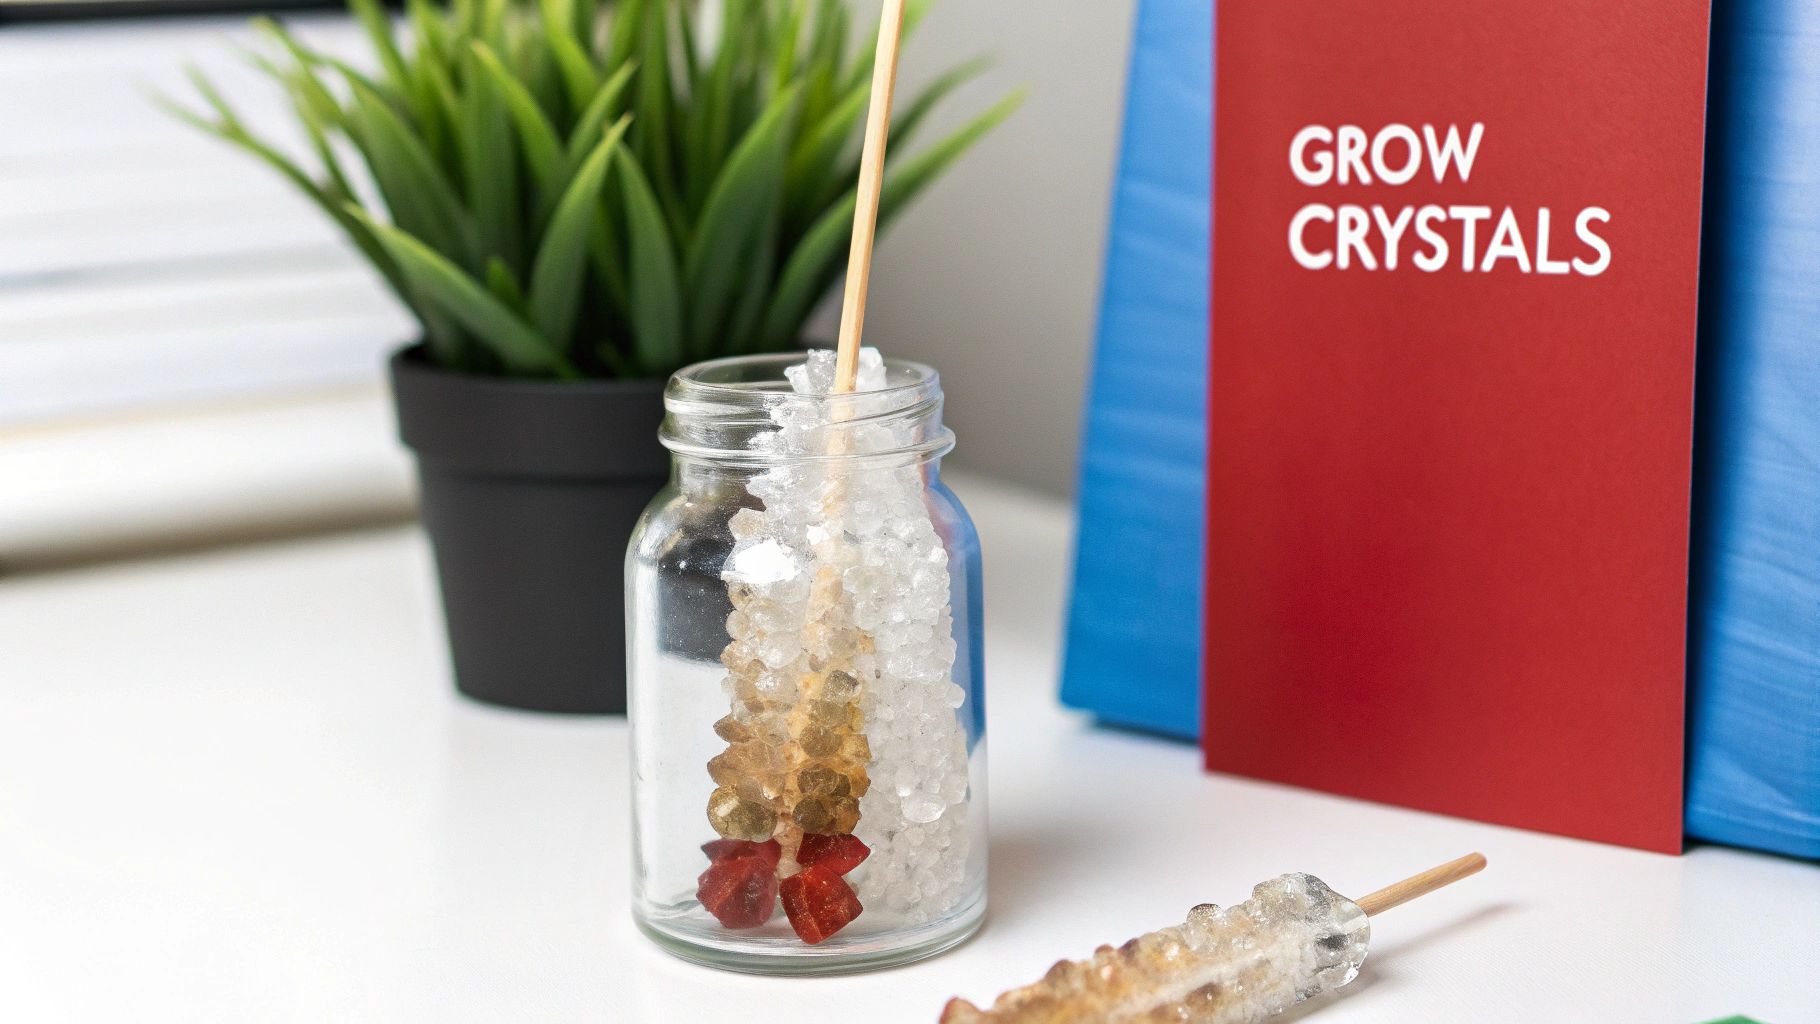
This experiment is a favorite in science fairs and is often featured in educational kits because it teaches patience and observation skills. Unlike explosive chemical reaction experiments for kids, this one unfolds over days, allowing children to witness a gradual but equally amazing transformation. It’s an excellent way to introduce concepts like solubility, saturation, and molecular structure.
How to Conduct the Experiment
- Create a Supersaturated Solution: With adult supervision, boil water and stir in a solute (like sugar, salt, or borax) one tablespoon at a time until no more will dissolve. This creates a supersaturated solution.
- Prepare the Seed: Tie a piece of yarn or string to the middle of a pencil or wooden skewer. The pencil will rest across the top of a clean glass jar, allowing the string to hang down into the center of the jar without touching the sides or bottom.
- Grow the Crystals: Carefully pour the hot, supersaturated solution into the jar. Rest the pencil across the jar's opening so the string is submerged. Place the jar in a location where it will not be disturbed and watch as crystals begin to form on the string over the next several days.
Tips for a Successful Reaction
To achieve the best crystal growth, use a clear jar to allow for easy observation from all angles. Encourage children to keep a daily log with drawings or photos to document the process. It's crucial to keep the solution in a stable environment with a consistent room temperature to promote large, well-defined crystals. This experiment is a wonderful project that combines chemistry with art, and it's a perfect example of a science fair project that yields a beautiful result.
4. Density Tower Experiment
The Density Tower is a visually stunning experiment that introduces children to the concept of density in a memorable way. While not a chemical reaction in the traditional sense, it’s a foundational physical chemistry demonstration that explores how different substances interact based on their molecular weight. Kids layer various household liquids to create a rainbow-like column, where each liquid finds its place based on its mass per unit of volume.
This experiment is a staple in science classrooms and museums because it makes an abstract concept like density tangible and easy to understand. By observing how honey sinks to the bottom and oil floats on top of water, children gain a powerful visual lesson in physical properties. It’s an excellent precursor to more complex chemical reaction experiments for kids, as it builds a solid understanding of how different substances behave when mixed.
How to Conduct the Experiment
- Gather Your Liquids: Collect a variety of liquids with different densities. Good choices include honey, corn syrup, dish soap, water (colored with food dye), vegetable oil, and rubbing alcohol (also colored).
- Layer Carefully: Start with the densest liquid first (honey) and pour it into the bottom of a tall, clear container like a vase or glass cylinder. Slowly and carefully add the next densest liquid (e.g., dish soap) by tilting the container and letting it run down the inside wall. This prevents the layers from mixing too much.
- Build the Tower: Continue adding liquids one by one in order of decreasing density: water, then oil, and finally rubbing alcohol on top. Watch as they settle into distinct, colorful layers.
Tips for a Successful Reaction
To enhance the learning, have children guess which liquid is the heaviest or lightest before you start. After the tower is complete, gently drop in small objects like a plastic bead, a grape, or a piece of foam to see where they settle, introducing the concept of buoyancy. Encourage kids to observe the tower over time, as some layers may slowly mix. Discuss why each liquid sits where it does, relating density to how "packed" the molecules are in each substance.
5. Elephant Toothpaste Experiment
The Elephant Toothpaste experiment is one of the most visually stunning chemical reaction experiments for kids, producing a massive, warm, foamy eruption. This experiment showcases a rapid decomposition reaction. When hydrogen peroxide breaks down, it separates into oxygen and water. Normally this process is slow, but a catalyst like yeast speeds it up dramatically. The addition of dish soap traps the quickly escaping oxygen gas in countless bubbles, creating the iconic "toothpaste" foam.
Its popularity in science museums, STEM outreach programs, and viral social media videos highlights its power to captivate an audience. This experiment is a fantastic demonstration of catalysts and exothermic reactions (reactions that release heat) because the foam produced is warm to the touch, providing a multi-sensory learning experience.
How to Conduct the Experiment
- Prepare the Catalyst: In a separate small cup, mix one tablespoon of dry yeast with three tablespoons of warm water. Stir for about 30 seconds until the yeast is mostly dissolved.
- Set Up the Reaction Vessel: Place a clean 16-ounce plastic soda bottle in a wash tub or on a tray with high sides to contain the foam. Add about half a cup of 3% hydrogen peroxide (the kind found in most first-aid kits) to the bottle.
- Add Soap and Color: Squirt a generous amount of dish soap into the bottle and add several drops of your favorite food coloring. Swirl the bottle gently to mix the contents.
- Start the Reaction: Use a funnel to quickly pour the yeast mixture into the bottle, then step back and watch the foamy eruption!
Tips for a Successful Reaction
For a truly dramatic effect, use a bottle with a narrow neck to force the foam out with more speed. Before starting, ask children to feel the outside of the bottle and then feel it again after the reaction to notice the heat produced. This is a messy experiment, so conducting it outdoors or in a bathtub is highly recommended. For more great hands-on activities, explore these other chemistry experiments for kids. This activity provides an unforgettable lesson on how catalysts can accelerate a chemical reaction.
6. Cabbage pH Indicator Experiment
The Cabbage pH Indicator experiment turns an ordinary kitchen vegetable into a magical color-changing potion, revealing the hidden chemistry of everyday substances. Red cabbage contains a pigment called anthocyanin, which changes color when it comes into contact with acids or bases. By boiling the cabbage, this pigment is extracted into the water, creating a natural pH indicator solution.
This experiment is a favorite in elementary school science and homeschooling because it transforms an abstract concept like pH into a vibrant, hands-on visual lesson. It's one of the most colorful and safe chemical reaction experiments for kids, allowing them to test the acidity and alkalinity of common household items like lemon juice and soapy water, making complex chemistry accessible and fun.
How to Conduct the Experiment
- Create the Indicator: Chop a few red cabbage leaves and place them in a pot with about two cups of water. With adult supervision, bring the water to a boil, then reduce the heat and simmer for 10-15 minutes until the water is a deep purple color. Let it cool, then strain out the leaves.
- Prepare Your Test Samples: Line up several clear cups or jars. In each one, place a small amount of a different household substance. Good choices include lemon juice, vinegar, baking soda mixed with water, and soapy water.
- Test and Observe: Carefully pour a small amount of the purple cabbage indicator into each cup. Watch as the color instantly changes! Acidic substances will turn it pink or red, while basic (alkaline) substances will turn it blue, green, or even yellow.
Tips for a Successful Reaction
To get the most out of this activity, have children predict what color each substance will produce before adding the indicator. You can create a pH rainbow by arranging the cups in order from most acidic to most basic. Encourage kids to draw or document their results, creating their own pH color chart. For a more structured activity, consider using a science kit like those found in these chemistry experiments for kids, which often include droppers and test tubes for a more lab-like feel. This experiment beautifully demonstrates how chemical indicators work and introduces the fundamental concept of the pH scale.
7. Invisible Ink Messages Experiment
The Invisible Ink Messages experiment merges the thrill of espionage with the fundamentals of chemistry, making it a captivating activity for curious minds. This experiment demonstrates oxidation, a chemical reaction that occurs when a substance is exposed to heat or another chemical. In this case, lemon juice (a weak acid) weakens the paper's fibers. When heated, the lemon juice oxidizes and turns brown much faster than the surrounding paper, revealing the secret message.
This experiment is a favorite in creative learning and STEM programs because it connects scientific principles to history and storytelling, recalling the use of invisible ink for espionage. It stands out among chemical reaction experiments for kids by offering a blend of art, science, and imaginative play, proving that chemistry can be both educational and mysterious.
How to Conduct the Experiment
- Write Your Secret Message: Squeeze the juice from a lemon into a small bowl. Dip a cotton swab or small paintbrush into the lemon juice and use it to write a message on a piece of white paper.
- Let It Dry: Allow the paper to dry completely. As it dries, the message will become invisible to the naked eye.
- Reveal the Secret: With adult supervision, carefully hold the paper near a heat source like a warm light bulb or a hairdryer on a low setting. The heat will cause the dried lemon juice to oxidize and turn brown, revealing the hidden words.
Tips for a Successful Reaction
To get the most out of this spy-themed activity, encourage children to write coded messages to a friend or family member. A modern, heat-free alternative for revealing the message is to use a UV flashlight, which will cause the dried lemon juice to glow. This method is exceptionally safe and adds a high-tech twist. Combining this experiment with a history lesson on spies or a creative storytelling session can deepen the educational impact and make the science behind the reaction even more memorable.
8. Oobleck (Cornstarch Slime) Experiment
The Oobleck experiment introduces children to the fascinating world of non-Newtonian fluids. This simple yet mind-bending mixture of cornstarch and water creates a substance that defies easy categorization. When pressure is applied, like squeezing it or tapping it quickly, the oobleck acts like a solid. When the pressure is released, it flows and drips like a liquid, demonstrating the principles of viscosity and molecular physics in a very tangible way.
Named after the gooey substance from Dr. Seuss's book Bartholomew and the Oobleck, this activity is a staple in early childhood education and sensory play. It's an exceptional entry point into chemical reaction experiments for kids because it requires just two ingredients, is completely taste-safe, and provides a powerful, hands-on lesson about the states of matter that they can literally feel.
How to Conduct the Experiment
- Prepare Your Mixture: In a large bowl or shallow bin, combine approximately two parts cornstarch with one part water. You can start with one cup of cornstarch and slowly add half a cup of water while mixing with your hands.
- Add Color (Optional): For a more vibrant experience, add a few drops of food coloring to the water before you mix it with the cornstarch. This helps distribute the color evenly.
- Explore the Properties: Encourage kids to experiment with the oobleck. Have them try to punch it quickly, then slowly sink their fingers into it. See if they can roll it into a ball and then watch it melt back into a puddle in their open palm.
Tips for a Successful Reaction
To maximize the fun and learning, challenge children to describe what they are feeling. Ask questions like, "What happens when you squeeze it hard?" or "How does it feel when you let it rest?" This encourages scientific observation and vocabulary development. Cleanup can be messy, so be prepared with access to water; oobleck rinses away easily but should be disposed of in the trash, not down the drain, to avoid clogs. This memorable experiment perfectly illustrates how materials can have surprising properties under different conditions.
9. Chromatography Paper Separation Experiment
The Chromatography Paper Separation experiment is a beautiful and artistic way to explore the science of mixtures. This activity reveals that many of the colors we see in everyday markers are actually combinations of different pigments. As water travels up a strip of paper through capillary action, it carries the marker ink with it. Because different color dyes have different properties, like size and solubility, they travel at different speeds, separating into their component colors.
This experiment is a staple in STEM programs because it introduces a fundamental technique used in analytical chemistry in a simple, visual, and engaging way. It's one of the most accessible chemical reaction experiments for kids, transforming a simple piece of paper into a vibrant spectrum of colors while teaching about separation science. The stunning, almost magical results make it a memorable learning experience.
How to Conduct the Experiment
- Prepare Your Strips: Cut a coffee filter or a piece of paper towel into long rectangular strips, about 2 inches wide and 6 inches long. Using a washable black or brown marker, draw a thick horizontal line about an inch from the bottom of each strip.
- Set Up the Solvent: Pour about half an inch of water into a tall glass or jar. The water level should be low enough that it will not touch the marker line directly when the paper is placed inside.
- Start the Separation: Fold the top of the paper strip over a pencil or stick and rest it across the rim of the glass. The bottom edge of the paper should just touch the water, allowing it to slowly absorb up the strip.
- Observe the Results: Watch as the water travels up the paper, carrying the ink with it. Within minutes, you will see the original line separate into a beautiful array of different colors like blue, pink, and yellow.
Tips for a Successful Reaction
For the best results, use non-permanent, water-soluble markers, as permanent markers will not separate with water. Encourage children to predict which colors are hidden inside the black ink before starting. You can turn this into a comparative study by testing different brands or colors of markers, labeling each strip accordingly. Experiment with different solvents like rubbing alcohol or salt water (with adult supervision) to see how the results change. To expand on this activity, check out other hands-on science activities that bring scientific principles to life.
10. Mentos and Diet Soda Geyser Experiment
The Mentos and Diet Soda Geyser is an explosive and highly memorable experiment that perfectly demonstrates physical chemistry in action. This isn't a traditional chemical reaction but rather a dramatic physical one. When Mentos candies are dropped into a bottle of carbonated diet soda, the soda erupts in a powerful geyser that can shoot several feet into the air. The magic happens at a microscopic level on the candy's surface.
This experiment has become a viral sensation on platforms like YouTube and is a staple at STEM events, proving its incredible ability to engage and excite. It’s an ideal outdoor activity for demonstrating concepts like nucleation, gas pressure, and surface tension. The rapid, impressive results make it one of the most exciting chemical reaction experiments for kids, guaranteed to leave a lasting impression.
How to Conduct the Experiment
- Set the Stage: Go outdoors to an open area, like a lawn or driveway, where you have plenty of space. Place a 2-liter bottle of diet soda on a flat, stable surface.
- Prepare the Mentos: Open a roll of Mentos mints. You will want to drop about 7-10 candies into the bottle all at once for the best effect. You can roll them in a piece of paper to create a simple tube for quick deployment.
- Trigger the Geyser: Unscrew the soda bottle cap. Position your Mentos tube directly over the opening and release the candies, then quickly step back several feet. Watch as a massive geyser of foam erupts instantly from the bottle!
Tips for a Successful Reaction
For the most spectacular geyser, use a fresh, unopened bottle of diet soda, as it contains the most dissolved carbon dioxide. Chilling the soda beforehand can also improve the gas content. Before starting, have kids predict how high the geyser will go. Afterward, discuss the science: the thousands of tiny pits on the Mentos' surface (nucleation sites) allow the carbon dioxide gas bubbles to form incredibly fast, creating the pressure that forces the soda out. Always stand back immediately after dropping the candies and wear old clothes, as the soda splash zone is large.
Comparison of 10 Kids Chemical Experiments
| Experiment | 🔄 Complexity | ⚡ Resources | 📊 Expected outcomes | 💡 Ideal use cases | ⭐ Key advantages |
|---|---|---|---|---|---|
| Volcano Eruption Experiment | 🔄 Low — simple mix and pour | ⚡ Very low — baking soda, vinegar, food coloring, tray | 📊 Immediate, dramatic fizzing overflow (short duration) | 💡 Introductory demos, classroom engagement, birthday STEM | ⭐⭐⭐⭐ Highly engaging, very affordable, teaches acid‑base reactions |
| Slime Creation Experiment | 🔄 Medium — mixing & correct activator ratios | ⚡ Low–medium — glue, borax/contact solution, add‑ins, storage | 📊 Reusable tactile material, long play value, shows polymer behavior | 💡 Sensory play, extended workshops, creative labs | ⭐⭐⭐⭐ Long‑lasting play, creative customization, teaches polymers |
| Crystal Growing Experiment | 🔄 Low prep / high patience — multi‑day growth | ⚡ Low — salt/sugar/borax/alum, jars, hot water, time | 📊 Visible crystal formation over days; decorative keepsakes | 💡 Science fair projects, observation/journaling activities | ⭐⭐⭐⭐ Teaches crystallization, produces keepsakes, low cost |
| Density Tower Experiment | 🔄 Low — careful layering required | ⚡ Low — common liquids (honey, oil, soap, water), clear container | 📊 Immediate colorful layered display demonstrating density | 💡 Visual demos, museum displays, classroom concept intro | ⭐⭐⭐⭐ Visually striking, reusable, clearly demonstrates density |
| Elephant Toothpaste Experiment | 🔄 Medium–High — safety precautions & catalyst timing | ⚡ Medium — hydrogen peroxide (6–12%), yeast, soap, outdoor containment | 📊 Very rapid copious foaming; exothermic reaction, dramatic effect | 💡 Large‑group demos, outreach events, high‑impact shows | ⭐⭐⭐⭐⭐ Spectacular WOW factor, teaches catalysts and exothermic reactions |
| Cabbage pH Indicator Experiment | 🔄 Medium — involves boiling and straining | ⚡ Low — red cabbage, water, cups, heat source | 📊 Color changes reveal acidity/basicity; reusable indicator | 💡 Curriculum labs, comparative testing, inquiry activities | ⭐⭐⭐⭐ Natural, colorful pH demonstration; multiple tests possible |
| Invisible Ink Messages Experiment | 🔄 Low — simple application and reveal methods | ⚡ Very low — lemon/milk, paper, heat or iodine/UV for reveal | 📊 Hidden messages revealed; demonstrates oxidation/heat effects | 💡 Creative storytelling, history lessons, spy‑themed activities | ⭐⭐⭐ Fun, low‑cost, repeatable; blends science with creativity |
| Oobleck (Cornstarch Slime) Experiment | 🔄 Low — mix cornstarch and water to texture | ⚡ Very low — cornstarch, water, optional coloring, large tub | 📊 Immediate non‑Newtonian behavior; tactile sensory play | 💡 Preschool sensory stations, messy play groups, kinesthetic lessons | ⭐⭐⭐⭐ Safe, edible ingredients, excellent for group sensory exploration |
| Chromatography Paper Separation | 🔄 Low — simple setup, controlled solvent rise | ⚡ Very low — markers, paper filters/coffee filters, cups, water | 📊 Rapid color separations; artistic and analytical results | 💡 Art‑science integration, middle school chemistry, quick labs | ⭐⭐⭐⭐ Quick, visual, teaches separation and capillary action |
| Mentos and Diet Soda Geyser Experiment | 🔄 Low — simple drop action but requires outdoor setup | ⚡ Low — 2L diet soda, Mentos, outdoor space, cleanup supplies | 📊 Immediate explosive geyser outdoors; high visual impact | 💡 Outdoor demonstrations, spectacle events, hypothesis testing | ⭐⭐⭐⭐ Dramatic nucleation demo; very memorable but messy |
Your Next Great Discovery Is Just One Experiment Away
We've journeyed through bubbling volcano eruptions, slimy creations, and towers of rainbow-colored liquids. From the simple acid-base reaction of baking soda and vinegar to the complex non-Newtonian properties of oobleck, each experiment on this list offers a unique window into the fascinating world of chemistry. You’ve seen how common household items can transform into tools for incredible scientific discovery, proving that you don’t need a high-tech laboratory to ignite a child's passion for learning.
These activities are far more than just fun ways to spend an afternoon. They are carefully designed launchpads for critical thinking and scientific inquiry. By engaging in these chemical reaction experiments for kids, young learners develop essential skills like observation, prediction, measurement, and problem-solving. They learn to ask insightful questions, formulate hypotheses, and test their ideas in a hands-on, tangible way.
From Kitchen Science to Lifelong Curiosity
The most significant takeaway from these experiments isn't just understanding what an endothermic reaction is or how polymers work. The real magic lies in fostering an enduring sense of wonder. When a child sees cabbage juice change color or creates their own "elephant toothpaste," they learn a powerful lesson: the world is full of amazing phenomena waiting to be understood.
This newfound curiosity is the cornerstone of a scientific mindset. It encourages children to look at everyday occurrences, from baking a cake to watching rust form, and ask "Why?" and "How?" This inquisitiveness is the driving force behind all great scientific advancements. By nurturing this spirit, you are equipping them with the tools to become lifelong learners and innovators. These simple experiments are often a child's first step towards a lifelong journey in science and discovery. For those interested in understanding the broader landscape and future career paths, you can delve deeper into a comprehensive guide to explore various STEM opportunities.
Actionable Steps to Continue the Adventure
Your role as a guide on this scientific journey is crucial. The end of one experiment should always be the beginning of another question. Here’s how you can keep the momentum going:
- Encourage Variations: After completing an experiment like the crystal growing activity, ask leading questions. "What do you think would happen if we used salt instead of sugar?" or "Would the crystals grow faster in a warmer spot?"
- Keep a Science Journal: Have your child draw or write about their observations. This practice reinforces learning, hones their communication skills, and creates a wonderful record of their scientific explorations.
- Connect to the Real World: When you see a geyser in a movie, connect it back to the Mentos and Diet Soda experiment. When you use a cleaning product with vinegar, remind them of its acidic properties from the volcano experiment. Making these connections helps solidify their understanding.
The true value of these chemical reaction experiments for kids is not just in the "wow" moment of the reaction itself, but in the lasting impact they have on a child's confidence and intellectual development. You are not just teaching chemistry; you are teaching them how to explore, discover, and confidently navigate the world around them. Every fizz, bubble, and color change is a small step toward a future filled with possibility. So, keep experimenting, keep questioning, and never stop discovering together.
Ready to take the next step in your scientific adventure? Playz offers a wide range of award-winning science kits that provide all the materials and step-by-step instructions needed for even more exciting and educational experiments. Explore our collection at Playz and continue making learning an unforgettable, hands-on journey.