

Ready to turn your kitchen into a science lab? Forget boring textbooks and passive screen time. The world of chemistry is bursting with fizzing, bubbling, and color-changing wonders just waiting to be discovered, and you don’t need a high-tech laboratory to explore them. This guide provides 10 hands-on chemistry experiments for kids that are not only incredibly fun but also packed with powerful learning moments. Each activity uses common household items to demonstrate fundamental scientific principles in a way that is both safe and exciting.
We'll walk you through each experiment step-by-step, from creating a classic volcano eruption to making gooey, non-Newtonian Oobleck. More importantly, we explain the 'why' behind the 'wow,' connecting the spectacular results to real-world chemistry concepts like acid-base reactions, polymer science, and density. These activities are designed to foster curiosity, build critical thinking skills, and show just how exciting science can be.
To further cultivate a comprehensive scientific interest, exploring a variety of educational tools can be highly effective. A well-rounded approach might complement these hands-on activities with other engaging resources. For parents seeking to broaden their child's scientific horizons, a helpful guide to learning STEM toys can offer valuable insights into choosing tools that spark long-term passion and understanding. Let's start exploring the building blocks of our world, one amazing reaction at a time.
1. Volcano Eruption: An Introduction to Acid-Base Reactions
The classic volcano eruption is one of the most iconic and visually exciting chemistry experiments for kids. It provides a foundational understanding of acid-base reactions in a safe and memorable way. The experiment involves mixing a common household acid, like vinegar (acetic acid), with a base, baking soda (sodium bicarbonate). This reaction rapidly produces carbon dioxide gas, which bubbles up and creates the "lava" eruption.
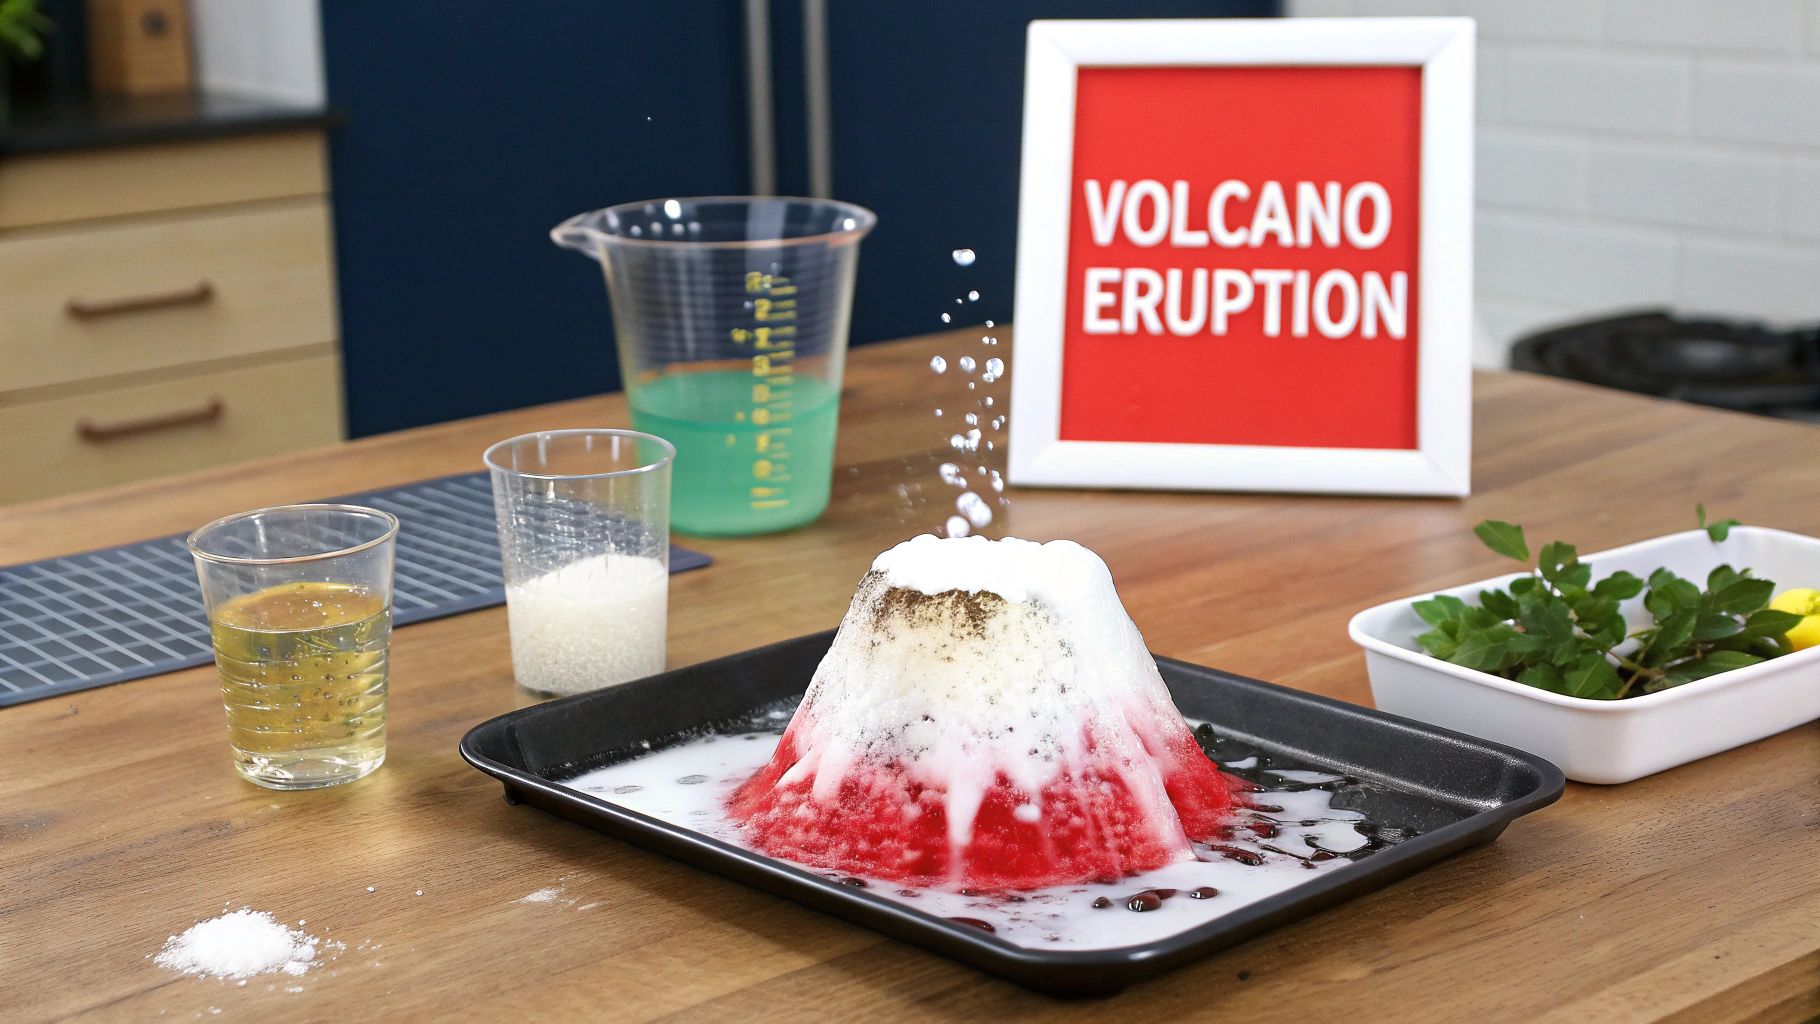
This hands-on activity is a staple in elementary science fairs and home education programs for good reason. It’s simple to set up, uses readily available materials, and offers immediate, dramatic results that capture a child's imagination. The fizzing and bubbling powerfully illustrate the concept of gas production and chemical change, a real-world example of chemistry in action.
Actionable Insights for the Best Eruption
To maximize the educational and entertainment value, consider these practical tips:
- Build Your Volcano: Shape a volcano cone around a small bottle or container using clay, play-doh, or even dirt outside. This adds a creative element and contains the reaction.
- Enhance the Lava: Add a few drops of red or orange food coloring to the vinegar for a more realistic lava flow. A squirt of dish soap will also trap the gas bubbles, creating a thicker, foamier eruption that lasts longer.
- Contain the Mess: Always place your volcano model on a baking sheet or a large tray. This makes cleanup significantly easier and keeps the "lava" from spreading across your workspace.
By turning a simple reaction into a volcanic spectacle, you make abstract concepts like acids, bases, and chemical reactions tangible and unforgettable. It's a perfect gateway experiment to spark a lifelong interest in science.
2. Crystal Growing: Exploring Supersaturation
Growing crystals at home is a fascinating chemistry experiment for kids that beautifully illustrates the scientific principles of solubility and supersaturation. The process involves dissolving a solid like sugar, salt, or borax into hot water to create a supersaturated solution. As this solution cools and the water evaporates, the dissolved particles come together and form ordered, repeating structures known as crystals.
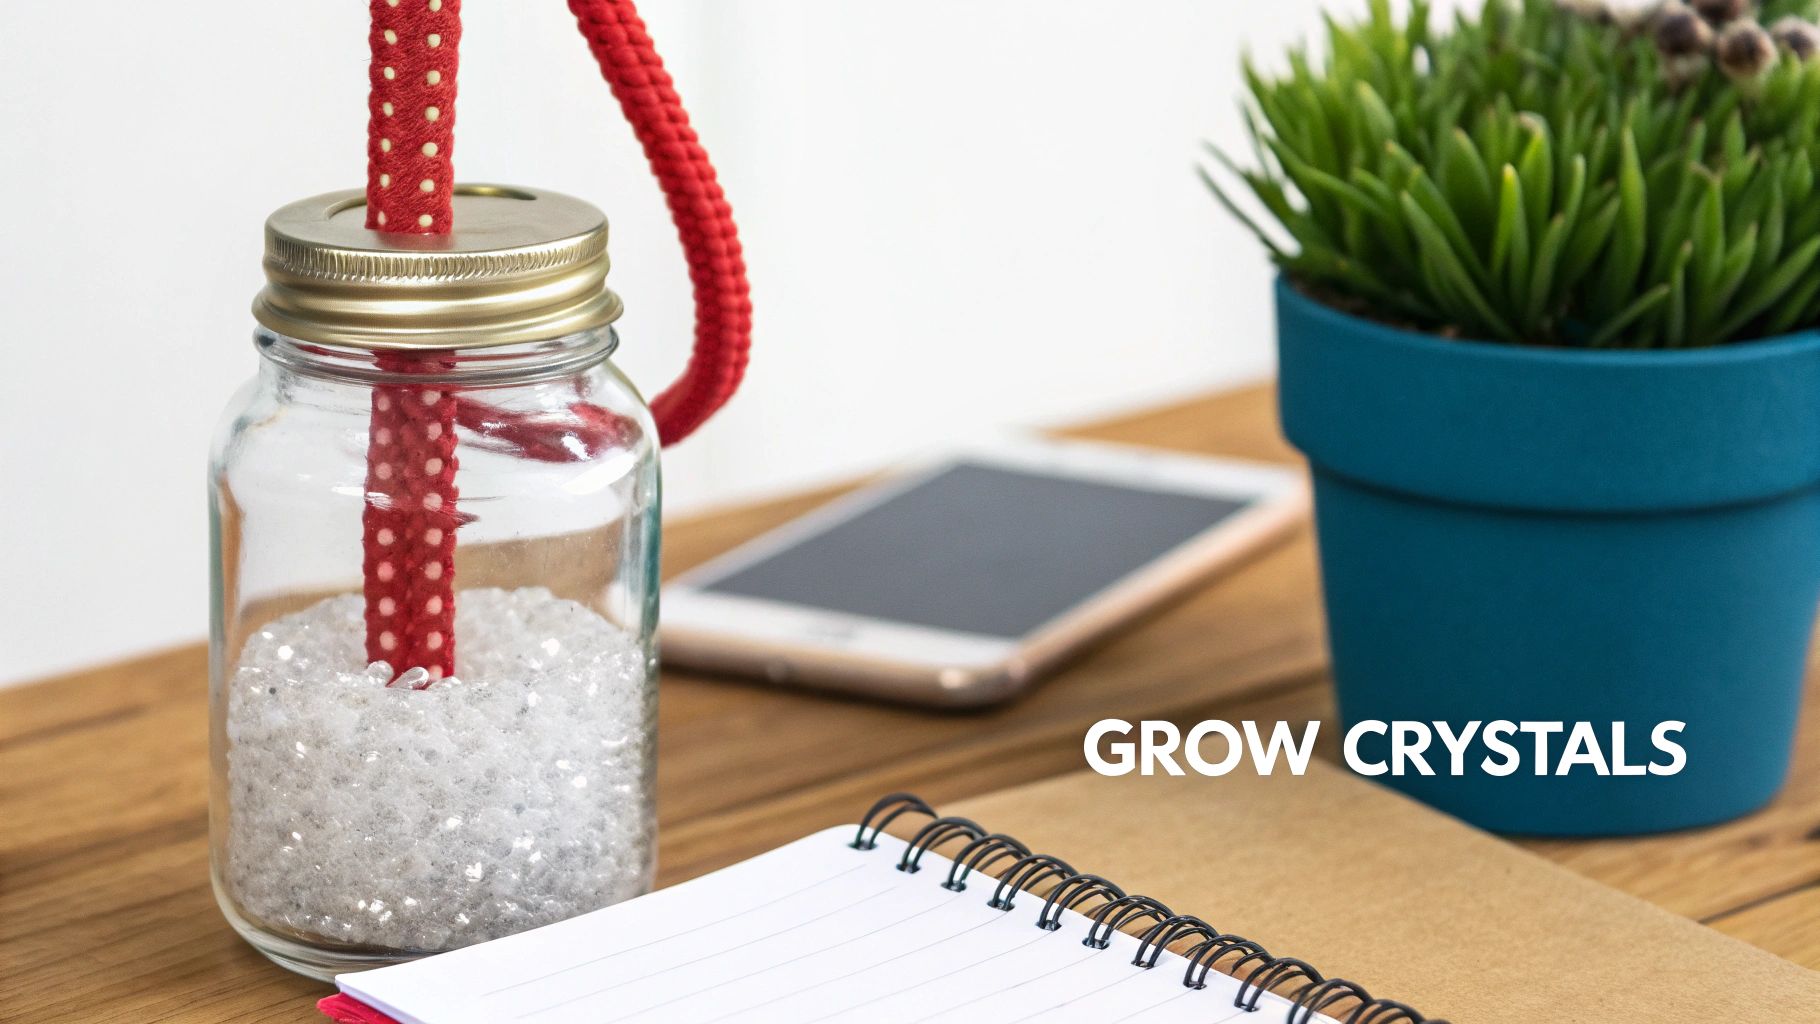
This experiment is a wonderful lesson in patience, as crystals form over several days. It provides a tangible outcome that children can hold and examine, making abstract concepts like molecular structure and lattice patterns much more concrete. For example, the hexagonal shape of a snowflake is a real-world example of crystallization.
Actionable Insights for Growing the Best Crystals
For stunning results that highlight the science, follow these practical tips:
- Provide a Foundation: Dangle a textured string or pipe cleaner into the solution. These objects provide "nucleation sites," which are surfaces where the crystals can easily begin to form and grow.
- Add Some Color: Mix a few drops of food coloring into your supersaturated solution. This will be incorporated into the crystal lattice as it forms, resulting in brilliantly colored gems.
- Create a Stable Environment: Place your crystal-growing container in a spot where it won't be disturbed and where the temperature is consistent. Sudden temperature changes or vibrations can disrupt the crystallization process. For more detailed instructions, you can explore a step-by-step crystal growing guide.
By transforming simple kitchen ingredients into beautiful geometric structures, this experiment demystifies the process of crystallization and offers a visually stunning introduction to molecular science.
3. Slime Production: A Fun Look at Polymer Science
Creating slime is a massively popular activity that doubles as one of the most compelling chemistry experiments for kids. It introduces the fascinating world of polymer science by showing how simple ingredients can link together to form a new substance with unique properties. The experiment involves mixing a polymer base, typically PVA glue, with an activator like a borax or contact lens solution. This activator causes the long polymer chains in the glue to cross-link, transforming the liquid into a stretchy, gooey, non-Newtonian fluid.
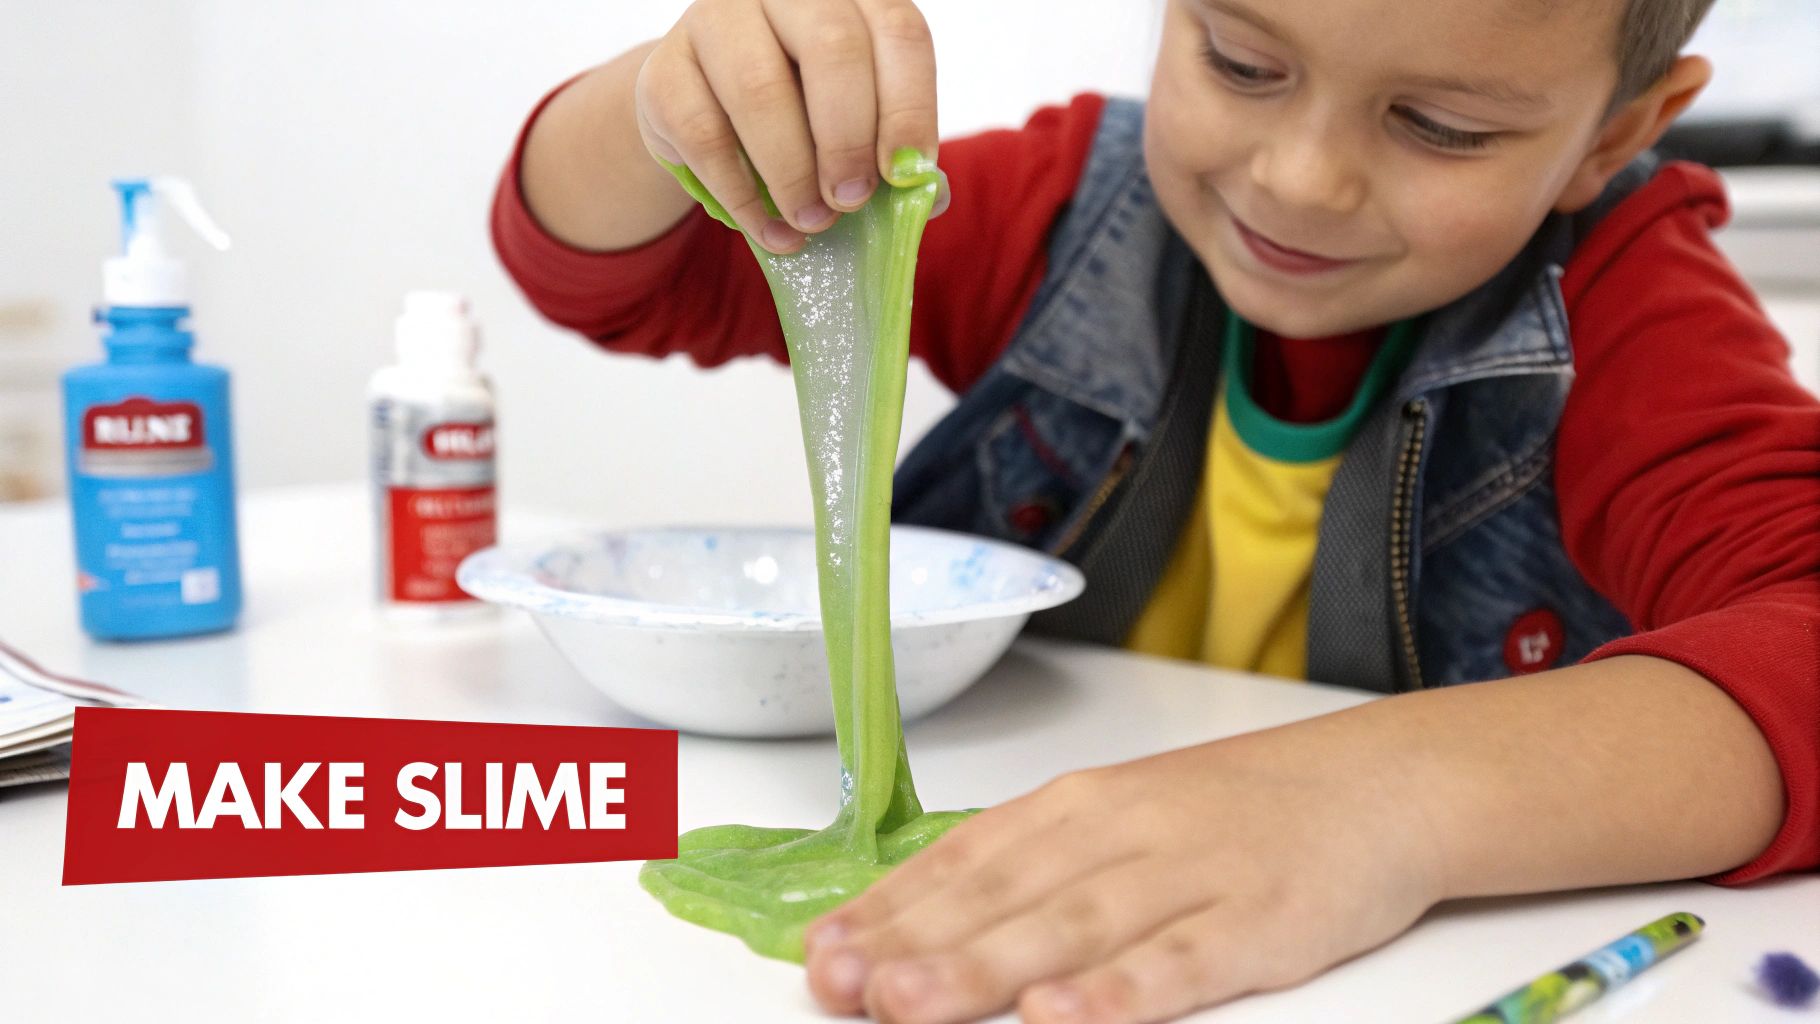
This hands-on experiment is a favorite in school STEM clubs and a viral trend online for good reason. It provides a tactile, sensory experience that makes abstract concepts like polymerization and viscosity tangible and fun. Kids don't just learn about polymers; they get to feel and manipulate them, observing firsthand how the slime can act like both a solid and a liquid. You can explore this concept further with a specialized kit, such as this Unicorn Slime Crystals Science Kit from playzusa.com.
Actionable Insights for Making the Best Slime
To create a safe, educational, and fun slime-making experience, follow these practical tips:
- Choose a Safe Activator: For younger children, using a contact lens solution that contains boric acid and baking soda is a gentler alternative to a borax solution. This ensures a safer handling experience.
- Enhance the Sensory Fun: Mix in glitter, small beads, or foam pieces to add different textures and visual appeal. This enhances the sensory play aspect and encourages creative experimentation.
- Encourage Scientific Inquiry: Challenge kids to experiment by slightly changing the ratios of glue, water, and activator. Discuss how these changes affect the slime’s stretchiness or firmness, turning playtime into a true scientific investigation.
4. Elephant Toothpaste: Witnessing Catalytic Decomposition
The Elephant Toothpaste experiment is a showstopper, creating a massive, fast-rising column of foam that mesmerizes kids and adults alike. It’s a fantastic demonstration of a decomposition reaction accelerated by a catalyst. The experiment involves breaking down hydrogen peroxide into water and oxygen gas. The addition of a catalyst, like yeast, speeds up this process dramatically, and dish soap traps the released oxygen, creating an impressive eruption of foam.
This visually spectacular reaction is a popular feature in science museum shows and on educational channels because it clearly illustrates several key concepts. It’s a safe yet dramatic way to teach about catalysts, exothermic reactions (the reaction releases heat), and the rapid production of gas. It makes abstract chemical principles visible and exciting. To learn more about this and other exciting chemistry experiments for kids at home, you can explore additional resources on playzusa.com.
Actionable Insights for the Best Reaction
For a truly impressive and safe foam-splosion, follow these specific tips:
- Use the Right Peroxide: Standard 3% hydrogen peroxide from a drugstore will create a slow, oozing foam. For a much more dramatic and rapid eruption, use 6% (20-volume) hydrogen peroxide, available at beauty supply stores. Adult supervision is required for this stronger concentration.
- Enhance the Foam: Add a generous squirt of dish soap and a few drops of food coloring to your hydrogen peroxide before adding the catalyst. This not only colors the "toothpaste" but also creates a richer, more stable foam structure.
- Activate Your Yeast: For the safest catalyst, mix a packet of active dry yeast with a few tablespoons of warm water and let it sit for about five minutes. This ensures the yeast is activated and ready to work its catalytic magic for a powerful reaction.
- Contain the Eruption: This experiment is famously messy. Perform it inside a large tub, plastic bin, or outdoors on a washable surface. Using a narrow-necked bottle, like a soda bottle, will force the foam to shoot upwards for a more dramatic effect.
5. Cabbage pH Indicator: Natural Acid-Base Indicators
Creating a homemade pH indicator from red cabbage is a vibrant and eye-opening experiment that introduces children to the concepts of acids and bases. This activity uses natural pigments called anthocyanins found in red cabbage, which change color in response to different pH levels. By boiling cabbage leaves in water, kids can extract this pigment and create a magical purple liquid that transforms into a rainbow of colors when mixed with various household substances.
This experiment is a favorite in elementary science curricula and at-home STEM lessons because it visually demonstrates the abstract concept of the pH scale. Seeing the solution turn red with acidic lemon juice or green with basic baking soda provides a powerful, tangible connection to the chemistry of everyday items. It’s one of the most colorful and informative chemistry experiments for kids.
Actionable Insights for the Best Colors
To ensure a brilliant and educational color-changing display, follow these practical tips:
- Efficient Pigment Extraction: For the most potent indicator, roughly chop the red cabbage leaves and boil them in water for about 10-15 minutes. This process effectively extracts the anthocyanin pigments. Let the liquid cool completely before using it.
- Create a pH Rainbow: Set up a series of clear cups or test tubes. Add your purple cabbage indicator to each, then test various household substances like vinegar, lemon juice, clear soda, baking soda solution, and soapy water to see the full spectrum of colors.
- Make a Reference Chart: Have your child create a pH scale chart by labeling the resulting colors. For example, red/pink for strong acids, purple for neutral, and blue/green/yellow for bases. This reinforces the learning and creates a useful reference for future tests. Explore other safe chemistry experiments at home for more hands-on fun.
By turning a kitchen staple into a scientific tool, this experiment makes the invisible world of acids and bases visible, sparking curiosity about the chemical properties of the world around us.
6. Dancing Raisins: Observing Gas Bubble Nucleation
The dancing raisins experiment is a captivating and gentle introduction to the concepts of density, buoyancy, and gas behavior. It visually demonstrates how gases dissolved in a liquid can affect solid objects. When raisins are dropped into a glass of clear carbonated soda, tiny carbon dioxide bubbles attach to their wrinkled surfaces, acting like miniature floatation devices that lift them to the surface.
This simple yet mesmerizing activity is perfect for younger children and is one of the easiest chemistry experiments for kids to set up. It requires no special equipment and offers a fantastic opportunity to observe scientific principles in action. The slow, repetitive motion of the raisins rising and falling as bubbles attach and then pop at the surface provides a clear, observable example of changing buoyancy.
Actionable Insights for Making Your Raisins Dance
To get the most out of this simple yet effective experiment, try these practical tips:
- Choose Clear Soda: Use a clear, carbonated beverage like lemon-lime soda or club soda. This allows for the best visibility of the carbon dioxide bubbles attaching to the raisins.
- Experiment with Different Objects: Compare how raisins dance versus other small items like uncooked pasta, corn kernels, or even small beads. Discuss why the wrinkled surface of a raisin is particularly good at trapping bubbles.
- Observe Over Time: Watch what happens as the soda starts to lose its carbonation. This illustrates how the reduction of gas directly impacts the raisins' ability to float, connecting the concepts of cause and effect.
By observing this gentle "dance," children can grasp complex ideas like nucleation and density in an accessible and engaging way, making it a memorable scientific discovery.
7. DNA Extraction from Fruit: An Intro to Molecular Biology
This fascinating experiment bridges chemistry and biology, allowing kids to see and even hold the building blocks of life. By using simple household items, children can break down cell walls and nuclei to extract visible strands of DNA from fruit. The process involves mashing the fruit, adding a salt and soap solution to dissolve membranes, and then using cold alcohol to make the DNA precipitate, or become solid and visible.
Making the invisible visible is a powerful teaching moment that brings the abstract concept of genetic material to life. It’s a common activity in high school biology labs and STEM workshops because it clearly demonstrates molecular extraction and the macroscopic nature of DNA. This experiment is a standout among chemistry experiments for kids for its "wow" factor and direct connection to life science.
Actionable Insights for the Best Results
To ensure a successful and memorable DNA extraction, follow these practical tips:
- Choose Your Source Wisely: Strawberries are an excellent choice because they are "octoploid," meaning they have eight copies of each chromosome, which results in a lot of DNA to extract. Bananas or kiwis also work well.
- Keep the Alcohol Cold: Store your rubbing alcohol in the freezer for at least an hour beforehand. Cold alcohol is less dense and helps the DNA precipitate much more effectively, making it easier to see.
- Layer with Care: When adding the alcohol, tilt the glass and pour it very slowly down the side. This creates a distinct layer on top of the fruit mixture, allowing the DNA to rise to the interface where it can be clearly observed and collected.
8. Density Towers: Visualizing Layers and Density
The density tower is a visually captivating experiment that beautifully illustrates the scientific principle of density. This project involves carefully layering different liquids, such as honey, dish soap, water, and oil, into a single container. Because each liquid has a different mass per unit of volume (density), they separate into distinct, colorful layers instead of mixing, with the densest liquids sinking to the bottom.
This experiment provides a stunning and clear demonstration of how different substances interact based on their physical properties. It’s a fantastic way to introduce concepts like density, miscibility, and molecular weight in an accessible format. Watching the layers form is an almost magical experience for kids, making it one of the most memorable chemistry experiments for kids that combines art with science.
Actionable Insights for Building the Best Density Tower
To create a striking and stable tower, follow these practical tips:
- Choose the Right Container: Use a tall, narrow glass or a clear cylinder. This shape makes the individual layers thicker and more visible, enhancing the visual effect of the experiment.
- Layer Slowly and Carefully: Pour each liquid slowly down the side of the container or over the back of a spoon. This technique prevents the liquids from mixing aggressively, allowing them to settle into clean, distinct layers. Start with the densest liquid (like honey) and work your way up to the least dense (like rubbing alcohol).
- Add Objects for Observation: Once the tower is complete, gently drop in small objects like a grape, a plastic bead, or a small piece of cork. Observe where each object settles to further demonstrate how an object’s density relates to the density of the liquids around it.
By building a density tower, children can directly see a fundamental concept of physics and chemistry at work, turning an abstract idea into a tangible and colorful reality.
9. Invisible Ink: The Chemistry of Oxidation Reactions
Unleash your child's inner spy with the magic of invisible ink, a captivating experiment that introduces the concept of oxidation. This activity involves writing a secret message on paper using a common household substance like lemon juice. When the paper is gently heated, the once-invisible message is revealed as the lemon juice oxidizes and turns brown, appearing like magic.
This experiment is a favorite in science camps and homeschooling activities because it combines chemistry with an element of mystery and fun. It provides a tangible demonstration of how chemical compounds can change when exposed to energy, like heat. The slow browning of the message clearly illustrates a chemical reaction taking place, making abstract concepts like oxidation accessible and exciting for young learners.
Actionable Insights for Revealing Your Secret Messages
For the best results and a truly thrilling reveal, follow these practical tips:
- Choose the Right Ink: Lemon juice works exceptionally well because its acid weakens the paper fibers. When heated, the acidic areas oxidize and burn faster than the surrounding paper, revealing the message in a light brown color.
- Apply with Precision: Use a cotton swab, a small paintbrush, or even a toothpick to apply the "ink." This allows for clearer writing and prevents the paper from becoming too saturated, which can cause it to tear.
- Heat with Care: Adult supervision is required for this step. Gently heat the paper using a light bulb, a low-heat iron, or a hair dryer. The heat provides the energy needed for the oxidation reaction to occur. Avoid using an open flame to prevent the paper from catching fire.
This engaging project is one of many chemistry experiments for kids that turns a simple scientific principle into an unforgettable experience. For more great projects, you can find additional details about creating invisible ink and other 5th-grade science experiments to further explore chemical reactions.
10. Oobleck: Exploring Non-Newtonian Fluids
Creating Oobleck is a fascinating and wonderfully messy experiment that introduces kids to the bizarre world of non-Newtonian fluids. The substance, made from a simple mixture of cornstarch and water, blurs the line between a liquid and a solid. When you apply sudden pressure or force, it acts like a solid, but it flows like a liquid when you let it rest. This magical behavior is all about viscosity and shear stress.
This hands-on sensory activity is a huge hit in preschool classrooms, science museums, and homeschooling lessons because it’s incredibly engaging. It perfectly illustrates how some materials don't follow the typical rules of states of matter, providing a tangible lesson in physics and material science. Children are captivated by their ability to punch the surface without a splash or scoop up a "solid" ball that melts back into a puddle in their hands.
Actionable Insights for Making the Best Oobleck
To get the most out of this mind-bending chemistry experiment for kids, follow these practical tips:
- Perfect the Ratio: Start with a ratio of about 2 parts cornstarch to 1 part water. You can adjust it slightly until you get a mixture that tears when you pull it quickly but flows when you let it sit.
- Add Visual Appeal: Mix in a few drops of food coloring with the water before adding it to the cornstarch. This creates vibrant Oobleck without staining hands as much as adding it later.
- Encourage Experimentation: Challenge kids to hit the surface, then gently poke it. Ask them to roll a piece into a ball and then open their hands. These actions vividly demonstrate its non-Newtonian properties.
By exploring how force changes the material's behavior, kids gain an intuitive understanding of complex concepts like shear stress and viscosity. It's a powerful sensory experience that makes abstract physics feel like magic.
Comparison of 10 Kids Chemistry Experiments
| Experiment | Implementation Complexity (🔄) | Resources & Safety (⚡) | Expected Outcomes (⭐📊) | Ideal Use Cases (💡) | Key Advantages (⭐) |
|---|---|---|---|---|---|
| Volcano Eruption (Acid-Base Reaction) | Low 🔄 simple, single-step setup | Low ⚡ baking soda, vinegar; minimal PPE; foamy cleanup | High ⭐ immediate CO2/foam, short-lived 📊 | Classroom demos, science fairs, museums 💡 | Engaging, low-cost, teaches acid-base & gas production ⭐ |
| Crystal Growing (Supersaturation) | Medium 🔄 multi-step, multi-day observation | Low–Medium ⚡ salt/sugar/borax, hot water; borax needs supervision | High ⭐ visible crystals over days, durable keepsake 📊 | Long-term projects, STEM kits, classroom labs 💡 | Teaches crystallization and patience; tangible results ⭐ |
| Slime Production (Polymer Science) | Low–Medium 🔄 mixing ratios, recipe tuning | Low ⚡ glue + activator; watch for borax/allergies; stains/cleanup | High ⭐ immediate tactile play; varying longevity 📊 | Sensory play, STEM clubs, casual demos 💡 | Highly engaging; demonstrates polymers and non-Newtonian behavior ⭐ |
| Elephant Toothpaste (Catalytic Decomposition) | Medium 🔄 controlled, rapid reaction steps | High ⚡ concentrated H2O2 + catalyst; PPE & adult supervision required | Very High ⭐ dramatic foam and heat; fast reaction 📊 | Large demos, museums, audience-engaging shows 💡 | Spectacular demonstration of catalysts & exothermic reactions ⭐ |
| Cabbage pH Indicator (Acid-Base Indicators) | Medium 🔄 extract pigment, then test samples | Low ⚡ red cabbage + heat source; safe edible materials | High ⭐ color change across pH range; subtle vs commercial 📊 | Classroom pH lessons, home experiments 💡 | Safe, visual pH demonstration using household items ⭐ |
| Dancing Raisins (Gas Bubble Nucleation) | Low 🔄 one-step setup, immediate effect | Low ⚡ clear soda and raisins; safe and simple | Moderate ⭐ sustained bobbing for minutes; dependent on carbonation 📊 | Preschool demos, quick classroom activities 💡 | Simple, immediate demo of nucleation and buoyancy ⭐ |
| Extraction of DNA (Molecular Biology) | Medium–High 🔄 multi-step protocol, careful technique | Medium ⚡ salt/detergent/alcohol; cold alcohol and supervision needed | High ⭐ visible DNA precipitate; delicate but memorable 📊 | Middle/high school labs, museum hands-on programs 💡 | Makes molecular biology tangible; demonstrates real lab techniques ⭐ |
| Floating and Sinking Density Towers (Density and Layers) | Medium 🔄 careful, patient layering technique | Low ⚡ household liquids; non-toxic but can be messy | High ⭐ long-lasting layered display; clear density stratification 📊 | Classroom demos, visual exhibits, prediction exercises 💡 | Effective, aesthetic visualization of density differences ⭐ |
| Invisible Ink and Secret Messages (Oxidation Reaction) | Low–Medium 🔄 write + reveal via gentle heating | Low ⚡ lemon/milk/baking soda; heat source requires supervision | Moderate ⭐ hidden-to-visible messages; clarity varies 📊 | Creative demos, history-linked activities, elementary 💡 | Fun, connects chemistry to history; teaches oxidation effects ⭐ |
| Oobleck (Non-Newtonian Fluid) | Low 🔄 simple mixing ratio (2:1 cornstarch:water) | Low ⚡ cornstarch and water; messy but safe | High ⭐ immediate shear-thickening behavior; tactile 📊 | Sensory tables, physics demos, early STEM 💡 | Clear non-Newtonian demonstration; low-cost and safe ⭐ |
Continue the Discovery: Your Next Step in Science
You have just explored ten incredible doorways into the world of chemistry, each demonstrating that science isn't confined to laboratories and textbooks. From the fizzing reaction of a baking soda volcano to the mind-bending properties of Oobleck, these chemistry experiments for kids are designed to do more than just entertain. They are carefully crafted learning experiences that transform abstract scientific principles into tangible, memorable moments of discovery.
Each activity you’ve completed has built a foundational block of understanding. You didn’t just make slime; you witnessed polymerization in action. You didn’t just create a secret message; you saw how oxidation can reveal hidden information. These hands-on interactions are crucial because they connect a child’s natural curiosity with real-world scientific phenomena, fostering an intuitive grasp of complex topics. The true value lies not just in the "wow" moment of the reaction, but in the "why" that follows.
Key Takeaways for Budding Scientists
To maximize the educational impact of these activities, remember these core principles:
- Embrace the Questions: Encourage your child to ask "What if?" and "Why?" These questions are the heart of the scientific method. What if we added more vinegar? Why did the raisins dance? Exploring these inquiries together is where the deepest learning happens.
- Connect to the Real World: Bridge the gap between the experiment and everyday life. When discussing the cabbage pH indicator, point out how similar principles are used to test the water in a swimming pool. When creating a density tower, relate it to how a salad dressing separates into layers. These connections make science relevant and observable everywhere.
- Process Over Perfection: Sometimes experiments don't go exactly as planned, and that’s a valuable lesson in itself. Use these moments to troubleshoot, hypothesize what went wrong, and try again. This builds resilience, critical thinking, and a genuine understanding of scientific processes.
From Kitchen Chemistry to Lifelong Passion
The journey doesn't have to end here. The skills and curiosity cultivated through these simple chemistry experiments for kids are the seeds of a lifelong passion for STEM. By consistently providing opportunities for hands-on exploration, you are equipping your child with more than just scientific knowledge; you are nurturing problem-solving abilities, analytical thinking, and a confident, inquisitive mindset that will serve them in every aspect of their life. To continue your journey of scientific discovery, we encourage you to visit other educational platforms where you can find even more engaging experiments. Many websites offer curated lists and video tutorials to keep the fun going, so be sure to explore more hands-on science activities and keep that spark of curiosity burning bright.
Ready to take the learning to the next level with even more exciting and structured science adventures? Playz offers a wide range of science kits, from slime labs to chemistry stations, all designed to make complex topics accessible and fun for kids. Visit the Playz shop today and find the perfect kit to ignite your child's passion for STEM