

The 5th-grade science fair is a cornerstone of elementary education, a chance for students to transform from passive learners into active scientists. It's an exciting opportunity to ask questions, form hypotheses, and get hands-on with the world around them. But for parents and teachers, the thought of guiding a 10-year-old through this process can feel daunting. Where do you start? How do you find a project that is engaging, educational, and won't require a trip to a specialty lab supply store?
You're in the right place. This guide is your ultimate roundup of truly easy science fair projects for 5th graders that are not only fun but are designed to teach core scientific principles using materials you likely already have at home. These projects move beyond simple instructions and encourage students to ask "why," which is the heart of scientific inquiry.
This approach aligns with a powerful educational method where students tackle real-world questions, making abstract concepts tangible. By engaging with this hands-on process, they are essentially practicing a form of Problem-Based Learning, developing critical thinking and problem-solving skills that extend far beyond the science fair.
Each project in our list is broken down into a complete, easy-to-follow blueprint for success, including:
- A clear, grade-appropriate hypothesis.
- A simple list of required materials.
- Step-by-step instructions for the experiment.
- Suggestions for variables to test and measure.
- Key safety notes and presentation tips to help your young scientist shine.
Let's turn potential science fair anxiety into an unforgettable scientific adventure and help your student build a project they can be proud of.
1. Project 1: The Classic Volcano Eruption with a Scientific Twist
The baking soda and vinegar volcano is a rite of passage, but for a 5th-grade science fair, it needs to be more than just a fizzy demonstration. This project elevates the classic model into a genuine experiment by focusing on the scientific method. Instead of just making a mess, your student will investigate how changing the ingredients affects the chemical reaction’s outcome. It’s a perfect, easy science fair project for 5th graders that masterfully combines hands-on fun with core chemistry principles.
The Scientific Hypothesis
A great starting point is to focus on a single variable. A testable hypothesis for this experiment could be:
"If the amount of vinegar (the acid) is increased while the amount of baking soda (the base) stays the same, then the volcano's eruption will be taller and last longer because there will be more acid to react with the base, producing more carbon dioxide gas."
Materials You'll Need
Most of these items are already in your kitchen pantry:
- For the Volcano Structure: A small plastic bottle (12-20 oz), modeling clay or play-dough, a tray or baking pan with a lip to contain the "lava."
- For the Reaction: Baking soda (sodium bicarbonate), white vinegar (acetic acid), warm water, liquid dish soap, red food coloring.
- For Measurement: Measuring cups, measuring spoons, a ruler or measuring tape, a stopwatch.
Step-by-Step Procedure
- Build the Volcano: Place the plastic bottle in the center of your tray. Mold the clay or dough around it to form a volcano cone, leaving the top of the bottle open. Let it dry if necessary.
- Prepare the "Magma": In the bottle, mix 2 tablespoons of baking soda, 1 tablespoon of dish soap, and a few drops of red food coloring. Add a quarter cup of warm water and stir gently.
- Conduct the First Trial: Measure out a specific amount of vinegar (e.g., ½ cup). Pour it into the bottle and immediately start the stopwatch.
- Observe and Record: Use the ruler to measure the peak height of the eruption foam. Record how long the fizzing lasts until it mostly subsides. Note any other observations, like the speed of the flow.
- Test Your Variable: Repeat steps 3 and 4, but change only one thing. For example, use ¾ cup of vinegar for the second trial and 1 cup for the third, keeping all other ingredients identical. Conduct at least three trials for each variable change to ensure your results are consistent.
Data Collection & Presentation
Create a simple chart to log the data for each trial. Columns should include: Amount of Vinegar, Eruption Height (cm), and Eruption Duration (seconds). This data will be the foundation of your student’s display board, allowing them to create a bar graph that clearly shows how the variable change impacted the results. For the presentation, include photos of each eruption stage and a well-labeled graph to visually explain the findings.
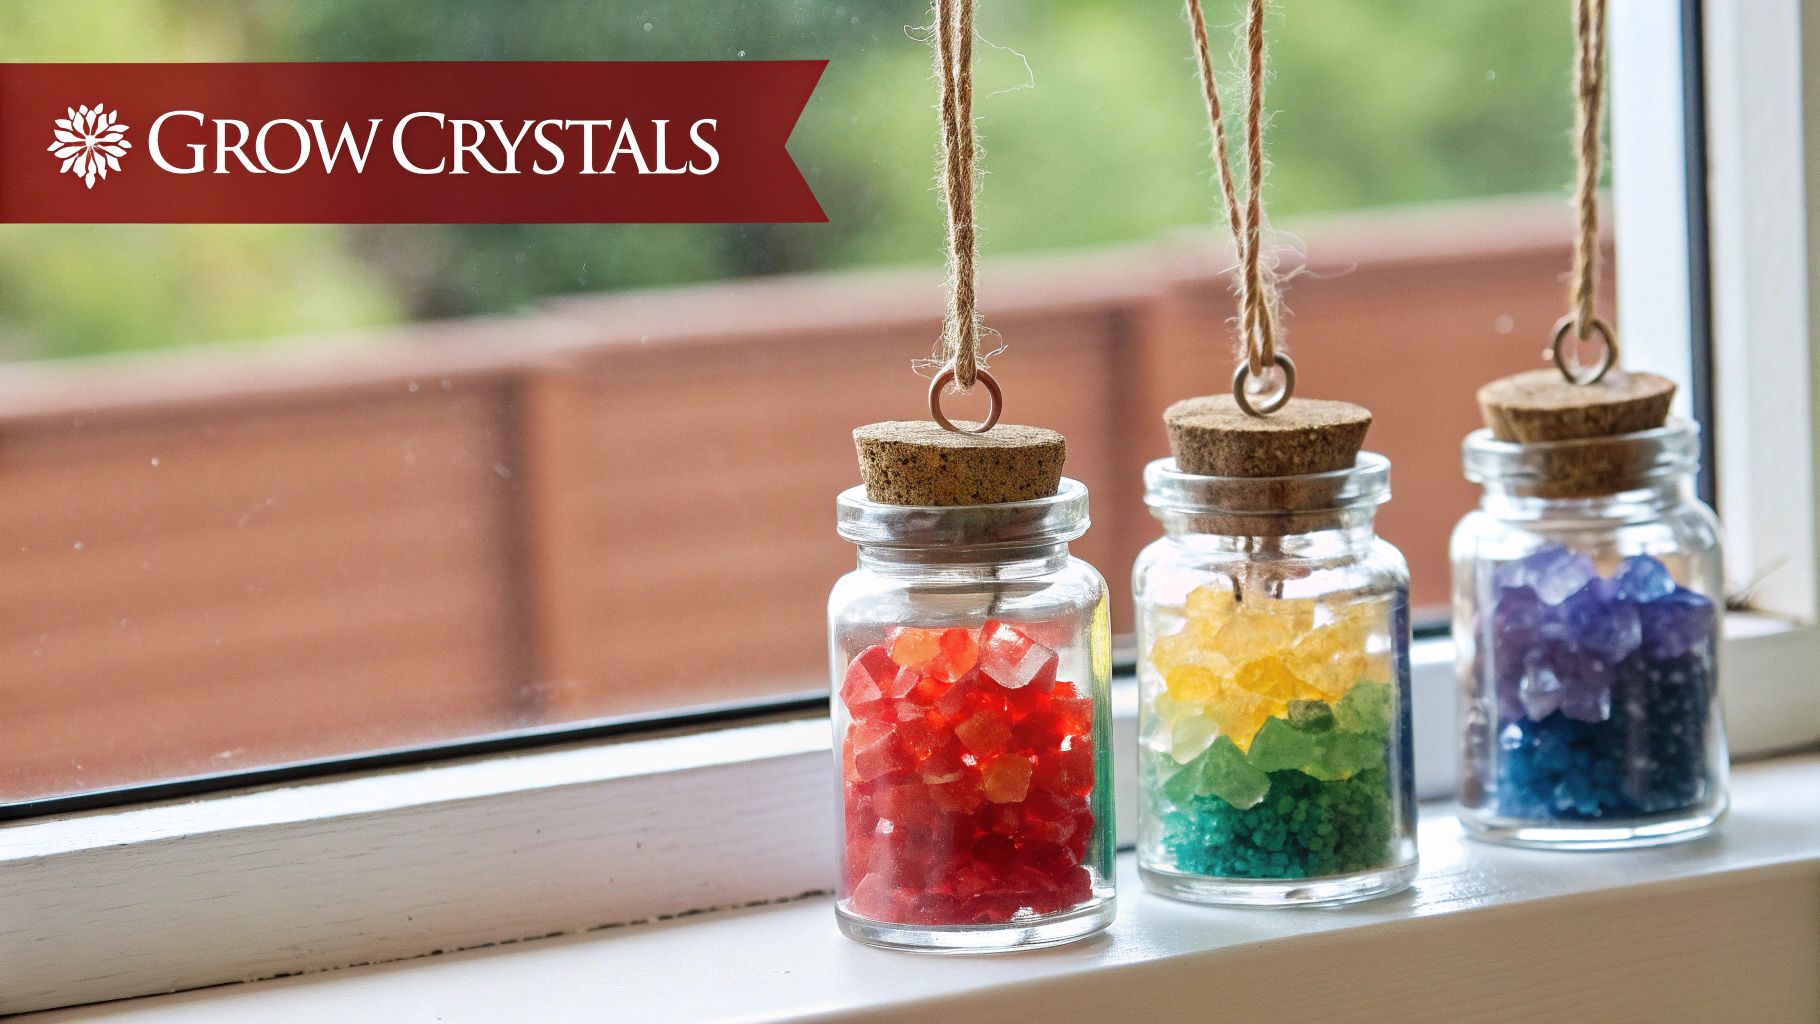
2. Crystal Growing Experiment: The Science of Supersaturation
Growing crystals is a visually stunning project that teaches fundamental chemistry concepts like solubility, saturation, and molecular structure. This experiment moves beyond a simple demonstration by having students investigate how different conditions affect crystal growth. By observing the process over several days, students can witness the orderly formation of crystal lattices firsthand. This project is one of the most rewarding easy science fair projects for 5th graders because it combines patience with a beautiful scientific outcome.
The Scientific Hypothesis
For this experiment, a strong hypothesis can focus on the rate of cooling, which directly impacts crystal size. A clear, testable hypothesis could be:
"If a saturated sugar solution is cooled down slowly over several days, then it will form larger, more well-defined crystals than a solution that is cooled rapidly, because slow cooling allows more time for molecules to arrange themselves into an orderly lattice structure."
Materials You'll Need
Most of these items can be found around the house or at a grocery store:
- For the Crystal Solution: Granulated sugar, Borax, or Epsom salt.
- For the Growing Medium: A clean glass jar, cotton string, a popsicle stick or pencil, paper clips (as weights).
- For Preparation: A saucepan, stove, measuring cups, stirring spoon, food coloring (optional).
- For Measurement: A ruler with millimeter markings, a magnifying glass, a camera for a photo log.
Step-by-Step Procedure
- Prepare the Suspension Point: Tie a piece of string to the middle of the pencil or popsicle stick. The string should be long enough to hang into the jar without touching the bottom or sides. Attach a paperclip to the bottom of the string to weigh it down.
- Create a Supersaturated Solution: With adult supervision, heat 2 cups of water in the saucepan until it is nearly boiling. Slowly stir in sugar, one tablespoon at a time, until no more will dissolve. This creates a supersaturated solution. Add food coloring if desired.
- Set Up the Experiment: Carefully pour the hot solution into the glass jar. Lay the pencil across the top of the jar so the string and paperclip are submerged in the solution.
- Test Your Variable: This is where you test your hypothesis. Place this jar in a location where it can cool slowly and remain undisturbed (e.g., inside a cupboard). For your comparison, create a second, identical jar of solution, but place it in the refrigerator to cool rapidly.
- Observe and Record: Check the jars daily for at least a week. Use a journal to sketch the crystal growth and use the ruler to measure the size of the largest crystals. Take daily photos to document the progress.
Data Collection & Presentation
Create a data table with columns for Day, Slow-Cooled Crystal Size (mm), and Fast-Cooled Crystal Size (mm). Your student can then create a line graph showing crystal growth over time for both conditions. The display board should feature the daily photo log, a close-up of the final crystals, and the graph comparing the two cooling methods. For a more in-depth look at the process, you can find a variety of crystal growing kit instructions online to supplement your project.
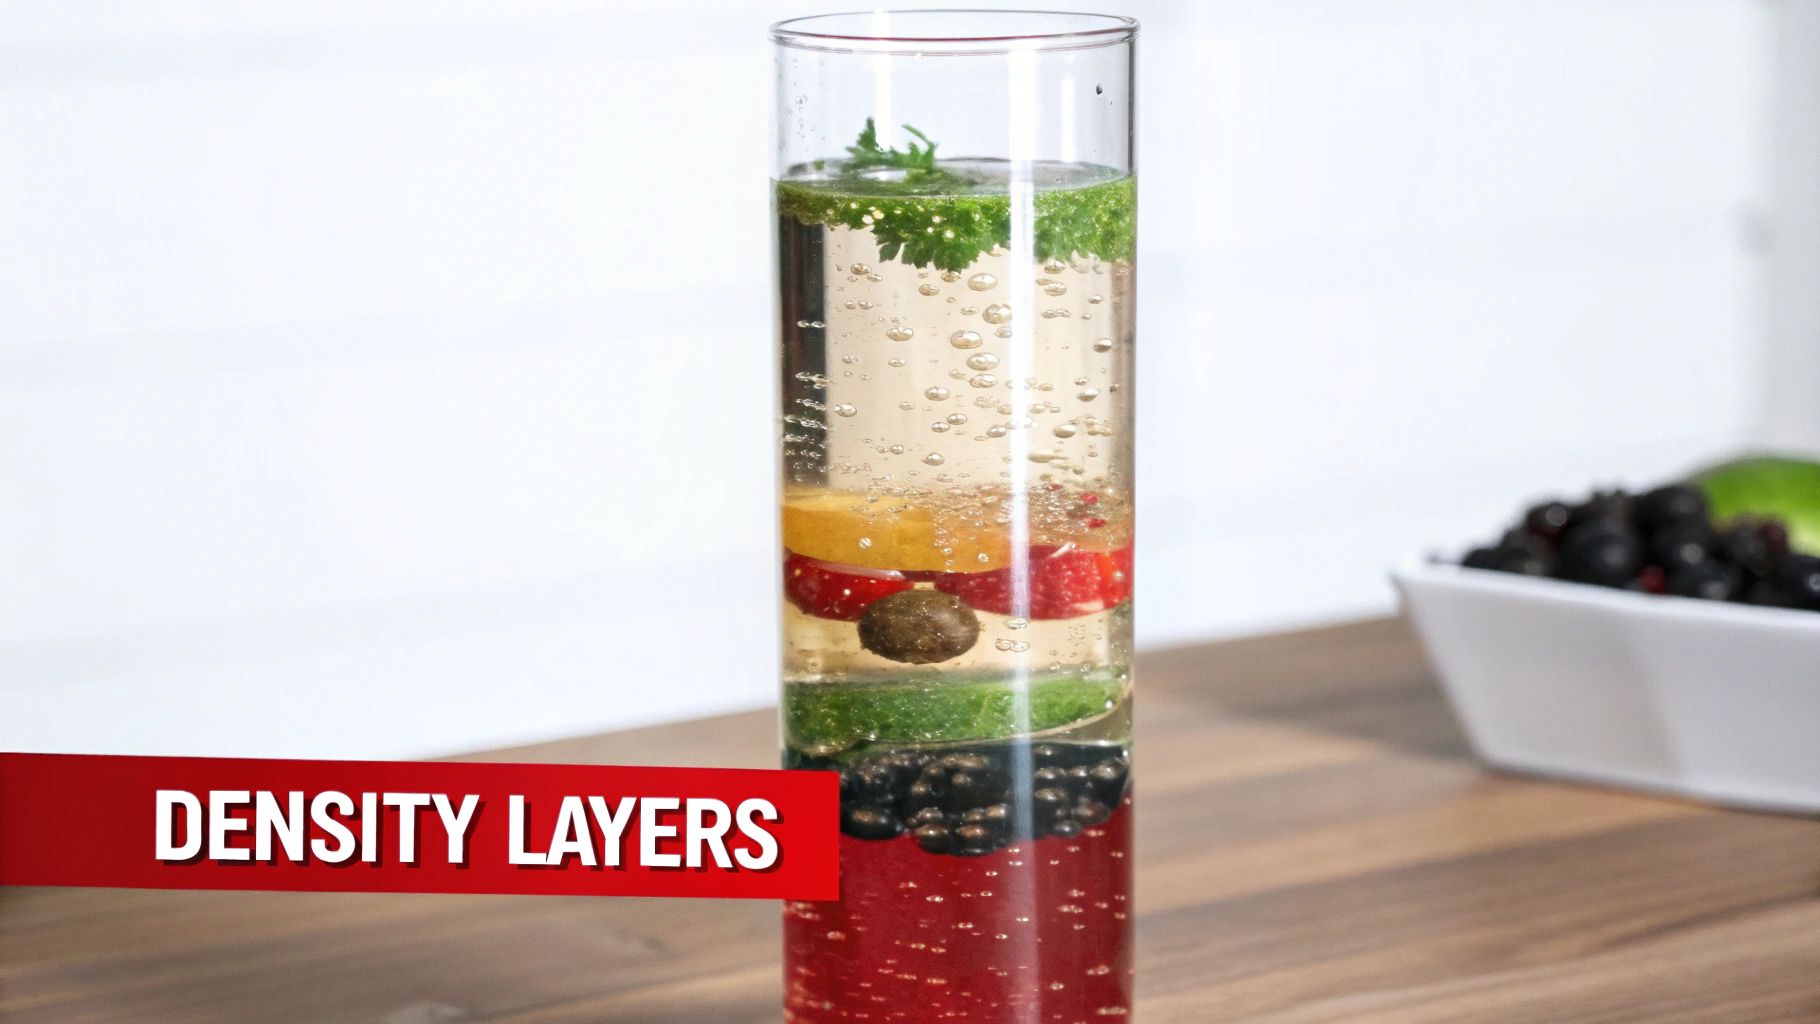
3. Density Column (Rainbow Layered Liquids)
The rainbow density column is a visually stunning experiment that instantly grabs attention at any science fair. This project moves beyond simple reactions to explore a fundamental concept in physics and chemistry: density. Your student will learn that liquids, like solids, have different densities that prevent them from mixing, allowing them to stack on top of each other in neat, colorful layers. This is a fantastic and easy science fair project for 5th graders because it provides a clear, memorable visual for an otherwise abstract scientific principle.
The Scientific Hypothesis
The core of this experiment is predicting how different objects will behave when placed in the column. A strong hypothesis could be:
"If various small objects (a plastic bead, a grape, a metal screw) are dropped into a layered density column, then each object will sink until it reaches a liquid layer that is denser than itself, where it will float."
Materials You'll Need
Gather these common household items to build your rainbow:
- For the Column: A tall, clear container (like a vase or a large glass jar), a turkey baster or spoon for careful pouring.
- For the Layers: Honey, corn syrup (or light karo syrup), dish soap (blue or green works well), water, vegetable oil, and rubbing alcohol. Food coloring is needed for the clear liquids (water, alcohol, syrup).
- For Testing: A small collection of objects with varying densities, such as a plastic bead, a cherry tomato, a paperclip, a small piece of sponge, or a metal screw.
- For Measurement: A liquid measuring cup.
Step-by-Step Procedure
- Prepare the Liquids: If needed, add food coloring to the clear liquids (e.g., make the water red, the rubbing alcohol purple). Plan your colors for a rainbow effect.
- Pour the First Layer: Start with the densest liquid. Pour a measured amount of honey directly into the center of the container, being careful not to touch the sides.
- Add Subsequent Layers: Pour the next liquid (corn syrup) very slowly down the inside of the container or over the back of a spoon. This prevents the layers from mixing. Continue this process for each liquid in order of decreasing density: dish soap, water, vegetable oil, and finally rubbing alcohol.
- Conduct the Test: Once your layers are settled, gently drop your test objects into the column one at a time.
- Observe and Record: Watch where each object settles. Note which liquid layer it floats on top of. Take careful notes for each object.
Data Collection & Presentation
Create a chart that lists each test object and the liquid layer where it came to rest. For a visually engaging display board, your student can draw a large diagram of the density column and then draw or glue pictures of the objects in their final positions. Include photos of the process and the final result. This project also serves as an excellent introduction to more complex concepts found in many at-home chemistry experiments. For a deeper look into liquid properties, explore these chemistry experiments you can do at home.
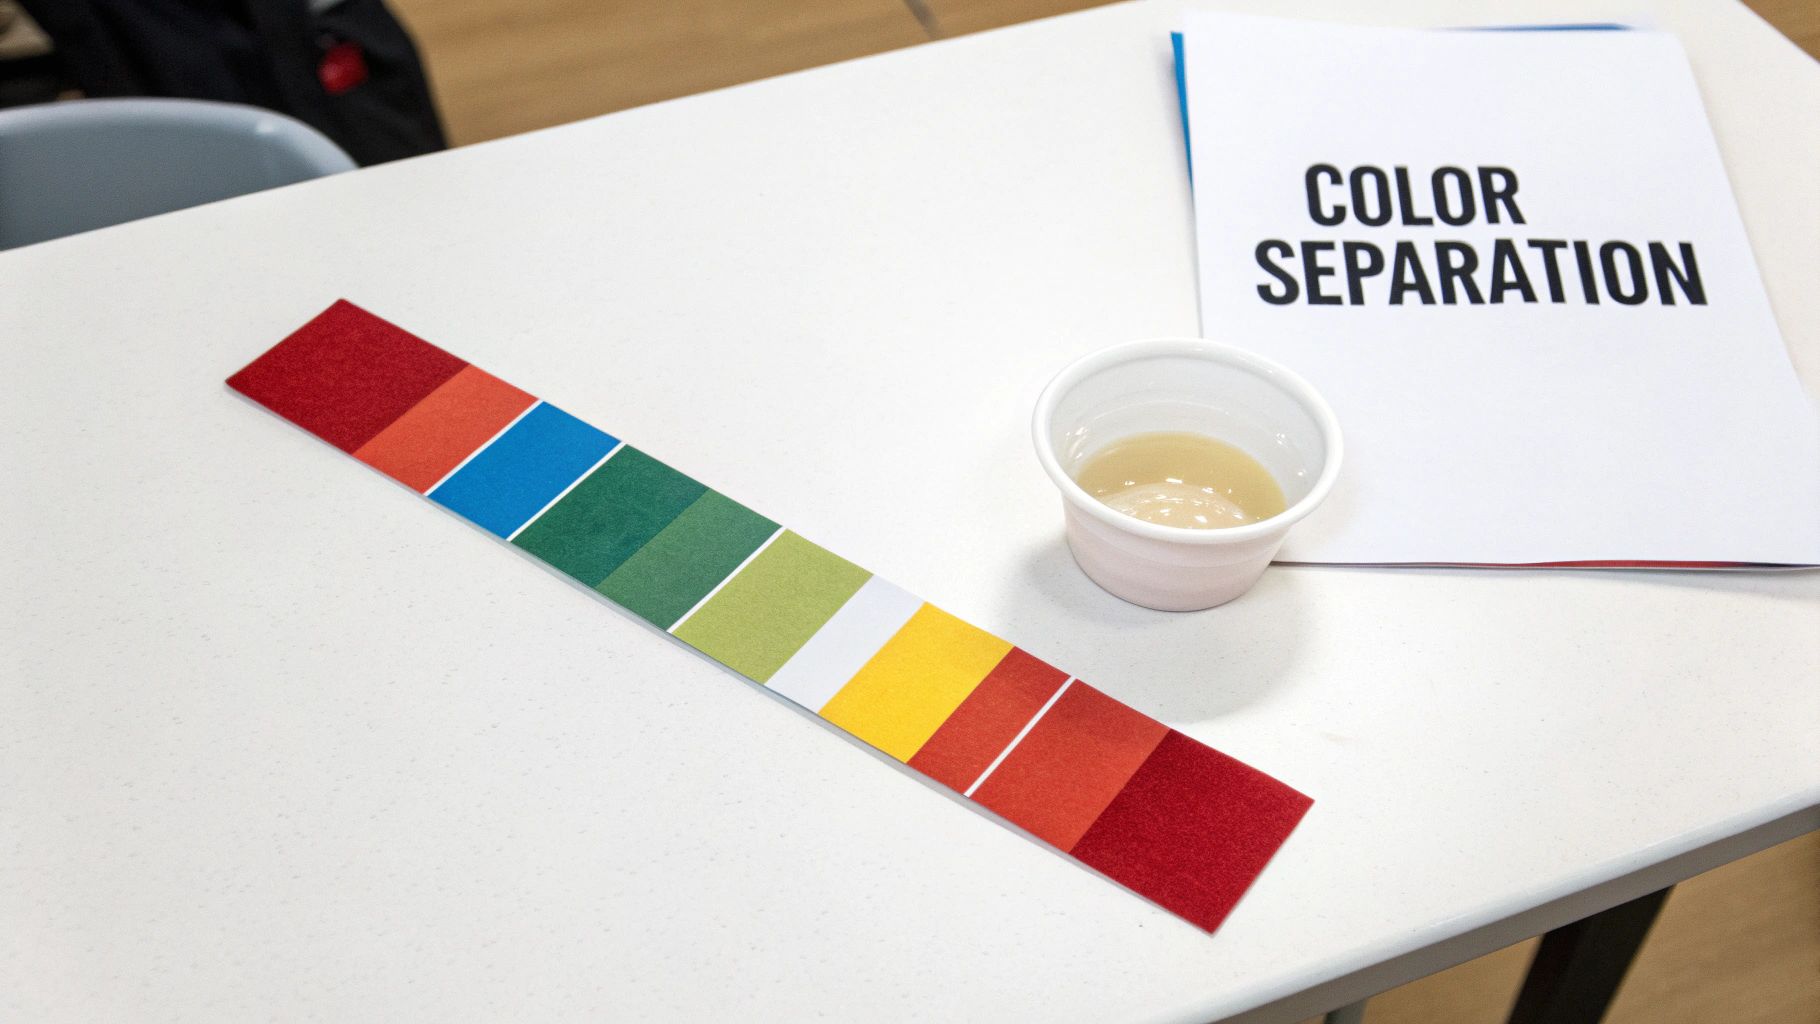
4. Paper Chromatography: Uncovering Hidden Colors in Ink
This project turns a simple black marker into a stunning display of hidden colors, introducing students to the powerful scientific technique of chromatography. The experiment explores how a solvent (like water) can separate a mixture (like ink) into its individual components. It’s an incredibly visual and easy science fair project for 5th graders that feels like a magic trick but is grounded in fundamental chemistry principles about solubility and molecular properties.
The Scientific Hypothesis
The core of this experiment is to see if different brands or types of markers use the same dye mixtures. A strong, testable hypothesis could be:
"If different brands of black water-soluble markers are tested using paper chromatography, then they will separate into different component colors because each company uses a unique formula of dyes to create its black ink."
Materials You'll Need
This project requires minimal, low-cost materials, many of which you likely have on hand:
- For the Chromatography Setup: Tall, clear glasses or jars, coffee filters or paper towels cut into strips (about 2 inches wide), pencils or craft sticks, tape.
- For the Test Subjects: A variety of water-soluble markers in different colors and brands (black, brown, and green work best).
- For the Solvent: Water. You can also test other solvents like rubbing alcohol or a saltwater solution for a more advanced experiment.
- For Measurement: A ruler, a timer (optional).
Step-by-Step Procedure
- Prepare the Paper: Cut the coffee filter into a rectangular strip, long enough to reach from the bottom of the glass to the pencil resting on top.
- Apply the Ink: Use one of the markers to draw a thick, dark line or a large dot about 1-2 inches from the bottom of the paper strip.
- Set Up the Solvent: Pour about half an inch of water into the bottom of the glass. The water level must be below the ink spot on the paper.
- Run the Chromatogram: Tape the top of the paper strip to a pencil and rest the pencil across the rim of the glass, so the paper hangs down into the glass. The bottom edge of the paper should just touch the water, but the ink spot should not.
- Observe and Record: Watch as the water travels up the paper (a process called capillary action). As it passes through the ink, it will carry the different colored dyes with it at different speeds, separating them. Remove the paper when the water is close to the top and let it dry.
- Test Your Variable: Repeat the entire process for each different marker brand or color you want to test. Make sure to use a fresh strip of paper and clean water for each trial.
Data Collection & Presentation
For each marker tested, students should tape the resulting colorful chromatogram to their display board. They can create a data table that lists the "Marker Brand/Color" and the "Component Colors Observed" (e.g., blue, yellow, red). They should take photos of the process to include on the board. The final display will be a vibrant and compelling visual representation of how a seemingly simple color is often a complex mixture.
5. Seed Germination and Plant Growth Experiment
This project moves from chemistry to biology, exploring the fundamental question of what plants need to survive. Instead of a quick reaction, this experiment teaches patience, careful observation, and long-term data collection. Your student will investigate how a specific environmental factor, like light or water, impacts the entire life cycle from seed to sprout. This is an easy science fair project for 5th graders that provides a tangible, living result and reinforces core concepts in botany.
The Scientific Hypothesis
The key is to isolate a single environmental condition to test. A clear, focused hypothesis for this project could be:
"If bean seeds are given different amounts of sunlight (full sun, partial shade, and complete darkness) while all other conditions like water and temperature are kept the same, then the seeds in full sun will germinate faster and grow taller because sunlight provides the energy needed for photosynthesis and healthy development."
Materials You'll Need
Most of these items are easily found around the house or at a garden store:
- For the Plants: Fast-germinating seeds (e.g., lima beans, radishes, or cress), small pots or clear plastic cups, potting soil.
- For the Environment: A sunny windowsill, a partially shaded area, and a dark closet or box.
- For Measurement: Water, a measuring cup for consistent watering, a ruler, a notebook or journal for observations, a camera for photographic evidence.
Step-by-Step Procedure
- Set Up the Pots: Fill three identical pots or cups with the same amount of potting soil. Label them clearly: "Full Sun," "Partial Shade," and "Darkness."
- Plant the Seeds: Plant two or three seeds in each pot at the same depth (about 1 inch deep). This ensures you have a backup if one seed doesn't sprout.
- Initial Watering: Water each pot with the exact same amount of water (e.g., ¼ cup). This is your control.
- Place the Experiments: Put each pot in its designated location. The "Full Sun" pot goes on a sunny windowsill, "Partial Shade" in a spot with indirect light, and "Darkness" inside a cupboard or under a box.
- Observe and Record: Check the pots daily. Water them with the same amount of water every 2-3 days to keep the soil consistently moist. Once sprouts appear, measure their height with a ruler every other day and record it. Take photos to document changes.
Data Collection & Presentation
Create a data table to track growth over several weeks. Your columns should include: Date, Height of Plant in Full Sun (cm), Height of Plant in Partial Shade (cm), and Height of Plant in Darkness (cm), along with a section for written observations (e.g., "leaves are yellow," "stem is bending"). For the display board, a line graph showing plant height over time is perfect for comparing the growth rates of the three conditions. To better understand the science behind how plants utilize light, you can learn more about how flowers grow and develop.
6. Static Electricity and Balloon Experiments
Making your hair stand on end with a balloon is a classic party trick, but it's also a fantastic demonstration of physics in action. This experiment transforms that simple fun into a structured investigation of static electricity. Your student will learn about positive and negative charges, electrical attraction, and insulators through hands-on, highly visual tests. This is a wonderfully easy science fair project for 5th graders because it uses simple materials to explore complex scientific concepts in a safe and engaging way.
The Scientific Hypothesis
The experiment will test how different materials generate and hold a static charge. A clear and testable hypothesis could be:
"If a balloon is rubbed against different materials (like a wool sweater, a cotton t-shirt, and human hair), then the balloon rubbed against the wool sweater will pick up the most pieces of paper because wool transfers electrons more effectively, creating a stronger static charge."
Materials You'll Need
Most of these items are household staples, making this project very low-cost:
- For the Experiment: Several latex balloons, small torn-up pieces of tissue paper (about 1cm squares), an empty aluminum can, a thin stream of water from a faucet.
- For Testing Variables: A wool sweater or scarf, a cotton t-shirt, a polyester or fleece blanket.
- For Measurement: A ruler, a stopwatch, a designated person to run their hair (if testing).
Step-by-Step Procedure
- Establish a Baseline: Before rubbing it on anything, hold an uncharged balloon near the pile of tissue paper. Observe and record what happens (nothing should). This is your control.
- Charge the Balloon (Trial 1): Take one balloon and rub it vigorously on one of the materials (e.g., the wool sweater) for a set amount of time, like 30 seconds.
- Conduct the Test: Immediately hold the charged part of the balloon about one inch above the pile of tissue paper.
- Observe and Record: Count how many pieces of paper jump up and stick to the balloon. Record the number. You can also test its ability to pull the empty aluminum can or bend the stream of water and record those qualitative observations.
- Test Your Variable: Repeat steps 2-4 using the exact same method but with the other materials (cotton t-shirt, then human hair). Ensure you use a fresh, uncharged balloon for each new material to avoid cross-contamination of charges. Conduct at least three trials for each material to get an average.
Data Collection & Presentation
Create a chart to log your quantitative data. The columns should include: Material Used for Charging, Trial 1 (Pieces of Paper), Trial 2, Trial 3, and Average. This data can be turned into a bar graph that clearly compares the effectiveness of each material. For the display board, include photos of the balloon interacting with the paper, the can, and the water stream. A diagram explaining how electrons transfer from the material to the balloon to create a negative charge would be an excellent addition to show a deeper understanding of the science.
7. Homemade Compass and Magnetism Exploration
This project demystifies the invisible force of magnetism by guiding students to build a functional compass from simple household items. It moves beyond a simple demonstration into a hands-on investigation of Earth’s magnetic field, polarity, and the properties of magnetic materials. By creating and testing their own navigational tool, students get a tangible understanding of earth science principles. This is a fascinating and easy science fair project for 5th graders that connects a simple craft with major scientific concepts.
The Scientific Hypothesis
For this project, the hypothesis can focus on the core function of the compass or the properties of magnetism. A strong, testable hypothesis could be:
"If a sewing needle is stroked repeatedly in one direction with a strong magnet, then it will become temporarily magnetized and, when floated in water, will align itself with the Earth's north-south magnetic field, just like a real compass."
Materials You'll Need
Most of these materials are easy to find around the house or at a craft store:
- For the Compass: A sewing needle, a strong magnet (like a refrigerator magnet or neodymium magnet), a small piece of cork or a leaf, a bowl of water.
- For Verification: A commercial compass.
- For Measurement & Observation: A permanent marker, a notepad.
- For Extension Activities (Optional): Iron filings, a clear plastic container with a lid, various small objects to test for magnetism (paperclip, aluminum foil, plastic toy, coin).
Step-by-Step Procedure
- Magnetize the Needle: Take the strong magnet and stroke the sewing needle from the middle to the tip. Do this at least 30-50 times, always stroking in the same direction. Lifting the magnet high up before starting the next stroke is crucial. This aligns the magnetic domains within the needle.
- Assemble the Compass: Carefully push the now-magnetized needle through the small piece of cork or place it gently on top of a floating leaf.
- Float the Compass: Place the cork and needle assembly into the center of the bowl of water. Make sure it can float and spin freely without touching the sides.
- Observe and Record: Watch as the needle slowly rotates and settles into a fixed position. This position should point along the Earth’s north-south magnetic poles.
- Verify and Test Variables: Use the commercial compass to check if your homemade version is pointing north. Note any discrepancies. You can then test variables: Does the number of magnet strokes affect its accuracy? Does it work near a TV or computer?
Data Collection & Presentation
Create a chart to record observations. Columns could include: "Location Tested" (e.g., kitchen, backyard), "Homemade Compass Direction," "Commercial Compass Direction," and "Notes" (e.g., "Spun quickly," "Affected by nearby metal table leg"). For a visual display, include photos of the process and a large, hand-drawn diagram showing the Earth's magnetic field lines and how the compass needle aligns with them. This helps explain the science behind the observation.
8. Slime Making and Polymer Science
Slime is more than just a gooey trend; it’s a fascinating introduction to the world of polymer chemistry. This project transforms a popular playtime activity into a structured experiment, allowing students to investigate how different ingredients create unique material properties. By changing the ratios of glue and an activator, your student will explore how long-chain molecules, called polymers, link together. This is a fantastically engaging and easy science fair project for 5th graders that makes abstract concepts like non-Newtonian fluids tangible and fun.
The Scientific Hypothesis
A clear hypothesis will guide the experiment, focusing on how a specific ingredient change affects the slime's final texture. A great testable hypothesis could be:
"If the amount of contact lens solution (the activator) is increased while the amount of glue (the polymer base) remains constant, then the slime will become less stretchy and more firm because more cross-links will form between the polymer chains, making the substance more rigid."
Materials You'll Need
Most of these materials are simple to find at a craft or grocery store:
- For the Slime: White school glue (containing PVA), contact lens solution (containing boric acid and sodium borate), baking soda, water, food coloring (optional).
- For Measurement & Mixing: A mixing bowl, measuring cups, measuring spoons, a craft stick or spoon for stirring, a ruler.
- For Safety & Storage: Safety goggles, disposable gloves, and an airtight container for storing the finished slime.
Step-by-Step Procedure
- Create the Base: In the mixing bowl, combine a specific amount of glue (e.g., ½ cup) with ½ cup of water. Add a few drops of food coloring if desired and stir until evenly mixed.
- Add the Activator: Stir in ½ teaspoon of baking soda. Then, add a measured amount of contact lens solution (e.g., 1 tablespoon).
- Mix to Form Slime: Stir vigorously until the mixture pulls away from the sides of the bowl and begins to form a cohesive blob. Knead it with your hands for a couple of minutes until it reaches its final consistency.
- Observe and Record: Test the slime's properties. Measure how far it can stretch before breaking using a ruler. Note its texture: is it sticky, firm, or runny?
- Test Your Variable: Repeat steps 1-4, but change only one thing. For the next trial, use 1.5 tablespoons of contact lens solution, and for the third, use 2 tablespoons. Keep all other ingredient amounts exactly the same. Conduct at least three trials for each variable change to gather reliable data.
Data Collection & Presentation
Create a chart to log your observations for each batch of slime. Include columns for: Amount of Activator (tablespoons), Stretchiness (cm), and a description of the Texture (e.g., "very sticky," "stretchy," "putty-like"). This data can be used to create a bar graph comparing the stretchiness of each slime recipe. For your presentation board, include photos of the different slimes and the testing process. For those looking for more exciting variations, you can even explore kits that create things like zombie farts and bloody slime using these same scientific principles.
8 Easy 5th-Grade Science Fair Projects Compared
| Experiment | 🔄 Implementation Complexity | ⚡ Resource & Time Efficiency | 📊 Expected Outcomes | Ideal Use Cases | ⭐ Key Advantages · 💡 Quick Tip |
|---|---|---|---|---|---|
| Volcano Eruption with Baking Soda and Vinegar | Low–Moderate; simple model-building | Very low cost; immediate, short demo | High visual impact; demonstrates acid–base and gas production | Quick demos, science fairs, engagement sessions | Highly engaging & inexpensive · Use a tray, pre-measure ingredients |
| Crystal Growing Experiment | Low setup; requires patience over days | Low cost; multi-day (3–7 days) commitment | Tangible, display-worthy crystals; teaches crystallization | Long-term projects, science fair displays, observation logs | Teaches crystallization well · Use distilled water and undisturbed location |
| Density Column (Rainbow Layered Liquids) | Moderate; careful layering technique needed | Low cost; quick setup and instant result | Clear demonstration of density and buoyancy with strong visuals | Classroom demos, museum displays, hypothesis testing | Visually impressive and consistent · Pour slowly over a spoon, color layers first |
| Paper Chromatography (Ink Separation) | Low; minimal materials and simple steps | Very low cost; fast (10–20 minutes) | Demonstrates separation techniques; reveals pigment composition | Intro to lab methods, quick class activities, forensic demos | Introduces real lab technique · Keep solvent level low and avoid touching paper |
| Seed Germination and Plant Growth Experiment | Low–Moderate; needs controlled variables and ongoing care | Very low cost; long duration (1–3 weeks) | High educational value; teaches experimental design and growth measurement | Long-term biology units, variable testing, curriculum projects | Teaches scientific method & data collection · Use fast-germinating seeds and track daily |
| Static Electricity and Balloon Experiments | Very low; hands-on and immediate | Minimal cost; instant results | Demonstrates static charge qualitatively; very engaging | Intro to electricity, interactive demos, outreach | Highly engaging and participatory · Perform on dry days; have spare balloons |
| Homemade Compass and Magnetism Exploration | Low; simple assembly but needs careful magnetizing | Low cost; quick to assemble | Practical demo of Earth's magnetic field and navigation | Outdoor education, scouts, earth science lessons | Practical real-world application · Magnetize with many strokes and test away from metal |
| Slime Making and Polymer Science | Low; simple mixing but requires safety measures | Low cost; quick to make but messy | Tangible product illustrating polymers and non-Newtonian behavior | Hands-on polymer lessons, sensory activities, engagement labs | Very engaging and modifiable · Use contact lens solution as safer activator; store airtight |
From Project to Presentation: Launching Your Young Scientist's Success
The bubbling volcano has settled, the last crystal has formed, and the final seed has sprouted. Your 5th grader has successfully navigated the exciting world of hands-on science, transforming everyday materials into a source of incredible discovery. But the journey doesn't end with the final observation. The true capstone of any great science fair project is sharing that journey with others, a process that solidifies learning and builds invaluable life skills.
This article has provided a launchpad with eight easy science fair projects for 5th graders, from the satisfying fizz of a chemical reaction to the quiet wonder of growing a plant. We've explored how simple household items can unlock complex concepts like density, polymer science, and magnetism. The goal was to demonstrate that science isn't confined to a high-tech laboratory; it’s all around us, waiting to be explored.
Key Takeaways: The Core of a Great Project
As you move from the experiment phase to the presentation, remember the core principles that make a science fair experience successful and memorable for a 5th grader:
- Curiosity is the Catalyst: The best projects start with a genuine question. Whether it’s “What happens if I use more vinegar?” or “Which color of ink is made of the most other colors?”, encouraging your child to ask "why" is the most critical first step.
- The Scientific Method is a Story: Don't present the scientific method as a rigid checklist. Frame it as a story with a beginning (the question), a middle (the experiment), and an end (the conclusion). This narrative approach makes the process more engaging and easier for your child to explain.
- Mistakes are Discoveries: An experiment that doesn't go as planned is not a failure; it’s a learning opportunity. If the slime is too runny or the crystals don't grow, it's a chance to troubleshoot, adjust variables, and demonstrate real scientific thinking.
Actionable Next Steps: Building the Presentation
With data in hand, it's time to create a compelling presentation. The classic tri-fold board is a fantastic visual tool. Guide your child to organize it logically, following the flow of their scientific story.
- Create a Clear Title: Make it catchy and descriptive. "The Great Slime Stretch-Off" is more exciting than "Polymer Experiment."
- Organize Sections: Use clear headings for each part of the scientific method: Question, Hypothesis, Materials, Procedure, Results, and Conclusion. This structure makes the project easy for judges and visitors to understand.
- Visualize the Data: A picture is worth a thousand words, and a graph is worth a thousand data points. Use simple bar graphs, charts, and lots of photos of the experiment in action. This breaks up text and makes the results easy to digest.
- Practice the Pitch: Help your child craft a simple, two-minute explanation of their project. Encourage them to speak clearly and with enthusiasm. Practice answering potential questions like, "What would you do differently next time?" or "What surprised you the most?"
As students prepare to showcase their hard work, guiding them on how to make presentations interactive can significantly boost audience engagement and help their scientific discoveries shine. Simple additions, like having a sample of their slime or a spare density column on the table, can make their display come alive.
The Lasting Impact of a Single Project
Ultimately, the science fair is about much more than a grade or a ribbon. It’s a powerful exercise in critical thinking, problem-solving, and communication. By completing one of these easy science fair projects for 5th graders, your child has practiced formulating a question, designing a test, collecting data, and drawing a conclusion. These are skills that extend far beyond the science classroom, building a foundation for academic success and a lifelong appreciation for inquiry and discovery. You are not just guiding a project; you are nurturing a future innovator, one baking soda volcano at a time.
Ready to take the guesswork out of your next experiment? The kits from Playz are packed with all the tools, ingredients, and step-by-step, kid-friendly instructions needed to make science fun, safe, and educational. Explore our collection and find the perfect kit to spark your child's curiosity at Playz today