


A child has just opened a box, tapped a chisel into a plaster block, and heard the small clink that makes every adult stop what they're doing. Dust moves aside, a colored crystal appears, and suddenly geology feels less like a page in a textbook and more like a discovery happening at the kitchen table. That excitement makes a gem dig kit a memorable STEM activity, but the excavation itself is only the beginning.
The strongest learning happens after the stones come out. Identification, sorting, hardness testing, observation, and discussion turn a one-time reveal into a practical introduction to mineral science. With a thoughtful setup, a gem dig kit can support family learning, classroom investigation, and repeated conversations about how Earth materials form and differ.
What a Gem Dig Kit Is and Why Kids Love Them
A gem dig kit usually contains an excavation block with gemstones, minerals, or fossils embedded inside. Children use a small chisel or dowel, a mallet or hammer, and a brush to remove the surrounding material. The format is simple, but it combines tactile effort, suspense, and a real specimen to examine afterward.
Some kits use plaster, gypsum, clay, or a sand-based block. A commonly sold Smithsonian kit presents children with 11 real gemstones and minerals, using a mallet and dowel for the excavation process, as described in this gem dig kit product listing. That makes the experience different from a purely decorative craft. The child isn't only making something. They're uncovering a physical object, then deciding what it might be.
Practical insight: The discovery moment attracts children, but the specimen gives you a reason to keep teaching after the block is empty.
Gem digging compared with other dig kits
A fossil kit focuses on traces of ancient life. An archaeology kit may imitate the recovery of artifacts. A gem dig kit centers on minerals, crystals, color, texture, and physical properties. The tools may look similar, but the questions change.
Instead of asking, “What animal left this fossil?” children can ask:
- Observation: Is the stone transparent, translucent, or opaque?
- Surface: Does it look glassy, dull, metallic, or pearly?
- Structure: Does it show flat faces, bands, layers, or a cluster of crystals?
- Testing: How does it compare with another specimen when scratched?
Major retail listings commonly position these products for children starting around 5+ or 6+, while another listing gives an 8+ suggested age, and large retailers group rock and gem excavation products with science kits. Those listings show how the category has moved beyond novelty gifting and into early elementary STEM play. Parents looking for related hands-on activities can also explore STEM toys for kids when building a broader activity shelf.
The appeal is emotional as well as educational. Children control the pace, make choices about where to tap, and experience uncertainty in a safe, bounded task. That combination supports curiosity before anyone introduces a formal mineral name.
How the Excavation Process Works
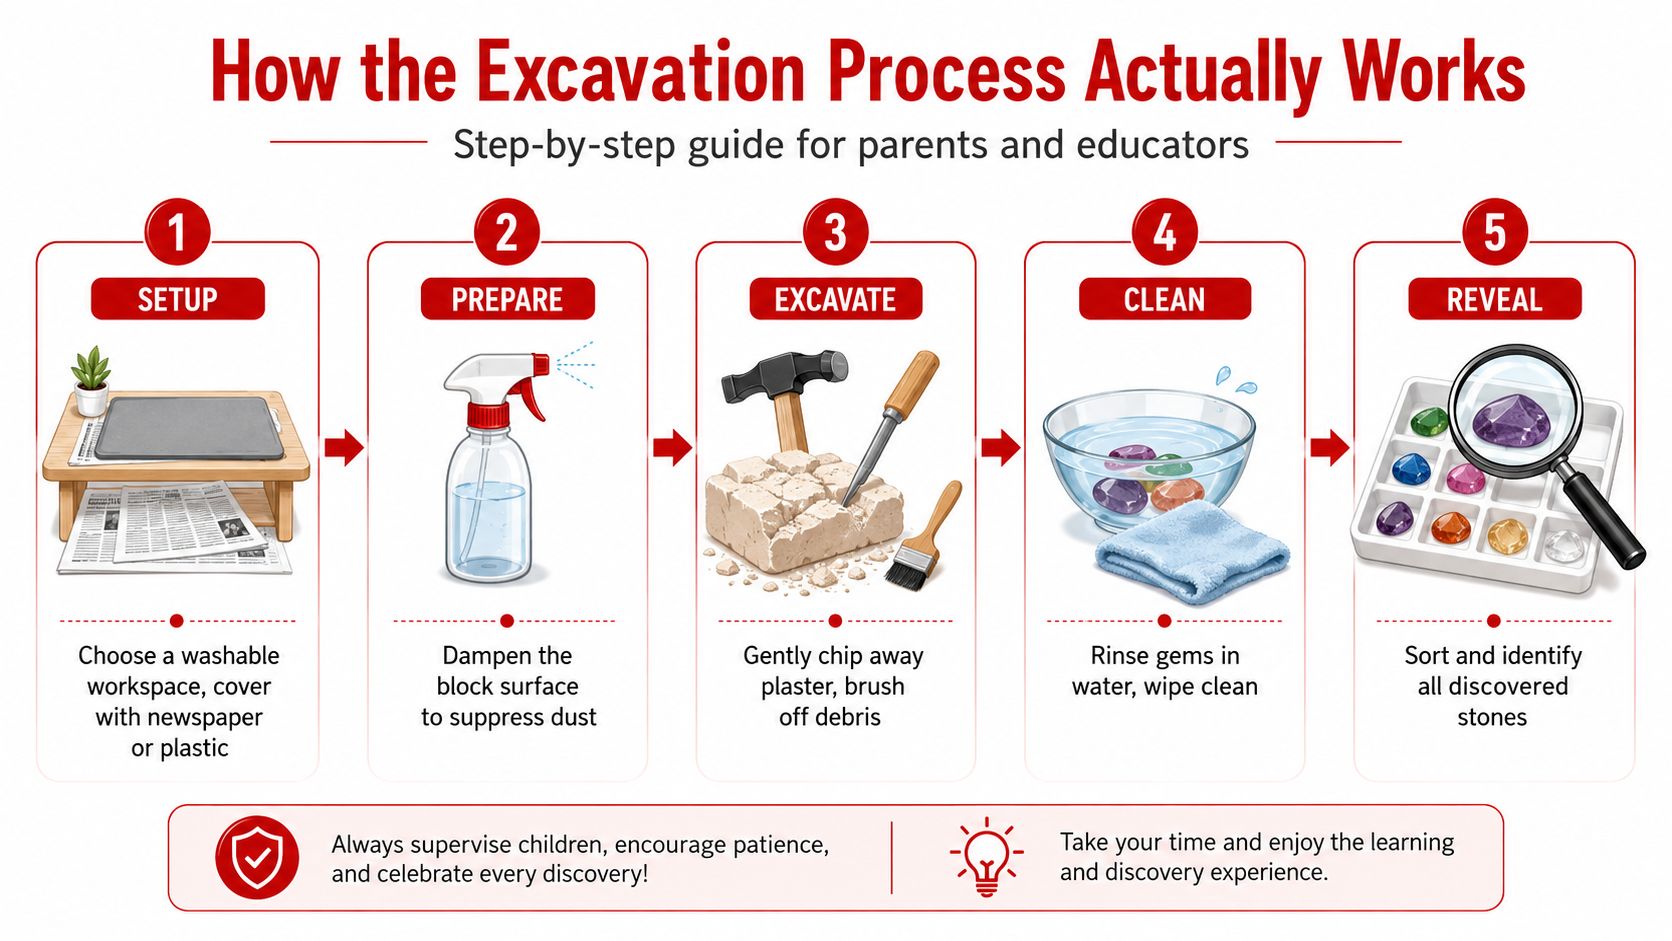
A child who starts tapping before the workspace is ready can scatter plaster across the table and lose small specimens in the mess. Set up first: use a washable table, silicone mat, shallow plastic bin, or large tray. Keep water, a soft brush, paper towels, and a container for recovered stones within reach.
Many plaster or dig-brick blocks soften in water. One example recommends soaking the block for about 15 minutes, as described in this gemstone excavation kit guidance. Water enters the binder and reduces its cohesion, so children can work with less force while the block continues to hold the specimens in place.
A controlled method produces better finds
Use this sequence, while following the product's own directions:
- Set up the station. Cover the surface and place the block where it will not slide.
- Dampen or soak the matrix. Follow the package guidance. Moist material usually creates less airborne dust than dry chiseling.
- Begin at the outer material. Hold the chisel at a low angle and tap lightly. Aim for plaster, not a visible stone.
- Change tools as the specimen appears. When a colored edge or crystal face emerges, brush away loose material instead of prying.
- Collect fragments promptly. Small specimens can disappear among dust and debris, especially when children share a tray.
- Rinse and dry the finds. Use a separate container for washing, then place the stones on a towel.
The block is not a piñata. Heavy blows can damage a softer mineral or send a specimen across the room. Another kit's instructions describe breaking plaster with a chisel and hammer, then cleaning the recovered gemstone with a brush, as shown in this mineral mining activity description.
Demonstrate one gentle tap before a child takes the tool. In a classroom, assign roles: one child stabilizes the block, one excavates, and one collects debris. In a home, an adult can steady the tray and monitor pressure.
The excavation is only the first pass. After rinsing, arrange the specimens by color, surface, shape, or transparency. Ask children what they observe before giving them names. That habit turns a one-time dig into a repeatable geology lesson, with each stone providing evidence for identification and later hardness testing.
Broader hands-on ideas appear in this fossil-finding activity guide, and the same principle applies here: careful preparation protects the specimens and improves the quality of the learning that follows.
Educational and Developmental Benefits Beyond the Dig
The excavation phase gives children a physical problem to solve. They must control pressure, adjust the chisel angle, watch where the material breaks, and decide when to stop using force. Those actions support fine motor control, hand-eye coordination, patience, and sustained attention.
The post-excavation phase has a different character. Children move from action to evidence. They can place the recovered stones on a tray and compare color, luster, transparency, shape, and texture. A child who says, “This one is prettier,” can be guided toward a more scientific observation, such as, “This specimen reflects light from a glassy surface.”
Mineral identification turns play into investigation
Credible educational kits often add identification material, rather than leaving children with unnamed stones. One kit includes a 16-page, full-color guide about gemstone formation and mining, while another provides a mineral identification card and geology fact poster, as described in this rock and mineral starter kit resource.
Hardness testing makes the follow-up especially powerful. The Mohs hardness scale is an ordinal scale that runs from talc at 1 to corundum at 9. Its reference minerals include gypsum at 2, calcite at 3, fluorite at 4, apatite at 5, feldspar at 6, quartz at 7, and topaz at 8, as explained in the Smithsonian rock and gem dig kit information.
A child doesn't need to memorize the entire scale at once. Start with a comparison. Quartz can scratch glass, while gypsum cannot. That result gives children a testable reason to describe one mineral as harder than another. Use appropriate supervision and avoid testing valuable surfaces or fragile specimens.
Classification creates a second lesson
After testing, ask learners to classify the stones in more than one way:
- Visual groups: light and dark, transparent and opaque, smooth and rough.
- Physical groups: harder and softer, heavier and lighter, crystalline and noncrystalline-looking.
- Geology groups: igneous, sedimentary, or metamorphic, when the guide provides enough information to support that discussion.
Children can record a prediction, make an observation, test a property, and revise an identification. That sequence mirrors the basic rhythm of scientific inquiry. It also builds vocabulary through use, including cleavage, streak, crystal habit, luster, and transparency.
The dig creates excitement. The classification conversation creates understanding.
Partner work adds another layer. One student can describe a specimen while another sketches it, checks the guide, and explains the evidence. A short presentation about “how we identified this stone” often reveals more learning than a worksheet asking children to copy names.
Families and teachers can find complementary ideas about the benefits of hands-on learning, especially when the activity includes discussion and documentation rather than stopping at the reveal.
Age Recommendations and Smart Buying Considerations
Age labels help, but they don't tell the whole story. A child's readiness depends on how hard the block is, how much force the tools require, how small the specimens are, and whether an adult will stay nearby. Compare the physical demands of the kit with the environment where you'll use it.
| Age Group | Block Hardness | Tool Type | Mess Level | Key Features to Look For |
|---|---|---|---|---|
| Ages 3–5 | Softer or pre-scored material | Rounded, low-force tools | Usually easier to contain with close supervision | Large specimens, simple pictures, short activity |
| Ages 6–8 | Standard plaster or dig brick | Chisel, brush, and mallet used with guidance | Dust or wet residue may be noticeable | Clear instructions, visible discoveries, collection tray |
| Ages 9–12 | Firmer blocks or layered excavation material | More precise chisel and brush work | Requires a planned work area | Identification guide, hardness activities, comparison tasks |
For younger children, large, chunky specimens and rounded tools reduce frustration. Preschool learners may enjoy the reveal but still need an adult to manage tool placement and prevent mouthing small objects. Early elementary children can usually handle a standard block when the adult demonstrates controlled tapping first.
Older children benefit from kits that include identification resources. A harder block isn't automatically more educational. The better choice is the one that gives the child something meaningful to do after excavation, such as comparing mineral properties or organizing a labeled collection.
Questions to ask before buying
Check whether the specimens are described as real minerals or whether the product uses glass or plastic substitutes. Also look for a collection case, display tray, identification card, or guide, because these features support the post-dig phase.
Mess deserves honest attention. Dry plaster can create fine dust, while a soaked block creates muddy residue. If you're in an apartment, classroom, or childcare room, choose a contained setup rather than assuming the activity will be mess-free. Clear illustrated directions also help independent learners more than dense text alone.
Finally, consider replay value. A kit becomes more useful when its tools, guide, and tray can support future refill blocks or teacher-created specimens.
Safety Tips and Cleanup Strategies for Real Homes
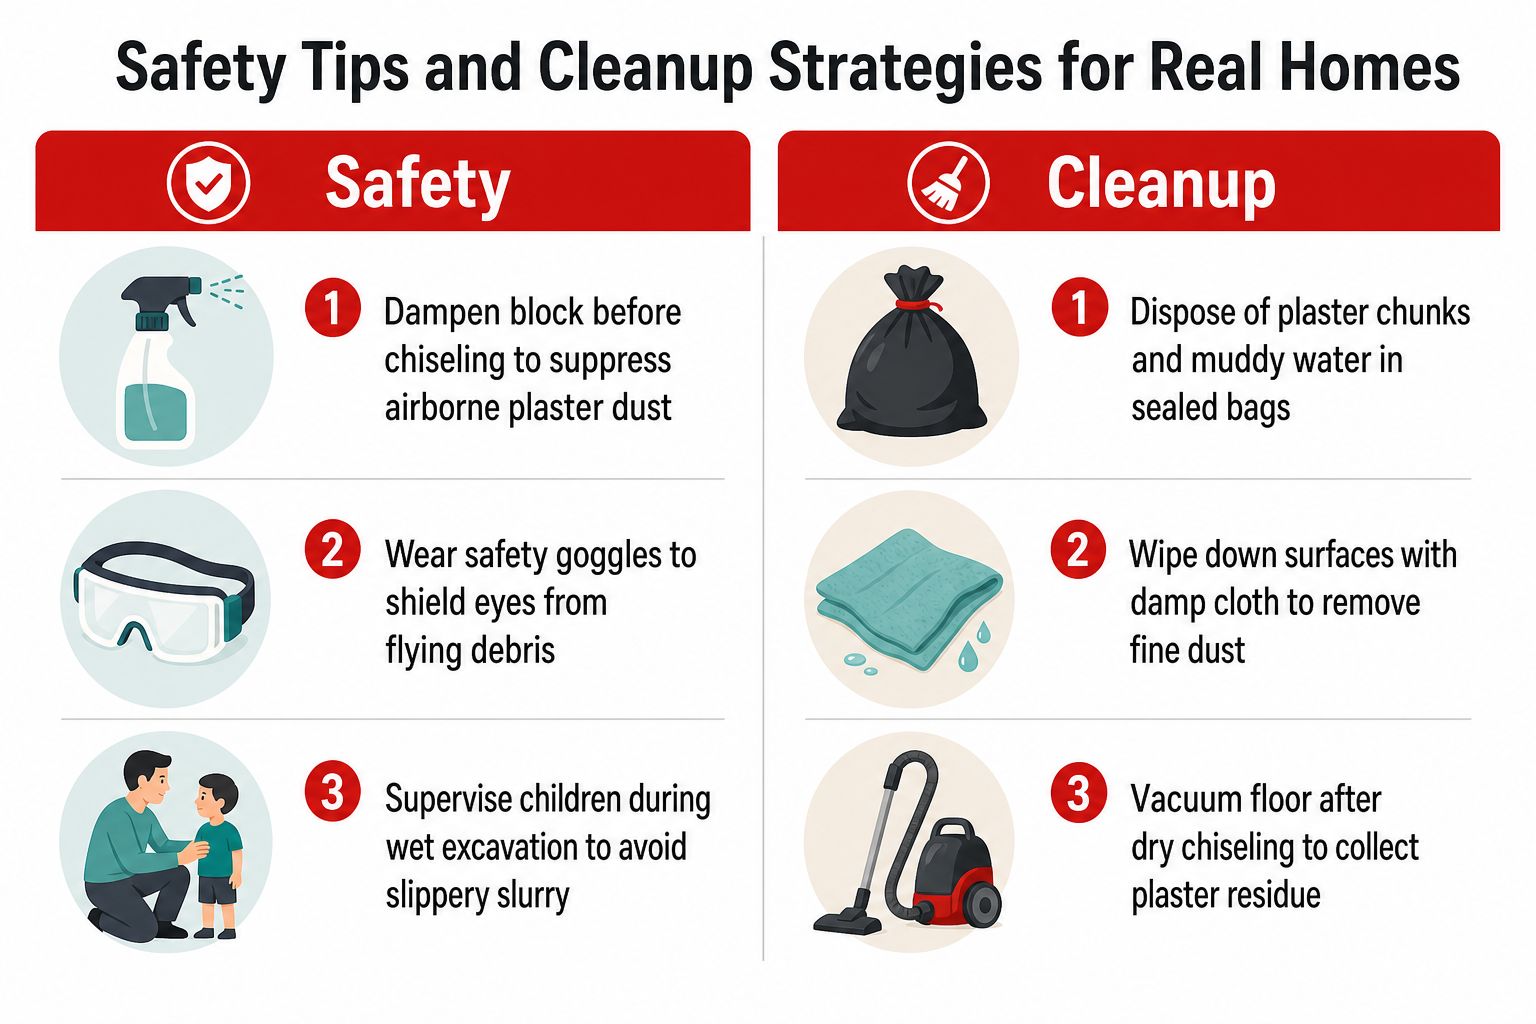
Gem excavation creates two practical hazards: airborne plaster dust and wet slurry. Both are manageable when adults prepare the station before children begin. Dampening the block reduces dust, while a tray or shallow bin keeps wet material from spreading across the table.
Require safety goggles during chiseling. The chisel should point away from the child's body, and an adult should supervise tool use closely. Once a gemstone becomes visible, children should brush around it instead of levering it out with force.
A safer home station
Independent review guidance highlights dust exposure, eye protection, table protection, and careful disposal of plaster slurry as recurring concerns in home use, as discussed in this gemstone dig kit safety review. Product pages often emphasize discovery more than cleanup, so adults need to supply the missing plan.
Use this setup:
- Contain the block: Place it inside a shallow plastic bin or on a silicone mat.
- Protect clothing: An apron or old shirt keeps wet plaster from becoming a laundry problem.
- Control the water: Use a bowl for rinsing instead of working directly over a sink.
- Watch small parts: Count and collect every recovered specimen before packing away.
- Keep tools directed safely: Stop the activity if a child begins swinging rather than tapping.
Never pour plaster chunks or thick slurry down a drain. Solidify or bag the waste according to local disposal rules, and wipe tools with a damp cloth before residue hardens. A damp cloth also works well on the work surface, while a vacuum can collect dry residue from the floor once the area is clear.
Avoid introducing cleaning chemicals into a children's geology activity. If you're researching general household cleaning practices, keep that information separate from the excavation station, such as the guidance on isopropyl alcohol. The dig itself needs water, containment, supervision, and patience more than complicated products.
Activity Ideas and Lesson Plans for Educators
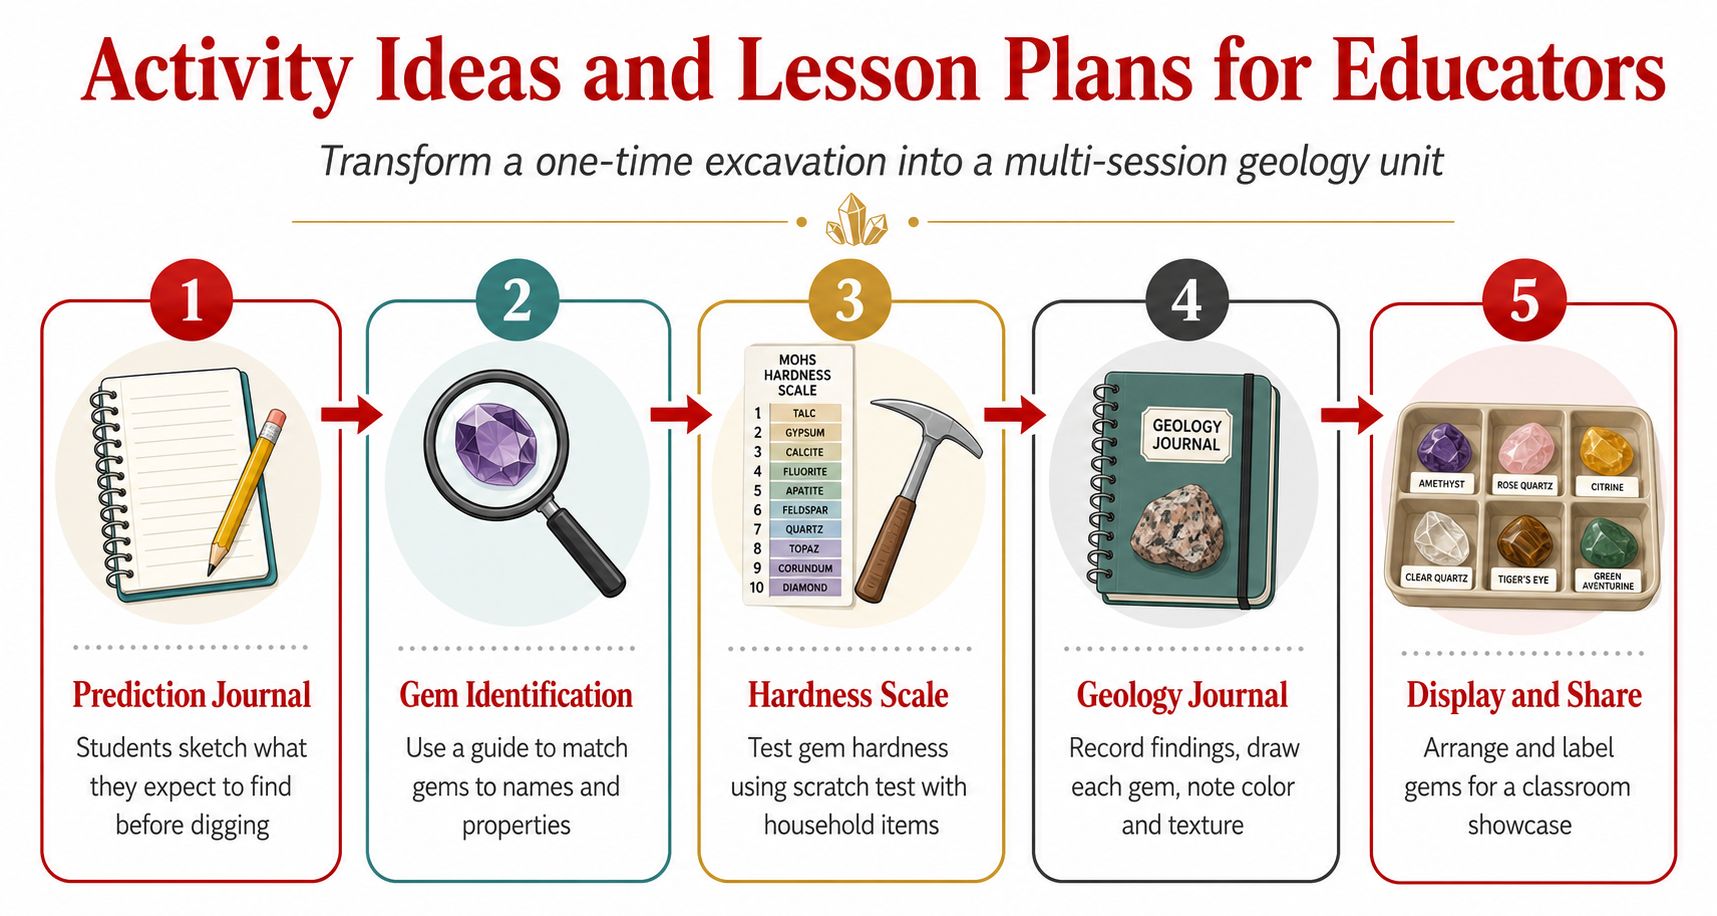
A classroom gem dig works best as a sequence of investigations rather than a single noisy event. Begin before anyone touches the block. Give students a prediction journal and ask them to draw what they expect to find, describe possible colors and shapes, and explain what evidence might help identify each discovery.
Assign roles to make group work purposeful:
- Excavator: Controls the chisel under supervision.
- Documenter: Sketches each specimen and records observations.
- Classifier: Compares findings with the guide and organizes the tray.
- Presenter: Explains the group's evidence to classmates.
Roles can rotate during the activity. This arrangement keeps children involved even when only one person is holding the tool.
Build the lesson around evidence
After excavation, create stations rather than ending the class. At an identification station, students use the guide to compare color, luster, transparency, and crystal shape. At a hardness station, they use suitable reference materials to investigate scratch order and record results. At a classification station, they sort the stones by a chosen property, then defend the rule they used.
A geology journal can include:
- A drawing of each specimen
- The observed color and surface
- A prediction about its identity
- A test result
- The final identification and supporting evidence
The specimens can also anchor other subjects. Students might map where minerals form, write a first-person account of a crystal's geological journey, or compare how igneous, sedimentary, and metamorphic rocks develop. The point isn't to claim that every recovered gem represents each rock type. The point is to use tangible objects to make abstract Earth science processes easier to discuss.
A classroom showcase gives the unit a clear finish. Students can label a tray, write a short explanation, and present one specimen whose identity changed after testing.
For broader planning support, pair this activity with project-based learning lesson plans.
The following video can provide a visual reference for teachers preparing to demonstrate the activity:
DIY Alternatives and Kit Maintenance Tips
A store-bought gem dig kit isn't the only way to create an excavation lesson. Educators can make a simple block with plaster of Paris, small mineral specimens, and household molds such as yogurt containers or ice cube trays. Add sand, gravel, or clay between plaster pours to create layers with different textures, but let the material cure fully before children excavate it.
DIY blocks can be useful when a class needs several stations or when a teacher wants to control the specimens and difficulty. They also make it possible to prepare themed investigations, such as sorting stones by color or embedding specimens at different depths. Adults should handle plaster preparation and follow the product's safety guidance.
Purchased kits still have practical advantages. Their tools, specimen guides, and prepared blocks reduce planning time, while a well-designed guide can support identification after the digging ends. The best approach may be modular: use the original kit as the introduction, then create refill activities around the same collection.
Preserve the learning materials
Store recovered stones in a labeled compartment tray rather than a loose bag. Protect identification booklets in sheet protectors, and keep brushes and chisels together so the next activity starts quickly. Wipe tools after use, sand rough wooden handles if needed, and replace picks that have rusted or become unsafe.
Treat every specimen as a teaching object. A child can revisit an earlier find, compare it with a new one, and revise an old classification. That habit turns a gem dig kit into an ongoing earth science resource, not a disposable activity.
Playz offers hands-on children's activities, including a dinosaur fossil digging kit described with gemstone excavation activities, that can complement a growing home or classroom geology collection. Visit Playz to explore options that help children learn through active discovery, then plan the identification and testing work that makes the experience last.