

In a small tracking study of children's informal STEM activities, 72% of activity check-ins occurred at home, according to the University of Oxford-hosted study. The kitchen table is already a place for scientific discovery. The challenge is turning an interesting activity into something a child can investigate, repeat, and explain.
Science kits at home can help, but finishing the instructions isn't the same as understanding the science. A useful routine makes room for predictions, careful comparisons, unexpected results, and a child's own explanation.
Why Science Kits at Home Are Worth the Effort
Approximately 19% of U.S. adults helped a child with a science project during the previous twelve months, whether for school or outside school, according to the National Science Foundation's National Center for Science and Engineering Statistics. The same national reporting found that participation differed by household income and educational attainment. Families aren't starting from the same resources or confidence.
Say your child opens a water-filtration activity and immediately wants to pour everything together. You don't need to deliver a lesson about environmental engineering. You need a manageable question, suitable materials, and instructions that help you slow the activity down enough to notice what happens.
For an everyday extension, Water Filter Advisor offers an activity to explore how water filters work. Treat the filtered water as an observation sample, not drinking water. Looking clearer doesn't establish that water is safe to drink.
The useful question: Can your child explain what the materials did, rather than simply show you the finished object?
A kit can reduce preparation and give adults a starting explanation. Those are practical advantages, especially when nobody at home feels comfortable teaching science. The benefits of hands-on learning become more meaningful when children connect their actions to evidence.
Start with a modest plan: choose an age-appropriate activity, make safety checks, record what happens, and leave room to try again. As a planning target, reserve about thirty minutes a week and one shelf space, with hazardous materials stored securely elsewhere if necessary. Some investigations need brief observations between sessions, but you don't need a permanent home laboratory.
Pick the Right Kit for Your Child's Age
| Age band | Typical kit focus | Adult help needed | Good first experiment |
|---|---|---|---|
| Ages 3-5 | Sensory play, color mixing, magnets | Adult guides every step | Sorting objects that float and sink in a tub of water |
| Ages 6-8 | Simple chemistry, crystals, basic circuits | Adult reads and supervises | Growing salt or sugar crystals on a string |
| Ages 9-12 | Multi-step reactions, electronics, microscopy | Adult checks safety steps | Testing which material keeps ice from melting fastest |
| Ages 13 and up | Controlled tests, builds, data logging | Adult on call for questions | Timing how water temperature changes dissolving speed |
These are planning bands, not safety permissions. The manufacturer's age range and supervision requirements take priority, even when a child reads above their age level.
Young children need activities they can understand through looking, touching suitable materials, and talking. For floating and sinking, choose large objects and keep an adult within reach throughout. Use large, enclosed magnets only in an age-appropriate activity, never loose high-powered magnets.
Beginning readers can follow short sequences with an adult reading alongside them. Crystal growing offers changes to observe over time, but adults should handle hot solutions, and the finished crystals aren't snacks.
Older elementary children may manage a longer sequence, simple circuit connections, or microscope observations. Let them organize materials and explain the next step, while an adult remains responsible for chemical and heat supervision.
Teenagers can take more ownership of planning and recording. Independence should mean better decisions and documentation, not permission to improvise chemical mixtures.
Check the box before buying
- Match the stated age range. Consider reading demands, hand coordination, patience, and the actual hazards, not just the child's birthday.
- Count consumables and refills. Find out whether the included ingredients support repeat investigations or only the advertised demonstrations.
- Check household requirements. Look for reusable tools and clearly identified extras, such as measuring spoons, water, or paper towels.
Playz sells science kits across several age groups, so compare its stated ranges with these planning bands alongside other kits and household activities. For gift buying, check with the caregiver about storage, supervision, and mess before choosing.
The trade-off: A complicated kit may offer more possibilities, but a simpler kit that a child can revisit is often the more practical choice. Don't buy extra complexity merely to make the gift feel educational.
Stay Safe with Chemicals, Heat and Small Parts
In 2004, the U.S. Consumer Product Safety Commission announced a recall of about 5,100 Professor Wacko's Exothermic Exuberance kits, marketed for children age 10 and older. The kits contained glycerine and potassium permanganate in separate bottles; accidentally switching caps could allow the chemicals to mix and cause an unexpected fire. The agency linked the hazard to at least two reported house fires and cited inadequate warnings and directions.
An educational label doesn't remove the need to inspect how a kit works. A cap, storage bottle, or measuring tool can matter as much as the experiment itself.
Under CPSC children's-product guidance, every element of a kit designed and primarily intended for children age 12 or younger is treated as a children's product and must meet applicable requirements. That doesn't mean every activity is appropriate without adult supervision.
Match each hazard to an action
| Kit item or hazard | Main risk | Required action |
|---|---|---|
| Chemical powders and liquids | Mixing, oxidizing reactions, burns | Keep in original labeled containers and replace caps right away |
| Heat sources and flame | Burns and fire | Adult controls the heat and children wear eye protection |
| Small parts | Choking for children under 3 | Check the age label and store small parts out of reach |
| Containers and tools used near food | Chemical contamination | Never reuse for food after a science activity |
| Unused substances | Accidental mixing or ingestion | Store locked and sealed between sessions |
Use this visual reminder when setting up the activity.
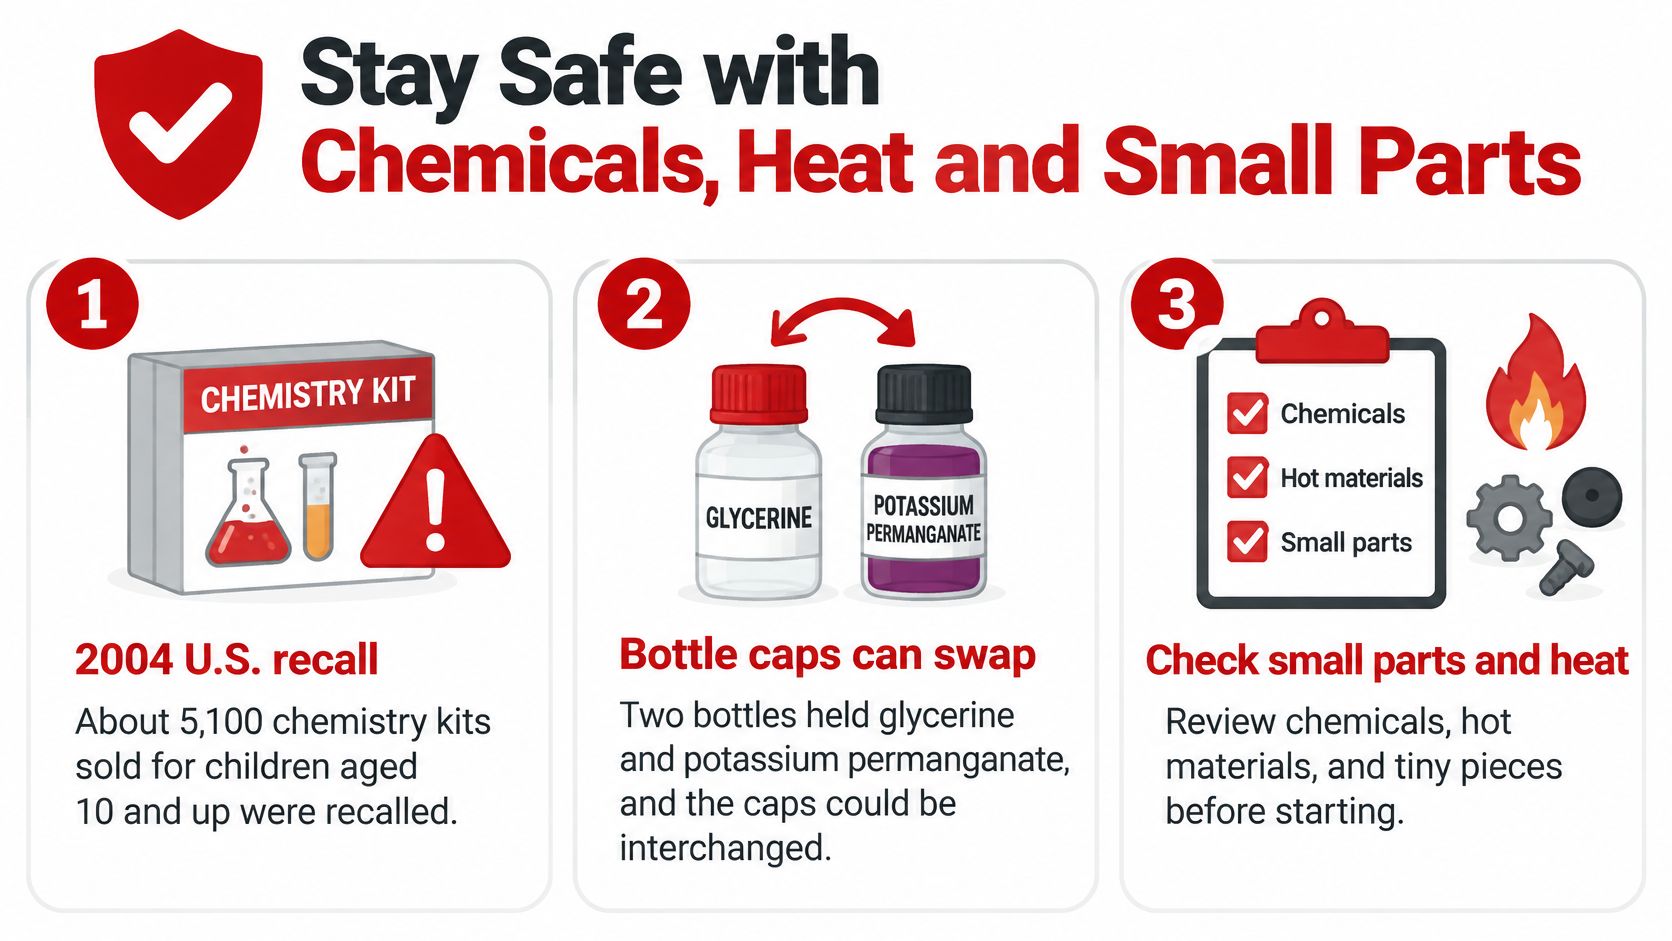
Never substitute ingredients, increase quantities, or seal a reaction container unless the instructions explicitly direct it. Follow the stated sequence, ventilation directions, protective-equipment requirements, and disposal instructions. An adult should closely supervise anything involving heat, flame, pressure, or oxidizing chemicals.
Keep food and drinks away from the workspace. Even a familiar kitchen ingredient should be treated as experiment material once it has contacted kit tools or chemicals.
Before every session
- Read the complete procedure. Identify adult-only steps before opening ingredients.
- Inspect the equipment. Check labels, caps, containers, and protective eyewear.
- Clear the workspace. Remove food, protect the surface, and keep younger siblings away.
- Plan the finish. Know where waste goes and where sealed materials will be locked away.
For broader checks beyond the experiment itself, use this guide to toy safety for children. Supervision means watching the process, not merely being somewhere in the house.
Run and Record Each Experiment Step by Step
The most useful shift is from making something happen to finding something out. A fizzing reaction can be entertaining, but the learning depends on the question a child investigates and the evidence they collect.
A structured sequence of introduction, vocabulary, question, modeling, guided investigation, and conclusion was used in an after-school STEM trial described in this published STEM-intervention paper. The paper also reports a family-based intervention in which children's general science interest didn't improve significantly. Enjoyment and completion aren't reliable substitutes for a learning check.
Use the following sequence with the kit's approved procedures. The example here compares materials used to slow ice melting.
Prepare the question and the comparison
-
Introduce the phenomenon.
Let your child inspect melting ice and notice the puddle forming around it. Ask what might help the ice last longer, then offer suitable materials such as fabric, paper, and foil.
This gives the question a visible starting point. A common slip is asking for a prediction before children understand what they're looking at, so they choose a favorite material.
-
Define the words you'll use.
Explain that insulation slows heat transfer. A variable is something that can change, and a trial is a repeated attempt at the same test.
Keep the explanation tied to the objects on the table. Don't make vocabulary a memory test; ask the child to point to the material they plan to change.
-
Write a testable question.
Ask which wrapping material leaves the most ice after the same observation period. The wrapping material is the independent variable, meaning the factor deliberately changed.
Keep the starting ice size, containers, location, wrapping method, and observation time as similar as possible. These fixed conditions help make the comparison fair.
The common slip is wrapping a large cube in fabric and a small cube in foil, then attributing the difference entirely to the wrapping. If several conditions change, you can't confidently explain which caused the result.
For more child-friendly language, use these scientific method steps for kids alongside the kit's own directions.
Model, investigate, and explain
-
Demonstrate the procedure and safety rules.
Show how to position the container, start the timer, and record an observation. Explain which tasks belong to the adult and what the child should do if something spills or breaks.
Keep the demonstration focused on technique rather than revealing the expected answer. Otherwise, children may try to reproduce your conclusion instead of describing their own results.
-
Let the child conduct the investigation.
Stay nearby, but leave safe measuring, timing, and recording tasks to the child. If they hesitate, ask them to identify the next instruction rather than completing it yourself.
Photograph intermediate stages from the same angle and label the images with the material and observation time. Pictures are particularly useful when changes are gradual, but they should accompany measurements rather than replace them.
For the ice comparison, choose a measurement you can make consistently. If using a kitchen scale to compare remaining ice, keep the draining and weighing procedure the same throughout.
-
Require a conclusion that answers the question.
Ask which material performed differently and which recorded results support that answer. Separate observation, what the child measured or saw, from explanation, why they think it happened.
If results are close or inconsistent, an honest conclusion can be that the comparison wasn't clear. Don't supply a confident answer that the child's measurements don't support.
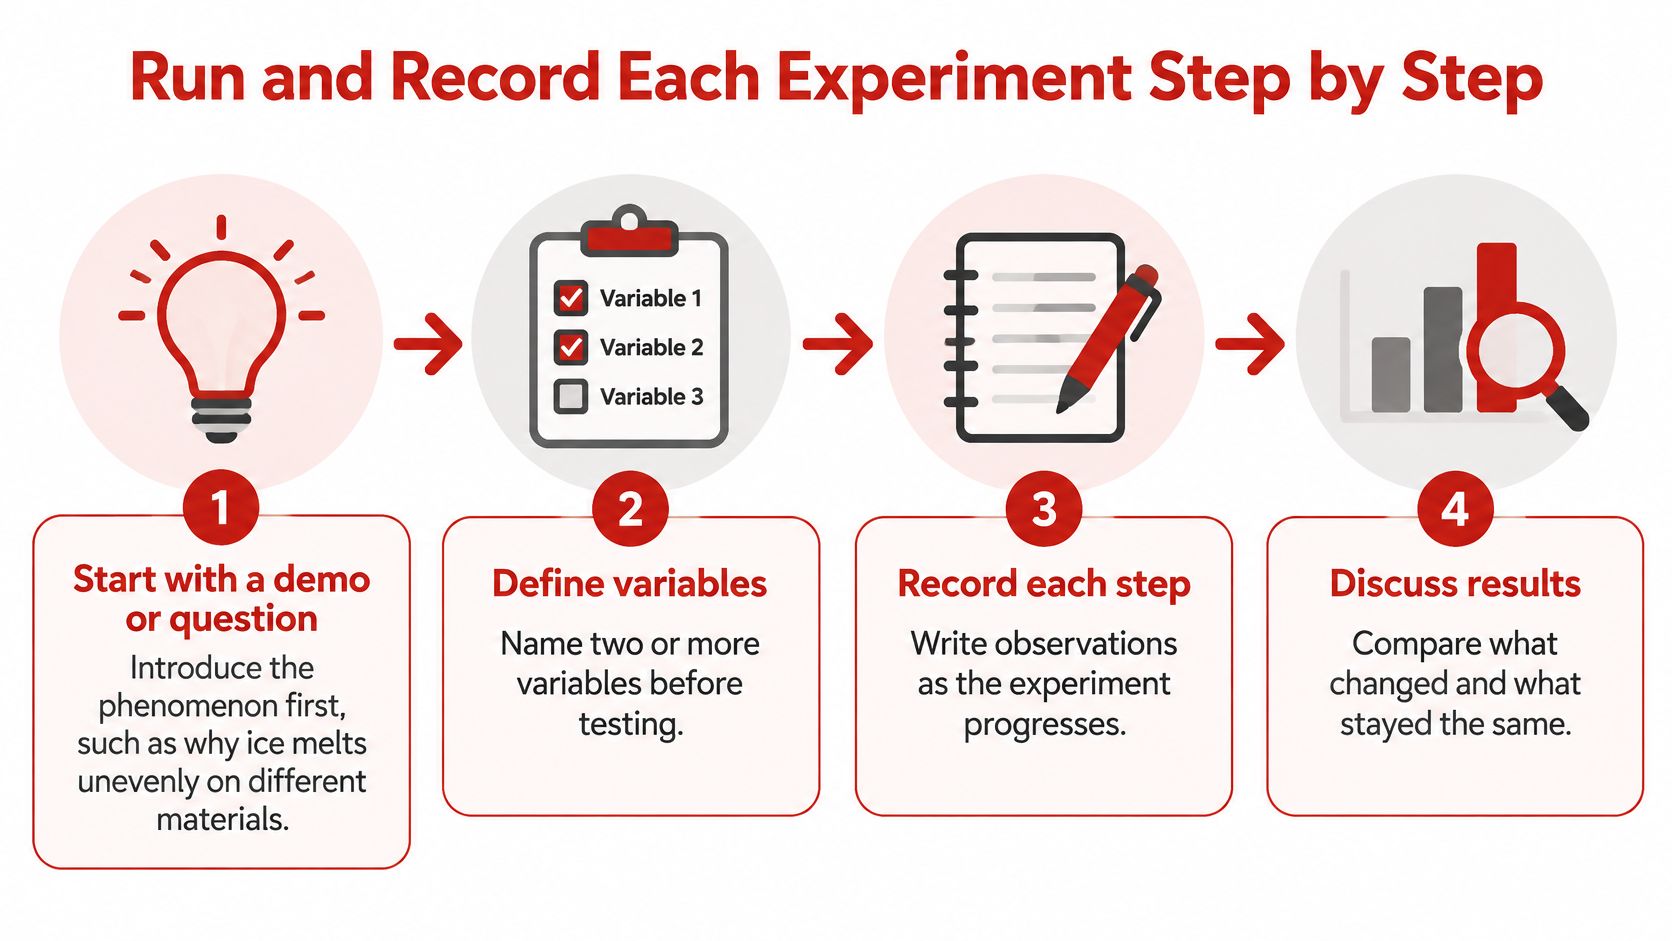
This visual summarizes the investigation cycle.
Check for understanding, not just completion
| Check | What to record | Sign of real understanding |
|---|---|---|
| Prediction | Written guess before the test starts | Child explains why the guess was right or wrong |
| Changed variable | The one factor altered, with the fixed controls named | Child can say what stayed the same and why |
| Measurements | Numbers in a results table across three trials | Repeat trials give similar results, and the child notices outliers |
| Explanation | The child's conclusion in their own words | Child links the result to the idea, not only to what happened |
Treat three trials as a practical starting plan, not a guarantee of accuracy. If an unusual result appears, check the procedure and record it rather than deleting it. An outlier is a result noticeably different from the others, and noticing one is useful scientific work.
A notebook needs only the question, materials, procedure, measurements with units, and conclusion. Professional documentation is more elaborate, but Verbal Experiment's guide to ELN-ready records for wet-lab teams offers useful context for adults about organized experiment records. Children don't need an electronic laboratory notebook to practice clear documentation.
A wrong prediction isn't a failed investigation. It gives the child something specific to reconsider.
Finish with the same paired prompts every time: ask what the child thinks will happen before testing, then ask what evidence changed or supported that idea afterward. Listen for a connection between the result and the explanation, not a memorized scientific word.
Fix Experiments That Fail or Stall
An experiment that shows no visible change can leave everyone staring at the container. Before adding more ingredients, check whether you've reached the stated observation window. Crystals and seedlings won't behave like an immediate fizzing reaction.
Use the symptom to choose a check rather than trying random fixes.
| Symptom | Likely cause | Fix |
|---|---|---|
| No reaction or change | Missing ingredient, skipped step or water too cold | Recheck the step list and repeat with water at the stated temperature |
| Results vary wildly between tries | Too few trials or several variables changed | Run at least three trials and change only one factor each time |
| Child loses interest midway | Task too long or too hard | Split into two sessions and add a prediction game before the second part |
| Adult cannot answer the child's question | Limited science background | Use the kit's explanation card and look up the answer together |
These are starting hypotheses, not certain diagnoses. No visible result might also reflect deteriorated materials or unsuitable storage conditions. Don't taste, smell closely, or mix unknown leftovers to investigate.
Decide whether to rescue or restart
A missed instruction may be easy to identify during the current session, but correcting it isn't always safe once ingredients are combined. If the sequence matters, stop and follow the manufacturer's troubleshooting or disposal directions.
Crystal growth often needs a fresh setup and observations over several days. Check the crystal-growing kit instructions for practical setup guidance, while using your particular kit's directions for quantities and temperatures.
Interest problems need a different response. Pause at a safe stopping point, leave a picture of the setup, and let the child predict what they'll find when they return.
Troubleshooting rule: Record what happened before changing the setup. Otherwise, you lose the clues that could explain the result.
An unanswered question doesn't require a restart. Tell the child what you know, identify what you're unsure about, and consult the explanation card together. Being candid about uncertainty models a more useful habit than inventing an answer.
Common Questions About Science Kits at Home
Is a science kit worth the price?
Bosson Research reported an average price of approximately USD 120 per STEAM education-material set in 2024. That's a broad market category, not a typical price for every children's science kit. Compare the actual purchase price with usable experiments, reusable tools, refill availability, and required extras.
Should I buy a kit or use household materials?
Kits offer selected materials and a defined sequence; household activities can reduce purchases and reuse everyday objects. A practical combination is a kit for the initial setup, followed by an approved household-material investigation. Don't substitute household chemicals into kit reactions.
Is a kit safe for a child under 3?
Only consider a product whose stated age range explicitly includes the child. Keep small parts inaccessible and materials sealed between sessions, and choose closely supervised activities without chemical, heat, or choking hazards. An older sibling's kit isn't automatically suitable.
Which band should I choose for a child between levels?
Start lower if reading, coordination, or sustained attention makes the higher band frustrating. Move toward more demanding activities when the child can explain predictions and follow the sequence, without overriding the manufacturer's age restrictions.
Start a Four-Week Kit Routine at Home
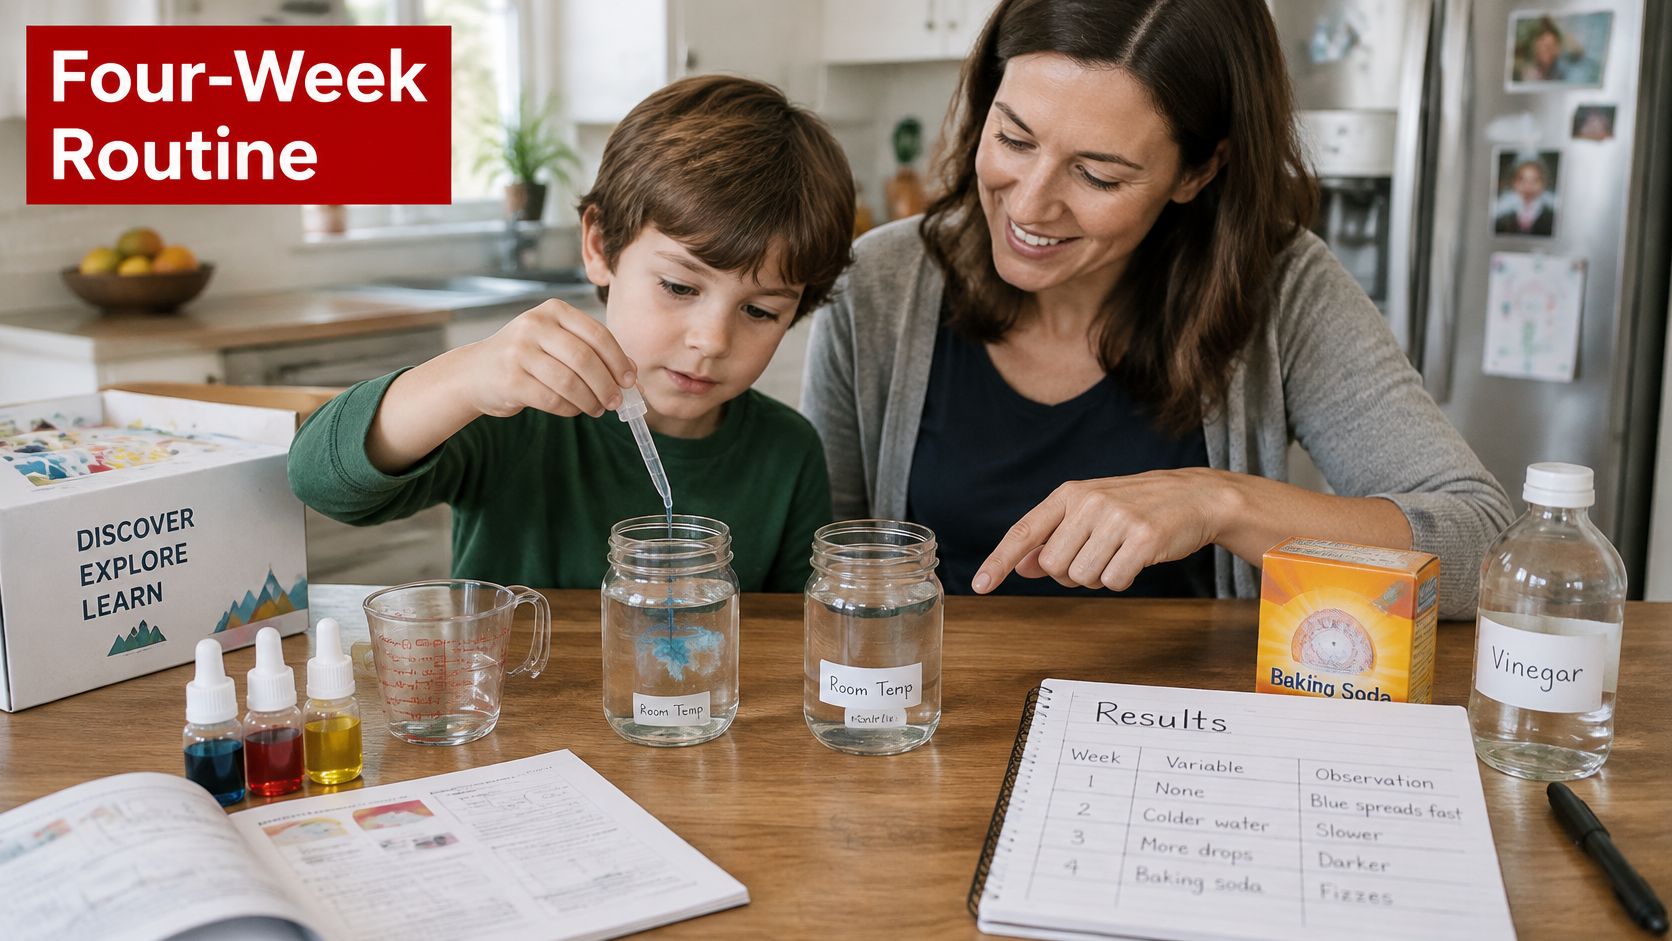
Use this four-week plan as a flexible schedule, not a deadline.
- Week one. Run an age-appropriate kit experiment with full adult guidance. Let the child become familiar with the tools.
- Week two. Revisit the activity with an approved change chosen by the child.
- Week three. Use safe household materials to investigate a new question based on the same idea.
- Week four. Invite the child to explain the sequence to a sibling or grandparent using their notes and pictures.
A shared table can be enough for this routine.
For help choosing a recurring cue, such as after a weekend breakfast, Pretty Progress offers a guide for goal setters. Choose a time you can protect rather than an ambitious schedule you'll abandon. For slower observations, plant-growing kits offer a different rhythm from immediate reactions.
Make participation accessible
Uneven STEM opportunities and family resources are concerns identified by the National Academies. Build flexibility into the activity: offer a seated, low-mess setup, stabilize containers, and let an adult handle difficult pouring.
Use picture step cards for developing readers or children who speak another language at home. Accept drawings or spoken explanations instead of written paragraphs. Ask older siblings to plan an additional variable for a separate follow-up test, not complicate everyone's current investigation.
Use the video as a shared viewing prompt, then discuss what your child notices.
For limited adult time, try a fifteen-minute planning session: read the explanation card aloud and arrange for a capable grandparent or sibling to collaborate on an appropriate test. A child helper doesn't replace required adult supervision. Choose one suitable kit and put the first session on your calendar.
Playz offers science kits for different age groups that families can use as starting points for hands-on investigations. Visit Playz, compare the stated age ranges and required supervision, and choose a kit you can revisit through your four-week plan.