

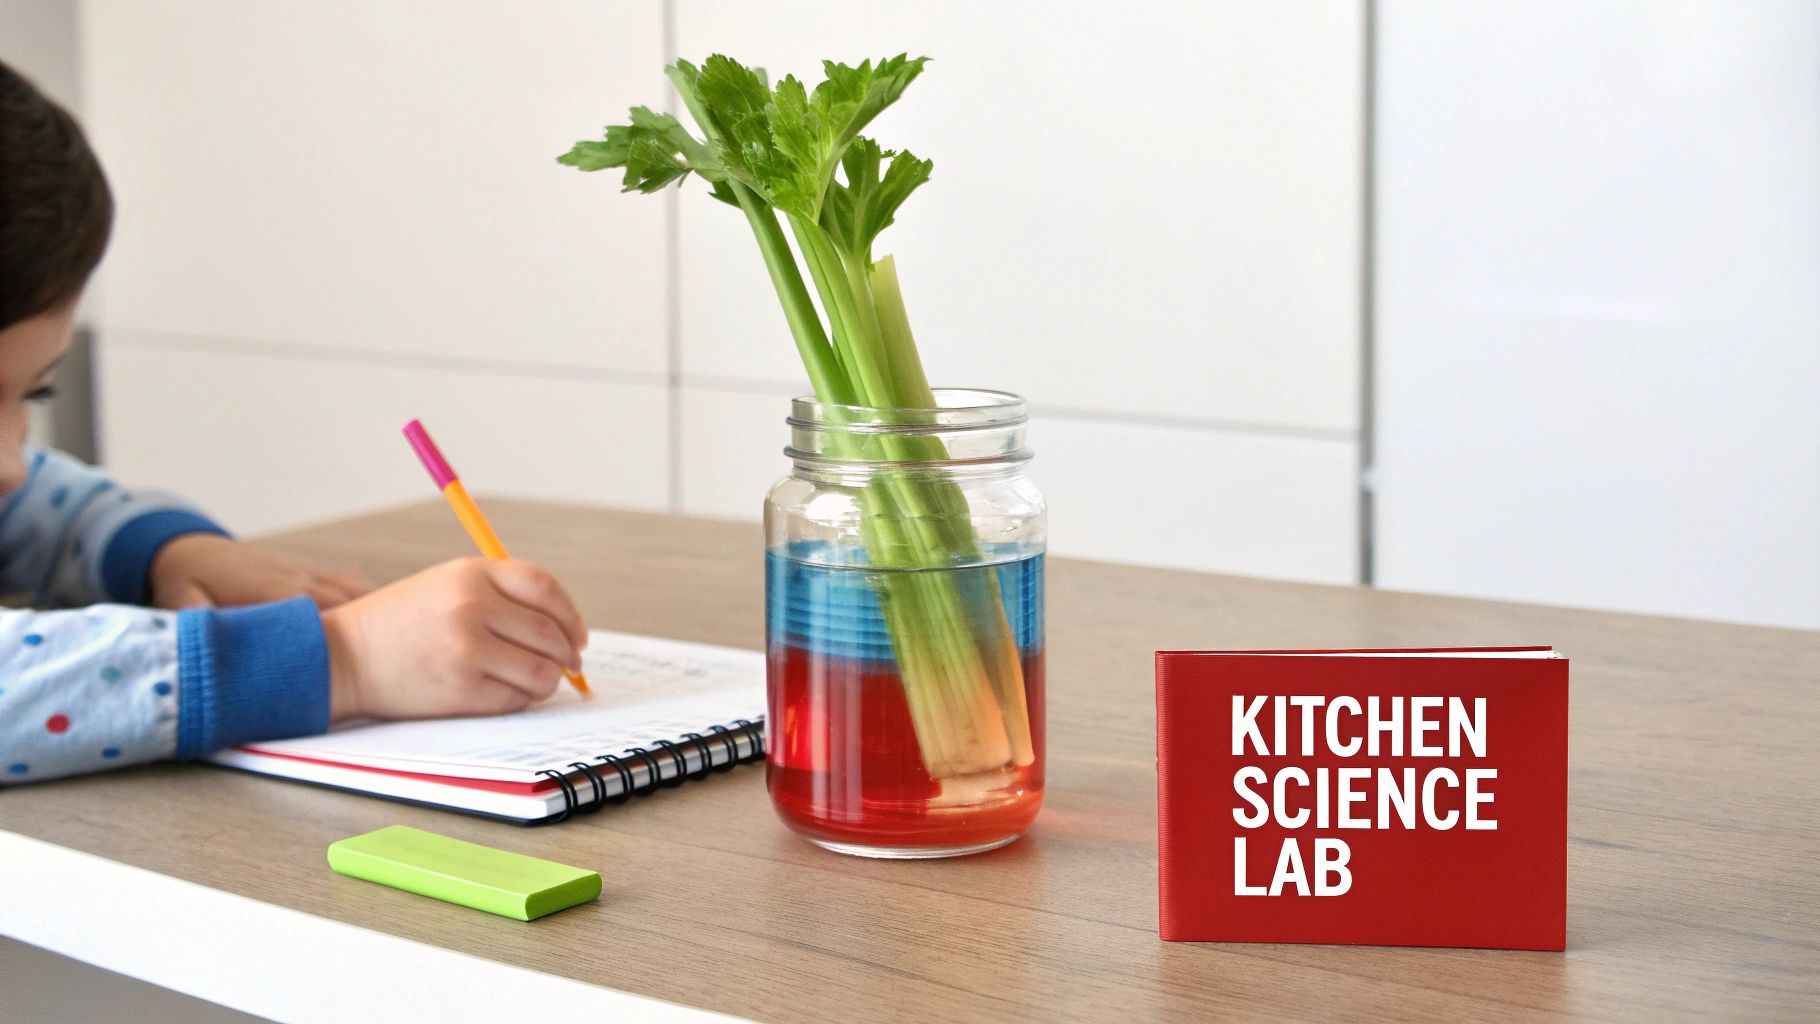
The classic celery color experiment is a staple in science experiments for kids at home, and for good reason. It’s simple, visually stunning, and perfectly demonstrates how plants "drink" water. For kids, it’s a hands-on way to make a complex biology lesson feel tangible and, frankly, a little bit magical.
Turn Your Kitchen Into a Colorful Science Lab
Ready to transform your kitchen into an exciting biology lab? This project isn't just about making a boring vegetable look cool; it's about making science visible, engaging, and unforgettable for young learners.
We’ll show you how a few common household items can reveal the incredible process plants use to pull water up from their base, a process known as capillary action. Imagine watching a plain stalk of celery slowly turn into a vibrant rainbow—that’s exactly what we’re going to do.
This practical guide provides everything you need to turn a simple activity into a memorable learning experience. You'll see firsthand how a humble celery stalk can spark genuine curiosity about the natural world.
Experiment Quick Facts: What to Expect
Here's a quick look at the materials, time commitment, and the key scientific concepts your child will learn with this engaging celery experiment.
| Category | Details |
|---|---|
| Main Supplies | Fresh celery stalks, clear jars, water, food coloring |
| Time Needed | 15 minutes for setup, 24-48 hours for observation |
| Ages | Best for ages 4-10 (with adult supervision) |
| Key Science Concept | Capillary action and transpiration |
This experiment is a fantastic entry point into core scientific principles, proving that you don't need a formal lab to explore amazing concepts.
Actionable Insights: What You'll Discover
This project is much more than a colorful trick. It’s a fantastic way to introduce scientific skills without it feeling like a stuffy lesson.
- See Biology in Action: You'll actually observe how plants transport water from their base to their leaves through tiny internal tubes called xylem.
- Practice Scientific Observation: This activity naturally encourages kids to pay close attention to details, document changes over time, and draw conclusions based on what they see.
- Learn Through Doing: It provides a tactile, multi-sensory way to learn, which is always more impactful than just reading about it in a book.
Key Takeaway: This experiment perfectly illustrates that the most profound lessons can often be found using everyday items. It makes learning accessible, fun, and something the whole family can get involved in.
From gathering your materials to understanding the final results, we’ll walk you through every step. Let's get started.
Getting Your Celery Experiment Set Up for Success
The magic of this experiment lies in its simplicity, but a few small choices upfront can make a huge difference. Getting the setup right is the key to turning a so-so result into a stunning, colorful success that gets kids truly excited.
Think of it like prepping a canvas before you start painting. A little groundwork ensures you end up with a masterpiece. We'll walk through how to pick the perfect celery, mix the most vibrant colors, and create the ideal observation station.
Tip 1: Choose Your Star Performer—The Celery Stalk
Not all celery is created equal for this particular job. The freshness of your stalk is the single most important factor. A crisp, healthy piece of celery will "drink" water far more efficiently than one that’s been wilting in your fridge.
When you're at the store, look for these key traits:
- Fresh and Leafy: Opt for the inner, lighter green stalks that still have plenty of fresh, vibrant leaves. Those leaves are the final destination for the colored water, and seeing them change color is the big payoff.
- Firm Stalks: Give the celery a gentle squeeze. It should feel firm and ready to snap, not soft or bendy. This is a clear sign that it's well-hydrated and its internal plumbing is ready to go.
- Avoid Blemishes: Try to find stalks without brown spots or wilted bits, as these can hinder water absorption.
Once you’ve got your celery, an adult should slice about an inch off the bottom. A fresh, clean cut exposes the xylem—the tiny straws inside the plant—ensuring they're open and ready to soak up colored water. Making the cut at an angle can even increase the surface area for absorption.
Pro Tip: For the absolute best results, perform the experiment the same day you buy the celery. The fresher it is, the faster and more dramatic the color change will be.
Tip 2: Mix the Perfect Potion—The Colored Water
The vibrancy of your experiment comes down to the concentration of your colored water. While a few drops might seem sufficient, we're aiming for a deep, saturated color to achieve that "wow" factor.
A good rule of thumb is to use at least 20 drops of food coloring for every cup (8 ounces) of room-temperature water. Don’t be shy about adding a few extra drops, especially for lighter colors like yellow. In my experience, dark reds and blues usually yield the most striking results.
Stir everything until the color is completely uniform. Using clear glass jars or cups is a must, as it lets you see the whole process from the outside. You can watch the water level drop and see the color begin its slow creep up the stalk.
Tip 3: Create Your Observation Station
The final step is to set up a dedicated space where your young scientist can easily check on the experiment's progress. This transforms it from a simple activity into a real investigation.
Here’s a practical setup:
- Find a Good Location: Place your jars in a well-lit spot, but avoid direct, hot sunlight, which can cause the water to evaporate too quickly. A kitchen counter or a spot near a window is usually perfect.
- Label Everything: Use masking tape or a sticky note to label each jar with its color. This is incredibly helpful if you’re testing different colors or other variables simultaneously.
- Prepare a Journal: Place a simple notebook and a pen next to the experiment. This encourages kids to record what they see by drawing pictures or jotting down notes at different times.
By taking a few minutes to prepare your materials and set the scene, you're paving the way for a successful and impressive celery color experiment.
The Science Explained: How Celery Drinks Water
Ever wondered how colored water travels up a celery stalk, seemingly defying gravity? It’s not magic, but a fascinating scientific process that’s easy for even the youngest kids to grasp. Two key forces work together here: capillary action and transpiration.
Capillary Action: The Upward Climb
The star of the show is capillary action. Think of the inside of the celery stalk as being filled with thousands of super-tiny straws. These microscopic tubes, called xylem, are the plant's plumbing system, designed to transport water from the roots all the way up to the leaves.
Water molecules have special properties that make this journey possible. First, they stick together (cohesion). Second, they stick to the sides of the xylem tubes (adhesion). This combination of sticking and climbing allows the water to pull itself upward, much like liquid climbing up a paper towel dipped in a glass.
This diagram breaks down the key steps that make the science visible.
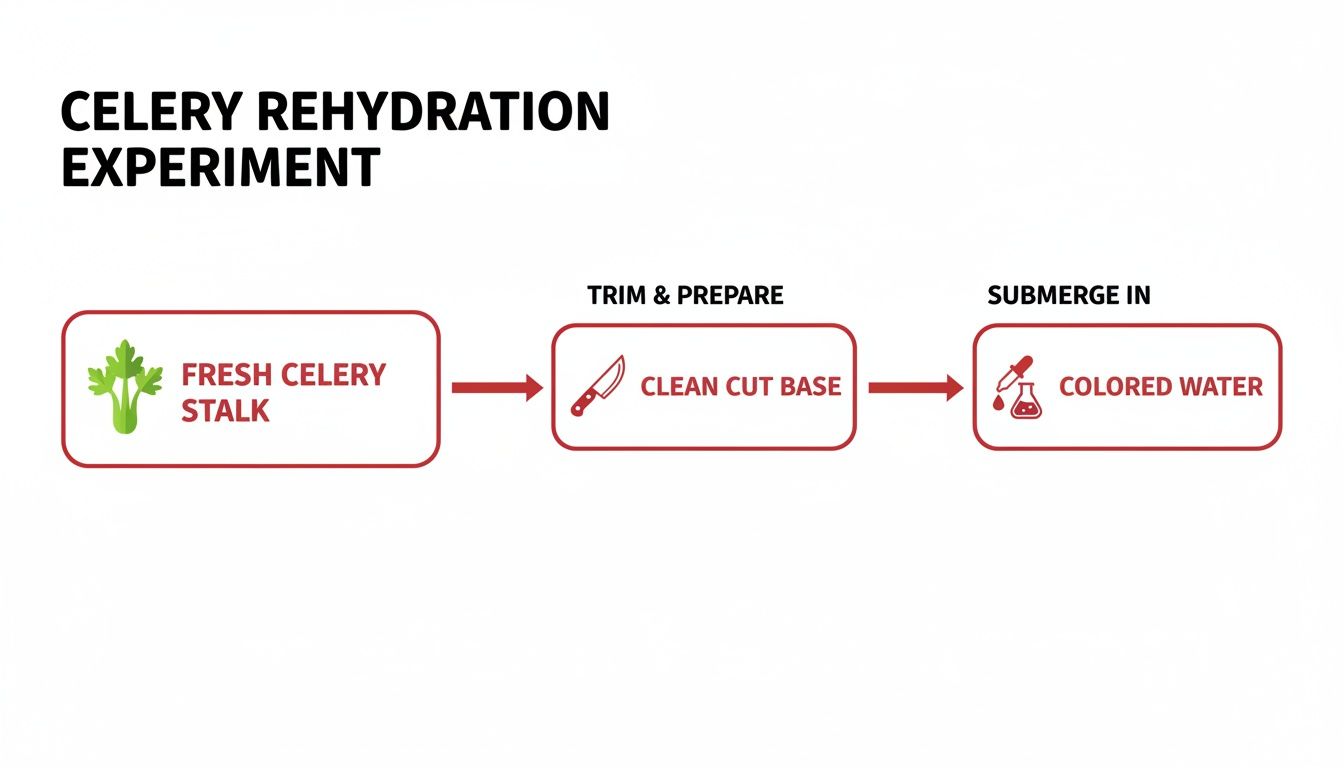
As you can see, a fresh stalk, a clean cut, and brightly colored water are the three ingredients you need to see this process in action.
Transpiration: The Engine Pulling the Water
So, what gives the water that extra pull to reach the top? That’s where transpiration comes in. Just like us, plants "breathe." They release water vapor into the air through tiny pores on their leaves called stomata.
As water evaporates from the leaves, it creates a gentle suction effect. This pulls more water up through the xylem tubes to replace what was lost. It’s a continuous cycle that acts like a powerful, silent engine, driving water circulation throughout the plant.
Key Takeaway: The celery color experiment makes invisible plant processes visible. Capillary action is the upward climb of water through the xylem, while transpiration is the pull from the leaves that keeps the whole system moving.
Connecting to the Real World of Plants
This amazing process isn't just happening in your glass of celery. It’s how all vascular plants—from the smallest flowers to the tallest redwood trees—get the water they need to survive.
While capillary action can help water climb nearly 100 cm in very tall plants, you'll see it move a visible 20-50 cm in your celery stalk over 24-48 hours. It’s a fantastic, real-time look at how water molecules cling together (cohesion) and to the plant's vessel walls (adhesion) to defy gravity. Understanding these concepts is fundamental to learning about plant life. After this experiment, a great next step is to explore our guide on how flowers grow to connect these ideas to the bigger botanical world.
Taking Your Celery Experiment to the Next Level
Once you’ve mastered the basic experiment, the real fun begins. Why stop with one color when you can push the boundaries and see what else is possible? This is your chance to encourage your child to think like a real scientist.
By changing one thing at a time—a key part of the scientific method—you can introduce concepts like forming a hypothesis, running a controlled test, and observing the results. It’s what transforms this from a cool demonstration into a genuine investigation.
The Famous Split-Stalk Experiment
One of the coolest variations is splitting the celery stalk. It’s a fantastic way to visualize how the xylem tubes work independently within the same plant. The results are always a huge hit with kids.
Here’s a step-by-step guide:
- Prep Your Colors: Fill two jars with different colored water—red and blue work great for a dramatic effect. Place them right next to each other.
- Split the Stalk: An adult should take a fresh celery stalk and carefully slice it lengthwise from the bottom up, going about halfway up the stalk to create two "legs."
- Place and Observe: Gently place one leg into the red water and the other into the blue water.
Over the next 24-4s8 hours, you'll see something amazing. The leaves on one side will start turning red, while the other side turns blue. You may even see a purple effect where the two colors meet in the middle leaves. It’s a powerful, visual lesson on how each half of the stalk pulls up its own water supply.
Scientist's Question: Before you start, ask your child to make a prediction. What do they think will happen? This simple question encourages them to form a hypothesis, a cornerstone of scientific thinking.
Testing Different Variables
Beyond the split-stalk method, you can dive deeper by exploring how different conditions affect the celery's water uptake. This is a great, low-stress way to introduce the idea of controlled variables.
Here are a few simple but effective tests:
- Hot vs. Cold Water: Does water temperature make a difference? Set up two jars, one with warm tap water and one with cold. See which one shows color in its leaves first. (Hint: Transpiration often speeds up in warmer conditions).
- Different Plants: Celery isn't the only plant that can do this trick! Try this experiment with a white carnation, a daisy, or a leaf of napa cabbage. Comparing how different plants absorb water is a great jumping-off point for discussions about plant structures.
If you’re enjoying these variations, you can find even more fantastic science experiments with plants that use simple household items. Sharing what you learn can be just as fun as the experiment itself. If this project ignites a passion for teaching, you might even be inspired to create and sell online courses to help others discover the joy of science.
More Celery Experiment Variations to Try
Want to keep the scientific discovery going? Expanding on the basic experiment is where real creativity comes in. Here are a few more ideas, what each variation teaches, and what exciting results you can expect.
| Experiment Variation | What It Teaches | Expected Result |
|---|---|---|
| Using a White Flower | How water travels to all parts of a plant, including petals. | The petals of a white carnation or daisy will change color, creating a beautiful tie-dye effect. |
| Leafy Greens Challenge | How different leaf structures absorb and show water. | A leaf of romaine lettuce or cabbage will show colored veins, highlighting its vascular system. |
| Salty vs. Fresh Water | The effect of salinity on a plant's ability to absorb water (osmosis). | The celery in freshwater will change color much faster than the one in salty water. |
| Light vs. Dark | How light exposure (and transpiration) affects water uptake. | The stalk in a sunny spot will likely absorb color faster than one kept in a dark cupboard. |
Trying these variations helps solidify the core concepts and makes learning interactive and fun.
Observing and Recording Your Scientific Findings

Any good scientist knows that the experiment isn't over when you set it up—that's when the real fun begins! Watching closely and jotting down what you see is where your child gets to step into the role of a true researcher, turning simple observations into their own data.
Setting up a science journal is the perfect way to track the celery's colorful journey. A simple notebook and colored pencils are all you need. The goal is to get your child to notice details and track changes over time. This practice builds patience, sharpens attention to detail, and is one of the best ways to encourage critical thinking in children.
A Practical Observation Timeline
To capture the magic, check in on your celery at a few key moments. This schedule lets you see the changes from the first hint of color to the final, vibrant reveal.
- After 2 Hours: Look closely at the bottom of the stalk. Can you spot any faint traces of color? Check the very edges of the leaves—that’s often where the first sign of color appears.
- After 6 Hours: The color should be more obvious in the stalk. The leaves will start showing distinct splotches of color, especially around the veins.
- After 24 Hours: This is the "wow" moment! The color should be bright and bold in both the stalk and the leaves, creating a vivid effect.
- After 48 Hours: The color will be at its peak. The celery has had two full days to drink the dyed water, resulting in deeply saturated leaves and clearly visible colored channels in the stalk.
The celery color experiment has become a powerhouse in early science education. Informal polls suggest it can boost STEM engagement by as much as 65% for kids between 4 and 8 years old.
Pro Tip: Don't just write down what you see—draw it! A series of drawings from each checkpoint creates a fantastic visual story of the experiment. It’s a great way for non-writers to participate, too.
The Grand Finale: The Cross-Section Reveal
Once you’ve made your final observation, it’s time for the big payoff. With an adult handling the knife, carefully slice a celery stalk in half. You'll see the clearest evidence of capillary action.
You should see a pattern of tiny, colored dots, often in a smiley-face shape. Those dots are the xylem tubes! They are the plant's "straws," now stained bright with the food coloring. This final step is the "aha!" moment that connects everything you’ve observed and makes the science click.
Celery Color Experiment FAQs
Even the most straightforward science project can have a few hiccups. Answering questions is what turns a simple activity into a real learning moment. Let's walk through common queries about the celery color experiment with practical, hands-on tips.
Why is my celery not changing color?
This is the most frequent question, but it's usually an easy fix. More often than not, the celery isn't fresh enough. If the stalk is old, its internal water channels (the xylem) might be blocked. A fresh trim right before placing it in the water is crucial. Another common issue is the food coloring concentration. If the water is too pale, the color won't be visible. Aim for at least 20 drops of dye per cup of water for vibrant results.
How long does the celery experiment take to show results?
Patience is part of science! You should see the first faint hints of color on the leaf edges within 2 to 4 hours. For the really dramatic, photo-worthy effect, give it at least 24 hours. The color will become even more concentrated over the next 48 hours. A helpful tip: warmer room temperatures can sometimes speed up the process.
Can I use other plants for this experiment?
Absolutely! This is a fantastic way to observe how capillary action works across different plant structures. White flowers are an especially beautiful alternative.
- White Carnations or Daisies: These are showstoppers. The dye travels right into the petals, creating a stunning visual of the plant's vascular system.
- Napa Cabbage or Romaine Lettuce: The leaves on these greens are perfect for highlighting the veins. You'll see the color create a clear, web-like pattern that shows exactly where the water is going.
Trying different plants shows that this water transport system is fundamental to how many species survive. Comparing results is a great way to start thinking like a scientist and can be the foundation for a more advanced example of a science fair project.
Safety Note: While standard food coloring is non-toxic, it's best to advise against eating the celery after the experiment. The concentrated dye can make the celery taste unpleasant. It's better to admire your colorful creation and then toss it in the compost bin.
At Playz, we believe learning happens best when kids can get their hands dirty. Our science kits are designed to spark natural curiosity and make complex concepts fun and easy to grasp. Explore our collection and find your family's next great adventure at https://www.playzusa.com.