

Welcome, curious minds and dedicated educators! Are you searching for ways to make learning unforgettable for your fourth grader? Science isn't just about memorizing facts from a textbook; it's about seeing chemical reactions fizz, watching crystals grow, and understanding the world through hands-on discovery. This guide is your ultimate resource, providing eight easy science experiments for 4th graders, each designed to spark a lifelong love for learning using simple, everyday materials you likely already have.
Each experiment is a mini-adventure, packed with excitement and fundamental scientific principles. We'll break down both the 'how' and the 'why' behind each project, offering clear, step-by-step instructions, actionable tips, and the science at play. Our guide embraces a hands-on, interactive discovery-based learning approach, proving that children truly learn best by doing. Get ready to transform your kitchen or classroom into a vibrant laboratory where play and education collide. Let's dive in and start experimenting
1. Volcano Eruption Experiment
The classic volcano eruption is one of the most memorable and easy science experiments for 4th graders, providing a visually spectacular introduction to chemical reactions. This hands-on project involves building a model volcano and then using common household ingredients, baking soda and vinegar, to simulate a dramatic eruption. It’s an engaging way to demonstrate how an acid (vinegar) and a base (baking soda) react to produce carbon dioxide gas, which creates the impressive fizzing foam.
This experiment is a staple in elementary school science fairs and STEM education kits for good reason. It simplifies a complex chemical concept into a tangible and exciting outcome, making abstract ideas like acid-base reactions and gas production easy for young minds to grasp.
Why It’s a Great Experiment for 4th Graders
The volcano experiment is perfect for this age group because it combines creativity with fundamental scientific principles. Students get to design and build their own volcano structure, which taps into their artistic skills, before diving into the scientific method. They can form a hypothesis about what will happen, observe the reaction, and draw conclusions based on the spectacular results. This project powerfully illustrates cause and effect in a safe and controlled setting.
Actionable Tips for a Perfect Eruption
To ensure your volcano experiment is a success, follow these simple but effective tips:
- Contain the Mess: Always place your volcano model inside a large tray, baking pan, or plastic bin before starting. The "lava" will overflow, and this makes cleanup significantly easier.
- Enhance the Lava: Mix a few drops of red food coloring and a squirt of dish soap into the vinegar before pouring. The soap helps create more bubbles, resulting in a foamier, longer-lasting eruption that looks more like real lava.
- Encourage Predictions: Before adding the vinegar, ask students to predict what will happen. This encourages critical thinking and engages them more deeply in the scientific process. For more ideas and variations on this classic, you can explore other 4th grade science experiments on Playz USA's blog.
2. Crystal Growing Experiment
Watching crystals form seemingly out of nowhere is a magical experience, making this one of the most captivating and easy science experiments for 4th graders. This project beautifully illustrates concepts like saturation, solubility, and molecular structure. By dissolving a substance like salt, sugar, or borax in hot water to create a supersaturated solution, students can observe the process of crystallization as the water cools and evaporates over several days.

This experiment transforms abstract chemistry into a tangible, visible process as molecules arrange themselves into intricate geometric patterns. It’s a popular activity in elementary STEM curricula and at science camps because it requires patience and careful observation, teaching valuable scientific virtues alongside the core concepts. The stunning results are a fantastic reward for their dedication.
Why It’s a Great Experiment for 4th Graders
The crystal growing experiment is ideal for 4th graders as it introduces them to long-term observation and data collection. Unlike instant-reaction experiments, this project unfolds over days, encouraging students to keep a science journal, note daily changes, and practice patience. It allows them to see how a dissolved solid can reappear in a new, highly organized form, making the invisible world of molecules feel more concrete. It also provides an excellent opportunity to compare the different geometric shapes that various substances create.
Actionable Tips for Perfect Crystals
To grow beautiful, well-formed crystals, try these simple yet effective tips:
- Provide a Good Foundation: Use a textured pipe cleaner or a coarse string suspended from a pencil or stick. This gives the molecules a surface to cling to and begin the crystallization process.
- Location is Key: Place the jar in a warm, dry location where it will not be bumped or disturbed. Constant movement can disrupt the delicate crystal formation, resulting in smaller, less-defined structures.
- Compare and Contrast: Set up multiple jars using different solutes like salt, sugar, and borax. Ask students to predict which will grow the fastest or largest and have them compare the final crystal shapes using a magnifying glass. For a complete guide, you can find more detailed steps in these crystal growing kit instructions.
3. Slime Making Experiment
Creating slime is one of the most popular and easy science experiments for 4th graders, captivating students with its gooey, tactile nature while secretly teaching them about polymer chemistry. This engaging activity involves mixing household ingredients like glue, water, and a borax solution (or a safer contact lens solution alternative) to create a unique substance. It’s a fantastic hands-on demonstration of how chemical reactions can change the properties of materials, turning simple liquids into a stretchy, non-Newtonian fluid.
This experiment is a worldwide favorite in classrooms and at science-themed parties because it makes the abstract concept of polymers tangible. Students can feel the long chains of molecules (polymers) forming as the slime comes together, providing a memorable lesson in chemical bonding that is both fun and educational.
Why It’s a Great Experiment for 4th Graders
The slime experiment is ideal for fourth graders as it allows them to directly manipulate and observe a chemical change. They get to measure ingredients, mix them, and feel the transformation from liquid to a semi-solid. This process encourages them to follow instructions carefully and observe the results closely. It perfectly illustrates the concept of a non-Newtonian fluid, which behaves like both a solid and a liquid, sparking curiosity about material science in a way a textbook cannot.
Actionable Tips for Perfect Slime
To ensure your slime-making session is a scientific success, follow these practical tips:
- Prioritize Safety: Use a non-toxic contact lens solution containing boric acid and sodium borate as a safer, kid-friendly alternative to a borax-water solution. Always ensure an adult handles the activator solution.
- Get the Color Right: Add food coloring to the glue and water mixture before adding the activator. This helps distribute the color evenly for a vibrant, uniform slime without extra messy stirring later.
- Control the Stickiness: If your slime is too sticky, add a tiny bit more contact lens solution. If it's too stiff, knead in a small amount of water or lotion. Encourage students to experiment with these small adjustments. For a kit with all the right ingredients and fun variations, check out this Unicorn Slime & Crystals Science Kit from Playz USA.
4. Density Tower Experiment
Creating a colorful liquid rainbow in a jar is one of the most visually stunning and easy science experiments for 4th graders. This project introduces the scientific concept of density in a way that is both beautiful and easy to understand. By carefully layering different household liquids like honey, oil, and water, students can build a tower that demonstrates how substances with different densities arrange themselves, with the densest liquids sinking to the bottom and the least dense floating on top.
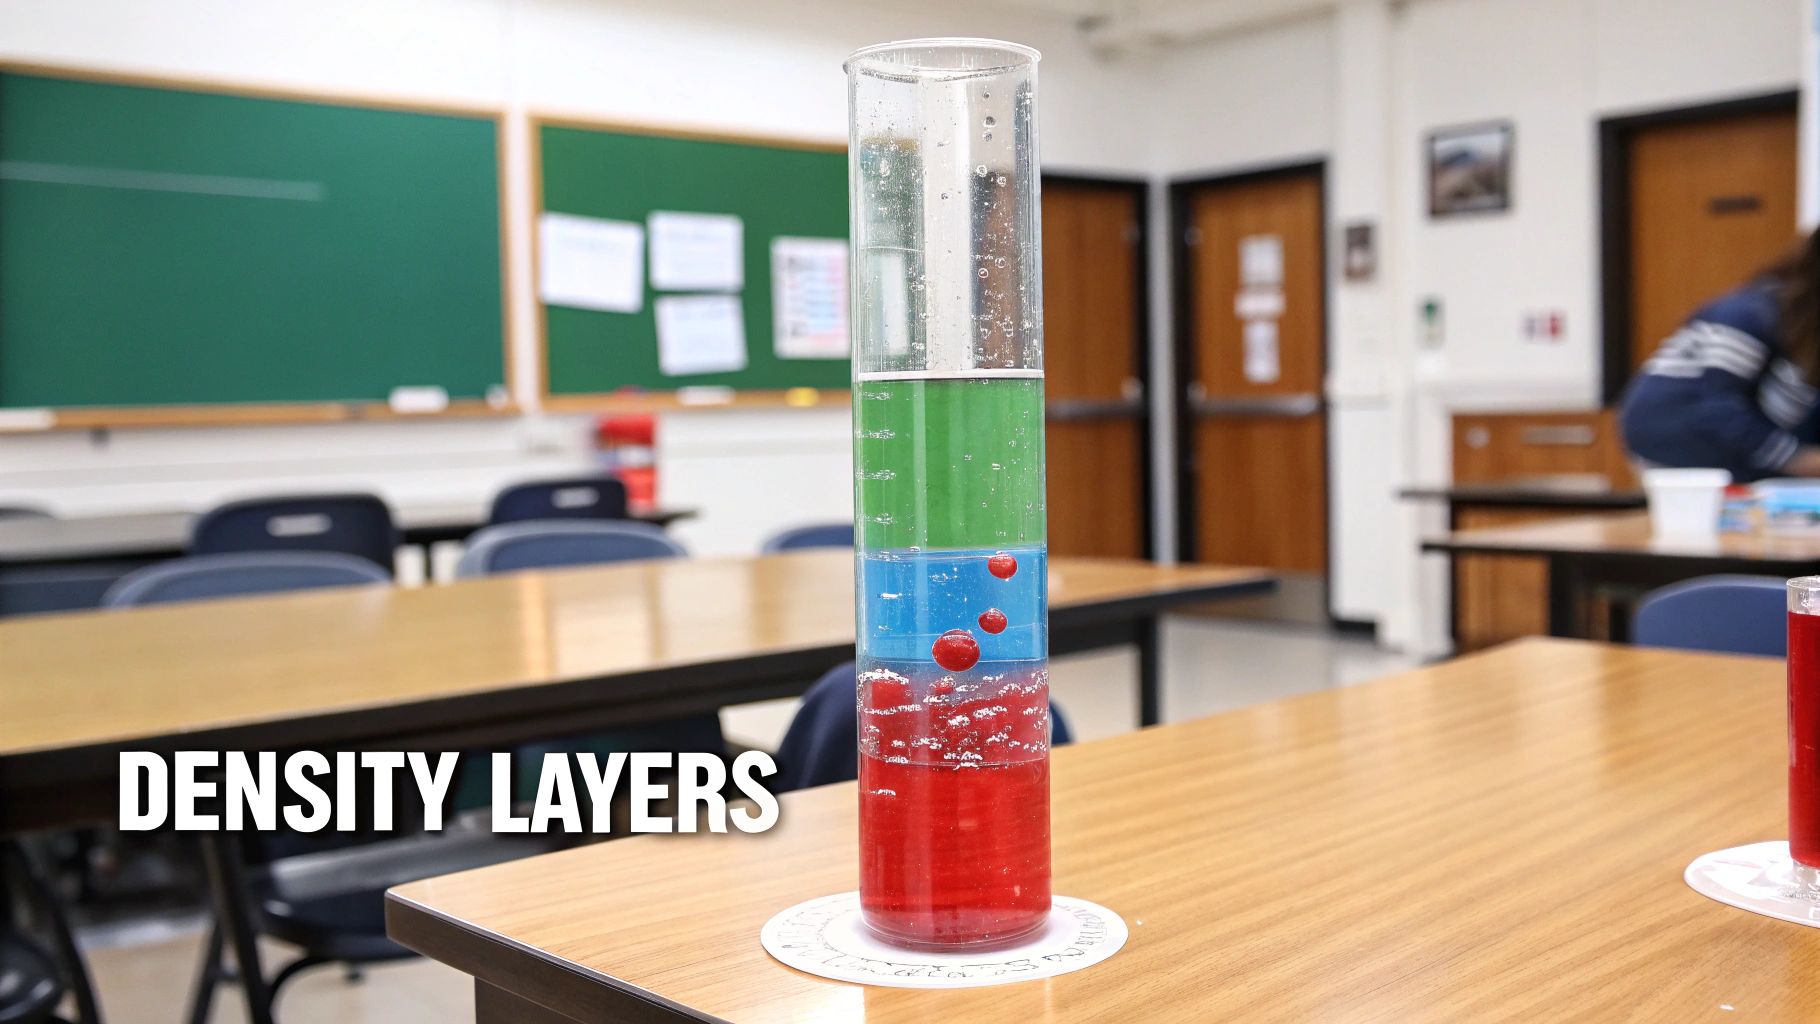
This experiment is a favorite in elementary physics lessons and museum demonstrations because it makes an abstract concept like mass per unit volume tangible. Watching the distinct layers form and remain separate provides a powerful visual that solidifies the principles of density and buoyancy for young learners.
Why It’s a Great Experiment for 4th Graders
The density tower is perfect for 4th graders because it requires patience, careful observation, and develops fine motor skills. It clearly illustrates a core principle of physics without complex equations. Students can hypothesize which liquid will be the densest, observe the layering process, and then test their understanding by dropping small objects into the tower to see where they float. This hands-on interaction makes the learning process dynamic and memorable, transforming a simple observation into a true scientific investigation.
Actionable Tips for a Perfect Tower
To ensure your density tower is a success with clear, distinct layers, follow these tips:
- Go Tall and Narrow: Use a tall, thin container like a graduated cylinder or a clear water bottle. This accentuates the layers and makes the visual effect more dramatic.
- Pour with Precision: Pour each liquid slowly down the inside of the container. Tilting the container and using the back of a spoon to guide the flow helps prevent the liquids from mixing prematurely.
- Color for Clarity: Add a different food coloring to clear liquids like water and rubbing alcohol. This makes each layer distinct and creates a vibrant, rainbow-like effect that is easier to observe.
- Test Buoyancy: Once your tower is complete, gently drop small objects like a grape, a plastic bead, or a small screw into the cylinder. Ask students to predict where each object will settle, providing a great extension of the lesson.
5. Invisible Ink Experiment
The invisible ink experiment is a fascinating and easy science experiment for 4th graders that blends chemistry with the thrill of secret messages. This activity introduces students to the concept of chemical reactions triggered by heat, specifically oxidation. By using common kitchen staples like lemon juice or milk, students can write messages that are completely invisible until gently heated, revealing the hidden text as if by magic.
This experiment is a fantastic way to explain how certain substances oxidize, or burn, at a lower temperature than the paper they are on. The lemon juice weakens the paper's fibers, and when heat is applied, the "ink" turns brown before the rest of the paper has a chance to scorch, making the secret message appear. It's a fun, spy-themed way to engage young scientists.
Why It’s a Great Experiment for 4th Graders
This experiment is perfect for 4th graders because it feels like a magic trick backed by real science. It taps into their natural curiosity and love for secrets and codes while teaching them about chemical properties and reactions. Students can hypothesize which "ink" will work best, observe the changes under heat, and draw conclusions, all while practicing the scientific method in a creative and memorable way. It’s a great example of historical science, tying into stories of spies and secret communications.
Actionable Tips for Revealing Secret Messages
To ensure your invisible ink messages appear clearly and safely, follow these key tips:
- Choose Your Ink: Lemon juice is the classic choice, but you can also experiment with milk, a solution of baking soda and water, or even onion juice. Use cotton swabs or a small paintbrush to apply the "ink" to white paper.
- Supervise the Heat: An adult should always handle the heating process. You can use a hot lightbulb, a hairdryer on its highest setting, or an iron (on a low setting, with no steam) to gently and evenly warm the paper until the message is revealed.
- Encourage Experimentation: Have students write the same message using different types of invisible ink. Ask them to predict which one will show up the darkest or the fastest, turning the activity into a comparative experiment. This enhances critical thinking and observation skills.
6. Seed Germination Experiment
The seed germination experiment is a fantastic, long-term project that ranks among the most impactful easy science experiments for 4th graders. This hands-on investigation into botany allows students to witness the miracle of life firsthand. By planting seeds under various conditions, such as with or without light, water, or warmth, students learn about the essential elements plants need to grow.
This experiment beautifully illustrates the scientific method over several weeks. Students will form a hypothesis, control variables, collect data, and observe the entire germination process, from a tiny seed to a sprouting seedling. It's an excellent way to introduce concepts in biology, environmental science, and data analysis in a way that is both engaging and patient.
Why It’s a Great Experiment for 4th Graders
This experiment is perfect for fourth graders because it teaches patience, observation, and the importance of controlled variables. Unlike instant-reaction experiments, this project unfolds over time, encouraging students to keep detailed records and notice subtle changes. They learn that science isn't always about explosions; it's also about careful, methodical observation. This project gives them a sense of ownership and responsibility as they care for their potential plants.
Actionable Tips for a Successful Grow
To ensure your seed germination experiment yields clear results and valuable lessons, follow these tips:
- Choose Fast-Growing Seeds: Use seeds that germinate and grow quickly, like beans, peas, or radishes. This helps maintain student engagement as they will see noticeable changes within days.
- Establish a Control Group: Always have a "control" plant that receives ideal conditions (water, light, and warmth). This provides a baseline to compare against the plants growing in altered environments.
- Document Everything: Encourage students to keep a daily or weekly journal. They should measure plant height, count leaves, draw pictures, and take photos to create a comprehensive record of growth. To understand the fascinating process happening inside the seed, you can learn more about how flowers grow and develop.
- Use Clear Containers: Plant seeds in clear plastic cups or glass jars with damp paper towels. This allows students to see the roots growing downward and the shoot growing upward, providing a complete view of the germination process.
7. Static Electricity Experiment
Exploring the invisible forces of static electricity is one of the most intriguing and easy science experiments for 4th graders, revealing the fundamentals of physics with just a balloon and a piece of cloth. This hands-on activity involves creating a static charge by rubbing a balloon with wool and then using that charge to attract small pieces of paper. It’s a fascinating way to demonstrate electron transfer and the resulting attractive force, making abstract concepts like electrical charges tangible and fun.
This experiment is a classic in elementary physics units and is frequently featured in science museums because of its simplicity and immediate "wow" factor. It provides a safe, memorable introduction to the principles that govern everything from lightning strikes to the cling of a sock fresh out of the dryer, sparking curiosity about the unseen world of atoms and electrons.
Why It’s a Great Experiment for 4th Graders
The static electricity experiment is ideal for fourth graders as it brings a core physics concept to life without complex equipment. Students can directly observe cause and effect: rubbing the balloon (the cause) makes it attract paper (the effect). This simple yet powerful demonstration allows them to form hypotheses about which materials will create the strongest charge and test their ideas in real-time. It encourages keen observation and critical thinking as they try to understand why this invisible force works.
Actionable Tips for a Perfect Attraction
To ensure your static electricity experiment is a shocking success, follow these simple but effective tips:
- Work in Dry Conditions: Static electricity works best in low humidity. If the air is damp, the charge on the balloon will dissipate quickly. Try this experiment on a dry day for the most dramatic results.
- Use Small, Light Materials: Instead of perfectly cut squares, use tiny, irregularly torn pieces of tissue paper. Their light weight and uneven edges make them easier for the static charge to pick up.
- Encourage Experimentation: Before starting, ask students to predict which materials will work best. Have them test different items to rub the balloon with, like their own hair, a cotton shirt, or a polyester cloth, and compare the outcomes. This turns a simple demonstration into a true scientific investigation.
8. Rock Candy Making Experiment
Creating edible rock candy is one of the most delicious and easy science experiments for 4th graders, perfectly blending kitchen chemistry with a sweet reward. This project visually demonstrates the scientific principles of supersaturation and crystallization. By dissolving a large amount of sugar in hot water to create a supersaturated solution, students can watch as sugar crystals form and grow on a string or skewer over several days.
This experiment is a favorite in candy science curricula and home learning activities because it makes abstract concepts tangible. Students witness firsthand how molecules organize themselves into structured, crystalline patterns as the water slowly evaporates, leaving behind a tasty, rock-like treat. It’s a slow-burn experiment that teaches patience and observation skills.
Why It’s a Great Experiment for 4th Graders
The rock candy experiment is ideal for 4th graders as it introduces complex chemistry concepts like solubility and molecular structure in an accessible and engaging way. The multi-day process encourages students to practice patience and consistent observation, documenting the crystal growth daily. Because the end result is edible, it provides a powerful and memorable connection to the scientific process, reinforcing that science is all around us, even in the kitchen.
Actionable Tips for Perfect Crystals
To grow the best possible rock candy, follow these simple yet crucial tips:
- Create a Seed Crystal: Before suspending your string or skewer in the solution, wet it and roll it in granulated sugar. These tiny "seed" crystals give the new crystals a surface to start growing on, speeding up the process.
- Location, Location, Location: Place the jar in a warm, dry spot where it will not be disturbed. Any jostling can disrupt the delicate crystal formation process, resulting in smaller, less defined crystals.
- Don't Rush the Cooling: Allow the hot sugar solution to cool down for about 20-30 minutes before pouring it into your jar and adding the skewer. If the solution is too hot, it will simply dissolve the seed crystals instead of growing on them. If your young scientist loves edible experiments, they can explore even more with an Edible Candy Food Science STEM Kit.
Comparison of 8 Easy 4th-Grade Science Experiments
| Experiment | 🔄 Implementation Complexity | ⚡ Time / Speed | Resource Requirements | 📊 Expected Outcomes & Quality ⭐ | 💡 Ideal Use Cases / Key Tip |
|---|---|---|---|---|---|
| Volcano Eruption Experiment | Low — simple build and mix | Short — 20–30 min setup; eruption 2–3 min | Household: baking soda, vinegar, dish soap, clay; low cost; minimal supervision | Very high visual engagement; demonstrates acid–base reaction; moderate depth. ⭐⭐⭐⭐ | Science fair/demo; Tip: test run and use a tray to contain overflow |
| Crystal Growing Experiment | Medium — prepare supersaturated solution and suspend string | Long — 15 min prep, 5–7 days growing | Salt/borax, hot water, jars, string; adult for hot water; low cost | Produces striking crystals; good for crystallization concepts; high observational value. ⭐⭐⭐⭐ | Multi-day STEM lessons; Tip: keep jars warm and undisturbed, label start date |
| Slime Making Experiment | Low–Medium — mixing with careful measurements | Immediate — 10–15 min | Glue, borax or contact-solution, water, colorants; watch for borax safety | Highly tactile and motivating; demonstrates polymer behavior; quick payoff. ⭐⭐⭐ | Sensory activities/engagement stations; Tip: use non-toxic activator and small batches |
| Density Tower Experiment | Medium — careful, slow layering required | Short — 15–20 min setup; immediate result | Various liquids (honey, soap, water, oil, alcohol), tall cylinder, food coloring | Very visually impressive; clearly teaches density and buoyancy; displayable. ⭐⭐⭐⭐ | Classroom demo or museum display; Tip: pour slowly along a spoon and follow correct density order |
| Invisible Ink Experiment | Low — simple writing plus controlled heating | Short — ~15 min (plus heating reveal) | Lemon/milk/baking soda, cotton swabs, paper, heat source; supervision for heat | Engaging, mysterious demonstration of oxidation; variable reliability. ⭐⭐⭐ | Creative writing/code-breaking activities; Tip: supervise heating and use white paper for best contrast |
| Seed Germination Experiment | Low complexity but sustained care over time | Long — 10 min setup, 2–4 weeks observation | Seeds, soil, containers, water, optional grow lights; daily care required | Strong for teaching scientific method, variables, and plant biology; high educational depth. ⭐⭐⭐⭐ | Multi-week curriculum and biology units; Tip: choose fast-growing seeds (beans/radishes) and use controls |
| Static Electricity Experiment | Low — simple rubbing and observation | Immediate — 10–15 min | Balloons, wool cloth, torn paper, optional string; safe materials | Immediate, repeatable demo of charge transfer; limited long-term depth. ⭐⭐⭐ | Quick demos/intro to electricity; Tip: perform in low-humidity conditions for best results |
| Rock Candy Making Experiment | Medium — boiling sugar and suspending string | Long — 20 min prep, 5–7 days growth | Sugar, water, jars, string, wooden stick; boiling requires supervision | Produces large edible crystals; clear crystallization lesson with tasty reward. ⭐⭐⭐⭐ | Kitchen science or extended projects; Tip: use 3:1 sugar:water, cool solution before pouring and keep undisturbed |
Frequently Asked Questions (FAQs)
What are the safest science experiments for 4th graders?
Safety is paramount. The safest experiments use non-toxic, common household items. The Static Electricity experiment with a balloon, the Seed Germination project, and the Density Tower using kitchen liquids are excellent choices. For experiments involving heat (like Invisible Ink) or activators (like Slime), always ensure direct adult supervision.
How can I connect these experiments to real-world science?
Making connections to the real world reinforces learning. For example, explain that the volcano eruption is a model for real geological events, the density tower demonstrates principles used in shipbuilding (buoyancy), and static electricity is the same force that causes lightning.
How long do most of these experiments take?
It varies. The Volcano Eruption and Static Electricity experiments offer immediate results, taking about 15-20 minutes. Others, like the Crystal Growing, Rock Candy, and Seed Germination experiments, are long-term projects that require a few minutes of setup and then days or weeks of observation.
From Curiosity to Confidence: Your Next Steps in Science
You’ve just journeyed through eight incredible, easy science experiments for 4th graders, each designed to transform abstract scientific principles into hands-on, memorable experiences. From the fizzing chemical reaction of a homemade volcano to the sweet, slow process of crystallography in rock candy, these activities reveal the magic of science hidden in everyday materials. The journey from a simple question to a tangible result is where true learning happens, building a foundation of curiosity and a passion for discovery.
The most important takeaway is that science is not just about memorizing facts; it’s about doing, questioning, and even failing forward. Each experiment, whether it’s revealing a secret message with invisible ink or observing the miracle of seed germination, empowers a young mind to think like a scientist. It encourages them to ask "what if?" and to see the world not just as it is, but as a place full of possibilities waiting to be explored.
Key Learnings from Our Experiments
- Chemistry in Action: Experiments like the volcano eruption, slime making, and invisible ink bring chemical reactions to life, showing how different substances interact to create something entirely new.
- Physics is Fun: The density tower and static electricity experiments provide a tangible way to understand complex physical concepts like density, polarity, and electrical charges without overwhelming a young learner.
- Biology Uncovered: Watching seeds sprout or crystals grow offers a front-row seat to the wonders of life science and geology, teaching patience and the power of observation.
What's Next on Your Scientific Journey?
The end of this list is just the beginning of your adventure. The confidence gained from successfully completing these easy science experiments for 4th graders is the perfect launchpad for tackling more complex ideas. As you continue your scientific journey and build confidence, you might find yourself ready to explore more fundamental concepts beyond experiments, such as understanding atomic structure with this easy-to-follow visual guide to the Bohr diagram for nitrogen. Building on these foundational skills will open up a new world of scientific understanding.
Encourage your young scientist to revisit their favorite experiments and try new variables. What happens if you use a different liquid in the density tower? Can you make slime with a different kind of glue? This process of iteration and inquiry is at the very heart of the scientific method. Remember, every great discovery began with a simple question. By fostering this inquisitive spirit, you are not just teaching science; you are nurturing the next generation of innovators, problem-solvers, and critical thinkers.
Ready to take the next step and unlock even more scientific fun? The kits from Playz are designed to build on this natural curiosity, providing all the tools and instructions needed for more advanced, yet equally exciting, explorations. Inspire a lifelong love of learning and discover your next great adventure today.