

Ready to unlock the electrifying world of science with your child? Electricity can seem mysterious, but with a few household items, you can transform your home into a hands-on science lab. This guide offers a curated list of safe and engaging electricity experiments for kids, designed to spark curiosity and build foundational STEM skills. We'll explore everything from making a battery from a lemon to building a working telegraph, all while explaining the core science in a way young minds can easily grasp.
Each experiment is designed for maximum fun and learning, offering a fantastic alternative to screen time. By making science tangible, you help your child see the invisible forces that power our world. These electricity experiments offer a thrilling entry point into STEM, much like other fun and educational activities for children, encouraging hands-on discovery. We'll also show you how Playz science kits can complement these activities, turning a simple experiment into a lifelong passion. Let's get started!
1. The Lemon Battery: Power from a Fruit
The Lemon Battery Experiment is a classic, safe, and fascinating introduction to electrochemistry. It brilliantly demonstrates how chemical energy can be converted into electrical energy using everyday items. As one of the most popular electricity experiments for kids, it shows them how to create a simple circuit to power a small device like an LED.
The Science Behind It
The acidic lemon juice acts as an electrolyte, a solution that conducts electricity. When you insert two different metals—like a zinc-coated nail (the negative electrode) and a copper coin (the positive electrode)—into the lemon, a chemical reaction begins. Tiny charged particles called electrons flow from the zinc, through the lemon juice, to the copper, creating an electrical current.

Why It's a Great Starter Experiment
This project is perfect for young learners because it makes abstract concepts like voltage, current, and circuits tangible. The visual payoff of seeing an LED light up using just fruit provides an unforgettable "aha!" moment.
Actionable Tips for Success
- Roll the Lemon: Before inserting the electrodes, gently roll the lemon on a table to break up the internal juice sacs. This helps the electrolyte flow more freely.
- Use Clean Metals: Polish the zinc nail and copper coin with sandpaper or steel wool to remove any oxidation, which can block electron flow.
- Increase the Power: A single lemon won't produce much voltage. To light an LED, connect three or four lemons together in a series.
- Measure Your Results: Use a multimeter to measure the voltage produced. This adds a layer of quantitative analysis to the experiment.
By turning a simple fruit into a power source, this activity lays a foundational understanding of how batteries work, blending biology, chemistry, and physics. For more activities that explore these sciences, check out these chemistry experiments you can do at home.
2. Simple Circuit Building: Make an LED Glow
Building a simple circuit is a fundamental step in understanding how electricity works. This hands-on activity demystifies the flow of electrical current by letting kids construct a complete loop using a battery, wires, and an LED (Light Emitting Diode). It’s one of the most effective electricity experiments for kids because it directly illustrates the core principles of electrical engineering in a safe, controlled way.
The Science Behind It
The goal is to create an unbroken path. The battery provides the power (voltage), and when wires connect its positive and negative terminals to an LED, they create a closed loop. This loop allows electrons to flow from the negative side of the battery, through the circuit and the LED (making it light up), and back to the positive side. Adding a switch gives kids control to open or close the circuit, turning the light on and off.
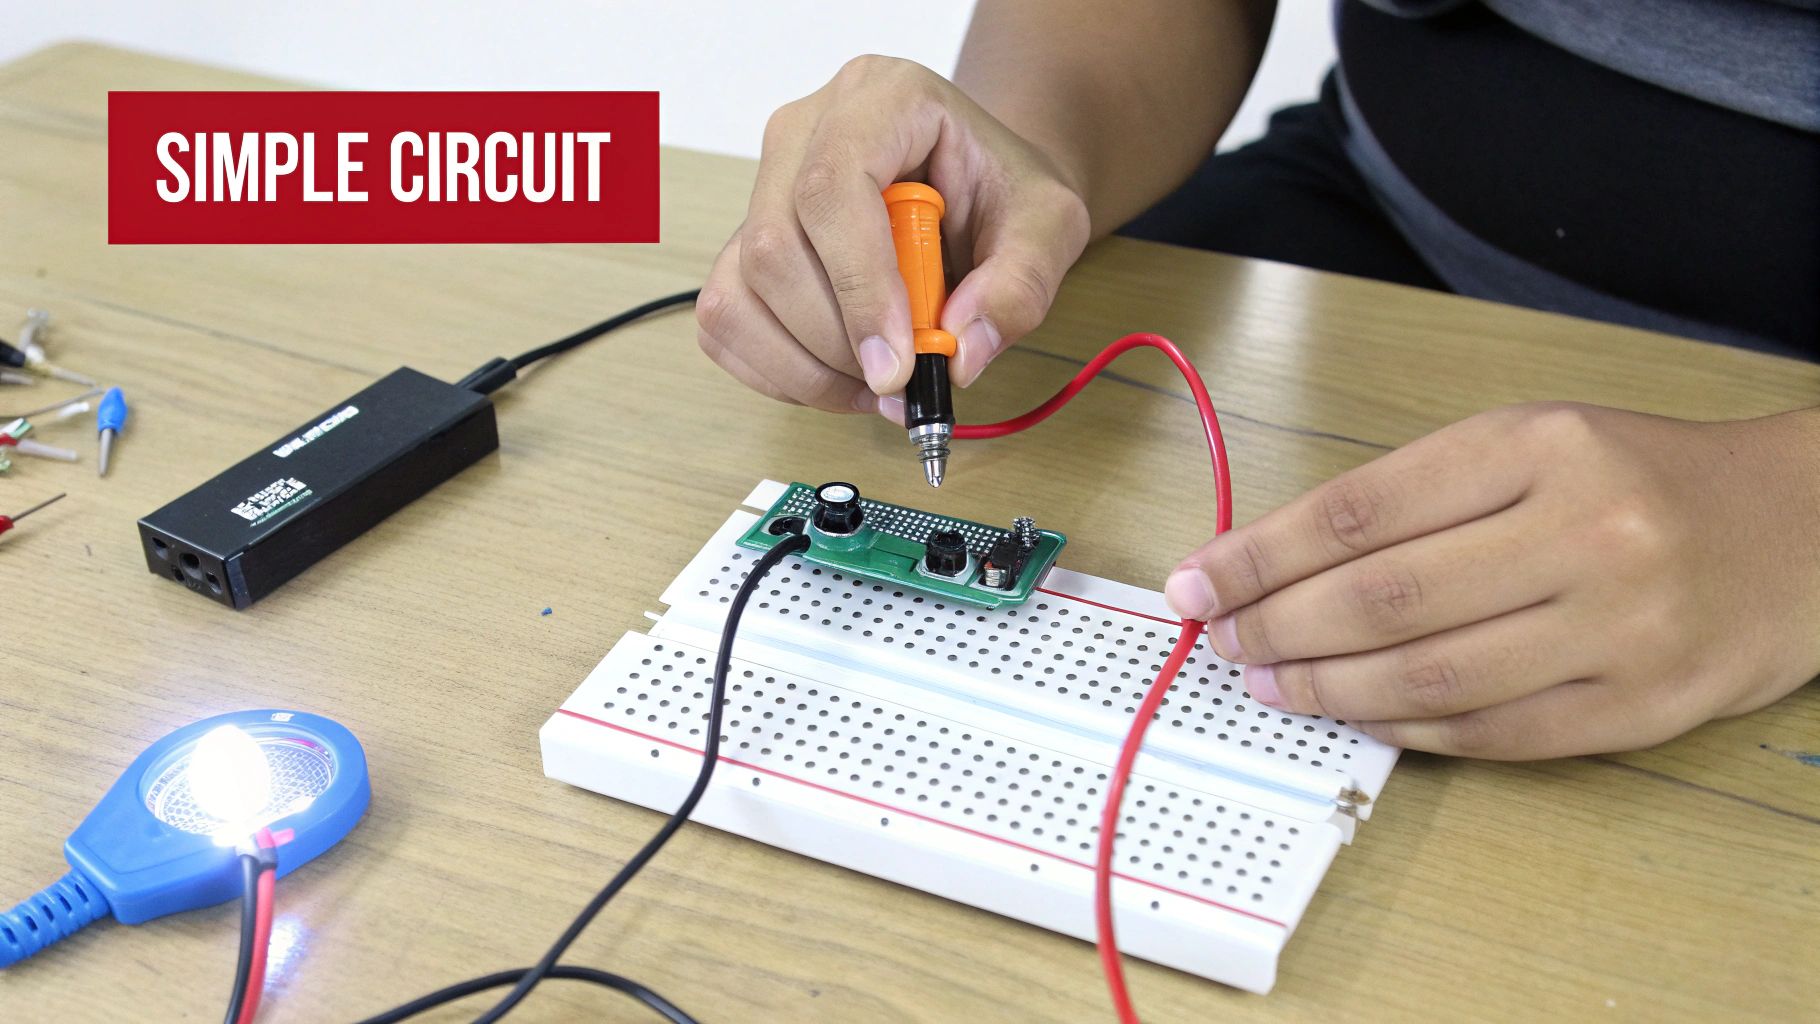
Why It's a Great Foundational Experiment
This project is essential for any young innovator because it moves beyond theory into practical application. The immediate feedback of a glowing LED provides a powerful sense of accomplishment and solidifies the concept of a complete circuit.
Actionable Tips for Success
- Use Battery Holders: Ensure a secure connection by using a battery holder with built-in wire leads to avoid frustration.
- Teach Polarity: Explain that LEDs have a positive (long) leg and a negative (short) leg. They must be connected correctly to light up.
- Go with Alligator Clips: For younger children, alligator clip wires are much easier to handle than bare wires, making connections quick and simple.
- Draw First, Build Second: Have children sketch a diagram of their circuit before they start. This helps them plan their design and troubleshoot issues.
By constructing their own circuits, children gain a tangible understanding of conductivity, polarity, and electrical flow. This activity is a perfect way to spark curiosity in STEM. For a more detailed guide, learn more about how to build a simple circuit for kids.
3. Electromagnet Creation: A Magnet You Can Switch On
The Electromagnet Creation experiment offers a thrilling look into the relationship between electricity and magnetism. It's a foundational project that demonstrates how an electrical current can generate a magnetic field—a core principle behind countless modern technologies. This activity is one of the most impactful electricity experiments for kids, letting them build a functional electromagnet with simple components and see its invisible force in action.
The Science Behind It
When you wrap an insulated copper wire around an iron core, like a nail, and connect the wire's ends to a battery, you create a circuit. As current flows through the coiled wire, it generates a concentrated magnetic field around the iron core, turning it into a temporary magnet. This force is strong enough to attract small metal objects like paper clips.
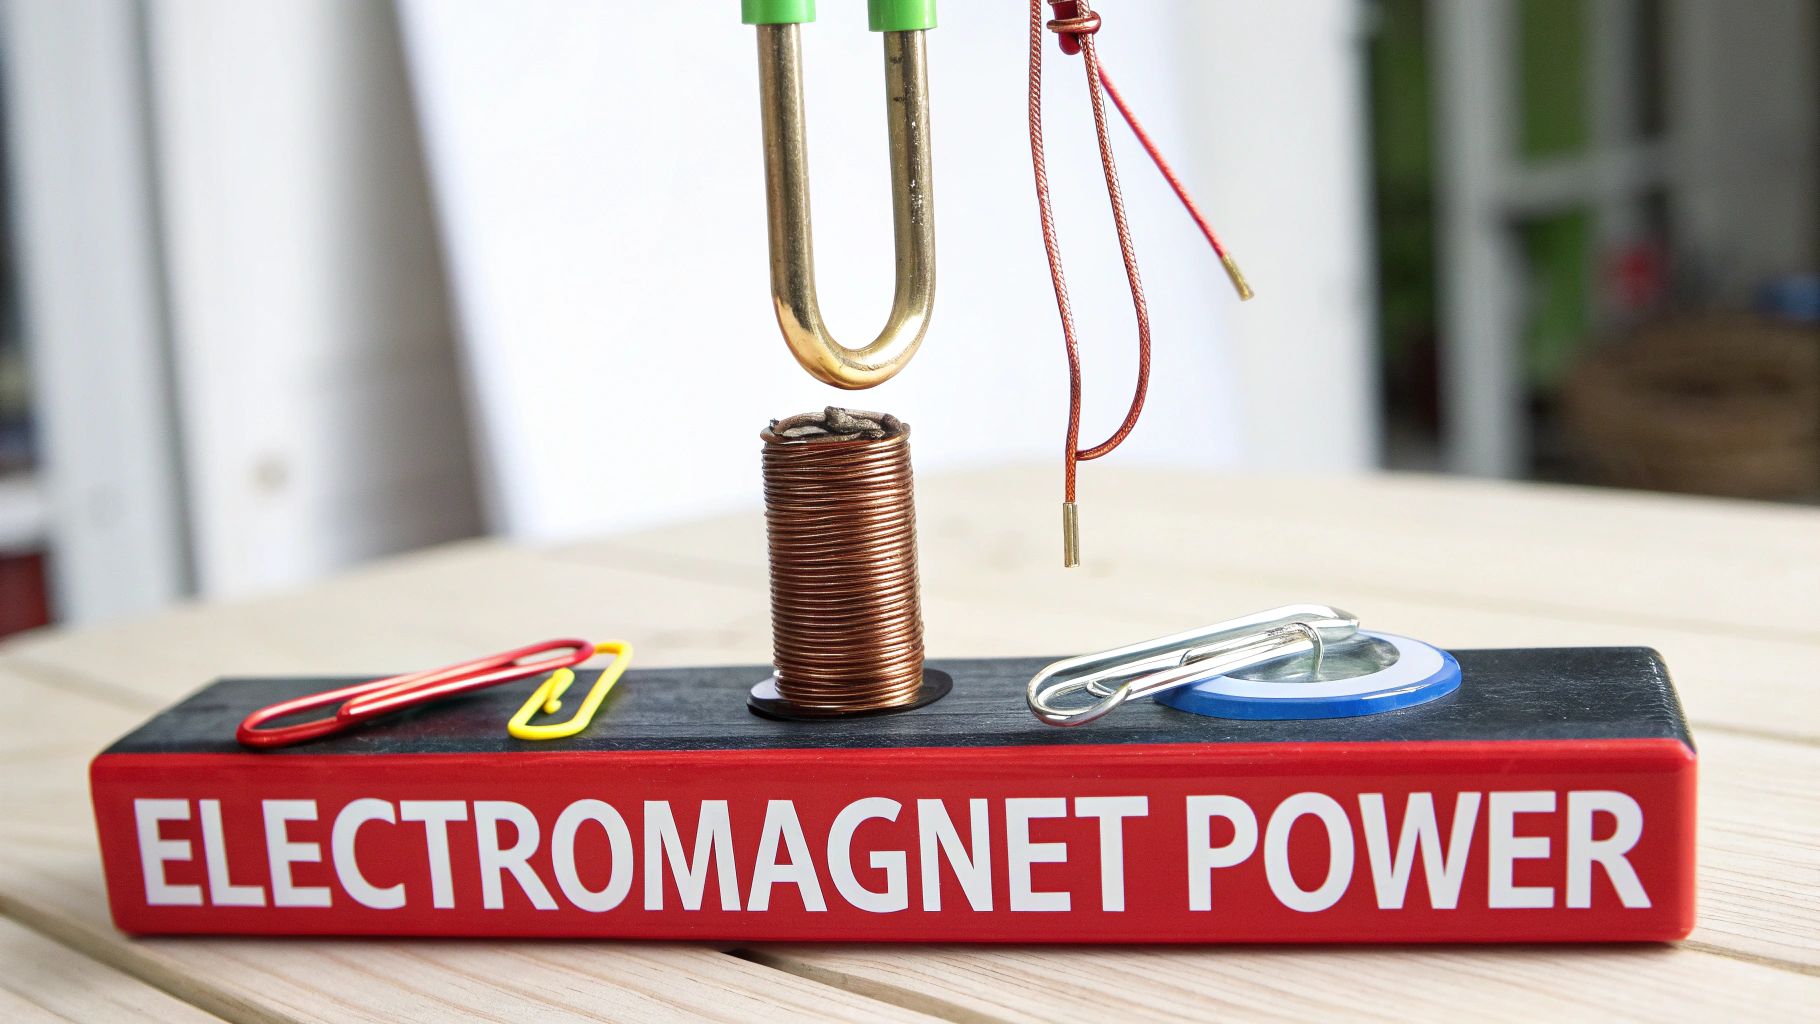
Why It's a Great Starter Experiment
This experiment is perfect for slightly older children or those ready to move beyond basic circuits. It bridges two major physics concepts—electricity and magnetism—in a hands-on way. The instant gratification of creating a magnet that can be turned on and off is incredibly empowering.
Actionable Tips for Success
- Wrap Tightly: The more tightly and evenly you wrap the insulated copper wire around the nail, the stronger the magnetic field will be.
- Safety First: The wire and battery can get warm. Don't leave the electromagnet connected for more than 30 seconds at a time to prevent overheating.
- Test the Power: Use paper clips or iron filings to test the strength of your electromagnet. Challenge kids to see how many clips it can lift.
- Experiment with Variables: Encourage scientific thinking. What happens if you use more coils? What if you use a stronger battery?
By transforming a simple nail into a powerful magnet, this activity demystifies a fundamental force of nature and introduces the engineering concepts behind many everyday devices.
4. Static Electricity and Plasma Ball Exploration
Static electricity exploration is a thrilling and accessible way to introduce children to electric charge. This experiment demonstrates electrostatic phenomena through simple friction, showing how rubbing certain objects together can cause electrons to build up, creating a charge that can attract or repel other objects. It's one of the most immediate and visually engaging electricity experiments for kids, requiring no batteries or complex circuits.
The Science Behind It
The science involves the transfer of electrons. When you rub a balloon on your hair, it picks up extra electrons, giving it a negative charge. Your hair, having lost electrons, becomes positively charged. Since opposite charges attract, the negatively charged balloon can now attract lightweight items like small pieces of paper or even bend a stream of water. This principle of charge accumulation is the same magic that makes a plasma ball work, but in a much more dramatic fashion.
Why It's a Great Starter Experiment
This experiment is fantastic for young learners because it feels like magic but is rooted in real science. The tactile sensation of hair standing on end and the visible effect of a balloon attracting paper provide a powerful, hands-on learning experience. It makes the invisible world of electric charges visible and tangible.
Actionable Tips for Success
- Choose a Dry Day: Static electricity works best in low humidity. Dry winter days are perfect for this experiment.
- Use the Right Materials: Wool, fur, and synthetic fabrics are excellent for building up a strong static charge on a balloon.
- Go for Small Pieces: Tear paper into very small, lightweight confetti for a more impressive attraction effect.
- Bend Water: Hold the charged balloon near a thin, steady stream of water from a faucet and watch the water bend toward it.
- Supervise Plasma Balls: While fascinating, plasma balls are not toys. Always use them with adult supervision and avoid placing metal objects near the glass.
By using simple friction to manipulate objects from a distance, this experiment demystifies electrostatic forces and provides a foundational understanding of positive and negative charges.
5. Homemade Electric Generator Using Magnets and Coils
Building a Homemade Electric Generator is an advanced yet incredibly rewarding experiment that introduces the principles of electromagnetism. It powerfully illustrates how mechanical energy (spinning) is converted into electrical energy. This hands-on project is one of the most impactful electricity experiments for kids, demonstrating the core concept behind power plants and renewable energy sources like wind turbines.
The Science Behind It
The science is based on Faraday's law of induction. When a coil of wire moves through a magnetic field, or when a magnet moves near a coil of wire, it induces an electrical current in the wire. By spinning a coil of wire near strong magnets, you create a continuous flow of electrons, generating electricity that can power a small light or be measured with a voltmeter.
Why It's a Great Advanced Experiment
This project is ideal for older children and teens as it connects abstract physics concepts to real-world technology. Seeing a small LED light up from their own hand-cranked generator provides a profound understanding of where electricity comes from.
Actionable Tips for Success
- Use Strong Magnets: Neodymium magnets create a powerful magnetic field, which will induce a stronger current.
- Increase Coil Windings: The more turns of wire in your coil, the more voltage you can produce. Aim for at least 100-200 wraps of thin, insulated copper wire.
- Spin It Faster: The speed of rotation directly impacts the amount of electricity generated. A faster spin means a higher voltage output.
- Measure Your Output: Connect a voltmeter to the ends of your coil to get real-time feedback on how much electricity you are generating.
By constructing a device that creates power from motion, this activity provides a tangible lesson in energy conversion. For more projects that dive deep into the laws of motion and energy, explore these physics projects for science fair ideas.
6. Conductivity Testing with Household Materials
This experiment answers a fundamental question: what makes something a good conductor of electricity? By testing various household materials, kids can build a simple circuit to discover firsthand the difference between conductors and insulators. This project is a cornerstone of electricity experiments for kids, offering a clear and interactive way to explore the properties of everyday objects.
The Science Behind It
The science is all about electron mobility. In conductors (like metals), electrons can move freely between atoms. When you add a conductor to a circuit, these electrons flow and carry a current. In insulators (like rubber or plastic), electrons are tightly bound to their atoms and cannot move easily, which stops the flow of electricity. This activity lets kids see this principle in action by observing whether an LED lights up when different items complete the circuit.
Why It's a Great Starter Experiment
Conductivity testing is an excellent way to introduce core concepts of materials science. It’s highly visual and encourages scientific thinking through prediction and observation. Testing objects from around the house, like spoons, pencils, and even saltwater, makes abstract ideas tangible and exciting.
Actionable Tips for Success
- Create a Data Table: Before you start, have your child create a chart to record their predictions and results for each material.
- Use a Simple Circuit: A battery, wires with alligator clips, and a small LED are all you need to create a reliable conductivity tester.
- Test Liquids Safely: Show how pure water is a poor conductor, but adding salt creates an electrolyte solution that conducts electricity well.
- Include Controls: Always test a known conductor (like a copper wire) and a known insulator (like a rubber eraser) to ensure your circuit is working correctly.
This experiment helps children classify the world around them in a new way, based on invisible properties. It builds a foundational understanding of why specific materials are chosen for electrical applications.
7. Water-Activated Crystal Growing with Electrical Conductivity
This experiment beautifully merges chemistry with physics, showing kids how electricity can influence the formation of crystals. It demonstrates that some solutions, like saltwater, can conduct electricity and how this property can be used to accelerate and observe crystal growth. This project is a visually stunning example of electrochemistry in action.
The Science Behind It
The science involves creating a supersaturated solution with a salt like borax, salt, or alum. When dissolved in water, these substances break down into charged ions, turning the water into an electrolyte. By introducing a low-voltage electrical current via two electrodes, you can initiate electrolysis, which encourages the ions to come out of the solution and form solid crystals on one of the electrodes.
Why It's a Great Advanced Experiment
This project is fantastic for slightly older children or those ready for a multi-day observation experiment. It teaches concepts like saturation, ionization, and electrolysis in a hands-on way. Watching the intricate crystal structures form over time provides a deep sense of accomplishment and wonder.
Actionable Tips for Success
- Create a Supersaturated Solution: Use hot water to dissolve as much of the crystal-growing powder (salt, borax, etc.) as possible. Stir until no more will dissolve.
- Use a Low-Voltage Source: Safety is key. Always use a low-voltage DC power source, like a 9-volt battery, to power the electrolysis.
- Keep It Still: Place your crystal-growing jar in a location where it won’t be bumped, as this can disrupt the delicate formation process.
- Document the Growth: Take a photo each day to create a time-lapse record of the crystal formation.
- Add Some Color: Mix in a few drops of food coloring to the solution to grow vibrant, colorful crystals.
This activity is one of the most rewarding electricity experiments for kids because it combines patience with scientific principles, resulting in a beautiful crystalline creation. To get started, explore these detailed crystal growing kit instructions.
8. Morse Code and Telegraph System Building
Building a Morse Code and Telegraph System is an incredible project that blends history, communication, and electrical engineering. This experiment takes kids back in time to the dawn of long-distance communication, showing them how simple circuits and electromagnets can transmit complex information. It's a fantastic hands-on activity that demonstrates how electricity can be controlled to send messages over a wire.
The Science Behind It
The experiment involves creating a simple circuit with a switch (the telegraph key) and an electromagnet. When you press the key, you close the circuit, allowing electricity to flow through a coil of wire wrapped around an iron core. This creates a magnetic field, which can attract a metal arm to make a "clicking" or buzzing sound. By controlling the length of these clicks (dots and dashes), you can send messages using Morse code.
Why It's a Great Advanced Experiment
This project is ideal for older elementary and middle school students who are ready for a more complex challenge. It introduces core concepts like circuits, switches, and electromagnetism in a tangible and historically significant way. Seeing a message they tapped out appear as a sound on another device provides a powerful connection between electrical principles and real-world application.
Actionable Tips for Success
- Master the Code First: Teach students the basics of Morse code before they start building. Use laminated charts as a handy reference.
- Test the Electromagnet: Before assembling the full system, test your electromagnet by connecting it to a battery to ensure it can attract a paperclip.
- Start Simple: Begin by building a simple buzzer circuit. Once that works, you can add the more complex telegraph components.
- Send Basic Messages: Have students start by sending their names or simple greetings. This builds confidence before they try longer messages.
By creating their own communication device, kids gain a deep appreciation for the ingenuity behind modern technology. For more hands-on building projects, explore these engineering activities for kids that inspire creativity.
8-Point Comparison of Kids Electricity Experiments
| Experiment | 🔄 Implementation Complexity | ⚡ Resource Requirements & Speed | 📊 Expected Outcomes | ⭐ Key Advantages | 💡 Ideal Use Cases / Quick Tip |
|---|---|---|---|---|---|
| Lemon Battery Experiment | Very low — simple insertion and wiring | Very low materials; quick setup but short-lived output | Produces ~0.7–1.0 V per lemon; visible LED demo | Affordable, safe, highly engaging | Elementary demos; use fresh lemons and polish electrodes |
| Simple Circuit Building with LEDs | Low — basic wiring, polarity attention needed | Low-cost reusable parts; immediate results | Teaches circuit flow, series/parallel; instant LED feedback | Foundational, customizable, reusable | Great for makerspaces; use battery holders and alligator clips |
| Electromagnet Creation | Low–Medium — coil winding and battery connection | Low materials but may need several batteries; monitor heat | Creates a working electromagnet; variable strength by coils/current | Interactive, demonstrates electromagnetism clearly | Use insulated wire, tight coils, limit continuous use to avoid heating |
| Static Electricity & Plasma Ball Exploration | Very low — friction experiments; optional plasma ball | Minimal everyday materials; plasma ball requires supervision | Shows charge accumulation, attraction/repulsion; dramatic effects | Highly visual, safe for young kids, no batteries needed | Best on dry days; use wool/balloons and supervise plasma ball use |
| Homemade Electric Generator (Magnets & Coils) | Medium–High — mechanical assembly and bearings | Moderate — neodymium magnets, coils, mechanical parts; more build time | Converts mechanical → electrical; measurable output at sufficient rpm | Demonstrates renewable energy principles; scalable for tests | Use strong magnets, minimize friction, measure voltage vs speed |
| Conductivity Testing with Household Materials | Low — simple circuit tests and measurements | Very low — household samples plus LED/volmeter; quick to run | Classifies conductors vs insulators; shows saltwater conductivity | Practical, repeatable, ties to real-world material choice | Create a data table and include controls for clear comparisons |
| Water-Activated Crystal Growing (with Conductivity) | Medium — solution prep, optional electrolysis, long duration | Low–Moderate — salts/borax, heat source, low-voltage supply for electrolysis | Grows visible crystals over 24–72 hrs; links conductivity to concentration | Multidisciplinary, visually impressive, preserves results | Use hot water to dissolve solute, supervise boiling, document growth daily |
| Morse Code & Telegraph System Building | Medium–High — wiring, electromagnets, and coding practice | Moderate — coils, switches, batteries; requires two systems for two-way | Produces a functional telegraph; teaches circuits and communication history | Engaging, collaborative, connects tech to history | Start with a buzzer version, teach Morse basics, test electromagnets first |
From Sparks to Circuits: Supercharge Your Child's Love for Science
You have now journeyed through eight incredible electricity experiments for kids, turning abstract scientific principles into tangible, memorable experiences. From the simple yet brilliant lemon battery to the construction of a working telegraph, each activity was designed to illuminate the invisible forces that power our world. These projects are more than just ways to spend an afternoon; they are foundational steps in building scientific literacy and a passion for discovery.
By guiding your child through these hands-on projects, you have provided them with a powerful learning framework. They have not just read about electrical currents; they have built the circuits that carry them. They have not just learned the definition of an electromagnet; they have created one and witnessed its pull firsthand. This active participation transforms learning from a passive activity into an exciting adventure.
The True Power of Hands-On Learning
The most important takeaway is not the successful lighting of an LED or the perfect transmission of a Morse code message. Instead, the true value lies in the development of crucial life skills.
- Problem-Solving: What happens when the circuit doesn’t work? Children learn to troubleshoot, check connections, and think critically about the system they built.
- Resilience and Patience: Science is rarely perfect on the first try. These activities teach the value of persistence, encouraging kids to adjust their approach and try again.
- Curiosity and Inquiry: A successful experiment often sparks more questions than answers. This curiosity is the engine of all scientific progress, prompting young learners to ask "why?" and "what if?"
These skills are the building blocks for future success, not just in STEM fields, but in any path your child chooses. You are nurturing a mindset that embraces challenges and finds joy in the process of discovery.
Your Next Steps in Scientific Exploration
The journey doesn't have to end here. The spark of interest you have ignited with these electricity experiments for kids can be fanned into a lifelong flame. Continue to encourage questions and provide opportunities for hands-on, screen-free play. Look for the science in everyday life, from the static shock on a dry day to the complex circuits inside their favorite toys.
Remember, the goal is exploration over perfection. Celebrate the "aha!" moments, learn from the experiments that don’t go as planned, and most importantly, keep the experience fun. By doing so, you are not just teaching science; you are empowering a future innovator who is ready to tackle the challenges of tomorrow.
Ready to continue the adventure and explore more complex scientific concepts with ease? The Playz collection of STEM kits is expertly designed to make advanced topics in chemistry, physics, and engineering accessible and engaging for young minds. Our all-in-one kits provide the safe materials and clear, step-by-step instructions needed to unlock hours of educational fun. Visit Playz to discover the perfect kit and supercharge your child’s learning journey today