

Welcome, future scientists and innovators! The science fair is more than just a school assignment; it's a launchpad for discovery, creativity, and critical thinking. It’s where a simple "what if?" can transform into an award-winning experiment. Finding the right project can feel like searching for a needle in a haystack, but a great idea is the first step toward a blue ribbon.
This guide is your magnet, designed to pull you toward 10 incredible project ideas for science fair success. We've curated a list that spans biology, chemistry, physics, and engineering, complete with everything you need to get started. Each entry includes practical details like age recommendations, step-by-step guidance, and tips for creating a presentation that wows the judges.
These aren't just projects; they are adventures in learning. We believe that hands-on exploration is the key to understanding complex concepts, and each idea here is crafted to be engaging, educational, and, most importantly, fun. A well-structured plan is crucial for turning a great idea into a winning project. To ensure your project stays organized and focused from start to finish, delve into the strategies for crafting a powerful research outline.
Whether you're building a volcano, designing a water filter, or extracting DNA from a strawberry, this blueprint will help you navigate the entire process. Get ready to unleash your inner genius and create a project that you'll be proud to present. Let's dive in and turn your curiosity into a first-place finish.
1. Crystal Growing Experiment
The Crystal Growing Experiment is a classic and visually stunning choice for a science fair project, perfectly demonstrating principles of chemistry and crystallography. It involves creating a supersaturated solution of a solute like salt, sugar, or borax in a solvent (usually water) and then allowing crystals to form as the solution cools or evaporates. This process reveals how molecules arrange themselves into ordered, repeating patterns, building the intricate structures we see as crystals.
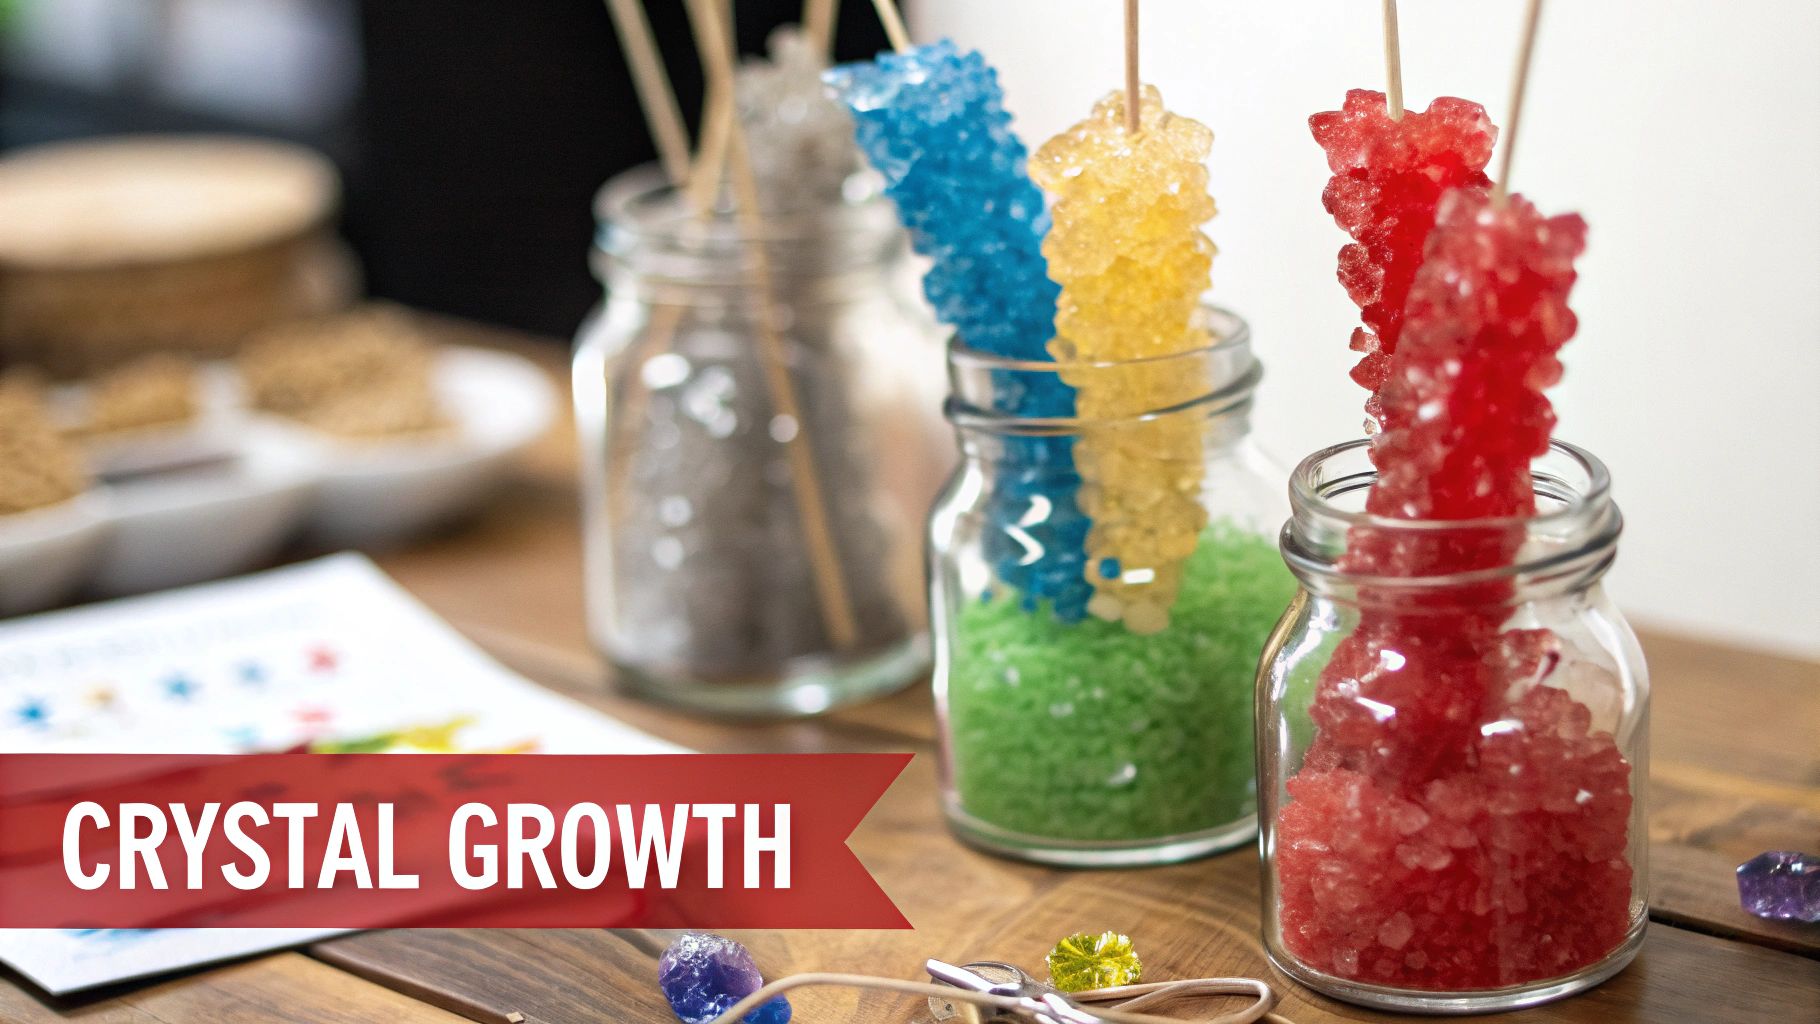
This project is not just one of the most engaging project ideas for a science fair; it’s a direct observation of solubility, saturation, and molecular bonding in action. It’s highly scalable, making it suitable for a wide range of grade levels, from simple salt crystals in elementary school to more complex experiments comparing the crystalline structures of different substances in middle school.
Key Details and Implementation
- Grade Level: Elementary (Grades 1-5) to Middle School (Grades 6-8)
- Difficulty: Easy to Medium
- Hypothesis Example: "If a supersaturated borax solution is allowed to cool slowly, then larger, more well-defined crystals will form compared to a solution that cools quickly, because slow cooling allows more time for molecules to arrange into an orderly lattice structure."
- Materials: Jar or beaker, distilled water, stirring rod, pipe cleaners or string, and a crystalline solid (salt, sugar, borax, or alum).
Display and Presentation Tips
For your display board, create a time-lapse photo series showing the crystal growth day-by-day. Present several finished crystals of different types or colors to showcase variety. You can also include magnified photos of your best crystals to highlight their geometric shapes. Be prepared to explain concepts like "supersaturation" and "nucleation" to the judges.
Pro-Tip: Using distilled water instead of tap water can lead to purer, more well-formed crystals, as the minerals in tap water can interfere with the crystallization process. For a detailed guide on getting started, explore these crystal growing kit instructions for more advanced techniques.
2. Volcano Eruption Simulation
The Volcano Eruption Simulation is a quintessential hands-on science fair project that spectacularly demonstrates acid-base chemical reactions and basic geological principles. Participants build a model volcano and create a simulated eruption using household ingredients like baking soda (a base) and vinegar (an acid). When mixed, they react to produce carbon dioxide gas, which builds up pressure and erupts from the "volcano's" crater, mimicking a real volcanic eruption.
This project is one of the most memorable project ideas for a science fair because it merges creative construction with explosive scientific results. It's an excellent way to teach fundamental concepts in chemistry and earth science, such as chemical reactions that produce gas, pressure buildup, and the formation of volcanic landforms. The project’s hands-on nature makes it highly engaging for a broad age range, from simple clay models for younger students to more elaborate constructions for older ones.
Key Details and Implementation
- Grade Level: Elementary (Grades 1-5) to Middle School (Grades 6-8)
- Difficulty: Easy
- Hypothesis Example: "If the amount of vinegar (acid) is increased while the amount of baking soda (base) remains constant, then the eruption will be more vigorous and last longer, because there will be more reactant to create carbon dioxide gas."
- Materials: Plastic bottle, baking soda, vinegar, dish soap, food coloring (optional), and materials to build the cone (clay, papier-mâché, or sand).
Display and Presentation Tips
For your display board, use photos documenting each step of building your volcano. Record a video of your best eruption to play on a loop for the judges. You can also include a diagram labeling the parts of a real volcano (magma chamber, conduit, crater) and compare them to your model. Be ready to explain the chemical equation for the baking soda and vinegar reaction.
Pro-Tip: Add a few drops of dish soap to your vinegar mixture. The soap will trap the carbon dioxide gas bubbles, creating a foamier and more realistic "lava" flow that lasts longer. For a comprehensive guide on construction, review these tips on how to build a volcano model for step-by-step instructions.
3. Water Filtration System Design
Designing and building a water filtration system is a hands-on project that directly tackles real-world environmental science and engineering challenges. This project involves using common materials like sand, gravel, cotton, and activated charcoal to construct a device that purifies contaminated water. It’s a powerful way to demonstrate the principles behind water treatment, porosity, and the removal of pollutants, connecting scientific concepts to the vital global issue of clean water access.
This experiment stands out as one of the most impactful project ideas for a science fair because it empowers students to engineer a solution to a tangible problem. It’s highly adaptable, allowing for simple layered filters for younger students or more complex investigations into a material’s chemical properties, such as adsorption by activated charcoal, for older students. The visual before-and-after results of dirty water becoming clear provide a dramatic and satisfying outcome.
Key Details and Implementation
- Grade Level: Elementary (Grades 3-5) to Middle School (Grades 6-8)
- Difficulty: Medium
- Hypothesis Example: "If a multi-layer filter containing activated charcoal is used to purify contaminated water, then the resulting water will have lower turbidity and a more neutral pH compared to a filter using only sand and gravel, because activated charcoal has a porous surface that adsorbs chemical impurities."
- Materials: Clear plastic bottles, sand, gravel, cotton balls, activated charcoal, and "dirty water" (made with soil, twigs, and food coloring).
Display and Presentation Tips
Your display board should visually guide judges through your design process. Use diagrams to show the layers of your filter and explain the function of each material. Present samples of the water before and after filtration in clear, sealed jars for a powerful side-by-side comparison. Include charts showing quantitative data, such as changes in turbidity or pH levels, to scientifically validate your filter's effectiveness.
Pro-Tip: To make your "dirty water," use a consistent recipe of contaminants like soil, small leaves, and a few drops of food coloring. This ensures that you can reliably test and compare the performance of different filter designs under the same conditions.
4. Renewable Energy Generation (Wind/Solar)
A renewable energy generation project allows students to build a small-scale wind turbine or solar panel system to explore clean energy principles firsthand. This hands-on project tackles core concepts in physics, engineering, and environmental science by challenging students to design, build, and test a device that converts natural energy (wind or sunlight) into measurable electrical power. It’s a powerful way to demonstrate the potential of sustainable technology and how electrical circuits work in a real-world application.
This experiment is one of the most impactful project ideas for a science fair because it directly addresses a critical global issue while teaching fundamental scientific principles. Students can go beyond simple construction to optimize and measure their system's efficiency, making it an excellent project for middle and high school students interested in STEM fields. Variations can include comparing different wind turbine blade designs or testing how the angle of a solar panel affects its power output.
Key Details and Implementation
- Grade Level: Middle School (Grades 6-8) to High School (Grades 9-12)
- Difficulty: Medium to Advanced
- Hypothesis Example: "If the angle of the wind turbine blades is increased from 30 to 45 degrees, then the electrical voltage generated will increase, because a steeper angle will capture more kinetic energy from the wind."
- Materials: Small DC motor, propeller/blades (can be DIY), wires, multimeter, small solar panel, fan (for wind), lamp (for solar), and an LED or small buzzer to demonstrate power.
Display and Presentation Tips
Your display board should feature detailed diagrams of your wind turbine or solar circuit design. Include charts and graphs showing the voltage or current produced under different conditions (e.g., varying wind speeds, different light intensities, or blade/panel angles). A live demonstration where you use a fan to power your turbine and light an LED will be highly engaging for judges. Be ready to discuss concepts like energy conversion, voltage, current, and efficiency.
Pro-Tip: Standardize your testing environment to ensure reliable data. For a wind turbine, always place the fan at the exact same distance and speed for each test. For a solar panel, use the same light source at a consistent height and angle. To explore the basics further, check out these electricity experiments for kids for foundational concepts.
5. Bioluminescence and Light-Producing Organisms
Exploring bioluminescence offers a captivating dive into the intersection of biology and chemistry, where students can observe the fascinating phenomenon of living organisms producing their own light. This project involves studying light-producing life forms, such as dinoflagellates or glowing bacteria, to understand the chemical reactions that create "cold light." It's a visually spectacular way to learn about enzymes, substrates like luciferin, and energy transfer within biological systems.
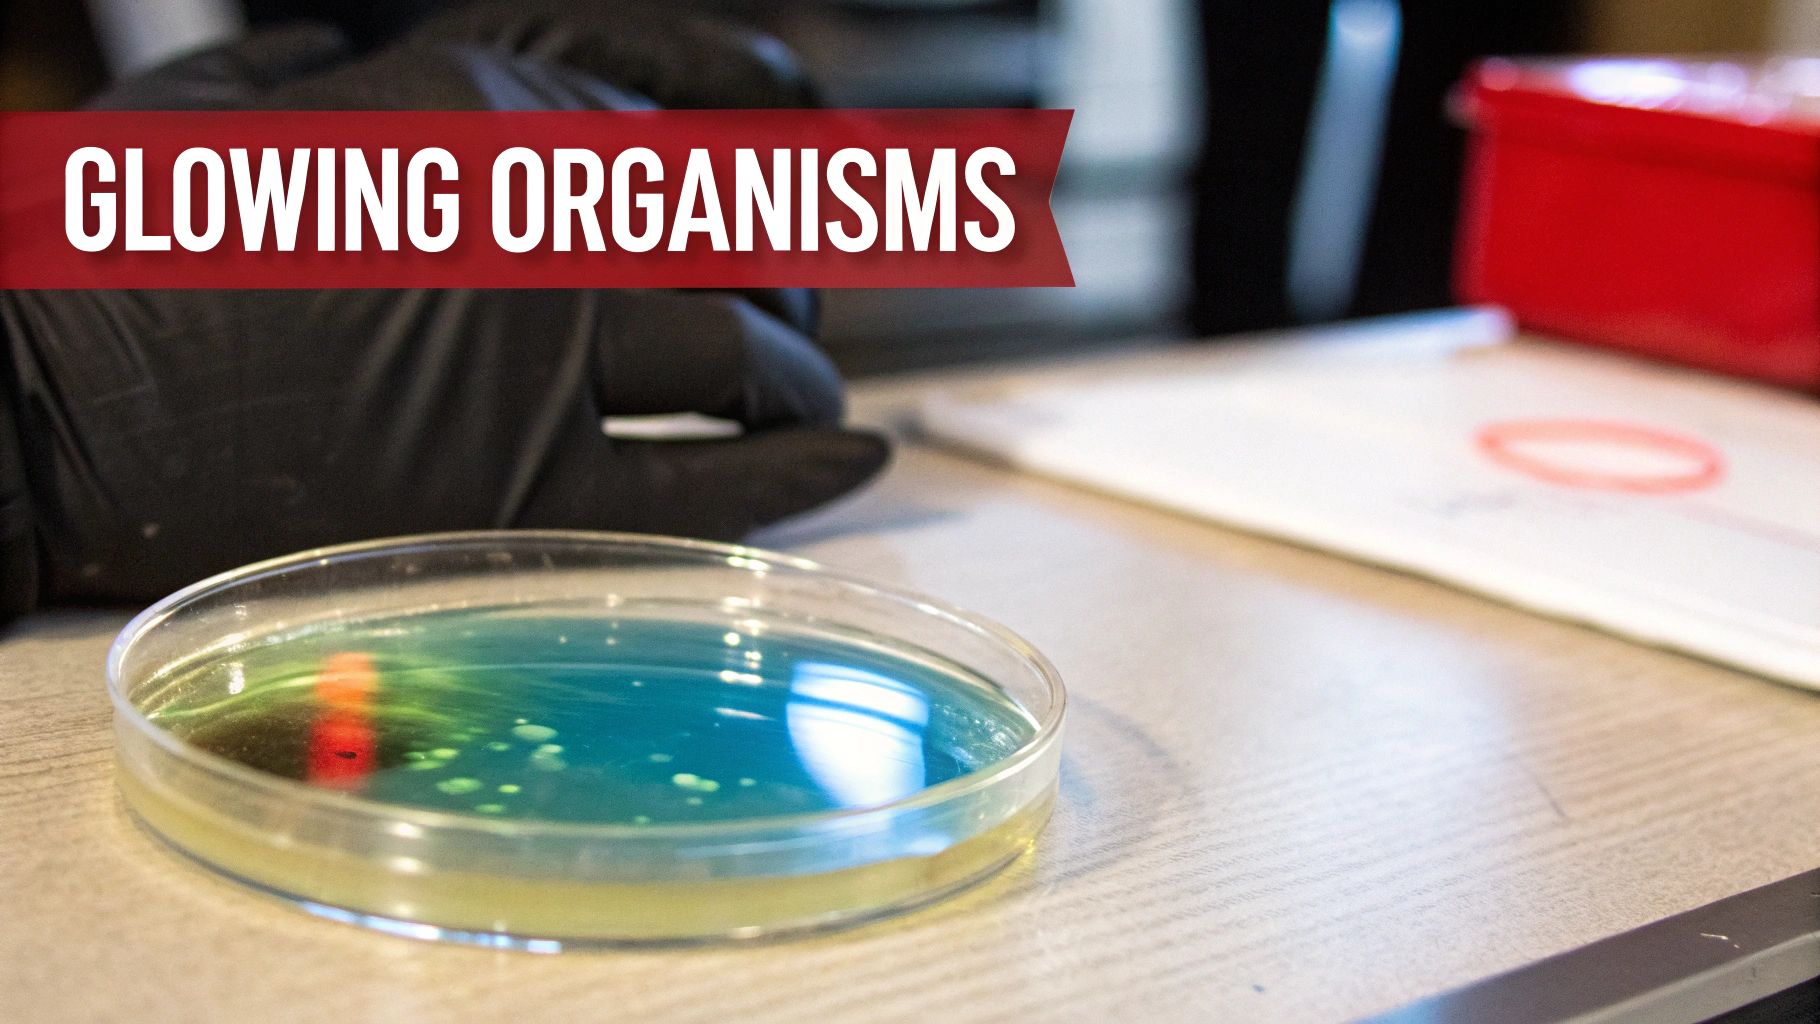
This project stands out as one of the most unique project ideas for a science fair, allowing for hands-on investigation into a process that has evolved independently many times in nature. It's suitable for older students due to the need to care for live organisms, but the awe-inspiring results make the effort worthwhile. Students can investigate how environmental factors like temperature or physical agitation affect the brightness or frequency of the light produced.
Key Details and Implementation
- Grade Level: Middle School (Grades 6-8) to High School (Grades 9-12)
- Difficulty: Medium to Hard
- Hypothesis Example: "If the dinoflagellate culture is physically agitated, then it will produce a brighter bioluminescent glow compared to an undisturbed culture, because the mechanical stress triggers the chemical reaction between luciferin and luciferase, releasing energy as light."
- Materials: Live culture of dinoflagellates (e.g., Pyrocystis fusiformis) or a bioluminescent bacteria kit, culture medium, clear containers or flasks, a dark room or box, and a camera capable of long-exposure shots.
Display and Presentation Tips
Your display should be interactive if possible. Keep your culture in a dark box and allow judges to gently swirl the container to trigger the bioluminescence. Use high-quality, long-exposure photographs or videos on a tablet to showcase the glowing effect vividly. Your board can detail the chemical equation for bioluminescence and include a chart documenting changes in light intensity under different conditions (e.g., time of day, after shaking).
Pro-Tip: Dinoflagellates are photosynthetic and require a consistent light-dark cycle (around 12 hours of light, 12 hours of dark). Maintain this cycle strictly, as they will only produce their signature glow during their "night" phase when disturbed.
6. Rube Goldberg Machine Engineering Challenge
A Rube Goldberg Machine Engineering Challenge is an ambitious and incredibly rewarding project that combines physics, engineering, and creative design. The goal is to build an elaborate, over-engineered contraption that performs a simple task through a complex chain reaction. This project brings concepts like potential and kinetic energy, momentum, and cause-and-effect to life in a tangible and entertaining way.
This is one of the most dynamic project ideas for a science fair because it demonstrates a deep understanding of multiple scientific principles working in harmony. It challenges students to think critically, troubleshoot problems, and persevere through trial and error. Examples range from simple domino runs that trigger a lever to complex systems involving pulleys, rolling balls, and water-based cascades to pop a balloon or turn on a light.
Key Details and Implementation
- Grade Level: Middle School (Grades 6-8) to High School (Grades 9-12)
- Difficulty: Medium to Hard
- Hypothesis Example: "If a series of energy transfers involving gravitational potential energy, kinetic energy, and momentum are linked in a specific sequence, then it is possible to successfully pop a balloon using at least 10 distinct steps without direct human intervention after the initial trigger."
- Materials: Recycled materials (cardboard tubes, plastic bottles), dominoes, marbles, toy cars, string, pulleys, levers, tape, and glue.
Display and Presentation Tips
Your display should include a clear, step-by-step diagram of the machine, labeling each stage and the scientific principle at play (e.g., "Step 3: Lever Arm - Mechanical Advantage"). Since a live demonstration can be risky, have a high-quality video of a successful run playing on a loop on a tablet or laptop. Be prepared to explain the energy transformations that occur at each critical transition point.
Pro-Tip: Design and test each segment of your machine independently before connecting them. This modular approach makes it much easier to identify and fix points of failure. For more inspiration on building complex contraptions, check out these engineering activities for kids.
7. DNA Extraction and Genetic Exploration
DNA Extraction and Genetic Exploration is a fascinating project that brings the abstract world of molecular biology into plain view. This experiment involves using simple, household materials to break open cells (like those from a strawberry or onion) and isolate the DNA, making the very blueprint of life visible to the naked eye. It’s a hands-on way to understand cell structure, genetics, and the chemical properties of DNA.

This experiment is one of the most memorable project ideas for a science fair because it makes a complex scientific concept tangible. Students can literally see and touch the genetic material they read about in textbooks. The project can be adapted for different grade levels, from a basic strawberry DNA extraction to a more advanced comparative study of DNA yields from different organisms.
Key Details and Implementation
- Grade Level: Middle School (Grades 6-8) to High School (Grades 9-12)
- Difficulty: Medium
- Hypothesis Example: "If DNA is extracted from a strawberry, which is an octoploid (has eight sets of chromosomes), then it will yield a greater quantity of visible DNA compared to an onion, which is a diploid, because there is more genetic material per cell to start with."
- Materials: Fruit (strawberries work best), zip-top bag, salt, dish soap, cheesecloth or coffee filter, beaker or small glass, and ice-cold isopropyl alcohol (rubbing alcohol).
Display and Presentation Tips
Your display board should feature large, clear photos documenting each step of the extraction process, especially a close-up of the precipitated DNA. Include a diagram of a DNA double helix and explain the role of each material, for example, how soap breaks down the cell membrane. You can present vials containing the extracted DNA from different sources to compare the results visually.
Pro-Tip: Using ice-cold isopropyl alcohol is crucial. The colder the alcohol, the less soluble the DNA is in it, which causes it to precipitate more effectively and become a distinct, visible mass. For more ideas in this field, explore these science fair biology projects for inspiration.
8. Weather Station and Climate Data Collection
Building a homemade weather station is a fantastic environmental science project that moves beyond a one-time experiment into long-term data collection and analysis. This project involves constructing and using simple instruments like a thermometer, barometer, rain gauge, and anemometer to gather daily meteorological data. Students learn firsthand how to measure environmental variables, record observations systematically, and interpret weather patterns over time.
This entry is one of the most practical project ideas for a science fair because it connects directly to the world around us. It teaches valuable skills in data management, graphing, and pattern recognition, making it an excellent choice for middle and high school students interested in meteorology, environmental science, or data science. The project can be as simple as tracking daily temperature or as complex as analyzing how barometric pressure correlates with precipitation.
Key Details and Implementation
- Grade Level: Middle School (Grades 6-8) to High School (Grades 9-12)
- Difficulty: Medium to Advanced
- Hypothesis Example: "If the barometric pressure drops steadily over a 24-hour period, then there will be a higher probability of precipitation within the next 48 hours, because falling pressure indicates an approaching low-pressure system which is associated with clouds and rain."
- Materials: DIY components like plastic bottles (for a rain gauge), a glass jar and balloon (for a barometer), a thermometer, a compass, and materials for an anemometer (cups, straws, pin).
Display and Presentation Tips
Your display board should feature charts and graphs visualizing your collected data, such as a line graph showing temperature fluctuations or a bar chart of weekly rainfall. Include photos of your homemade instruments and a map showing their placement. Be ready to discuss any trends or correlations you discovered, like the relationship between wind direction and temperature changes. Comparing your data to official reports from a local news station can add a powerful layer of validation to your findings.
Pro-Tip: Consistency is key for this project. Take measurements at the same time each day and from the same location to ensure your data is reliable. Placing your instruments in an open area away from buildings or trees will give you the most accurate readings.
9. Polymer Science and Slime Creation
The Polymer Science and Slime Creation project is a fun, hands-on way to explore the fascinating world of chemistry. This project involves mixing common household ingredients, like glue and a borax solution, to create a non-Newtonian fluid better known as slime. This process wonderfully demonstrates how long-chain molecules called polymers can be linked together (cross-linked) to change a substance's properties from a liquid to a stretchy, viscous solid.
This experiment is more than just messy fun; it’s an excellent tactile exploration of chemical bonds and material science. As one of the most engaging project ideas for a science fair, it allows students to directly manipulate variables like ingredient ratios to see immediate, tangible changes in viscosity, elasticity, and texture. The project can be easily adapted for various age groups, from simple slime-making for younger kids to quantitative analysis of polymer properties for middle schoolers.
Key Details and Implementation
- Grade Level: Elementary (Grades 2-5) to Middle School (Grades 6-8)
- Difficulty: Easy to Medium
- Hypothesis Example: "If the amount of borax solution is increased in a glue-based slime recipe, then the resulting slime will become firmer and more elastic, because a higher concentration of borate ions will create more cross-links between the polyvinyl acetate polymer chains."
- Materials: White or clear school glue (containing polyvinyl acetate), borax solution or contact lens solution with boric acid, water, mixing bowls, measuring spoons, and optional add-ins like food coloring or glitter.
Display and Presentation Tips
Showcase several slime samples in sealed containers, each created with a different variable (e.g., varying borax levels, different types of glue). Create a chart or graph that documents how properties like stretchiness or "flow rate" changed with each variation. Including a simple molecular diagram that illustrates the concept of polymer cross-linking will impress the judges and demonstrate your understanding of the core chemistry.
Pro-Tip: To make your experiment more scientific, develop a method to quantitatively measure your slime's properties. For example, measure how far it can stretch before breaking or time how long it takes for a marble to sink through a standardized amount of each slime batch to compare viscosity.
10. Ecosystem in a Bottle or Terrarium
Creating an ecosystem in a bottle or terrarium is a fascinating biology project that allows students to build and observe a miniature, self-sustaining world. This project brilliantly demonstrates core ecological principles like nutrient cycling, energy flow, and the delicate balance required to sustain life. By sealing plants and sometimes small organisms in a container, students can watch firsthand how an isolated environment functions over time.
This experiment is one of the most hands-on project ideas for a science fair, as it involves careful design and long-term observation. It’s ideal for teaching about photosynthesis, respiration, and decomposition within a closed loop. The complexity can be adjusted for different age groups, from a simple plant terrarium for younger students to a complex aquatic and terrestrial system for middle schoolers.
Key Details and Implementation
- Grade Level: Elementary (Grades 3-5) to Middle School (Grades 6-8)
- Difficulty: Medium
- Hypothesis Example: "If a sealed terrarium containing plants, soil, and decomposers is given adequate sunlight, then it will sustain itself for several weeks by recycling water and nutrients, demonstrating a functioning, closed ecosystem."
- Materials: A large, clear glass or plastic container with a lid (like a 2-liter bottle or large jar), gravel, activated charcoal, soil, small plants (ferns, mosses), and water. Optional: small insects like springtails or isopods.
Display and Presentation Tips
Your display board should feature a detailed diagram of your terrarium, labeling each layer and explaining its purpose. Include a daily photo log to document changes like plant growth, condensation (the water cycle), or decomposition. Be prepared to explain key concepts like the carbon and nitrogen cycles. For projects involving observation of plant health within your miniature ecosystem, it can be beneficial to research common plant issues and their causes, such as understanding plant discoloration.
Pro-Tip: Resist the urge to open your sealed terrarium. Opening it disrupts the delicate balance you've created. Use a clear container to make observations without interference, and place it in indirect sunlight to prevent overheating and excessive algae growth.
Comparison of 10 Science Fair Project Ideas
| Project | Implementation (🔄) | Resources (💡) | Expected Outcomes (📊) | Ideal Use Cases (⚡) | Key Advantages (⭐) |
|---|---|---|---|---|---|
| Crystal Growing Experiment | 🔄 Low — simple setup, requires patience (3–7 days) | 💡 Minimal: salt/sugar/borax, jars, strings, distilled water recommended | 📊 Visual crystalline growth; demonstrates supersaturation & precipitation | ⚡ Ages 7–14; classroom demos, science-fair displays, short-term projects | ⭐ Highly engaging, safe, low-cost, easily modified |
| Volcano Eruption Simulation | 🔄 Low — build + chemical reaction, repeatable demo | 💡 Minimal: baking soda, vinegar, modeling materials, tray for containment | 📊 Dramatic immediate eruption; illustrates acid–base reaction (limited depth) | ⚡ Ages 5–12; introductory chemistry demos, creative presentations | ⭐ Exciting, interactive, repeatable |
| Water Filtration System Design | 🔄 Medium — multi-stage builds, iterative trials (1–2 weeks) | 💡 Moderate: sand, gravel, activated charcoal, bottles, measuring tools | 📊 Quantifiable changes (turbidity, pH); tests material effectiveness | ⚡ Ages 9–16; environmental science units, project-based learning | ⭐ Real-world relevance, measurable engineering outcomes |
| Renewable Energy Generation (Wind/Solar) | 🔄 Medium — circuit building and optimization (2–4 weeks) | 💡 Moderate–high: small panels/turbines, multimeter, mounting hardware, data logger | 📊 Measurable power output and efficiency data; connects to climate topics | ⚡ Ages 11–17; STEM clubs, engineering projects, sustainability lessons | ⭐ Teaches real-world STEM skills; scalable and data-driven |
| Bioluminescence and Light-Producing Organisms | 🔄 Medium — culturing/observation with biological care (2–3 weeks) | 💡 Specialized: cultures or kits, sterile supplies, dark observation space | 📊 Visually striking luminescence; insights into biological light production | ⚡ Ages 10–16; biology electives, interdisciplinary demos | ⭐ Unique, memorable, multidisciplinary |
| Rube Goldberg Machine Engineering Challenge | 🔄 High — iterative design, testing, and debugging (3–5 weeks) | 💡 Low–variable: recycled materials, workspace, time for assembly | 📊 Entertaining chain-reaction demos; illustrates multiple physics concepts | ⚡ Ages 8–16; maker spaces, team engineering challenges, presentations | ⭐ Encourages creativity, problem-solving, hands-on physics |
| DNA Extraction and Genetic Exploration | 🔄 Low — simple lab protocol, quick results (30–60 min) | 💡 Low: fruit/onion, detergent, salt, cold alcohol; careful reagent handling | 📊 Visible DNA precipitate; concrete lesson on heredity and cell structure | ⚡ Ages 8–15; lab sessions, biology introductions, short demos | ⭐ Fast, tangible demonstration of genetics; accessible materials |
| Weather Station and Climate Data Collection | 🔄 Medium — setup plus long-term maintenance (4–8+ weeks) | 💡 Moderate: thermometer, rain gauge, anemometer, data logs/spreadsheets | 📊 Long-term datasets for trend analysis; teaches sampling & statistics | ⚡ Ages 9–16; semester-long projects, community science, data literacy | ⭐ Builds real-world data skills and ongoing engagement |
| Polymer Science and Slime Creation | 🔄 Low — simple mixing, repeatable (2–4 hours) | 💡 Low: glue, activators (borax/contact solution), additives; safety for borax | 📊 Immediate tactile products; demonstrates cross-linking and viscosity | ⚡ Ages 6–14; hands-on chemistry labs, sensory and comparative experiments | ⭐ Immediate results, highly engaging, many variations for testing |
| Ecosystem in a Bottle or Terrarium | 🔄 Medium — careful assembly, long observation (4–12+ weeks) | 💡 Low–moderate: clear containers, soil, plants, small fauna/decomposers | 📊 Long-term ecological observations: nutrient cycling, succession | ⚡ Ages 8–16; ecology units, long-term classroom observations | ⭐ Demonstrates ecosystem interactions, inspires stewardship |
Launch Your Scientific Journey Today
You've explored a world of scientific possibilities, from the dazzling geometry of growing crystals to the complex engineering of a Rube Goldberg machine. This list of project ideas for science fair was designed not just as a set of instructions, but as a launchpad for your own unique investigation. The perfect project isn't just about a flashy volcano; it's about finding a question that genuinely excites you and having the courage to seek out the answer.
The most memorable science fair projects are born from curiosity. They begin with a simple "what if?" What if I change the temperature of the water for the crystal experiment? What if I use a different type of filter material? These are the questions that transform a standard assignment into a true scientific endeavor. Your goal is to move beyond simply replicating an experiment and into the realm of innovation, making the project distinctly your own.
Key Takeaways for a Winning Project
To ensure your science fair experience is both educational and rewarding, remember these core principles:
- Embrace the Scientific Method: Your project is a story with a beginning (hypothesis), a middle (experimentation), and an end (conclusion). This structured approach is crucial for a compelling presentation and demonstrates a clear understanding of scientific inquiry.
- Safety is Paramount: Always prioritize safety. Whether you're handling household chemicals or building with tools, understanding potential risks and following safety guidelines is non-negotiable. Adult supervision is key for many of these exciting experiments.
- Documentation is Everything: Your lab notebook is your most important tool. Meticulously record every observation, measurement, and even your mistakes. This detailed record is the foundation of your data analysis and supports your final conclusions.
- Presentation Matters: A brilliant experiment can be overlooked if presented poorly. A clean, organized, and visually engaging display board that clearly communicates your process and findings will capture attention and effectively tell your scientific story.
Your Next Steps to Scientific Discovery
Feeling inspired? It's time to transition from reading to doing. The path from a great idea to a finished project is a clear one if you take it one step at a time. First, select the project that sparks the most interest. Don't just pick the easiest one; choose the one that makes you ask more questions.
Next, carefully review the materials list and procedure. This planning phase is critical. Gather all your supplies before you begin and create a timeline for your work. This will help you manage your time effectively and avoid a last-minute rush. As you experiment, remember to be a keen observer. Science is often about noticing the small details that others might miss. And finally, have fun! The process of discovery, of seeing your hypothesis proven or disproven, is the true prize. Every result, expected or not, is a learning opportunity. The skills you build—critical thinking, problem-solving, and perseverance—are far more valuable than any ribbon.
Ready to find all the high-quality materials and step-by-step guidance you need for these projects and hundreds more? Explore the award-winning science kits from Playz to give your young innovator the tools they need to build, experiment, and discover. Turn curiosity into an unforgettable, hands-on learning adventure with a Playz kit today.